background image

– 73 –

WARNING: 

Disconnect electrical power before servicing.

Caution

: Label all wires prior to disconnection.  Wiring errors can cause improper and dangerous operation.   

Verify operation after servicing.

Schematics and Wiring Diagrams

(

Continued next page

)

THERMAL

 SWITCH

THERMAL

 LINE BREAK

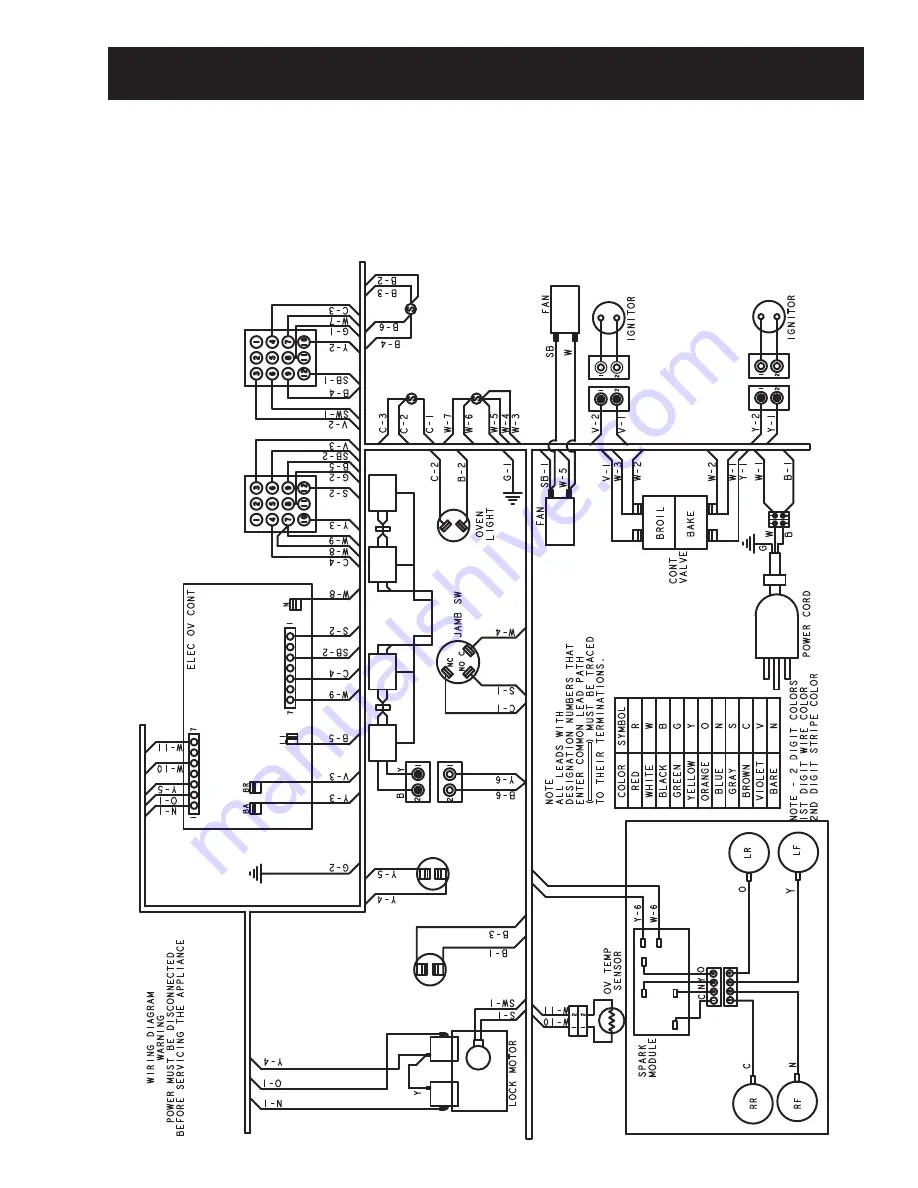
PGS908 Wiring Diagram

Summary of Contents for Profile PGS908

Page 1: ...GE Appliances General Electric Company Louisville Kentucky 40225 31 9156 GE Gas Slide In Ranges PGS908 PGS968 PGS975 Technical Service Guide December 2007 GE Consumer Industrial...

Page 2: ...witch do not use any phone in the building Immediately call the gas supplier from a neighbor s phone Follow the gas supplier s instructions If you cannot reach the gas supplier call the fire departmen...

Page 3: ...Panel Assembly 50 Convection Fan Assemblies 44 Convection Fan Cover 45 Convection Fan Motor 45 Cooling Fans 37 Diagnostics and Service Information 66 Door Lock Assembly 62 Door Switch 38 Electronic Ra...

Page 4: ...Oven Door Removal 29 Oven Light Assemblies 49 Oven Light Bulbs 33 Oven Temperature Sensor 47 Oven Vent 48 Range Components 29 Range Removal 32 Range Top Components 52 Rear Cover Removal 34 Relay Cont...

Page 5: ...range has an electronic tactile touch control panel for the oven This easy to operate touch control panel is user friendly and simple to understand The range includes many helpful features including...

Page 6: ...r Serial Number The first two characters of the serial number identify the month and year of manufacture Example AM123456S January 2007 A JAN 2007 M D FEB 2006 L F MAR 2005 H G APR 2004 G H MAY 2003 F...

Page 7: ...en 5 inches and 13 inches of water column For LP gas the pressure supplied must be between 10 inches and 13 inches of water column When checking for proper operation of the regulator the inlet pressur...

Page 8: ...our cabinet cannot provide a 1 4 in flat area at the back of the countertop opening consider changing the countertop to accommodate this dimension Note A 1 1 2 in minimum clearance must be maintained...

Page 9: ...he grate may chip without cookware to absorb the heat Be sure the burners and grates are cool before you place your hand a pot holder cleaning cloths or other materials on them Sealed Gas Burners Your...

Page 10: ...10 Using the oven controls on some models Throughout this manual features and appearance may vary from your model...

Page 11: ...setting the clock DELAY START Pad Use along with COOKING TIME or SELF CLEAN LO STD pads to set the oven to start and stop automatically at a time you set COOKING TIME Pad Touch and then touch the numb...

Page 12: ...Casseroles C or D Turkey A How to Set the Oven for Broiling IMPORTANT To avoid possible burns place the racks in the desired position before you turn the oven on Place the meat or fish on the broiler...

Page 13: ...d of a Timed Cycle The timer is a minute timer only The timer does not control oven operations The maximum setting on the timer is 9 hours and 59 minutes To Reset the Timer If the display is still sho...

Page 14: ...ternal temperature for the food that you can set is 200 F 93 C Touch the BAKE pad Touch the number pads to set the desired oven temperature Touch the START pad The display will flash if the probe is i...

Page 15: ...r Warming section Touch the CLEAR OFF pad to clear the display How to Set a Delayed Start and Automatic Stop You can set the oven control to delay start the oven cook for a specific length of time and...

Page 16: ...ght is off because heat from the bulb will speed harmful bacteria growth How to Set an Immediate Start and Automatic Stop The oven will turn on immediately and cook for a selected length of time At th...

Page 17: ...oven temperature will not auto convert Using the convection oven on some models How to Set the Oven for Convection Roasting when Using the Probe The display will flash PROBE and the oven control will...

Page 18: ...old food To use the WARM feature touch the WARM pad and then the START pad To use the WARM feature after Timed Baking or Roasting follow these steps Touch the mode of cooking that you want to use BAKE...

Page 19: ...the START pad to go back to the time of day display Use your oven as you would normally How to Set the Oven for Cleaning Turn all of the surface burners off Touch the SELF CLEAN LO STD pad once for a...

Page 20: ...a time other than 4 hours or 3 hours is needed use the number pads and enter the desired clean time You can change the clean time to any time between 3 hours 21 2 hours on some models and 5 hours dep...

Page 21: ...o shut off and leave the control set in this special features mode Fahrenheit or Celsius Temperature Selection Your oven control is set to use the Fahrenheit temperature selections but you may change...

Page 22: ...play will show 1 BEEP This is the quietest volume level For each time the level is changed a tone will sound to provide an indication of the volume level Choose the desired sound level 1 BEEP 2 BEEP 3...

Page 23: ...ow CON and the converted temperature of 325 F 163 C NOTE This feature only converts cooking temperatures not cooking times When convection roasting the oven temperature will not auto convert To turn o...

Page 24: ...HI LO and BAKE pads were not touched at the same time Touch the CLEAR OFF pad and begin again Tap the DELAY START pad until SAb bAtH appears in the display Touch the START pad and will appear in the...

Page 25: ...Drawer Compartment Shown with Storage Drawer Removed Convection Fan Control Panel Assembly Broil Burner Storage Drawer Broil Burner Igniter Oven Gas Shut Off Oven Temperature Sensor Bake Burner Under...

Page 26: ...next page Burner Assembly PGS975 Shown Burner Cap Oven Vent Maintop Burner Assembly PGS975 Shown with Grates Removed Igniter Electrode Burner Orifice Burner Orifice Burner Base Burner Head Assembly T...

Page 27: ...Oven Vent Rear Gas Valves 1 of 2 Continued next page Manifold Igniter Switch Harness Rear Gas Valves 1 of 2 Burner Box NOTE The door lock assembly and thermal switches are located under the burner bo...

Page 28: ...28 Rear View PGS975 Shown with Back Cover and Cooktop Lockout Cover Removed Convection Fan Motor Broil Igniter Wires Bake Igniter Wires Cooling Fan Cooling Fan Control Valve Cooktop Lockout Valve...

Page 29: ...e door frame to the unlocked position Hinge Door Lock Cut out Firmly grasp both sides of the door at the top 3 Close door halfway between broil stop and door 4 closed position door removal position th...

Page 30: ...the four T 15 Torx screws 2 on each 4 side from the outer door assembly Note The inner door assembly is heavier than the outer door assembly Separate the inner door assembly from the 5 outer door ass...

Page 31: ...he cocked position Pull the hinge lock back against the door liner surface to lock the hinge in this position Air enters the door assembly through large slots in the bottom and flows upward between th...

Page 32: ...ps clear the guides Lower the front of the drawer and push in until it closes Rail Guide Stop Stop Range Removal WARNING Shut off gas to the range before range removal Caution Take the necessary preca...

Page 33: ...1 4 turn until the tabs of the glass cover clear the grooves of the socket Bulb Socket Tab Glass cover Receptacle Using gloves or a dry cloth remove the bulb by pulling it straight out Use gloves or...

Page 34: ...d control panel so they cannot be activated See Control Features The purpose of the lockout valve is to shut off the gas supply to the surface burners when this feature is selected Note The cooktop is...

Page 35: ...rough it that enables the valve to open and close When the ball is positioned so that the hole runs the same direction as the passageway the gas flows through the hole and the valve is open However wh...

Page 36: ...of the range Tab Cutout Disconnect the wires from the lockout valve 5 Using an 11 16 in wrench disconnect the inlet 6 and outlet tube hex head nuts from the valve Cover Disconnect Wires Lockout Valve...

Page 37: ...The cooling fans will not turn on immediately when a cooking function is set THEY WILL TURN ON AFTER 12 MINUTES If the temperature is set over 300 F 149 C and the oven is turned off the fans will rem...

Page 38: ...of the oven door and provides this information to the oven s control board To remove the door switch Disconnect power to the range 1 Pull the switch forward to locate the ends of two 2 spring clips o...

Page 39: ...ator is in the open position Slow ignition can be caused by one or more of the following conditions Blockage of primary air intake Hole beneath 1 the bake orifice hood must be open and free of insulat...

Page 40: ...To remove the broil burner and glo bar igniter Remove the oven door See 1 Oven Door Removal Remove the two 1 4 in hex head screws that 2 hold the shield to the bottom of the broil burner Remove the t...

Page 41: ...ter Remove the oven door See 1 Oven Door Removal Remove the range from the installation 2 Remove the rear cover See 3 Rear Cover Removal Disconnect the bake igniter wire harness Note 4 the location of...

Page 42: ...install the oven door 3 Close the oven door set the control for 4 BAKE and observe the bake burner flame 6 Set the control for BROIL and repeat step 5 Note The door should remain closed during this te...

Page 43: ...ve the bake burner flame for any flame problems Note Examine the burner baffle for signs of warp age If warped baffle will have to be replaced 9 Install the burner baffle and bottom pan With the custo...

Page 44: ...ve a convection fan Fan Blade Oven Liner Oven Insultion Outer Back Panel Convection Fan Screws 4 Support Oven Cavity Mounting Screws 3 Convection Fan Mounting Screws 3 Fan Blade Nut PGS975 CONVECTION...

Page 45: ...resistance of the convection fan can be checked on the ERC Place the control panel in the service position See Touch Panel and ERC Test the low speed winding between N and the blue wire on RY2 for th...

Page 46: ...ors Meat Probe Outlet The meat probe outlet some models is located near the top right corner of the oven cavity To access the probe outlet open the oven door and remove the two 1 4 in hex head screws...

Page 47: ...le Sensor Wire Harness Continued next page Gently pull the sensor wire harness into the 6 oven Note When reinstalling the sensor use a small flat 1 blade screwdriver to push and guide the sensor wire...

Page 48: ...ked to ensure proper air circulation To remove the oven vent tower it is necessary to remove the grates oven vent cover and cap Using a 1 2 in socket the oven vent tower can then be removed Caution Th...

Page 49: ...b and socket and wire harness Each oven light bulb has an approximate resistance value of 26 8 The resistance of the light bulb circuit can be checked on the ERC Place the control panel in the service...

Page 50: ...ne Can only be used after another function has been selected To remove the touch panel and ERC Disconnect power 1 Caution In the following step to prevent marring the fasteners or damaging the glass t...

Page 51: ...Switch Door Lock Switches Probe CN6 Lockout Valve Switches RY1 Door Lock Motor RY2 Convection Fan High Low Speed RY4 Lockout Valve Motor RY6 Cooling Fans RY7 Oven Lights RY11 Broil RY12 Bake RY13 Conv...

Page 52: ...equired operating pressure is 5 W C P 4 W C P for model PGS968 Natural Gas or 10 W C P LP Propane Gas The pressure reading can be taken at the BROIL BAKE or TOP burner orifices Check for drafts enteri...

Page 53: ...lower right side of the valve Insert a small flat blade screwdriver through the 3 access hole and turn clockwise to fully tighten down the bypass screw Repeat for each screw If the flame appears too l...

Page 54: ...crews Surface Burner Igniters This range uses two different igniters The igniters for the 3 single burners are inserted through the main top and attached to the burner brackets The dual burner uses an...

Page 55: ...ide each housing are 2 switches When the burner valve is advanced from the OFF position to the LITE position the igniter switch closes The closed igniter switch sends line voltage to the spark module...

Page 56: ...down firmly Harness The switch housings and harness are replaced as one assembly To remove the igniter switch assembly Remove the control panel See 1 Touch Panel and ERC Remove the 2 plastic wire ties...

Page 57: ...See To remove the single burner valve Remove the 9 16 in nut and separate the 2 burner tube from the burner valve Remove the 7 16 in nut and separate the 3 simmer burner tube from the burner valve Cau...

Page 58: ...be from each single burner 3 valve and the burner and simmer tubes from the dual burner valve See Burner Valves Remove the 1 4 in hex head screw that attaches 4 the ground wire to the burner box Remov...

Page 59: ...control panel frame Continued next page Remove the 1 4 in hex head screw that 6 attaches the ground wire to the burner box and disconnect the igniter wire harness Remove the 11 16 in nut that connects...

Page 60: ...essary to remove the burner box to access the door lock assembly and the thermal switches To remove the burner box Remove the maintop See 1 Maintop Removal Open the oven door 2 Remove the five 1 4 in...

Page 61: ...floor of the component compartment in front of the fan motors and protect the electronics from damage should a high temperature condition occur The PGS908 and PGS975 have a thermal switch and a therm...

Page 62: ...assembly see 1 Maintop Burner Assembly Note the placement of the wiring to the thermal 2 switch that is being removed Disconnect the wiring Remove the 2 hex head screws that hold the 3 thermal switch...

Page 63: ...tch wiring incorrectly to the lock assembly When reconnecting the wiring make sure it is properly connected to the lock assembly before turning the power back on Motorized Door Lock Circuit Informatio...

Page 64: ...the lock hook into a corresponding slot in the oven door which secures the door The movement of the cam has also closed lock switch 1 which tells the control the door is locked The control then remove...

Page 65: ...D HI SPEED M CONVECTION MOTOR 1 2 3 4 5 6 7 8 OVEN TEMP SENSOR 1100 ROOM TEMP 2650 CLEAN TEMP UNLOCK SW 2 LOCK SW 1 MEAT PROBE 50K RM CONTROL CONNECTOR PLUG THERMAL SWITCH OPEN 275 F CLOSES 205 F TEMP...

Page 66: ...er Burner parts not replaced correctly Make sure pins in the burner head are properly located in the burner base holes Holes or slits in burners clogged Clean or replace as necessary Make sure all com...

Page 67: ...ng retainer and press down to remove the retainer Turn the spring retainer over so that L P is 7 showing on the bottom Snap the retainer back into position and 8 retighten the cap back onto the regula...

Page 68: ...future conversion Note In the future to convert back to natural gas remove the entire L P extended orifice spud II III I IV Front of Range Note On 15K Extra Large front right burner use the Extended S...

Page 69: ...le flame spreader 3 and remove the orifice fitting cover Continued next page Broil Burner Use a 1 2 in open end or adjustable wrench to 1 turn the orifice hood in the L P direction about 1 1 2 turns u...

Page 70: ...If the flames are yellow open the air shutter more b If the flames blow away or flutter from the burner close the air shutter more 1 2 TO 3 4 DE LLAMA QUEMADOR PARA HORNEAR ASAR 1 2 to 3 4 Inner Cone...

Page 71: ...LR 9 100 No 65 Bake 15 000 Broil 12 000 Relay Contacts Operation Test and Control Voltage Check Terminals Voltage L1 to N 120 VAC all the time BAKE to N 120 VAC when in BAKE mode BROIL to N 120 VAC w...

Page 72: ...ss of latch motor safety circuit Replace control ERC Failure Codes The ERC electronic range control has error F codes that can be utilized by the service technician in order to quickly identify failed...

Page 73: ...vicing Caution Label all wires prior to disconnection Wiring errors can cause improper and dangerous operation Verify operation after servicing Schematics and Wiring Diagrams Continued next page THERM...

Page 74: ...74 Continued next page PGS908 Schematic...

Page 75: ...75 Continued next page NOTE RY references on control may be different than shown THERMAL SWITCH L THERMAL SWITCH PGS968 Wiring Diagram...

Page 76: ...76 Continued next page PGS968 Schematic...

Page 77: ...77 THERMAL SWITCH THERMAL LINE BREAK PGS975 Wiring Diagram Continued next page...

Page 78: ...78 PGS975 Schematic...

Page 79: ...ecific legal rights and you may also have other rights which vary from state to state To know what your legal rights are consult your local or state consumer affairs office or your state s Attorney Ge...

Page 80: ...accessible to provide required service What Mabe Will Not Cover For The Period Of Mabe Will Replace One Year Any part of the range which fails due to a defect in materials or workmanship During this...

Reviews: