5
Care and cleaning of the vent hood.
ge.com
Be sure electrical power is off and all surfaces are cool before cleaning or servicing any part of the vent hood.
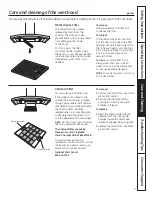
Metal Grease Filter
The metal filter traps grease
released by foods from the
cooktop. The filter also helps
prevent flames (from food, grease)
from damaging the inside
of the hood.
For this reason, the filter
must ALWAYS be in place when
the hood is in use. The grease filter
is dishwasher-safe and should be
cleaned every 6 months, or as
needed.
To remove:
Pull downward on the filter lock
to release the filter.
To replace:
Fit the tabs at the end of the filter
into the slots in left side of the filter
opening. Lift up the right side of the
filter and push gently until the filter
locks into place. Make sure the filter
lock is in the closed position to
secure the filter.
To clean
, swish the filter in hot
soapy water and rinse in clean
water or wash it in the dishwasher.
Do not use abrasive cleansers.
NOTE:
Some discoloration will occur
in the dishwasher.
Charcoal Filter
For recirculating installation only
If the model is not vented to the
outside, the air will be recirculated
through a disposable charcoal filter
that helps remove smoke and odors.
The charcoal filter should be
replaced when it is noticeably dirty
or discolored (usually after 6 to 12
months, depending on hood usage).
NOTE:
DO NOT rinse, or put charcoal
filter in an automatic dishwasher.
The charcoal filter cannot be
cleaned. It must be replaced.
Order Charcoal Filter WB02X11348.
To inquire about purchasing
replacement charcoal filters or to find
the location of a dealer nearest you,
please call our toll-free number:
National Parts Center
800.626.2002
To remove:
1.
Remove the metal filter—see
Metal
grease filter
section.
2.
Remove the charcoal filter by
pushing in on both locking tab
handles to release.
To replace:
1.
Insert the charcoal filter into the
opening. Push the locking tab
handles toward the center and
release to engage the locking tabs.
2.
Replace the metal filter—see
Metal
grease filter
section.
Consumer S
uppor
t
Tr
oubleshooting Tips
Operating Instructions
Safety Instructions
Car
e and Cleaning
Locking tab handle
Locking tab handle


