background image

Summary of Contents for PTC22MFMALCC and

Page 1: ...rator 17 19 Reversing the Door Swing 25 30 Trim Kit_s and Panels 13 16 Water Line Installation 20 24 Troubleshooting Tips 31 34 Normal Operating Sounds 31 Consumer Support Consuiner Support Back Cover...

Page 2: ...surfaces _In refiigerators with antomafic icemakers avoid contact with the moving parts of the ejector mechanism or with the heating element located on the bottom of the icemaken Do not place fingers...

Page 3: ...ng system that used CFCs chlorofluorocarbons CFCs are believed to harm sn atospheric ozone If you are throwdng away your old refiigerato_ make sure the CFC refrigerant is removed fbr proper disposal b...

Page 4: ...t use a cord that shows cracks or abrasion damage along its length or at either end When moving the refrigerator away from the wall be careful not to roll over or damage the power cord USE OF ADAPTER...

Page 5: ...freezer compartment Refrigerator Control The refligerator control maintains dm temperature dlroughout dm refrigerator compartment Moving the refiigerator control to OFF stops cooling in both areas ref...

Page 6: ...ge will rotate about 1 4 turn _Run water from the dispenser for 3 minutes about 1 gallons 6 liter to clear the system and prevent sputtering NOTE A newlyqnstalled water filter cartridge may cause wata...

Page 7: ...lift the bin housing up and out of the supports on the door You do not have to remove the bin fi om the housing when moving it Rearranging the Shelves Shelvesin the fl esh food and fi ee_r compartmen...

Page 8: ...the left side and the lever is set at coldest air fi om the fi eezer is forced 0 around the pan to keep it very cold You can move the pan to any location if you don t want the extra cold storage The s...

Page 9: ...itch to I on The green light will come on The icemaker will fill with water when it cools to 15 F 10 C A ne My installed refrigerator may take 12 to 24 hours to begin making ice cubes Throw away the f...

Page 10: ...back until it clicks into place If the bin does not go all the way back remove it and rotate the drive mechanism 1 4 turn Then push tim bin back again Important Facts About YourDispenser NAdd ice bef...

Page 11: ...ide TOhelp prevent odors leave an open box of baking soda in the fresh food and freezer compartments Unplug the refrigerator before cleaning If this is not practical wring excess moisture out of spong...

Page 12: ...fied servicer drain the water supply system on some models to prevent serious property damage due to flooding Preparing to Move Secure all loose items such as grille shelves and drawers by taping them...

Page 13: ...ss than 1 4 6 mm thick you need m create a filler panel such as 1 8 3 mm cardboard that will fit between the lace of the door mid the wood panel If you are installing the pre cut decorator panels pre...

Page 14: ...cm F Areato berouted on backbendle TopView HandleSide side toabew for V mountingscrews 3r_m 13 4 44 cm _ _ BackofPanel i P _ I 2 6 5 cm _ _ Fingertip Clearance Frontof Panel _ _S The areas at the top...

Page 15: ...anel Push the filler panel required with some door panels in behind the decorator panel Reinstall the Top Trim on the Freezer Door Using a 1 20 Torx Driver reinstall tim two screws attaching tbe Top l...

Page 16: ...pressing the trim with your hand as the adhesive is exposed Install the Refrigerator Door Side Trim Fit the Side Trim over the ends of the refrigerator door Top and Bottom Trim as illustramd Attach th...

Page 17: ...upply kit containing robing shutoff valve fittings and instructions is available at extra cost fi om your dealm by visiting our Website at www GEApplimaees com in Canada at www geapplimaees ca or fi o...

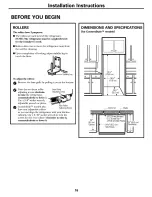
Page 18: ...ase grille by pulling it out at the bottom Turn the two front roller FrontRoller adjusting screws clockwise AdjustingScrew to raise the refrigerator counterdockMse to lower it Use a 3 8 socket wrench...

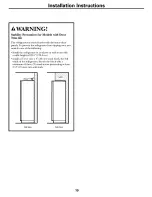
Page 19: ...t the refiigerator fl om tipping ovm you must do one of the following Install the refrigerator in ml alcove or wall recess with a sotTKheight of 70 4 178 4 cm Install a 9 5 1 cm x 4 10 cm wood block t...

Page 20: ...here temperatures fall below freezing When using any electrical device such as a power drill during installation be sure the device is double insulated or grounded in a manner to prevent the hazard of...

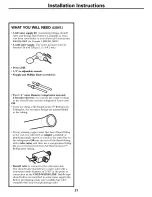
Page 21: ...a GE SmartConnect TM Refrigerator Tubing kit the necessary fittings are preassembled to the tubing If your existing copper water line has a flared fit6ng at the end you will need an adapter available...

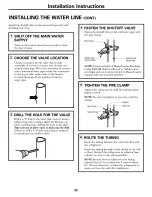
Page 22: ...to drill a 1 4 hole may resuh in reduced ice production or smaller cubes FASTEN THE SHUTOFF VALVE Fasten the shutoffvalve to the cold water pipe with the pipe clamp PipeClamp_ Saddle Type _4 Vertical...

Page 23: ...nd use is not permitted in Massachusetts Consult with your licensed plumber CONNECT THE TUBING TO THE REFRIGERATOR NOTES Before making the connection m the refrigerator be sure the refrigerator power...

Page 24: ...position You may need to pry open the clamp Tubing Clamp 1 4 Tubing SmartConnect TM Tubiag TURN THE WATER ON AT THE SHUTOFF VALVE Tighten any connections that leak Reatvach the access covm PLUG IN THE...

Page 25: ...ED Phillipsscrewdriver Maskiegtape 7 16 aed 1 4 socket aedratchet Needleeosepliers T 20orT 25TorxDriver whicheveryour model requires Puttyknifeor thie Nade screwdriver REMOVE THE FREEZER DOOR Tape the...

Page 26: ...it on the other side NOTE If tim washer is not on the hinge bracket check to see if it is stock to the bottom of the door Using a T 20 To_x Drives remove the stability leg from the left side and rein...

Page 27: ...losure from the reversibility kit The reversibility kit is taped onto the bottom shelf of the reti igerator door If you have misplaced the kit a new one can be ordered WR49M30g WR49M306 WR49M311 WR49M...

Page 28: ...he door and place the assembly aside Long Handle Short Handle H01e_ 1 e Pin _ e i After removing the handle Move the small plug buttons from the top right side of the door top and insert flmm into tim...

Page 29: ...R STOPS CAM RISER AND CAM CLOSURE On the freezer door install the left hand door stop cam riser spacer shims and aluminum foil to the left bottom flange i t 29 REINSTALL DOOR STOPS CAM RISER AND CAM C...

Page 30: ...et Support the door on the handle side and make sure tim door is straight and the gap between the doors is even across the front While holding the door in place tighten the top hinge screws To avoid s...

Page 31: ...rning tim refi igerator on or off The timer also produces a sound similar to an electric clock _Plastic Liner Cracking or popping sotmds may Ix heard due to expansion of dm plastic liner _Water Valve...

Page 32: ...t open Check to me if package is holding door open or closing mechanism is not engaged Too frequent or too long door openings Ieemaker power switch in Set the power switch re the I on position the 0 O...

Page 33: ...st half lass used for a period of time of water to he warm because this water has Ix en resting in the tube between the chilling reservoir and the dispenser Water supply line turned See Installing the...

Page 34: ...n wax on fhce of gaskeL sticking or folding over ii Your floor covering supplier should be consulted if you object re this discoloration Normal air flow cooling motor In the refrigeration process it i...

Page 35: ...remaining value of your contract No questions asked lt s that simple Protect your refrigerator dishwashm washer mid drym range TV VCR and much more any brand Plus there s no extra charge for emergency...

Page 36: ...Nmnber I I I I I I I I I I I IIIIIII Important If you did not get a registration card with your product detach and return the form below to ensure that your product is registered or register online a...

Page 37: ...Notes ww_ GEAppliances com e _h z_ e m_ b q 37...

Page 38: ...8 8 2 bar non shock N Pemperature 33 100 F 0 6 38 C _ Flow raW 0 5 gpm 1 9 lpm General Installation Operation Maintenance Requirements _Flush new cartridge at flfll flow for 3 miimtes to purge out tr...

Page 39: ...rg c F otozoo t y _ea _ting requirements pursuant to Section ontamlnants snt_diolo_leal Contaminants _StOS Organic Contaminants Atrazine Lindane 2 4 D Rated Service Capacity 300 gallons Rated Service...

Page 40: ...l 3 To obtain warranty service purchaser must present the original Bill of Sale Components repaired or replaced are warranted through the remainder of the original warranty period only 4 This warranty...

Page 41: ...and in home service to replace the defective part _NService trips to your home to teach you how to use the product _ Improper installation _ Failure of the product if it is abused misused or used for...

Page 42: ...u can purchase it on line anytime or call 800 626 2224 during normal business hours GE Consumer Home Services will still be there after your warranvy expires In Canada call 1 888 261 2133 v __ Partsan...

Reviews: