
R1125 Series
3
/
8
" Diameter Stubby Press Fit with Mini-Max
Installation Instructions
Switch
1: Drill
3
/
4
"
dia. hole 1
1
/
8
"
deep for the contact.
2: Connect contact leads to security system loop and test for continuity.
3: Lightly coat the contact RTV mounting compound (GE part number 1905) and insert into
respective hole.
Magnet
1: Mount magnet to double-sided tape (included) and affix to window frame.
2: Or, if using stainless steel screw (included), drill
1
/
16
"
dia. (using magnet center hole
as a guide) and mount using #4 x
1
/
2
"
stainless steel screw (included). Use caution if using
screw other than the one provided, as it will effect the gap performance.
3: Care should be taken not to over tighten screw to avoid damage to magnet or stripping hole.
Recess/Flush Mount Magnet
1: Drill
7
/
16
"
dia. hole (standard gap) or
5
/
8
"
dia. hole (wide gap) by approximately
1
/
8
"
deep .
2: Coat magnet with RTV silicon adhesive and mount into hole.
NOTE: When surface mounting magnet be sure there is enough clearance to prevent the magnet from
becoming damaged when closing the window or door.
Part
Loop
Electrical
Gap
Number
Type
Configuration
Distance
R1125
Closed
N.O.
1
/
2
"
R1125W
Closed
N.O.
7
/
8
"
**
European Union Specifications: 48 V AC/DC max, 0.5 Amp
**
FORM A (R1125, R1125W)
Voltage: 100 V AC/DC max
Current: 0.5 A max
Power: 7.5 W max
WARNING: Each electrical rating is an individual maximum and cannot be exceeded!
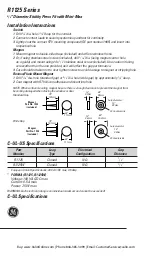
C-UL Specifications
Standard Gap
Wide Gap
.75"
19.1mm
.44"
11.1mm
.13"
3.3mm
.38"
9.5mm
.44"
11.1mm
.75"
19.1mm
.13"
3.3mm
.60"
15.2mm
hole diameter:
.13"
3.3mm
hole diameter:
.13"
3.3mm
#4 Countersink
#4 Countersink
Magnet
Part No. 1835
(included)
Magnet
Part No. 1830
(included)
C-UL-US Specifications
Buy: www.ValinOnline.com | Phone 844-385-3099 | Email: CustomerService@valin.com


