background image

Summary of Contents for SBC223

Page 1: ...GE K I 00636C INSTRUCTIONS STATIC BREAKER BACK UP RELAY TYPE SBC RELAY GE Power Management 205 Great Valley Parkway Malvern PA 193351337r USA SBC223 ...

Page 2: ...ND SBC223C ONLY 13 T6 BET DELAY B 0 TIMER SBC223C ONLY 13 Ti IT LOGIC TESTS SBC223B AND SBC223C ONLY 13 T8 TARGETTEST 13 PERIODIC TESTS 14 GENERAL 14 TEST EQUIPMENT 14 DRAWINGS 14 EQUIPMENT GROUNDING 14 GENERAL RELAY TESTS 14 Ti POWER UP 14 T2 ITTEST 15 T3 SHUTDOWN TEST 15 T4 IT BFT1 and BFT2 TEST 15 T5 BET LOGIC TESTS SBC223B AND SBC223C ONLY 15 T6 BFT DELAY B 0 TIMER SBC223C ONLY 15 T7 IT LOGIC ...

Page 3: ... AC and DC input circuits The SBC223B is similar to the SBC223A relay except for a contact convertor CC input and some additional logic The SBC223C is similar to the SBC223B except for a second timer and some additional 1oic The differences between the relays are evidenced in the External Connections and Logic Diagrams of the SBC223A and SBC223B and SBC223C as shown in Figures 1 2 and 3 respective...

Page 4: ... the breaker auxiliary switch is not a completely reliable indication of breaker position since it indicates the position of the breaker mechanism and not necessarily the state of the breakers main contacts The general method used to determine the setting of the breaker failure timer involves a coordination of various time delays as shown in the time coordination chart in Figure 5 The breaker fail...

Page 5: ...atures of the SBC223A relay plus some combination of the optional features noted below 1 Contact converter input to supervise the breaker failure timer The function of the contact converter is to convert a contact operation into a signal that is compatible with the logic circuit of the Type SBC relay 2 A second timer that in conjunction with the other timer allows different time settings depending...

Page 6: ...an output from the level detector The B U timer is energized by an output from the ANDI logic function With the link in the LD position the AND1 logic function is in service and will produce an output whenever there is an output from the leveL detector and the contact converter This arrangement can be used with breaker auxiliary switch 52 a to provide a short tripping time via the B U timer if the...

Page 7: ...he configuration with which the original SBC23 was shipped The routing of the contact initiation inputs and the BFT outputs depend upon the bus and breaker arrangement The static breaker failure relaying schemes described in this book are intended for application on a per breaker basis That is there is one breaker failure relay associated with each breaker in a bus array On this basis the current ...

Page 8: ...r 4 4 or Lockout Brkr 5 trips Bkr l0 F3 North Bus Relay blocks reclosing of Brkr 5 Lockout relay Breaker Fl Line A that transfer a Half 7 or 5 5 or Brlcr 4 Brlcr 6 trips Skis 10 F2 Line B 11 blocks re closing of 4 6 South Lockout relay Breaker F2 Line B Bus that transfer a Half 7 or 6 6 or Lockout Brkr 5 trips Brkr 11 F4 South Bus Relay blocks re closing of 5 Lockout relay Fl Line A that transfer ...

Page 9: ...t then turn the screw in the counter clockwise direction until the LED is on continuously Timer The timers for the SBC are calibrated at the factory and should not need any adjustment Reset Timer The reset timer for the SBC is a permanent value built into the hardware of the relay If there is a need to change the reset time consult the factory for details TIMER SETTiNGS The delay through the timer...

Page 10: ...uman body and the conditions of low humidity carpeted floors and isolating shoes are conducive to the generation of electrostatic discharge currents Where these conditions exist care should be exercised when removing and handling the modules The persons handling the module should make sure that their body charge has been discharged by touching some surface at ground potential before touching any o...

Page 11: ...eference during testing They are located in the PRODUCT DESCRIPTION PD section 1 The External Connections Diagram SBC223A FIG I 2 The External Connections Diagram SBC223B FIG 2 3 The External Connections Diagram SBC223C FIG 3 EQUIPMENT GROUNDING All equipment used in testing the SBC223 relay should be connected to a common grounding point to provide noise immunity This includes the current source ...

Page 12: ... the relay as shown in Figure 21 Set the IT logic switch to the LD position 2 Conduct the test according to the last line of Table II 3 While the input current is still being applied decrease the input DC to 60 of the rated DC vohage 4 The only relay lights that should remain on are the DC Voltage Low light and the Energized light All contacts should go to their un energized state T4 IT BF i and B...

Page 13: ...any time delay T6 BF DELAY BfO TIMER SBC223C ONLY 1 Connect the relay as shown in Figure 22 Set the AJO and BlO timer to 0 ms 2 Set the BFT Logic switch to CC 3 Close the switch to stud 9 and record the time to close contacts 13 14 15 16 and 19 20 4 Set B 0 timer to 20 ms 5 Repeat step 3 and notice a 10 ms increase 2 rns in the time needed to close contacts 13 14 15 16 and 19 20 6 Repeat steps 4 a...

Page 14: ...ment are given in the text of this section and in the associated circuit diagrams DRAWINGS The following drawings should be used for reference during testing They are located in the PRODUCT DESCRIPTION section 1 The External Connections Diagram SBC223A Fig 1 2 The External Connections Diagram SBC223B Fig 2 3 The External Connections Diagram SBC223C Fig 3 EQUIPMENT GROUNDING All equipment used in t...

Page 15: ...ontacts 11 12 13 14 15 16 or 19 20 When the contacts are closed notice that lights IT BFTI and BFT2 are on 4 Notice that the time required to close the contacts is equal to the A 0 time dela Only the SBC223A has delay on its IT contacts See the NOTE under TIME SETTINGS to calculate the timer delay Dropout Delay 5 Input current 5 percent above the Phase pickup value to studs 1 2 After the relay has...

Page 16: ...h is field service where an attempt is made to replace defective components at the relay location Generally this will take the most time and require the highest degree of skill and understanding It can also be expected to result in the longest system outage time The preferred approach is board replacement where a determination is made as to which printed circuit board has failed and that board is ...

Page 17: ...wanted the part number if known and the complete model number of the relay for which the part is required The table below lists the part numbers for the most common replacement parts It is recommended that renewal parts only be obtained from the General Electric Company Should a printed circuit card become inoperative it is recommended that the card be replaced with a spare RENEWAL PARTS MODEL NUM...

Page 18: ...3CO2A 0215B841 1G004 SBC223CO3A SBC223CO4A 0215B841 1 3003 SBC223DOIA 0215B841 1G005 SBC23IAOIA 0215B8412G001 SBC23 IAO2A 0215B8412G002 SBC23IAO3A SBC23IAO4A 0215B8412G001 SBC2XXXXXA EXTENDER BOARD 0215B8031G001 CARD PULLER 207A5404P001 UPPER CRADLE BLOCK 0184B8624G014 LOWER CRADLE BLOCK 0184B8624G 13 UPPER CASE BLOCK 006418058 3045 LOWER CASE BLOCK 0064 18058 3129 SPECIFICATIONS RATINGS Rated Fre...

Page 19: ...ax CONTACT DATA Trip Outputs Continuous Rating 3 Amps Make and carry 30 Amps per ANSI C37 90 Target Operate Level Minimum 150 mAmps Maximum 30 Amps for 1 sec OVERCURRENT UNITS Range in Amps Resolution in Amps 1 Amp Relay 5 Amp Relay 1 Amp Relay 5 Amp Relay Phase 2 1 7 1 8 5 1 5 Ground 1 85 5 4 25 05 25 TIMERS Range in Milliseconds Resolution in Milliseconds A 0 10 1650 10 B 0 10 1650 10 There is n...

Page 20: ...ssembly 34 Figure 19 Outline and Panel Drilling Dimensions 35 Figure 20 Power Up Test 36 Figure 21 IT Test 36 Figure 22 BFTI and BFT2 Test 37 Figure 23 IT Logic Test 37 Figure 24 Target Test 38 LIST OF TABLES TABLE 1 Common Bus Arrangements 8 TABLE II IT Test Steps 12 TABLE III IT BFT1 BFT2 Test Settings 12 Among the changes made since the first edition are the following the Figures have been move...

Page 21: ...A B C T0 SURGE GROUND 50SF A2 50SF Al IT LLJ IT LOGIC SWITCH J1 LOCATED ON BACKPLANE JlL ____ J IT SEAL IN 11 13 15 19 T2 TI f 3 911 BFT 9fl IT A2 12 iS 20 P ...

Page 22: ...5OF A2 50RF Al A B C i T i BFT LOGIC SWITCH r FT LOGIC SWITCH IT sEAL IN 17 Ill T2 IT 12 13 15 19 Ti j T 3 BET BET BET A1 _A1 _TA2 i4 16 2O ...

Page 23: ...A 1 9 C 0 1 J t J C e 509F A2 502F Al IT BFI IT SEAL IN 11 915 9 19 T2 4T1 I J i JFT LBFT IT Al _r_Ai A2 12 14 l5 20 0 m ...

Page 24: ...GEK 1 00636 Figure 4 0286A4845 Basic Components of Breaker Failure Scheme 24 ...

Page 25: ...RRUPTING TI ME INOPERATIVE BREAKE NORMAL CLEARING TIME 1 C PROTECTIVE RELAY DROPOUT TIME MARGIN IBACK UP 4REAKER G2 B E TIMER 62 1 I NTERRUPTI1 EC OR OPERATING TIME SBC TOTAL OPERATING TIME TRIP AUX RELAS BREAKER FAILURE TOTAL CLEARING TIME C m ...

Page 26: ...GEK 100636 LINE Figure 7 0246A2277 2 Relay Application Double Bus Double Breaker SBC F 1 LINE A LINE B LINE çN Figure 6 0246A2279 1 26 ...

Page 27: ...GEK 1 00636 Figure 8 0246A2280 2 Relay Application Breaker and a Half LI LINE F Figure 9 0246A2278 1 Relay Application 27 ...

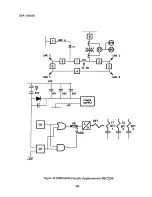
Page 28: ...GEK 1 00636 Figure 10 0286A4846 Sample Application for SBC223B UNE C UNE D UNE F lii DC AND T1 BFT I T 8Ff BFT 2J3 DC 28 ...

Page 29: ...input to timer I I I I I 456789 Multiples of Pickup Setting I I I 10 11 12 13 Figure 11 0286A5391 Level Detector Reset Time Graph for the SBC Relay SBC The time Time ms 10 K y Current Reduced to 95 of PU 8 Current Reduced to 0 of PU 7 6 5 __ 4 3 2 1 0 0 12 3 29 ...

Page 30: ...Multiples of Pickup Setting Figure 12 0286A5390 Level Detector Operating Time for the SBC Relay 10 9 0 7 1 Conditions 1 D C Power Supply Suddenly 2 Steady State Current Flowing L Energized Previously 5 4 N Maximum Time Minimum Time 3 2 1 __ _____ 0 01 I I I I 2 34567 89 10 11 12 I 13 30 ...

Page 31: ...U C cc cc t J o c c HED L_ 1 fl C Q t_ L 0 rn 0 0 a A a ...

Page 32: ...GEK 1 00636 Figure 14 8919530 SBC with Front Cover Removed Figure 15 8919531 SBC Front View Without Nameplate arT 1 nFL 32 ...

Page 33: ...Surge Ground Stud GEK 100636 Figure 1 8919532 Rear View of Relay Case and Cradle 1 I Function 33 ...

Page 34: ... CONNECTING PLUG TRAVELS 1 4 INCH BEFORE ENGAGING THE MAIN BRUSH ON THE TERMINAL BLOCK Figure 18 8025039 Drawout Case Contact Assembly Figure 17 JG PLUG 8919533 Typical Removed Module MAIN BRUSH CONNECTING BLOCK AUXILIARY BRUSH TERMINAL BLOCK SHORTING BAR 34 ...

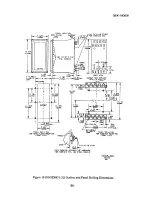
Page 35: ...Figure 19 0145D8851 1 Outline and Panel Drilling Dimensions GEK 1 00636 PANEL DRILLING SEMI FLUSH MOUNTING FRONT VIEW PANEL DRILLING FOR SURFACE MOUNTING FRONT VIEW TYPICAL DIM I NCHLS MM 35 ...

Page 36: ...GEK 100636 BAU 17 sUpP 2 VJ8Z18 10 Figure 20 0286A4840 Power Up Test Figure 21 0286A4853 IT Test UNIT UNDER TEST Sac SURGE GROUND 36 ...

Page 37: ...GEK 1 00636 Figure 23 0286A4854 IT Logic Test 37 Figure 22 0286A4852 BFT l and BFT2 Test UNIT UNDER TEST sac SURGE GROUND ...

Page 38: ...DER TEST BATr 17 SBC CURRENT 12 SOURCE I IT DC CURRENT TARGET 200 mA LIMIJ C CURRENT TARGET 0mAUUIT rri SOURCE BFT2 19 DC CURRENT 20 SOURCE I TARGET 200 mA UMIT J 10 SURGE GROUND I _____ Figure 24 0286A4843 Target Test 38 ...

Page 39: ...GE Power Management 215 Anderson Avenue Markham Ontario Canada L6E 1B3 Tel 905 294 6222 Fax 905 201 2098 wwwgecomIindsysIpm ...

Page 40: ......

Reviews: