


CHAP
. 10
GE Healthcare
Senographe 2000 D Acquisition System
REV 1
OM 5179217–1–100
119
9.
IMAGE ACQUISITION
Note:
When Right/Left image pairs are acquired, it is recommended that, the Right image should
always be acquired before the Left. This ensures consistent display when using the 2 x 1
view; selection of the first image displays the pair with the two chest walls in the center of the
screen.
D
The image acquisition function must be entered from the Worklist function. Select the correct
patient in the Worklist (a new patient can be created if necessary), and click the
Start Exam
button
in the Worklist window, to display the Viewer window and permit exposures.
D
When ready for the exam, check the image information displayed on the Gantry Console. It should
include:
– The Support Arm angle, if other than 0
°
.
– The magnification coefficient (e.g., M 1.5), if magnification is used.
D
Select the breast laterality (right or left), or Cleavage if no laterality. The Console should now show:
– Laterality (R or L).
– View name (e.g., LCC, RML, LLM, etc.).
D
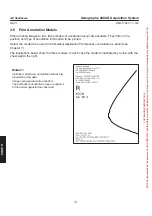
Check the displayed view name. For special views or recumbent patients, modify the view name
manually:
a.
Special Views for standing or sitting patients.
Refer to section 6-3 in Chapter 4; use the
Special
Views Selection
key (key
"
in section 3, Chapter 4) to modify the view name.
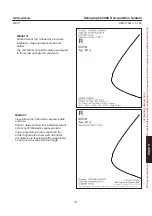
b.
Recumbent patients.
Refer to section 6-4 in Chapter 4; press the control console
SET UP
key
(key
in section 3) and use the
VIEW/RECUMBENT PATIENT
menu to select the
appropriate view name.
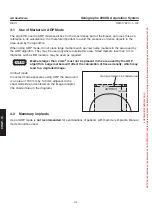
When the patient is positioned for a Cleavage view (CV), external markers must
be used to assist in determining laterality when viewing the image. Place a Right
(R) or Left (L) marker in the lateral aspect of the breast of interest, or place
markers on the lateral side of each breast. Markers must be placed outside of
the 140 mm x 160 mm ROI used by AOP see Chapter 10.
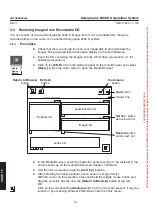
D
To display the acquired images on the AWS in the same order as films hung in the conventional
order on a viewbox, it is suggested that patient images should be acquired in the following order:
RCC
LCC
RMLO
LMLO.
D
When all parameters are correctly chosen and the patient prepared, make the exposure in the
usual way using the Prep and Exposure buttons.
D
After the exposure, the image acquired by the Digital Detector is automatically transferred to the
workstation, added to the exam and displayed on the Viewer screen as a raw image. During the
transfer of the raw image all user interface functions are disabled.
NOTICE
FOR
TRAINING
PURPOSES
ONLY!
NOTE:
Once
downloaded,
this
document
is
UNCONTROLLED,
and
therefore
may
not
be
the
latest
revision.
Always
confirm
revision
status
against
a
validated
source
(ie
CDL).


