background image

GE Multilin

745 Transformer Management Relay

5-49

5 SETPOINTS

5.6 S4 ELEMENTS

5

5.6.5 PHASE OVERCURRENT

a) MAIN MENU

PATH: SETPOINTS 

ÖØ

 S4 ELEMENTS 

ÖØ

 PHASE OC

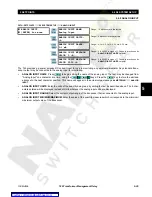
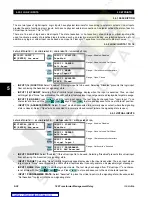
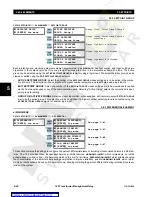
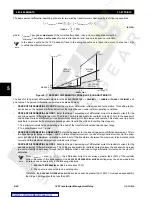
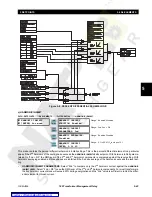
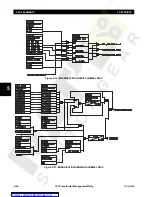
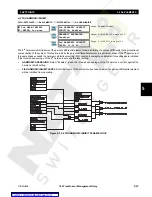
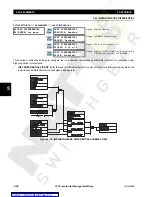
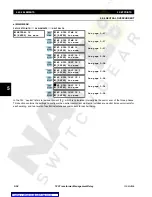
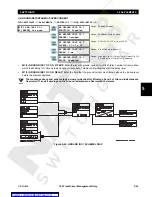
This section contains settings to configure the phase overcurrent elements. Included are phase time overcurrents and two
levels of phase instantaneous overcurrent for each phase of each winding.

b) TIME OVERCURRENT CURVES

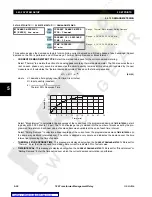
The inverse time overcurrent curves used by the TOC (time overcurrent) elements are the ANSI, IEC, and GE Type IAC
curve shapes. This allows for simplified coordination with downstream devices. If however, none of these curve shapes is
adequate, FlexCurves™ may be used to customize the inverse time curve characteristics. The Definite Time curve is also
an option that may be appropriate if only simple protection is required.

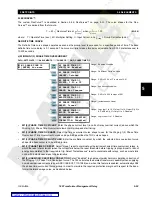
A time dial multiplier setting allows selection of a multiple of the base curve shape (where the time dial multiplier = 1) with
the curve shape (

SHAPE

) setting. Unlike the electromechanical time dial equivalent, operate times are directly proportional

to the time multiplier (

TIME OC MULTIPLIER

) setting value. For example, all times for a multiplier of 10 are 10 times the multi-

plier 1 or base curve values. Setting the multiplier to zero results in an instantaneous response to all current levels above
pickup.

Graphs of standard time-current curves on 11”

×

17” log-log graph paper are available upon request from

the GE Multilin literature department. The original files are also available in PDF format on the UR Software
Installation CD and the GE Multilin Web Page.

„

 PHASE OC

„

 [ENTER] for more

„

 W1 PHASE TIME OC

„

 [ENTER] for more

See page 5–53.

„

 W2 PHASE TIME OC

„

 [ENTER] for more

See page 5–53.

„

 W3 PHASE TIME OC

„

 [ENTER] for more

See page 5–53.

„

 W1 PHASE INST OC 1

„

 [ENTER] for more

See page 5–55.

„

 W2 PHASE INST OC 1

„

 [ENTER] for more

See page 5–55.

„

 W3 PHASE INST OC 1

„

 [ENTER] for more

See page 5–55.

„

 W1 PHASE INST OC 2

„

 [ENTER] for more

See page 5–55.

„

 W2 PHASE INST OC 2

„

 [ENTER] for more

See page 5–55.

„

 W3 PHASE INST OC 2

„

 [ENTER] for more

See page 5–55.

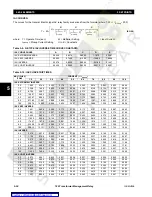
Table 5–4: TIME OVERCURRENT CURVE TYPES

ANSI

IEC

GE TYPE IAC

OTHER

ANSI Extremely Inverse

IEC Curve A (BS142)

IAC Extremely Inverse

FlexCurve™ A

ANSI Very Inverse

IEC Curve B (BS142)

IAC Very Inverse

FlexCurve™ B

ANSI Normally Inverse

IEC Curve C (BS142)

IAC Inverse

FlexCurve™ C

ANSI Moderately Inverse

IEC Short Inverse

IAC Short Inverse

Definite Time

ENTER

ESCAPE

ð

ð

MESSAGE

ESCAPE

MESSAGE

ESCAPE

MESSAGE

ESCAPE

MESSAGE

ESCAPE

MESSAGE

ESCAPE

MESSAGE

ESCAPE

MESSAGE

ESCAPE

MESSAGE

ESCAPE

NOTE

Courtesy of NationalSwitchgear.com

Summary of Contents for TRANSFORMER MANAGEMENT RELAY 745

Page 1: ...CONT EQ E83849 745 Transformer Management Relay 814768AG CDR IN SERVICE LOCAL SETPOINT GROUP 2 LOAD LIMIT REDUCED TRIP SELF TEST ERROR SETPOINT GROUP 3 TRANSFORMER DE ENERGIZED ALARM PICKUP TEST MODE TRANSFORMER OVERLOAD SETPOINT GROUP 1 PHASE A PHASE B PHASE C GROUND MESSAGE PROGRAM PORT SETPOINT 7 8 9 4 5 6 1 2 3 0 HELP MESSAGE VALUE ACTUAL ESCAPE ENTER RESET NEXT DIFFERENTIAL BLOCKED 745 STATUS...

Page 2: ...Courtesy of NationalSwitchgear com ...

Page 3: ...3 2 1 DESCRIPTION 3 4 3 2 2 REAR TERMINAL LAYOUT 3 4 3 2 3 WIRING DIAGRAMS 3 6 3 2 4 PHASE SEQUENCE AND TRANSFORMER POLARITY 3 8 3 2 5 AC CURRENT TRANSFORMER INPUTS 3 8 3 2 6 AC VOLTAGE INPUT 3 9 3 2 7 LOGIC INPUTS 3 9 3 2 8 CONTROL POWER 3 10 3 2 9 ANALOG INPUT 3 10 3 2 10 TAP POSITION INPUT 3 10 3 2 11 RTD DRIVER SENSOR 3 11 3 2 12 OUTPUT RELAYS 3 11 3 2 13 SOLID STATE TRIP OUTPUT 3 11 3 2 14 AN...

Page 4: ...OPTIONS 5 28 5 4 S2 SYSTEM SETUP 5 4 1 DESCRIPTION 5 29 5 4 2 TRANSFORMER 5 29 5 4 3 WINDING 5 31 5 4 4 ONLOAD TAP CHANGER 5 32 5 4 5 HARMONICS 5 32 5 4 6 FLEXCURVES 5 33 5 4 7 VOLTAGE INPUT 5 33 5 4 8 AMBIENT TEMPERATURE 5 34 5 4 9 ANALOG INPUT 5 35 5 4 10 DEMAND METERING 5 36 5 4 11 ANALOG OUTPUTS 5 37 5 5 S3 LOGIC INPUTS 5 5 1 DESCRIPTION 5 38 5 5 2 LOGIC INPUTS 1 TO 16 5 38 5 5 3 VIRTUAL INPUT...

Page 5: ... 3 A2 METERING 6 3 1 CURRENT 6 5 6 3 2 HARMONIC CONTENT 6 8 6 3 3 FREQUENCY 6 10 6 3 4 TAP CHANGER 6 10 6 3 5 VOLTAGE 6 10 6 3 6 DEMAND 6 10 6 3 7 AMBIENT TEMPERATURE 6 11 6 3 8 LOSS OF LIFE 6 12 6 3 9 ANALOG INPUT 6 12 6 3 10 POWER 6 12 6 3 11 ENERGY 6 13 6 4 A3 EVENT RECORDER 6 4 1 EVENT DATA CLEAR 6 14 6 4 2 EVENT RECORDS 6 14 6 5 A4 PRODUCT INFO 6 5 1 TECHNICAL SUPPORT 6 17 6 5 2 REVISION CODE...

Page 6: ... 3 2 OUTPUT RELAYS 8 6 8 4 DISPLAY METERING COMMUNICATIONS AND ANALOG OUTPUTS 8 4 1 DESCRIPTION 8 7 8 4 2 CURRENT INPUTS 8 7 8 4 3 VOLTAGE INPUT 8 8 8 4 4 TRANSFORMER TYPE SELECTION 8 8 8 4 5 AMBIENT TEMPERATURE INPUT 8 9 8 4 6 ANALOG OUTPUTS 8 11 8 4 7 TAP POSITION 8 11 8 5 PROTECTION SCHEMES 8 5 1 PRECAUTIONS 8 12 8 5 2 HARMONIC RESTRAINED PERCENT DIFFERENTIAL 8 12 8 5 3 INSTANTANEOUS DIFFERENTI...

Page 7: ...ement Relay vii TABLE OF CONTENTS 8 7 PLACING THE RELAY INTO SERVICE 8 7 1 PROCEDURE 8 38 A APPENDIX A 1 EU DECLARATION A 1 1 DECLARATION OF CONFORMITY A 1 A 2 WARRANTY A 2 1 GE MULTILIN WARRANTY A 2 Courtesy of NationalSwitchgear com ...

Page 8: ...viii 745 Transformer Management Relay GE Multilin TABLE OF CONTENTS Courtesy of NationalSwitchgear com ...

Page 9: ...ction which monitors the on load tap position and automatically corrects for CT ratio mismatch FlexLogic which allows PLC style equations based on logic inputs and protection elements to be assigned to any of the 745 outputs The 745 also includes a powerful testing and simulation feature This allows the protection engineer the ability to test the relay operation based on captured or computer gener...

Page 10: ...taneous Overcurrent 2 250N1 Neutral 3I0 Instantaneous Overcurrent 1 350N1 Neutral 3I0 Instantaneous Overcurrent 1 250N2 Neutral 3I0 Instantaneous Overcurrent 2 350N2 Neutral 3I0 Instantaneous Overcurrent 2 250G1 Ground Instantaneous Overcurrent 1 351P Phase Time Overcurrent 250G2 Ground Instantaneous Overcurrent 2 351N Neutral 3I0 Time Overcurrent 251P Phase Time Overcurrent 351G Ground Time Overc...

Page 11: ...115 Winding 1 1 A Winding 2 1 A Winding 3 5 A P151 Winding 1 1 A Winding 2 5 A Winding 3 1 A P155 Winding 1 1 A Winding 2 5 A Winding 3 5 A P511 Winding 1 5 A Winding 2 1 A Winding 3 1 A P515 Winding 1 5 A Winding 2 1 A Winding 3 5 A P551 Winding 1 5 A Winding 2 5 A Winding 3 1 A GROUND CURRENTINPUT RATINGS G1 Winding 1 2 1 A Winding 2 3 1 A G5 Winding 1 2 5 A Winding 2 3 5 A G15 Winding 1 2 1 A W...

Page 12: ...elay Input 1 A or 5 A specified when ordering Burden Less than 0 2 VA at rated load Conversion Range 0 02 to 46 CT Accuracy at 4 CT 0 25 of 4 CT 0 01 CT at 4 CT 0 5 of 46 CT 0 2 CT Overload Withstand 1 second at 80 times rated current 2 seconds at 40 times rated current continuous at 3 times rated current VOLTAGE INPUTS Source VT 2 to 600 kV 60 to 120 V Source VT Ratio 1 to 5000 in steps of 1 Rela...

Page 13: ...ver is greater at 1 03 pickup PHASE NEUTRAL GROUND NEGATIVE SEQUENCE INSTANTANEOUS OVERCURRENT Pickup Level 0 05 to 20 00 CT in steps of 0 01 Dropout Level 97 to 98 of Pickup Time Delay 0 to 60000 ms in steps of 1 Level Accuracy Per current input Solid State Output Operate Time at 1 2 pickup 22 to 30 ms at 2 0 pickup 18 to 26 ms at 4 0 pickup 11 to 19 ms Relay Outputs 2 to 5 Operate Time at 1 2 pi...

Page 14: ... Time Delay 0 00 to 600 00 s in steps of 0 01 Reset Delay 0 0 to 6000 0 s in steps of 0 1 Signal Source Voltage Range 10 to 65 Hz Level Accuracy 0 02 V Hz Solid State Output Operate Time at 1 10 pickup 165 to 195 ms Relay Outputs 2 to 5 Operate Time at 1 10 pickup 170 to 200 ms delay set at 0 0 s OVEREXCITATION ON 5th HARMONIC LEVEL Operating Current Pkp 0 03 to 1 00 CT in steps of 0 01 Pickup Lev...

Page 15: ... CASE Drawout Fully drawout unit automatic CT shorts Seal Seal provision Door Dust tight door Panel Panel or 19 rack mount Weight case and relay 18 lbs 6 oz IP class X0 PRODUCTION TESTS Thermal Operational test at ambient then increas ing to 60 C Dielectric Strength Per IEC 255 5 and ANSI IEEE C37 90 On CT inputs VT inputs Control Power inputs Switch inputs and Relay outputs 2 kV for 1 second RELA...

Page 16: ...1000 4 8 Damp Heat Cyclic Humidity per IEC 68 2 30 6 days Temperature Cycle 40 C 60 C Mechanical Stress 2 g Make and Carry Rating 30 A Current Withstand per ANSI IEEE C37 90 40 rated A for 2 seconds 80 rated A for 1 second RFI Radiated Immunity per IEC 255 22 3 160 MHz 460 MHz per EN 61000 4 3 10 V m RFI Conducted Immunity per EN 61000 4 6 10 V RFI Conducted Radiated Emission per EN 55011 CISPR 11...

Page 17: ...peatedly press the key to display the 3rd 4th 5th and 6th page headers and then back to the first setpoints page header As you have discovered there are 6 setpoint pages in all numbered from S1 the S prefix indicating that it is a setpoint page to S6 5 From the page one header of setpoints press the key once to display the first sub header Setpoints under this sub header are related to passcode se...

Page 18: ...several different classes of setpoints distinguished by the way their values are displayed and edited This sec tion describes how to edit the values used by all setpoint classes Hardware and passcode security features are designed to provide protection against unauthorized setpoint changes Since we will be programming new setpoints using the front panel keys a hardware jumper must be installed acr...

Page 19: ...ry This flash message momentarily appears to confirmation the storing process If 69 28 were entered the value is automati cally rounded to 69 3 since the step value for this setpoint is 0 1 c ENUMERATION SETPOINTS Enumeration setpoints have data values which are part of a set whose members are explicitly defined by a name A set is comprised of two or more members 1 Move to message S2 SYSTEM SETUP ...

Page 20: ...generic text assigned to it For this example let us rename output relay as INST DIFF TRIP Press the key and a solid cursor will appear in the first character position 2 Press or key until the character I is displayed in the first position then press to store the character and advance the cursor Change the second character to a N using the or keys and save this change by pressing again Continue edi...

Page 21: ...scode security is disabled SETPOINT ACCESS Read Write Each relay is shipped from the factory with setpoint access allowed The pass code is also defaulted to 0 which disables the passcode security feature entirely 2 Press the key once 3 Press the or key once 4 Press the key to begin the procedure of changing the passcode The displayed message will change as shown The current passcode is 0 so press ...

Page 22: ... Enter the current passcode and press the key This flash message indicates that the keyed in value was accepted and that passcode security is now disabled 4 This message will appear after a few seconds Now that setpoint access is enabled the ALLOW ACCESS TO SETPOINTS message has been replaced by the RESTRICT ACCESS TO SETPOINTS message The relay s setpoints can now be altered and stored If no fron...

Page 23: ...itted with mechanisms such as automatic CT shorting to allow the safe removal of the relay from an energized panel There are no electronic components in the case Figure 3 1 CASE DIMENSIONS 3 1 2 PANEL CUTOUT A 745 can be mounted alone or adjacent to another SR series unit on a standard 19 rack panel Panel cutout dimensions for both conditions are as shown When planning the location of your panel c...

Page 24: ... mounted so that its relay can be inserted The SR unit is now ready for panel wiring Figure 3 3 CASE MOUNTING 3 1 4 UNIT WITHDRAWAL AND INSERTION Turn off Control Power before drawing out or re inserting the relay to prevent maloperation a RELAY WITHDRAWAL 1 Open the door by pulling from the center of its right side It will rotate to the left about its hinges 2 Press upward on the locking latch wh...

Page 25: ...slide both rolling guide pins into the case guide slots Each rolling guide pin is found near the hinges of the relay s handle 2 Once fully inserted grasp the handle from its center and rotate it down from the raised position towards the bottom of the relay 3 As the handle is fully inserted the latch will be heard to click locking the handle in the final position The unit is mechanically held in th...

Page 26: ... broad range of applications As such it is not possible to present connections for all possible schemes The information in this section covers the important aspects of interconnec tions in the general areas of instrument transformer inputs other inputs outputs communications and grounding 3 2 2 REAR TERMINAL LAYOUT Figure 3 6 REAR TERMINAL LAYOUT Courtesy of NationalSwitchgear com ...

Page 27: ...AL RS485 F7 OUTPUT 7 AUXILIARY RELAY N O B8 IRIG B F8 OUTPUT 7 AUXILIARY RELAY N C B9 IRIG B F9 OUTPUT 8 AUXILIARY RELAY Common B10 RTD 1 HOT F10 OUTPUT 9 SERVICE RELAY N O B11 RTD 1 COMPENSATION F11 OUTPUT 9 SERVICE RELAY N C B12 RTD 1 RETURN F12 GROUND WINDING 2 3 CT LOGIC INPUTS 9 to 16 and VT INPUT CT INPUTS and 745 GROUNDING C1 LOGIC INPUT 9 G1 PHASE A WINDING 1 CT C2 LOGIC INPUT 10 G2 PHASE ...

Page 28: ...epending on which winding the voltage transformer is on the power flows and VARs displayed may be opposite in direction to the actual system flow e g in the case of a generator step up transformer depending on the relay winding assignments and which side of the transformer the VT is connected to the power may be negative when the generator is producing positive MWatts This can be corrected by reve...

Page 29: ...GE Multilin 745 Transformer Management Relay 3 7 3 INSTALLATION 3 2 TYPICAL WIRING 3 Figure 3 8 TYPICAL WIRING FOR THREE WINDING TRANSFORMER MULTILIN Courtesy of NationalSwitchgear com ...

Page 30: ...ound input is associated with the first Wye or Zig Zag type winding from a two winding transformer it is never associated with Winding 3 from a three winding transformer setup 3 The G2 3 ground input is associated with the second Wye or Zig Zag type winding from two or three winding setup it is never associated with Winding 1 The G2 3 ground input is associated with Winding 3 only if Winding 3 is ...

Page 31: ...ntact types A dry contact has one side connected to Terminal D11 This is the 32 V DC voltage rail The other side is connected to the required logic input terminal When a dry contact closes a 2 2 mA current flows through the associated circuit A wet contact has one side connected to the positive terminal of an external DC power supply The other side is connected to the required logic input terminal...

Page 32: ...uts This current signal can represent any external quantity such as temperature current or voltage Be sure to observe polarity markings for correct operation Both terminals are clamped to within 36 volts of ground with surge protection As such common mode voltages should not exceed this limit Shielded wire with only one end of the shield grounded is recommended to minimize noise effects The A2 ter...

Page 33: ... of the Self Test relay is fixed while the other relays can be programmed by the user via the FlexLogic feature 3 2 13 SOLID STATE TRIP OUTPUT A high speed solid state SCR output is also provided This output is intended for applications where it is necessary to key a communications channel 3 2 14 ANALOG OUTPUTS The 745 provides 7 analog output channels whose full scale range can be set to one of t...

Page 34: ...ed pair wire is recommended Correct polarity should also be observed For instance the relays must be connected with all B1 terminals labeled COM1 RS485 connected together and all B2 terminals labeled COM1 RS485 connected together Terminal B3 labeled COM1 RS485 COM should be connected to the common wire inside the shield To avoid loop currents the shield should be grounded at one point only Each re...

Page 35: ...n RS232C serial port is located on the front panel for programming through a PC This port uses the same Modbus protocol as the two rear ports The 745PC software required to use this interface is included with the relay Cabling for the RS232 port is shown below for both 9 pin and 25 pin connectors Figure 3 15 RS232 WIRING Courtesy of NationalSwitchgear com ...

Page 36: ...16 IRIG B FUNCTION 3 2 18 DIELECTRIC STRENGTH TESTING Dielectric strength test was performed on the 745 relay at the manufacturer It is not necessary to perform this test again at the customer site However if you wish to perform this test follow instructions outlined in Section 8 2 2 Dielectric Strength Testing on page 8 5 No special ventilation requirements need to be observed during the installa...

Page 37: ...viding system information These messages appear after a time of inactivity that is pro grammable by the user Pressing any key after default messages have appeared will return the display to the last message displayed before the default messages appeared Trip and alarm condition messages automatically override default mes sages All display pixels are illuminated briefly during power up self testing...

Page 38: ... ERROR The Self Test Error LED is on when any of the self diagnostic tests performed either at power on or in the background during normal operation has detected a problem with the relay TEST MODE The Test Mode LED indicator is on when any of the 745 testing features has been enabled The indicator is on if any of the following conditions are met S6 TESTING Ö OUTPUT RELAYS Ö FORCE OUTPUT RELAYS FUN...

Page 39: ...picked up With this indicator on the front panel display is sequentially displaying information about each element that has picked up PHASE A B OR C The Phase A C LED is on when Phase A C is involved in the condition detected by any ele ment that has picked up operated or is now in a latched state waiting to be reset GROUND The Ground LED is on when ground is involved in the condition detected by ...

Page 40: ...r multiple choice selections pressing or displays the next choice For numeric setpoints pressing increases the value by its step increment When the maximum value is reached setpoint selection continues from the minimum value Each time is pressed the value decreases by its step increment When the minimum value is reached setpoint selection continues from the maximum value Press and hold the value k...

Page 41: ...t a 745 relay to create or edit 745 setpoint files 4 2 2 REQUIREMENTS The configuration listed is for both a minimum configured and an optimal configured system Running on a minimum config uration causes the performance of the PC software to slow down Processor minimum 486 Pentium or higher recommended Memory minimum 4 MB 16 MB recommended minimum 540K of conventional memory Hard Drive 20 MB free ...

Page 42: ... 24 AWG cable from converter box to the 745 rear terminals The converter box GND terminals end up connected to B1 B2 B3 respectively The line should also be terminated in an R C network i e 120 ohm 1 nF as described in Section 3 2 15 RS485 RS422 Communications on page 3 12 Create a new setpoint file with factory defaults Open an existing file Save setpoints to a file Send a setpoint file to the re...

Page 43: ...ATUS OK MODE NORMAL COMMUNICAL ON COMPUTER RS232 CONNECTOR TO COMPUTER COM PORT TYPICALLY COM1 OR COM2 814797A3 CDR SR745 RELAY SETUP PROGRAM File Setpoints Actual Diagnosis Comms Help MOTOR RUNNING STATUS OK MODE NORMAL COMMUNICAL ON GND RS485 RS232 POWER 745 rear terminal block AB GE Power Management RS232 to RS485 Converter COMPUTER POWER SUPPLY MODULE TO WALL PLUG RS232 CONNECTOR TO COMPUTER C...

Page 44: ...REEN 3 Click the Index by Product Name item from the main page and select 745 Transformer Management Relay from the product list to open the 745 product page 4 Click the Software item from the Product Resources list to bring you to the 745 software page 5 The latest version of the 745PC software will be shown Click on the 745PC Program item to download the installation program to your local PC Run...

Page 45: ...erence In Communicate with Relay mode 745PC will attempt to establish communications immediately upon startup While in the File mode w default settings 745PC waits for the user to click the ON button before attempting communications this mode is preferred when the 745PC is being used without an attached 745 relay Startup Mode Set to match the type of RS232 RS485 converter If connected through the ...

Page 46: ... options when creating a setpoint file so that setpoints that are not available for that particular relay are not downloaded Figure 4 8 FILE PROPERTIES WINDOW 2 Select the installed options from the drop down menus After configuration select the File Save As menu item This launches the following dialog box Enter the file name under which the file will be saved in the File Name box or click on any ...

Page 47: ...file names appears in the file list box File names for released 745 firmware have the following format Figure 4 10 FIRMWARE FILE FORMAT 4 The 745PC software automatically lists file names beginning with 33 Click on the appropriate file name such that it appears in the File Name box Click OK to continue 5 745PC will provide one final chance to cancel the firmware upgrade before the flash memory is ...

Page 48: ...S FILE WINDOW 3 Select the File Send Info to Relay menu item 745PC will prompt to confirm or cancel the setpoint file load Click Yes to download the setpoints to the 745 relay or No to cancel d ENTERING SETPOINTS The following example illustrates the entering of setpoints from the 745PC software 1 Select the Setpoint System Setup menu item 2 Click the Transformer button in the System Setup window ...

Page 49: ...point box will causes selection menu to be displayed 6 Checked boxes indicate that the user has visited the setpoint during this session Enter the new value by clicking on the numerical keys Click to exit the keypad and keep the new value Accept Click to exit the keypad and keep the old value Cancel Select a Transformer Type from the drop down menu Click OK to save the values into PC memory Click ...

Page 50: ...xample the winding currents are examined 1 Select the Actual Metering Currents menu item 2 745PC displays the following dialog box detailing the winding currents To view any of the currents available click on the desired tab shown at the top of the box For example to view the positive negative and zero sequence currents in any of the windings click on the Sequence tab Figure 4 14 ACTUAL VALUES WIN...

Page 51: ...CK ENTER for more See page 5 26 DEFAULT MESSAGES ENTER for more See page 5 27 SCRATCHPAD ENTER for more See page 5 27 INSTALLATION ENTER for more See page 5 28 UPGRADE OPTIONS ENTER for more See page 5 28 SETPOINTS S2 SYSTEM SETUP TRANSFORMER ENTER for more See page 5 29 WINDING 1 ENTER for more See page 5 31 WINDING 2 ENTER for more See page 5 31 WINDING 3 ENTER for more See page 5 31 ONLOAD TAP ...

Page 52: ...ee page 5 49 NEUTRAL OC ENTER for more See page 5 56 GROUND OC ENTER for more See page 5 59 RESTRICTED GROUND ENTER for more See page 5 62 NEG SEQ OC ENTER for more See page 5 65 FREQUENCY ENTER for more See page 5 68 OVEREXCITATION ENTER for more See page 5 73 HARMONICS ENTER for more See page 5 77 INSULATION AGING ENTER for more See page 5 80 ANALOG INPUT ENTER for more See page 5 84 MESSAGE ESC...

Page 53: ...ge 5 92 VIRTUAL OUTPUTS ENTER for more See page 5 93 TIMERS ENTER for more See page 5 93 SETPOINTS S6 TESTING OUTPUT RELAYS ENTER for more See page 5 94 ANALOG OUTPUTS ENTER for more See page 5 94 SIMULATION ENTER for more See page 5 95 FACTORY SERVICE ENTER for more See page 5 98 MESSAGE ESCAPE MESSAGE ESCAPE MESSAGE ESCAPE MESSAGE ESCAPE ENTER ESCAPE ð ð MESSAGE ESCAPE MESSAGE ESCAPE MESSAGE ESC...

Page 54: ...y The SETPOINTS HAVE NOT BEEN PROGRAMMED diagnostic message appears until the 745 is put in the programmed state Messages may vary somewhat from those illustrated because of installed options Also some messages associated with disabled features or optional features which have not been ordered are hidden These messages are shown with a shaded message box KEYPAD ENTRY See Section 2 1 Using the Front...

Page 55: ...tages of forced air The following sections will illustrate auto configuration principles using this example 5 2 2 DYNAMIC CT RATIO MISMATCH CORRECTION a USE OF STANDARD CT RATIOS Standard CT ratios CT2 CT1 V1 V2 Tapped relay windings interposing CTs inaccurate expensive Solution WxNom Voltage Wx rated Load Wx CT primary setpoints Automatic correction for mismatch CT2 V2 CT1 V1 16 Even ignoring the...

Page 56: ... of the transformer tank The motor drive is placed in a protective housing containing all devices necessary for operation including a tap position indication circuit This indication circuit has a terminal for each tap with a fixed resistive increment per tap A cam from the drive shaft that provides local tap position indication also controls a wiper terminal in the indication circuit as illustrate...

Page 57: ...standard specifically states that the phase rela tionships are established for a condition where a source phase sequence of I II III is connected to transformer windings labeled I II and III respectively The source phase sequence must be stated when describing the winding phase relationships since these relationships change when the phase sequence changes The example below shows why this happens u...

Page 58: ...fore not recom mended All information presented in this manual is based on connecting the relay phase A B and C terminals to the power system phases A B and C respectively The transformer types and phase relationships presented are for a system phase sequence of ABC in accordance with the standards for power transformers Users with a system phase sequence of ACB must determine the transformer type...

Page 59: ... Traditionally this problem is solved by inserting a zero sequence current trap in the CT circuitry The 745 automatically removes zero sequence current from all Delta winding currents when calculating differential current Where there is no source of zero sequence current e g Delta windings not having a grounding bank the 745 effectively removes nothing 3 Autotransformers have an internal tertiary ...

Page 60: ...1 2 30 lag 2 DELTA 30 lag 0 Y d150 1 WYE gnd 1 2 150 lag 2 DELTA 150 lag 0 Y d210 1 WYE gnd 1 2 210 lag 2 DELTA 210 lag 0 Y d330 1 WYE gnd 1 2 330 lag 2 DELTA 330 lag 0 D d0 1 DELTA 0 2 DELTA 0 0 D d60 1 DELTA 60 lag 2 DELTA 60 lag 0 D d120 1 DELTA 120 lag 2 DELTA 120 lag 0 D d180 1 DELTA 180 lag 2 DELTA 180 lag 0 D d240 1 DELTA 240 lag 2 DELTA 240 lag 0 D d300 1 DELTA 300 lag 2 DELTA 300 lag 0 D ...

Page 61: ...2 ZIG ZAG gnd 2 3 330 lag 0 Table 5 1 TRANSFORMER TYPES SHEET 3 OF 24 TRANSFORMER TYPE WDG CONNECTION VOLTAGE PHASORS PHASE SHIFT D z0 1 DELTA 0 2 ZIG ZAG gnd 1 2 0 lag 0 D z60 1 DELTA 60 lag 2 ZIG ZAG gnd 1 2 60 lag 0 D z120 1 DELTA 120 lag 2 ZIG ZAG gnd 1 2 120 lag 0 D z180 1 DELTA 180 lag 2 ZIG ZAG gnd 1 2 180 lag 0 D z240 1 DELTA 240 lag 2 ZIG ZAG gnd 1 2 240 lag 0 D z300 1 DELTA 300 lag 2 ZIG...

Page 62: ...30 lag 0 Table 5 1 TRANSFORMER TYPES SHEET 5 OF 24 TRANSFORMER TYPE WDG CONNECTION VOLTAGE PHASORS PHASE SHIFT Y y180 d30 1 WYE gnd 1 2 30 lag 2 WYE gnd 2 3 180 lag 210 lag 3 DELTA 30 lag 0 Y y180 d150 1 WYE gnd 1 2 150 lag 2 WYE gnd 2 3 180 lag 330 lag 3 DELTA 150 lag 0 Y y180 d210 1 WYE gnd 1 2 210 lag 2 WYE gnd 2 3 180 lag 30 lag 3 DELTA 210 lag 0 Y y180 d330 1 WYE gnd 1 2 330 lag 2 WYE gnd 2 3...

Page 63: ...A 150 lag 240 lag Table 5 1 TRANSFORMER TYPES SHEET 7 OF 24 TRANSFORMER TYPE WDG CONNECTION VOLTAGE PHASORS PHASE SHIFT Y d30 d210 1 WYE gnd 1 2 30 lag 2 DELTA 30 lag 0 3 DELTA 210 lag 180 lag Y d30 d330 1 WYE gnd 1 2 30 lag 2 DELTA 30 lag 0 3 DELTA 330 lag 60 lag Y d150 y0 1 WYE gnd 1 2 150 lag 2 DELTA 150 lag 0 3 WYE gnd 2 3 0 150 lag Y d150 y180 1 WYE gnd 1 2 150 lag 2 DELTA 150 lag 0 3 WYE gnd...

Page 64: ...ELTA 330 lag 180 lag Table 5 1 TRANSFORMER TYPES SHEET 9 OF 24 TRANSFORMER TYPE WDG CONNECTION VOLTAGE PHASORS PHASE SHIFT Y d210 y0 1 WYE gnd 1 2 210 lag 2 DELTA 210 lag 0 3 WYE gnd 2 3 0 210 lag Y d210 y180 1 WYE gnd 1 2 210 lag 2 DELTA 210 lag 0 3 WYE gnd 2 3 180 lag 30 lag Y d210 d30 1 WYE gnd 1 2 210 lag 2 DELTA 210 lag 0 3 DELTA 30 lag 180 lag Y d210 d150 1 WYE gnd 1 2 210 lag 2 DELTA 210 la...

Page 65: ...YE gnd 2 3 180 lag 150 lag Table 5 1 TRANSFORMER TYPES SHEET 11 OF 24 TRANSFORMER TYPE WDG CONNECTION VOLTAGE PHASORS PHASE SHIFT Y d330 d30 1 WYE gnd 1 2 330 lag 2 DELTA 330 lag 0 3 DELTA 30 lag 300 lag Y d330 d150 1 WYE gnd 1 2 330 lag 2 DELTA 330 lag 0 3 DELTA 150 lag 180 lag Y d330 d210 1 WYE gnd 1 2 330 lag 2 DELTA 330 lag 0 3 DELTA 210 lag 120 lag Y d330 d330 1 WYE gnd 1 2 330 lag 2 DELTA 33...

Page 66: ...LTA 240 lag 0 Table 5 1 TRANSFORMER TYPES SHEET 13 OF 24 TRANSFORMER TYPE WDG CONNECTION VOLTAGE PHASORS PHASE SHIFT D d0 d300 1 DELTA 300 lag 2 DELTA 0 300 lag 3 DELTA 300 lag 0 D d0 y30 1 DELTA 0 2 DELTA 0 0 3 WYE gnd 2 3 30 lag 330 lag D d0 y150 1 DELTA 0 2 DELTA 0 0 3 WYE gnd 2 3 150 lag 210 lag D d0 y210 1 DELTA 0 2 DELTA 0 0 3 WYE gnd 2 3 210 lag 150 lag D d0 y330 1 DELTA 0 2 DELTA 0 0 3 WYE...

Page 67: ...210 lag 150 lag Table 5 1 TRANSFORMER TYPES SHEET 15 OF 24 TRANSFORMER TYPE WDG CONNECTION VOLTAGE PHASORS PHASE SHIFT D d120 d0 1 DELTA 120 lag 2 DELTA 120 lag 0 3 DELTA 0 120 lag D d120 d120 1 DELTA 120 lag 2 DELTA 120 lag 0 3 DELTA 120 lag 0 D d120 d180 1 DELTA 120 lag 2 DELTA 120 lag 0 3 DELTA 180 lag 300 lag D d120 y150 1 DELTA 0 2 DELTA 120 lag 240 lag 3 WYE gnd 2 3 150 lag 210 lag D d120 y3...

Page 68: ...YE gnd 2 3 150 lag 210 lag Table 5 1 TRANSFORMER TYPES SHEET 17 OF 24 TRANSFORMER TYPE WDG CONNECTION VOLTAGE PHASORS PHASE SHIFT D d180 y330 1 DELTA 0 2 DELTA 180 lag 180 lag 3 WYE gnd 2 3 330 lag 30 lag D d240 d0 1 DELTA 240 lag 2 DELTA 240 lag 0 3 DELTA 0 240 lag D d240 d60 1 DELTA 240 lag 2 DELTA 240 lag 0 3 DELTA 60 lag 180 lag D d240 d240 1 DELTA 240 lag 2 DELTA 240 lag 0 3 DELTA 240 lag 0 D...

Page 69: ...2 WYE gnd 1 2 30 lag 330 lag 3 DELTA 240 lag 120 lag Table 5 1 TRANSFORMER TYPES SHEET 19 OF 24 TRANSFORMER TYPE WDG CONNECTION VOLTAGE PHASORS PHASE SHIFT D y30 y30 1 DELTA 0 2 WYE gnd 1 2 30 lag 330 lag 3 WYE gnd 2 3 30 lag 330 lag D y30 y210 1 DELTA 0 2 WYE gnd 1 2 30 lag 330 lag 3 WYE gnd 2 3 210 lag 150 lag D y150 d0 1 DELTA 0 2 WYE gnd 1 2 150 lag 210 lag 3 DELTA 0 0 D y150 d120 1 DELTA 0 2 ...

Page 70: ...5 1 TRANSFORMER TYPES SHEET 21 OF 24 TRANSFORMER TYPE WDG CONNECTION VOLTAGE PHASORS PHASE SHIFT D y210 d0 1 DELTA 0 2 WYE gnd 1 2 210 lag 150 lag 3 DELTA 0 0 D y210 d60 1 DELTA 0 2 WYE gnd 1 2 210 lag 150 lag 3 DELTA 60 lag 300 lag D y210 d240 1 DELTA 0 2 WYE gnd 1 2 210 lag 150 lag 3 DELTA 240 lag 120 lag D y210 y30 1 DELTA 0 2 WYE gnd 1 2 210 lag 150 lag 3 WYE gnd 2 3 30 lag 330 lag D y210 y210...

Page 71: ... DELTA 300 lag 60 lag D y330 y150 1 DELTA 0 2 WYE gnd 1 2 330 lag 30 lag 3 WYE gnd 2 3 150 lag 210 lag Table 5 1 TRANSFORMER TYPES SHEET 23 OF 24 TRANSFORMER TYPE WDG CONNECTION VOLTAGE PHASORS PHASE SHIFT D y330 y330 1 DELTA 0 2 WYE gnd 1 2 330 lag 30 lag 3 WYE gnd 2 3 330 lag 30 lag Y z30 z30 1 WYE 30 lag 2 ZIG ZAG gnd 1 2 30 lag 0 3 ZIG ZAG gnd 2 3 30 lag 0 Y y0 y0 1 WYE 0 2 WYE gnd 1 2 0 0 3 W...

Page 72: ... of ACB interchange all B b and C c designations Table 5 2 PHASE SHIFTS PHASE SHIFT INPUT PHASORS OUTPUT PHASORS PHASOR TRANSFORMATION PHASE SHIFT INPUT PHASORS OUTPUT PHASORS PHASOR TRANSFORMATION 0 a A b B c C 180 lag a A b B c C 30 lag a A C b B A c C B 210 lag a C A b A B c B C 60 lag a C b A c B 240 lag a C b A c B 90 lag a B C b C A c A B 270 lag a C B b A C c B A 120 lag a B b C c A 300 lag...

Page 73: ... generated when the passcode is entered incorrectly three times in a row CHANGE PASSCODE Select Yes and follow directions to change the current passcode Changing the passcode to the factory default of 0 disables the passcode security feature ENCRYPTED PASSCODE If the programmed passcode is unknown consult the factory service department with the encrypted passcode The passcode can be determined usi...

Page 74: ...n necting them must run at the same baud rate The fastest response is obtained at 19200 baud COM1 COM2 PARITY The data frame is fixed at 1 start 8 data and 1 stop bit If required a parity bit is programma ble This setpoint cannot be changed via the communication ports The parity of the transmitted signal must match the parity displayed in this setpoint COM1 HARDWARE If the two wire RS485 hardware ...

Page 75: ...elect operate arm timer WRITE TIME INTERVAL Select the time that must elapse before the 745 will set the need time internal indication IIN After the time is written by a DNP master the IIN will be set again after this time elapses A value of zero disables this feature COLD RESTART INHIBIT When disabled a cold restart request from a DNP master will cause the 745 to be reset Enabling this setpoint w...

Page 76: ...r relays The clock performs time and date stamping for various relay features such as event and last trip data recording Without an IRIG B signal the current time and date must be entered in a new relay for any time and date dis played If not entered all message references to time or date will display Unavailable With an IRIG B signal only the cur rent year needs to be entered DATE Enter the curre...

Page 77: ... list Default messages are removed from the default message list as follows 1 Allow access to setpoints by installing the setpoint access jumper and entering the correct passcode 2 Select the message under the section S1 745 SETUP ÖØ DEFAULT MESSAGES to remove from the default message list 3 Press the decimal key followed by The screen displays PRESS ENTER TO REMOVE MESSAGE Press while this messag...

Page 78: ... Of Life option is to be added then the ENABLE ANALOG I O setpoint and the ENABLE LOSS OF LIFE setpoint must be set to Yes The ENABLE RESTRICTED GROUND FAULT setpoint must be set to No ENABLE ANALOG I O Select Yes if the upgrade options set supports the Analog I O feature otherwise select No The default value for this setpoint reflects the current state of the option ENABLE LOSS OF LIFE Select Yes...

Page 79: ...cking PHASE SEQUENCE Enter the phase sequence of the power system Systems with an ACB phase sequence require special considerations See Section 5 2 3 Phase Shifts on Three Phase Transformers on page 5 7 for details TRANSFORMER ENTER for more NOMINAL FREQUENCY 60 Hz Range 50 Hz 60 Hz FREQUENCY TRACKING Enabled Range Enabled Disabled PHASE SEQUENCE ABC Range ABC ACB TRANSFORMER TYPE Y d30 Range Refe...

Page 80: ...s selection affects the ranges of WINDING 1 3 NOM Ø Ø VOLTAGE WINDING 1 3 RATED LOAD MINIMUM TAP POSITION VOLTAGE and VOLTAGE INCREMENT PER TAP as shown in the table above RATED WINDING TEMP RISE Determines the type of insulation for use in the computation of Insulation Aging NO LOAD LOSS From the transformer data It is required for Insulation Aging calculations This is an auto ranging setpoint de...

Page 81: ... 1 3 neutral to ground path The CT secondary current rating must match the relay ground cur rent input rating indicated This message will only appear if the transformer type setpoint shows that Winding 1 3 is a wye connected winding WINDING 1 3 SERIES 3 Φ RESISTANCE Enter the series three phase resistance of the winding that is the sum of the resistance of each of the three phases for the winding ...

Page 82: ...idual harmonics in each of the phase current inputs up to the 21st harmonic With this informa tion it calculates an estimate of the effect of non sinusoidal load currents on the transformer rated full load current These calculations are based on ANSI IEEE Standard C57 110 1986 and require information that is often only available from the transformer manufacturer s test report including the three p...

Page 83: ... for the various pickup levels as indicated above 5 4 7 VOLTAGE INPUT PATH SETPOINTS ÖØ S2 SYSTEM SETUP ÖØ VOLTAGE INPUT The 745 provides a voltage input for the purposes of energization detection for the Energization Inhibit feature of the per cent differential element overexcitation protection the Volts per Hertz 1 and 2 functions and frequency protection the Underfrequency Frequency Decay and O...

Page 84: ... seen if AMBIENT RTD TYPE is By Monthly Average AVERAGE AMBIENT TEMP FOR DECEMBER 20 C Range 50 to 125 C in steps of 1 Only seen if AMBIENT RTD TYPE is By Monthly Average Table 5 3 RTD RESISTANCE VS TEMPERATURE TEMP 100 Ω PLATINUM 120 Ω NICKEL 100 Ω NICKEL TEMP 100 Ω PLATINUM 120 Ω NICKEL 100 Ω NICKEL 50 C 80 31 86 17 74 25 110 C 142 29 209 85 168 79 40 C 84 27 92 76 79 13 120 C 146 06 219 29 175 ...

Page 85: ...ove The 6 char acters entered will be displayed instead of Units wherever the analog input units are displayed ANALOG INPUT RANGE Select the current output range of the transducer that is connected to the analog input ANALOG INPUT MINIMUM MAXIMUM Enter the value of the quantity measured which corresponds to the minimum maximum output value of the transducer ANALOG INPUT ENTER for more ANALOG INPUT...

Page 86: ... per day is divided into the number of blocks as set by the pro grammed time interval Each new value of demand becomes available at the end of each time interval Select Rolling Demand to calculate a linear average of the current over the programmed demand TIME INTERVAL in the same way as Block Interval above The value is updated every minute and indicates the demand over the time interval just pre...

Page 87: ...A 4 20 mA 0 20 mA 0 10 mA ANALOG OUTPUT 1 MIN 0 A Range matches the range of the selected measured parameter ANALOG OUTPUT 1 MAX 1000 A Range matches the range of the associated actual value PARAMETER DESCRIPTION W1 3 ΦA B C CURRENT Select to monitor the RMS value at fundamental frequency of the Winding 1 3 Phase A C current input W1 3 LOADING Select to monitor the Winding 1 3 load as a percentage...

Page 88: ...ormally open contact where the signaling state is closed Select Open when connected to a normally closed contact where the signaling state is open 5 5 3 VIRTUAL INPUTS PATH SETPOINTS ÖØ S3 LOGIC INPUTS ÖØ VIRTUAL INPUTS Ö VIRTUAL INPUT 1 16 INPUT 1 FUNCTION Select Enabled if this virtual input is to be used Selecting Disabled prevents this virtual input from achieving the Asserted or signaling sta...

Page 89: ...sociated delay setpoint is shown directly above and the schematic sym bol indicates that tPKP DELAY LED INDICATORS Shown as the following schematic symbol The exact wording of the front panel label identifies the indicator LOGIC Described using basic AND gates and OR gates NAME OF ELEMENT FUNCTION Enabled Range Disabled Enabled Select Enabled to enable the element For critical protection elements ...

Page 90: ...ic input 5 6 3 DIFFERENTIAL ELEMENT a MAIN MENU PATH SETPOINTS ÖØ S4 ELEMENTS ÖØ DIFFERENTIAL This section contains the settings to configure the percent differential element including all associated harmonic inhibit fea tures The 745 provides three independent harmonic inhibit features HARMONIC INHIBIT which implements an inhibit scheme based on 2nd or 2nd 5th harmonic which is in circuit at all ...

Page 91: ...lculations have been changed from average to maximum to provide better security dur ing external faults The basic percent differential operating principle for three winding transformers is illustrated by the following equations EQ 5 4 PERCENT DIFFERENTL ENTER for more PERCENT DIFFERENTIAL FUNCTION Enabled Range Enabled Disabled PERCENT DIFFERENTIAL TARGET Latched Range Self Reset Latched None PERC...

Page 92: ...s slope are 1 To allow for mismatch when operating at the limit of the transformer s onload tap changer range 2 To accommodate for CT errors PERCENT DIFFERENTIAL KNEEPOINT Enter the kneepoint for the dual slope percent differential element This is the transition point between Slopes 1 and 2 in terms of restraint current in units of relay nominal current Set the knee point just above the maximum op...

Page 93: ... phases are inhibited if the 3 phase average of the harmonics exceeds the level set ting HARMONIC INHIBIT PARAMETERS Select 2nd to compare only the 2nd harmonic current against the HARMONIC INHIBIT LEVEL Select 2nd 5th to use the RMS sum of the 2nd and 5th harmonic components For most transformers the 2nd harmonic current alone will exceed 20 during energization and the 2nd value is sufficient to ...

Page 94: ...led Disabled ENERGIZATION INHIBIT PARAMETERS 2nd Range 2nd 2nd 5th HARMONIC AVERAGING Enabled Range Enabled Disabled ENERGIZATION INHIBIT LEVEL 20 0 f0 Range 0 1 to 65 0 f0 in steps of 0 1 ENERGIZATION INHIBIT DURATION 0 10 s Range 0 05 to 600 00 s in steps of 0 01 MINIMUM ENERGIZATION CURRENT 0 10 x CT Range 0 10 to 0 50 x CT in steps of 0 01 ENERGIZATION SENSING BY VOLTAGE Disabled Range Enabled...

Page 95: ...se the Parallel Transformer Breaker Close contact to initiate Energization Inhibit ENERGIZATION INHIBIT PARAMETERS Select 2nd to compare the 2nd harmonic current against HARMONIC INHIBIT LEVEL Select 2nd 5th to use the RMS sum of the 2nd and 5th harmonics HARMONIC AVERAGING Select Enabled to use the three phase average of the harmonic current against the har monic inhibit setting ENERGIZATION INHI...

Page 96: ...46 745 Transformer Management Relay GE Multilin 5 6 S4 ELEMENTS 5 SETPOINTS 5 Figure 5 10 ENERGIZATION INHIBIT SCHEME LOGIC Figure 5 11 ENERGIZATION SENSING SCHEME LOGIC Courtesy of NationalSwitchgear com ...

Page 97: ...phases are inhibited if the three phase average of the 5th harmonic exceeds the level setting HARMONIC AVERAGING Select Enabled to use the three phase average of the 5th harmonic current against the harmonic inhibit setting 5th HARMONIC INHIBIT LEVEL Enter the level of 5th harmonic current above which the percent differential element will be inhibited from operating Figure 5 12 5TH HARMONIC INHIBI...

Page 98: ...y nominal current above which the instantaneous differential element will pickup and operate Figure 5 13 INSTANTANEOUS DIFFERENTIAL SCHEME LOGIC INST DIFFERENTIAL ENTER for more INST DIFFERENTIAL FUNCTION Enabled Range Enabled Disabled INST DIFFERENTIAL TARGET Latched Range Self Reset Latched None INST DIFFERENTIAL PICKUP 8 00 x CT Range 3 00 to 20 00 in steps of 0 01 INST DIFFERENTIAL BLOCK Disab...

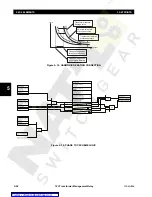
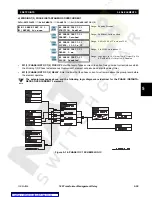
Page 99: ...lti plier 1 or base curve values Setting the multiplier to zero results in an instantaneous response to all current levels above pickup Graphs of standard time current curves on 11 17 log log graph paper are available upon request from the GE Multilin literature department The original files are also available in PDF format on the UR Software Installation CD and the GE Multilin Web Page PHASE OC E...

Page 100: ...7 1 097 0 982 ANSI VERY INVERSE 0 5 1 567 0 663 0 268 0 171 0 130 0 108 0 094 0 085 0 078 0 073 1 0 3 134 1 325 0 537 0 341 0 260 0 216 0 189 0 170 0 156 0 146 2 0 6 268 2 650 1 074 0 682 0 520 0 432 0 378 0 340 0 312 0 291 4 0 12 537 5 301 2 148 1 365 1 040 0 864 0 755 0 680 0 625 0 583 6 0 18 805 7 951 3 221 2 047 1 559 1 297 1 133 1 020 0 937 0 874 8 0 25 073 10 602 4 295 2 730 2 079 1 729 1 51...

Page 101: ...25 0 169 0 135 0 113 0 096 0 084 0 075 0 10 2 700 1 350 0 675 0 450 0 338 0 270 0 225 0 193 0 169 0 150 0 20 5 400 2 700 1 350 0 900 0 675 0 540 0 450 0 386 0 338 0 300 0 40 10 800 5 400 2 700 1 800 1 350 1 080 0 900 0 771 0 675 0 600 0 60 16 200 8 100 4 050 2 700 2 025 1 620 1 350 1 157 1 013 0 900 0 80 21 600 10 800 5 400 3 600 2 700 2 160 1 800 1 543 1 350 1 200 1 00 27 000 13 500 6 750 4 500 3...

Page 102: ...3 0 113 0 101 0 093 0 087 0 083 1 0 2 901 1 312 0 537 0 343 0 266 0 227 0 202 0 186 0 174 0 165 2 0 5 802 2 624 1 075 0 687 0 533 0 453 0 405 0 372 0 349 0 331 4 0 11 605 5 248 2 150 1 374 1 065 0 906 0 810 0 745 0 698 0 662 6 0 17 407 7 872 3 225 2 061 1 598 1 359 1 215 1 117 1 046 0 992 8 0 23 209 10 497 4 299 2 747 2 131 1 813 1 620 1 490 1 395 1 323 10 0 29 012 13 121 5 374 3 434 2 663 2 266 2...

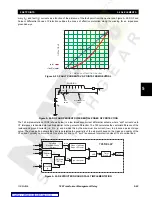
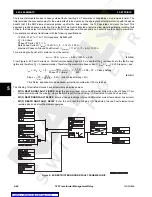
Page 103: ...rrent falls below the reset threshold before tripping is proportional to ratio of energy accumulated to that required to trip Select Instantaneous reset to coordinate with relays such as most static units with instantaneous reset characteristics W1 3 HARMONIC DERATING CORRECTION Select Enabled to enable automatic harmonic derating correction of the Winging 1 3 Phase Time Overcurrent curve The 745 ...

Page 104: ...IC DERATING CORRECTION Figure 5 15 PHASE TOC SCHEME LOGIC current time Transformer thermal damage curve Selected relay time overcurrent curve Pickup setting based rated load capability Pickup shifted based on harmonic derating Transformer thermal protection margin Courtesy of NationalSwitchgear com ...

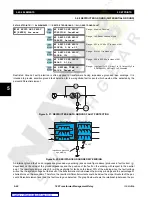
Page 105: ... operates The setpoint messages above and the following logic diagram are identical for the PHASE INSTANTA NEOUS OVERCURRENT 2 element Figure 5 16 PHASE IOC 1 SCHEME LOGIC W1 PHASE INST OC 1 ENTER for more W1 PHASE INST OC 1 FUNCTION Enabled Range Enabled Disabled W1 PHASE INST OC 1 TARGET Latched Range Self Reset Latched None W1 PHASE INST OC 1 PICKUP 10 00 x CT Range 0 05 to 20 00 x CT in steps ...

Page 106: ...taneous overcurrent for each winding NEUTRAL OC ENTER for more W1 NTRL TIME OC ENTER for more See page 5 57 W2 NTRL TIME OC ENTER for more See page 5 57 W3 NTRL TIME OC ENTER for more See page 5 57 W1 NTRL INST OC 1 ENTER for more See page 5 58 W2 NTRL INST OC 1 ENTER for more See page 5 58 W3 NTRL INST OC 1 ENTER for more See page 5 58 W1 NTRL INST OC 2 ENTER for more See page 5 58 W2 NTRL INST O...

Page 107: ... in which the reset characteristic when the current falls below the reset threshold before tripping is proportional to ratio of energy accumulated to that required to trip Select Instantaneous reset to coordinate with relays such as most static units with instantaneous reset characteristics Figure 5 17 NEUTRAL TOC SCHEME LOGIC W1 NTRL TIME OC ENTER for more W1 NEUTRAL TIME OC FUNCTION Enabled Rang...

Page 108: ...tes The setpoint messages above and the following logic diagram are identical for the Neutral Instantaneous Overcurrent 2 element Figure 5 18 NEUTRAL IOC 1 SCHEME LOGIC W1 NTRL INST OC 1 ENTER for more W1 NEUTRAL INST OC 1 FUNCTION Enabled Range Enabled Disabled W1 NEUTRAL INST OC 1 TARGET Latched Range Self Reset Latched None W1 NEUTRAL INST OC 1 PICKUP 10 00 x CT Range 0 05 to 20 00 x CT in step...

Page 109: ...e ground overcurrent elements Included are ground time overcurrents for each wye or zig zag winding and two levels of ground instantaneous overcurrent for each wye or zig zag winding GROUND OC ENTER for more W1 GND TIME OC ENTER for more See page 5 60 W2 GND TIME OC ENTER for more See page 5 60 W3 GND TIME OC ENTER for more See page 5 60 W1 GND INST OC 1 ENTER for more See page 5 61 W2 GND INST OC...

Page 110: ...rve is to be shifted in time W1 3 GROUND TIME OC RESET Enter the multiplier constant by which the selected time overcurrent curve shape the base curve is to be shifted in time Figure 5 19 GROUND TOC SCHEME LOGIC W1 GND TIME OC ENTER for more W1 GROUND TIME OC FUNCTION Enabled Range Enabled Disabled W1 GROUND TIME OC TARGET Latched Range Self Reset Latched None W1 GROUND TIME OC PICKUP 0 85 x CT Ra...

Page 111: ...cheme logic below are identical for Windings 2 and 3 of Ground Instantaneous Overcurrent 1 and all windings on the Ground Instantaneous Overcurrent 2 element Figure 5 20 GROUND IOC 1 SCHEME LOGIC W1 GND INST OC 1 ENTER for more W1 GROUND INST OC 1 FUNCTION Disabled Range Enabled Disabled W1 GROUND INST OC 1 TARGET Latched Range Self Reset Latched None W1 GROUND INST OC 1 PICKUP 10 00 x CT Range 0 ...

Page 112: ...nce the fault voltage will not be the system voltage but the result of the transformation ratio between the primary windings and the percentage of shorted turns on the secondary Therefore the resultant differential currents could be below the slope threshold of the per cent differential element and thus the fault could go undetected The graph below shows the relationship between the pri W1 RESTD G...

Page 113: ...745 calculates the vectorial difference of the residual and ground currents i e 3I0 Ig and divides this by the maximum line current Imax to produce a percent slope value The slope setting allows the user to determine the sensitivity of the element based on the class and quality of the CTs used Typically no more than 4 overall error due to CT spill is assumed for protection class CTs at nominal loa...

Page 114: ...r a winding fault point at 5 distance from the neutral EQ 5 10 From Figure 5 23 Fault Currents vs Points from Neutral on page 5 63 we see that the Ip increase due to the fault is neg ligible and therefore 3Io 0 approximately Therefore the maximum phase current Imax Irated 525 A approx and EQ 5 11 The Winding 1 Restricted Ground Fault setpoints are described below W1 3 RESTD GND FAULT PICKUP Enter ...

Page 115: ...ach winding and negative sequence instantaneous overcurrents for each winding NEG SEQ OC ENTER for more W1 NEG SEQ TIME OC ENTER for more See page 5 66 W2 NEG SEQ TIME OC ENTER for more See page 5 66 W3 NEG SEQ TIME OC ENTER for more See page 5 66 W1 NEG SEQ INST OC ENTER for more See page 5 67 W2 NEG SEQ INST OC ENTER for more See page 5 67 W3 NEG SEQ INST OC ENTER for more See page 5 67 ENTER ES...

Page 116: ...l time overcurrent relays in which the reset characteristic when the current falls below the reset threshold before tripping is proportional to ratio of energy accumulated to that required to trip Select Instantaneous reset to coordinate with relays such as most static units with instantaneous reset characteristics Figure 5 27 NEGATIVE SEQUENCE TOC SCHEME LOGIC W1 NEG SEQ TIME OC ENTER for more W1...

Page 117: ...ive sequence current must remain above the pickup level before the element operates Figure 5 28 NEGATIVE SEQUENCE IOC SCHEME LOGIC W1 NEG SEQ INST OC ENTER for more W1 NEG SEQ INST OC FUNCTION Disabled Range Enabled Disabled W1 NEG SEQ INST OC TARGET Latched Range Self Reset Latched None W1 NEG SEQ INST OC PICKUP 10 00 x CT Range 0 05 to 20 00 x CT in steps of 0 01 W1 NEG SEQ INST OC DELAY 0 ms Ra...

Page 118: ...he overspeed can lead to a turbine trip which would require a turbine start up before restoring the system If the turbine speed can be controlled successfully system restoration can be much quicker The overfrequency element of the 745 can be used for this purpose at a generating location We strongly recommend the use of either the voltage current or both signals for supervision If no super vising ...

Page 119: ...PERATING VOLTAGE Enter the minimum value of voltage in units of relay nominal voltage required to allow the underfrequency element to operate UNDERFREQUENCY 1 2 PICKUP Enter the frequency in Hz below which the Underfrequency 1 element will pickup and start the delay timer UNDERFREQUENCY 1 2 DELAY Enter the time the frequency remains below the pickup level before element oper ation Figure 5 29 UNDE...

Page 120: ...ed FREQUENCY DECAY TARGET Self Reset Range Self Reset Latched None CURRENT SENSING Enabled Range Enabled Disabled MINIMUM OPERATING CURRENT 0 20 x CT Range 0 20 to 1 00 x CT in steps of 0 01 MINIMUM OPERATING VOLTAGE 0 50 x VT Range 0 10 to 0 99 x CT in steps of 0 01 FREQUENCY DECAY THRESHOLD 59 50 Hz Range 45 00 to 59 99 Hz in steps of 0 01 FREQUENCY DECAY DELAY 0 00 s Range 0 00 to 600 00 s in s...

Page 121: ...abled MINIMUM OPERATING CURRENT 0 20 x CT Range 0 20 to 1 00 x CT in steps of 0 01 MINIMUM OPERATING VOLTAGE 0 50 x VT Range 0 10 to 0 99 x CT in steps of 0 01 OVERFREQUENCY PICKUP 60 50 Hz Range 50 01 to 65 00 Hz in steps of 0 01 OVERFREQUENCY DELAY 5 00 s Range 0 00 to 600 00 s in steps of 0 01 OVERFREQUENCY BLOCK Disabled Range Logc Inpt 1 to 16 Virt Inpt 1 to 16 Output Rly 2 to 8 SelfTest Rly ...

Page 122: ... OPERATING VOLTAGE Enter the minimum value of voltage in units of relay nominal voltage required to allow the underfrequency element to operate OVERFREQUENCY PICKUP Enter the frequency in Hz above which the overfrequency element will pickup and start the delay timer OVERFREQUENCY DELAY Enter the time that the frequency must remain above the pickup level before the element operates Figure 5 31 OVER...

Page 123: ...shutdown of generator connected transformers or following a load rejection the transformer may experience an excessive ratio of volts to hertz that is become overexcited When a transformer core is overexcited the core is operating in a non linear magnetic region and creates harmonic com ponents in the exciting current A significant amount of current at the 5th harmonic is characteristic of overexc...

Page 124: ...t must remain above the pickup level before the element operates Figure 5 32 5TH HARMONIC LEVEL SCHEME LOGIC 5th HARMONIC LEVEL ENTER for more 5th HARMONIC LEVEL FUNCTION Disabled Range Enabled Disabled 5th HARMONIC LEVEL TARGET Self Reset Range Self Reset Latched None MINIMUM OPERATING CURRENT 0 10 x CT Range 0 03 to 1 00 x CT in steps of 0 01 5th HARMONIC LEVEL PICKUP 10 0 f0 Range 0 1 to 99 9 f...

Page 125: ...will pickup and start the delay timer VOLTS PER HERTZ 1 SHAPE Select the curve shape to be used for the Volts per Hertz 1 element The inverse volts per hertz curve shapes are shown below VOLTS PER HERTZ 1 DELAY Enter the time that the volts per hertz value must remain above the pickup level before the element operates VOLTS PER HERTZ 1 RESET Enter the time that the volts per hertz value must remai...

Page 126: ... inverse curve 3 shape is derived from the formula EQ 5 14 where T operate time seconds D delay setpoint seconds V fundamental RMS value of voltage V F frequency of voltage signal Hz Pickup volts per hertz pickup setpoint V Hz T D V F Pickup 2 1 when V F Pickup 0 01 0 1 1 10 100 1000 1 00 1 20 1 40 1 60 1 80 2 00 Multiples of Volts Hertz Pickup Time Delay Setting ò 10 3 1 0 3 0 1 Time to Trip seco...

Page 127: ...ments Included are a THD level element for each winding and each phase HARMONICS ENTER for more W1 THD LEVEL ENTER for more See page 5 78 W2 THD LEVEL ENTER for more See page 5 78 W3 THD LEVEL ENTER for more See page 5 78 W1 HARM DERATING ENTER for more See page 5 79 W2 HARM DERATING ENTER for more See page 5 79 W3 HARM DERATING ENTER for more See page 5 79 ENTER ESCAPE ð ð MESSAGE ESCAPE MESSAGE ...

Page 128: ...tal harmonic distortion must remain above the pickup level before the element operates Figure 5 34 THD LEVEL SCHEME LOGIC W1 THD LEVEL ENTER for more W1 THD LEVEL FUNCTION Disabled Range Enabled Disabled W1 THD LEVEL TARGET Self Reset Range Self Reset Latched None MINIMUM OPERATING CURRENT 0 10 x CT Range 0 03 to 1 00 x CT in steps of 0 01 W1 THD LEVEL PICKUP 50 0 f0 Range 0 1 to 50 0 f0 in steps ...

Page 129: ...rating must remain below the pickup level before the element operates Figure 5 35 HARMONIC DERATING SCHEME LOGIC W1 HARM DERATING ENTER for more W1 HARM DERATING FUNCTION Disabled Range Enabled Disabled W1 HARM DERATING TARGET Self Reset Range Self Reset Latched None MINIMUM OPERATING CURRENT 0 10 x CT Range 0 03 to 1 00 x CT in steps of 0 01 W1 HARM DERATING PICKUP 0 90 Range 0 01 to 0 98 in step...

Page 130: ...re The second element monitors the aging factor and the third monitors the total accumulated loss of life Each ele ment produces an output when the monitored quantity exceeds a set limit The Insulation Aging Loss of Life feature is a field upgradable feature For the feature and associated elements to operate correctly it must first be enabled under the factory settings using the passcode provided ...

Page 131: ...ssible hottest spot temperature under emergency loading con dition and maximum ambient temperature HOTTEST SPOT LIMIT DELAY Enter a time delay above which the hottest spot temperature must remain before the element operates Figure 5 36 HOTTEST SPOT LIMIT SCHEME LOGIC HOTTEST SPOT LIMIT ENTER for more HOTTEST SPOT LIMIT FUNCTION Disabled Range Enabled Disabled HOTTEST SPOT LIMIT TARGET Self Reset R...

Page 132: ... for operation of the element This setting should be above the maximum permissible aging factor under emergency loading condition and maximum ambient temperature AGING FACTOR LIMIT DELAY Enter a time delay above which the Aging Factor must remain before the element operates Figure 5 37 AGING FACTOR LIMIT SCHEME LOGIC AGING FACTOR LIMIT ENTER for more AGING FACTOR LIMIT FUNCTION Disabled Range Enab...

Page 133: ...nly as users may wish to leave the transformer in service beyond the theoretical expended life Enter the expended life in hours required for operation of the element in the LOSS OF LIFE PICKUP setpoint This setting should be above the total life of the transformer in hours As an example for a 15 year transformer the total number of hours would be 13140 10 131400 The actual values are only displaye...

Page 134: ...ut is configured in S2 SYSTEM SETUP ÖØ ANALOG INPUT and the actual values displayed in A2 METERING ÖØ ANALOG INPUT Figure 5 39 ANALOG LEVEL SCHEME LOGIC ANALOG LEVEL 1 ENTER for more ANALOG LEVEL 1 FUNCTION Disabled Range Enabled Disabled ANALOG LEVEL 1 TARGET Self Reset Range Self Reset Latched None ANALOG LEVEL 1 PICKUP 10 µA Range 1 to 65000 µA in steps of 1 ANALOG LEVEL 1 DELAY 50 s Range 0 to...

Page 135: ...d each phase Figure 5 40 CURRENT DEMAND SCHEME LOGIC W1 CURRENT DEMAND ENTER for more W1 CURRENT DEMAND FUNCTION Disabled Range Enabled Disabled W1 CURRENT DEMAND TARGET Self Reset Range Self Reset Latched None W1 CURRENT DEMAND PICKUP 100 A Range 0 to 65000 in steps of 1 auto ranging W1 CURRENT DEMAND BLOCK Disabled Range Logc Inpt 1 to 16 Virt Inpt 1 to 16 Output Rly 2 to 8 SelfTest Rly Vir Outp...

Page 136: ...ion exists The logic input should be connected to the transformer winding temperature alarm contacts Figure 5 41 TRANSFORMER OVERLOAD SCHEME LOGIC XFORMER OVERLOAD ENTER for more TRANSFORMER OVERLOAD FUNCTION Disabled Range Enabled Disabled TRANSFORMER OVERLOAD TARGET Self Reset Range Self Reset Latched None TRANSFORMER OVERLOAD PICKUP 208 rated Range 50 to 300 of Rated Load in steps of 1 TRANSFOR...

Page 137: ...c This approach would be useful if very sensitive settings had been used in the normal in service Setpoint group for the Harmonic Restrained Differential element assuming that the tap changer position was used to compensate the input current magnitude Figure 5 42 TAP CHANGER FAILURE SCHEME LOGIC TAP CHANGER FAILURE ENTER for more TAP CHANGER FAILURE FUNCTION Disabled Range Enabled Disabled TAP CHA...

Page 138: ...he output The table below provides information about FlexLogic equations for all outputs in the 745 As mentioned above the parameters of an equation can contain either INPUTS or GATES Table 5 11 FLEXLOGIC OUTPUT TYPES NAME TYPE EQUATION PARAMETERS EVALUATION RATE Output Relay 1 solid state 20 every 1 2 cycle Output Relays 2 to 5 trip rated form A contacts 20 each every 1 2 cycle Output Relays 6 to...

Page 139: ...or Output Relay 2 On the right of the stack of boxes is an illustration of how the equa tion is interpreted In this example the inputs of the 4 input OR gate are Percent Diff OP Inst Diff OP the output of the XOR gate and the out put of the AND gate The inputs of the 2 input AND gate are the output of the NOT gate and Output Relay 2 The input to the NOT gate is Logic Input 2 The inputs to the 2 in...

Page 140: ... a reset command is issued or automatically after one week Select Self reset to automatically de energize the contacts after the condition is cleared The solid state out put Output 1 remains closed until externally reset by a momentary interruption of current unless wired in parallel with an electromechanical relay Outputs 2 to 8 in which case it turns off when the relay operates OUTPUT RELAY 1 EN...

Page 141: ...ow are the parameters of the Flex Logic equation for Output 1 8 as described in the introduction to FlexLogic Figure 5 45 OUTPUT RELAYS SCHEME LOGIC Table 5 14 OUTPUT RELAY DEFAULT FLEXLOGIC FLEXLOGIC GATE OUTPUT RELAY NUMBER 1 TO 3 4 5 6 7 8 01 Percent Diff OP Volts Hertz 1 OP W1 THD Level OP Underfreq 1 OP Underfreq 2 OP Freq Decay 3 OP 02 Inst Diff OP Volts Hertz 2 OP W2 THD Level OP Freq Decay...

Page 142: ...ition is defined by a FlexLogic equation and the number of pre trigger cycles of data captured is programmable This section contains the settings including the FlexLogic equation to configure trace memory triggering NO OF PRE TRIGGER CYCLES Enter the number of cycles of data of the 16 cycles of waveform data to be cap tured that are to be pre trigger information TRACE MEMORY ENTER for more NO OF P...

Page 143: ...ady have their own programmable delay timers where they are required For addi tional flexibility ten 10 independent timers are available for implementing custom schemes where timers are not available For example a pickup delay timer may be required on a logic input or a single delay timer may be required on the output of a block of logic TIMER 1 10 START Select the FlexLogic entry which when opera...

Page 144: ...rational when output relay testing is enabled FORCE SELF TEST RLY Select Energized to force the self test relay to the energized state and De energized to force to the de energized state This setpoint is only operational while the output relay testing feature is enabled 5 8 3 ANALOG OUTPUTS PATH SETPOINTS ÖØ S6 TESTING ÖØ ANALOG OUTPUTS The 745 has the ability to override the normal function of an...

Page 145: ... Disabled Prefault Mode Fault Mode Playback Mode BLOCK OPERATION OF OUTPUTS 12345678 Range Any combination of outputs 1 to 8 START FAULT MODE SIGNAL Disabled Range Disabled Logc Inpt 1 to 16 START PLAYBACK MODE SIGNAL Disabled Range Disabled Logc Inpt 1 to 16 MODE DESCRIPTION Prefault Mode Select Prefault Mode to simulate the normal operating condition of a transformer In this mode the normal inpu...

Page 146: ...1 W2 PHASE A CURRENT MAGNITUDE 1 0 x CT Range 0 0 to 40 0 x CT in steps of 0 1 W3 PHASE A CURRENT MAGNITUDE 1 0 x CT Range 0 0 to 40 0 x CT in steps of 0 1 W1 PHASE B CURRENT MAGNITUDE 1 0 x CT Range 0 0 to 40 0 x CT in steps of 0 1 W2 PHASE B CURRENT MAGNITUDE 1 0 x CT Range 0 0 to 40 0 x CT in steps of 0 1 W3 PHASE B CURRENT MAGNITUDE 1 0 x CT Range 0 0 to 40 0 x CT in steps of 0 1 W1 PHASE C CU...

Page 147: ...for wye or zig zag connected windings W2 PHASE B CURRENT ANGLE 0 Range 0 to 359 in steps of 1 W3 PHASE B CURRENT ANGLE 0 Range 0 to 359 in steps of 1 W1 PHASE C CURRENT ANGLE 0 Range 0 to 359 in steps of 1 W2 PHASE C CURRENT ANGLE 0 Range 0 to 359 in steps of 1 W3 PHASE C CURRENT ANGLE 0 Range 0 to 359 in steps of 1 W1 GROUND CURRENT MAGNITUDE 1 0 x CT Range 0 0 to 40 0 x CT in steps of 0 1 W2 GRO...

Page 148: ...ERVICE This section contains settings intended for factory use only for calibration testing and diagnostics The messages can only be accessed by entering a factory service passcode in the first message FACTORY SERVICE ENTER for more ENTER FACTORY PASSCODE Range Restricted access for factory personnel only ENTER ESCAPE ð ð Courtesy of NationalSwitchgear com ...

Page 149: ...or more See page 6 8 FREQUENCY ENTER for more See page 6 10 TAP CHANGER ENTER for more See page 6 10 VOLTAGE ENTER for more See page 6 10 DEMAND ENTER for more See page 6 10 AMBIENT TEMP ENTER for more See page 6 11 LOSS OF LIFE ENTER for more See page 6 12 ANALOG INPUT ENTER for more See page 6 12 POWER ENTER for more See page 6 12 ENERGY ENTER for more See page 6 13 ENTER ESCAPE ð ð MESSAGE ESCA...

Page 150: ...ocks throughout this chapter A reference of all messages is also provided at the end of the chap ter All values shown in these message illustrations assume that no inputs besides control power are connected to the 745 Some messages appear on the following pages with a gray background This indicates that the message may not appear depending upon the configuration of the relay as selected by setpoin...

Page 151: ... here 6 2 4 OUTPUT RELAYS PATH ACTUAL VALUES Ö A1 STATUS ÖØ OUTPUT RELAYS The states of Output Relays 1 through 8 and the Self Test Relay are displayed here DATE AND TIME ENTER for more CURRENT DATE Jan 01 2001 CURRENT TIME 00 00 00 LOGIC INPUTS ENTER for more LOGIC INPUT 1 STATE Not Asserted LOGIC INPUT 16 STATE Not Asserted SETPOINT ACCESS STATE Open VIRTUAL INPUTS ENTER for more VIRTUAL INPUT 1...

Page 152: ...RS The FLEXLOGIC EQN EDITOR value displays the source of the error occurring in a FlexLogic equation The BAD SETTINGS ERROR value displays the cause of a bad setting made while assigning setpoint values VIRTUAL OUTPUTS ENTER for more VIRTUAL OUTPUT 1 STATE Not Asserted VIRTUAL OUTPUT 5 STATE Not Asserted SELF TEST ERRORS ENTER for more FLEXLOGIC EQN EDITOR None BAD SETTINGS ERROR None ENTER ESCAPE...

Page 153: ...erence for all other currents both measured and derived The maximum specified load and average phase current are also shown for the specified winding CURRENT ENTER for more W1 CURRENT ENTER for more See below W2 CURRENT ENTER for more W3 CURRENT ENTER for more POSITIVE SEQUENCE ENTER for more See page 6 6 NEGATIVE SEQUENCE ENTER for more See page 6 6 ZERO SEQUENCE ENTER for more See page 6 6 DIFFE...

Page 154: ...are shown here e ZERO SEQUENCE CURRENT PATH ACTUAL VALUES ÖØ A2 METERING Ö CURRENT ÖØ ZERO SEQUENCE The zero sequence current magnitudes and phase values for Windings 1 2 and 3 are shown here POSITIVE SEQUENCE ENTER for more W1 POS SEQ CURRENT 0 A at 0 Lag W2 POS SEQ CURRENT 0 A at 0 Lag W3 POS SEQ CURRENT 0 A at 0 Lag NEGATIVE SEQUENCE ENTER for more W1 NEG SEQ CURRENT 0 A at 0 Lag W2 NEG SEQ CUR...

Page 155: ...rent magnitudes for Windings 1 through 3 are shown here DIFFERENTIAL ENTER for more PHASE A DIFFERENTIAL CURRENT 0 00 x CT PHASE A DIFFERENTIAL ANGLE 0 Lag PHASE B DIFFERENTIAL CURRENT 0 00 x CT PHASE B DIFFERENTIAL ANGLE 0 Lag PHASE C DIFFERENTIAL CURRENT 0 00 x CT PHASE C DIFFERENTIAL ANGLE 0 Lag RESTRAINT ENTER for more PHASE A RESTRAINT CURRENT 0 00 x CT PHASE B RESTRAINT CURRENT 0 00 x CT PHA...

Page 156: ...nal system frequency An actual value is calculated for each phase of each monitored winding The example above shows what is displayed in a typical case for harmonic components in this case the second harmonic Similar displays exist for all harmonics up to the 21st The second harmonic magnitude for each phase current of Windings 1 through 3 are displayed Values are expressed as a percentage of magn...

Page 157: ...FACTOR PATH ACTUAL VALUES ÖØ A2 METERING ÖØ HARMONIC CONTENT ÖØ HARMONIC DERATING The Harmonic Derating Factor for each of the windings shows the effect of non sinusoidal load currents on power trans former s rated full load current The calculations are based on ANSI IEEE standard C57 110 1986 The actual values mes sages display the harmonic derating factor for Windings 1 through 3 THD ENTER for m...

Page 158: ...ent 6 3 6 DEMAND a MAIN MENU PATH ACTUAL VALUES ÖØ A2 METERING ÖØ DEMAND Current demand is measured on each phase of each monitored winding These parameters can be monitored to reduce supplier demand penalties or for statistical metering purposes The calculated demand is based on the S2 SYSTEM SETUP ÖØ DEMAND METERING Ö CURRENT DEMAND METER TYPE setpoint value For each quantity the 745 displays th...

Page 159: ...r been programmed the default values shown above appear These messages are repeated for Windings 2 and 3 6 3 7 AMBIENT TEMPERATURE PATH ACTUAL VALUES ÖØ A2 METERING ÖØ AMBIENT TEMPERATURE Ambient temperature is monitored via an RTD connected to the 745 DEMAND DATA CLEAR ENTER for more CLEAR MAX DEMAND DATA No DATE OF LAST CLEAR Jan 01 1996 TIME OF LAST CLEAR 00 00 00 000 W1 CURRENT DEMAND ENTER fo...

Page 160: ... and the units programmed in S2 SYSTEM SETUP ÖØ ANALOG INPUT ÖØ ANALOG INPUT UNITS are displayed instead of µA which is the factory default 6 3 10 POWER PATH ACTUAL VALUES ÖØ A2 METERING ÖØ POWER ÖØ W1 3 POWER The 745 calculates and displays real reactive and apparent power as well as the power factor for all of the available wind ings providing that the voltage sensing is enabled Power flowing in...

Page 161: ... above appear c W1 TO W3 ENERGY PATH ACTUAL VALUES ÖØ A2 METERING ÖØ ENERGY ÖØ W1 3 ENERGY The source and load watthours and varhours are displayed for Winding 1 These messages are repeated for Windings 2 and 3 ENERGY ENTER for more ENERGY DATA CLEAR ENTER for more See below W1 ENERGY ENTER for more See below W2 ENERGY ENTER for more W3 ENERGY ENTER for more ENERGY DATA CLEAR ENTER for more CLEAR ...

Page 162: ...DATA RECORDER No CLEAR EVENT RECORDER SIGNAL Disabled Range Disabled Logic Inpt 1 to 16 DATE OF LAST CLEAR Jan 01 1996 TIME OF LAST CLEAR 00 00 00 000 NO OF EVENTS SINCE LAST CLEAR 0 EVENT 001 ENTER for more EVENT DATE Jan 01 2001 EVENT TIME 00 00 00 000 EVENT CAUSE On Control Power W1 PHASE A CURRENT 0 A at 0 Lag W1 PHASE B CURRENT 0 A at 0 Lag W1 PHASE C CURRENT 0 A at 0 Lag W1 GROUND CURRENT 0 ...

Page 163: ... PHASE C DIFFERENTIAL CURRENT 0 00 x CT PHASE A RESTRAINT CURRENT 0 00 x CT PHASE B RESTRAINT CURRENT 0 00 x CT PHASE C RESTRAINT CURRENT 0 00 x CT SYSTEM FREQUENCY 0 00 Hz FREQUENCY DECAY RATE 0 00 Hz s TAP CHANGER POSITION n a VOLTS PER HERTZ 0 00 V Hz AMBIENT TEMPERATURE 0 C ANALOG INPUT 0 µA MESSAGE ESCAPE MESSAGE ESCAPE MESSAGE ESCAPE MESSAGE ESCAPE MESSAGE ESCAPE MESSAGE ESCAPE MESSAGE ESCAP...

Page 164: ...st OC Underfrequency 1 Underfrequency 2 Frequency Decay 1 Frequency Decay 2 Frequency Decay 3 Frequency Decay 4 Overfrequency 5th Harmonic Level Volts Per Hertz 1 Volts Per Hertz 2 W1 THD Level W2 THD Level W3 THD Level W1 Harmonic Derating W2 Harmonic Derating W3 Harmonic Derating Analog Level 1 Analog Level 2 W1 Current Demand W2 Current Demand W3 Current Demand Transformer Overload ON OFF EVENT...

Page 165: ...UPPORT ENTER for more GE Multilin 215 Anderson Avenue Markham Ontario Canada L6E 1B3 Tel 905 294 6222 Fax 905 201 2098 Internet Address www GEmultilin com REVISION CODES ENTER for more 745 Transformer Management Relay HARDWARE REVISION F SOFTWARE REVISION 270 BOOTWARE REVISION 131 VERSION NUMBER 000 INSTALLED OPTIONS W3 P1 G1 LO ALR SERIAL NUMBER D33xxxxx MANUFACTURE DATE Jan 01 2001 CALIBRATION E...

Page 166: ...n even if the conditions that caused the element to activate are removed The PHASE part of the message represents the phase s that are associated with the element where applicable Messages for LATCHED targets remain in the queue until the relay is reset Messages for PICKUP and OPERATE targets remain in the queue as long as the condition causing the target to be active is present In addition messag...

Page 167: ...uously thereafter in a background task The tests ensure that every testable unit of the hardware is functioning correctly ANY SELF TEST ERROR INDICATES A SERIOUS PROBLEM REQUIRING SERVICE MAJOR SELF TEST ERRORS Upon detection of a major self test error the 745 disables all protection functionality turns on the front panel Self Test Error LED turns off the front panel In Service LED de energizes al...

Page 168: ...d line voltage as well as generated outputs e g analog outputs is not likely to be within those specified for the relay Real Time Clock minor This error is caused when the 745 detects that the real time clock is not running Under this condition the 745 will not be able to maintain the current time and date This would normally occur if backup battery power for the clock is lost and control power is...

Page 169: ...D is off There are no active conditions to display in the target message queue OUT OF RANGE VALUE NOT STORED This flash message is displayed in response to pressing while on a setpoint message with a numerical value The edited value was either less than the minimum or greater than the maximum acceptable value for this setpoint and as a result was not stored PLEASE ENTER A NON ZERO PASSCODE This fl...

Page 170: ...allow write access to setpoints has been successfully executed and set points can be changed and entered SETPOINT ACCESS IS NOW RESTRICTED This flash message is displayed in response to correctly entering the programmed passcode at S1 745 SETUP ÖØ PASSCODE ÖØ ALLOW SETPOINT WRITE ACCESS The command to restrict access to setpoints has been successfully executed and set points cannot be changed INVA...

Page 171: ...ns including RS232 RS422 RS485 fiber optics etc The 745 includes a front panel RS232 port and two rear terminal RS485 ports one of which can also be configured as RS422 Data flow is half duplex in all configura tions See Section 3 2 15 RS485 RS422 Communications on page 3 12 for details on wiring Each data byte is transmitted in an asynchronous format consisting of 1 start bit 8 data bits 1 stop b...

Page 172: ...ster commands Additional information on the Modbus protocol can be found on the Modbus website at www modbus org 7 2 3 ELECTRICAL INTERFACE The hardware or electrical interface is any of the following two wire RS485 for the rear terminal COM1 and COM2 terminals four wire RS422 for the rear terminal COM1 terminals RS232 for the front panel connector In a two wire RS485 link data flow is bidirection...

Page 173: ...s the Function Code sent from the master then the slave performed the function as requested If the high order bit of the Function Code sent from the slave is a 1 i e if the Function Code is 7Fh then the slave did not perform the function as requested and is sending an error or exception response DATA This will be a variable number of bytes depending on the Function Code This may include actual val...

Page 174: ...s shifted into the MSbit of x all other bits are shifted right one location Algorithm 1 FFFF hex A 2 0 i 3 0 j 4 Di Alow Alow 5 j 1 j 6 shr A 7 Is there a carry No go to step 8 Yes G A A and continue 8 Is j 8 No go to 5 Yes continue 9 i 1 i 10 Is i N No go to 3 Yes continue 11 A CRC GE Multilin will provide a C programming language implementation of this algorithm upon request 7 2 7 MESSAGE TIMING...

Page 175: ...lows the master to read one or more consecutive setpoints or actual values from the addressed slave device The maximum number of values that can be read in a single message is 120 MESSAGE FORMAT AND EXAMPLE Request to read 3 register values starting from address 0200 from slave device 11 Table 7 1 GE MULTILIN MODBUS FUNCTION CODES FUNCTION CODE DEFINITION DESCRIPTION SUBSTITUTE HEX DEC 03 3 READ A...

Page 176: ...rder byte low order byte FF 00 perform operation CRC low order byte high order byte DF 6A computed cyclic redundancy check Table 7 2 SUMMARY OF OPERATION CODES FOR FUNCTION CODE 05H OPERATION CODE DEFINITION DESCRIPTION 0000 NO OPERATION Does not do anything 0001 REMOTE RESET Performs the same function as the front panel RESET key 0002 TRIGGER TRACE MEMORY Initiates a waveform capture of trace mem...

Page 177: ...DDRESS high order byte low order byte 11 00 data starting at address 1100 DATA high order byte low order byte 00 C8 data for address 1100 00C8 CRC low order byte high order byte 8F F0 CRC computed by master SLAVE RESPONSE EXAMPLE HEX SLAVE ADDRESS 11 response message from slave 11 FUNCTION CODE 06 store single setpoint value DATA STARTING ADDRESS high order byte low order byte 11 00 data starting ...

Page 178: ... 123 can now be read from the Event Recorder Data registers at addresses 0830h to 0866h Only the last 128 events are actually stored in the relay s memory Attempting to retrieve data for older events that are not stored will result in a Modbus exception response when writing to the Event Record Selector Index Table 7 3 MODBUS ERROR CODES ERROR CODE MODBUS DEFINITION GE MULTILIN IMPLEMENTATION 01 I...

Page 179: ...the trace memory buffers for the last 3 trace memory triggers are actually stored in the relay s memory Attempting to retrieve data for older triggers that are not stored will result in a Modbus exception response when writing to the Trace Buffer Selector Index The following example illustrates how information can be retrieved from the Trace Memory A SCADA system polls the Total Number of Trace Tr...

Page 180: ... low order byte 03 01 0301 W1 Phase B 4th Harmonic Content DATA 5 high order byte low order byte 03 02 0302 W1 Phase C 4th Harmonic Content DATA 6 high order byte low order byte 20 02 2002 Percent Differential Pickup CRC low order byte high order byte 2F 8A CRC computed by master SLAVE RESPONSE EXAMPLE HEX SLAVE ADDRESS 11 response message from slave 11 FUNCTION CODE 10 store multiple setpoint val...

Page 181: ...rder byte low order byte 00 14 0014 0 30 Id CRC low order byte high order byte 9B 40 CRC computed by master SLAVE RESPONSE EXAMPLE HEX SLAVE ADDRESS 11 response message from slave 11 FUNCTION CODE 06 store single setpoint values DATA STARTING ADDRESS high order byte low order byte 01 85 data starting at address 0185 DATA high order byte low order byte 00 14 0014 0 30 Id CRC low order byte high ord...

Page 182: ... data starting at address 1100 NUMBER OF SETPOINTS high order byte low order byte 00 01 1 setpoint values 2 bytes total BYTE COUNT 02 2 bytes of data DATA high order byte low order byte 00 C8 data for address 1100 00C8 CRC low order byte high order byte 6B 07 CRC computed by master SLAVE RESPONSE EXAMPLE HEX SLAVE ADDRESS 11 response message from slave 11 FUNCTION CODE 00 store multiple setpoint v...

Page 183: ...ANDS 0080 Command Operation Code F19 0081 Passcode Access 4 registers F33 0085 Change Passcode 4 registers F33 0089 Reserved 008F Reserved VIRTUAL INPUTS 0090 Virtual Input 1 Programmed State F43 0 0091 Virtual Input 2 Programmed State F43 0 0092 Virtual Input 3 Programmed State F43 0 0093 Virtual Input 4 Programmed State F43 0 0094 Virtual Input 5 Programmed State F43 0 0095 Virtual Input 6 Progr...

Page 184: ...Flag F52 020E Winding 1 Phase Time O C Flag F52 020F Winding 2 Phase Time O C Flag F52 0210 Winding 3 Phase Time O C Flag F52 0211 Winding 1 Phase Inst O C 1 Flag F52 0212 Winding 2 Phase Inst O C 1 Flag F52 0213 Winding 3 Phase Inst O C 1 Flag F52 0214 Winding 1 Phase Inst O C 2 Flag F52 0215 Winding 2 Phase Inst O C 2 Flag F52 0216 Winding 3 Phase Inst O C 2 Flag F52 0217 Winding 1 Neutral Time ...

Page 185: ...ay Rate 3 Flag F52 023A Frequency Decay Rate 4 Flag F52 023B Overfrequency Flag F52 023C 5th Harmonic Level Flag F52 023D Volts Per Hertz 1 Flag F52 023E Volts Per Hertz 2 Flag F52 023F Winding 1 THD Level Flag F52 0240 Winding 2 THD Level Flag F52 0241 Winding 3 THD Level Flag F52 0242 Winding 1 Harmonic Derating Flag F52 0243 Winding 2 Harmonic Derating Flag F52 0244 Winding 3 Harmonic Derating ...

Page 186: ...3 CURRENT 02A0 Winding 3 Phase A Current Magnitude A F80 02A1 Winding 3 Phase A Current Angle 0 to 359 1 Lag F1 02A2 Winding 3 Phase B Current Magnitude A F80 02A3 Winding 3 Phase B Current Angle 0 to 359 1 Lag F1 02A4 Winding 3 Phase C Current Magnitude A F80 02A5 Winding 3 Phase C Current Angle 0 to 359 1 Lag F1 02A6 Winding 3 Neutral Current Magnitude A F80 02A7 Winding 3 Neutral Current Angle ...

Page 187: ...ing 2 Phase A 2nd Harmonic Content 0 0 to 99 9 0 1 ƒo F2 02E4 Winding 2 Phase B 2nd Harmonic Content 0 0 to 99 9 0 1 ƒo F2 02E5 Winding 2 Phase C 2nd Harmonic Content 0 0 to 99 9 0 1 ƒo F2 02E6 Winding 3 Phase A 2nd Harmonic Content 0 0 to 99 9 0 1 ƒo F2 02E7 Winding 3 Phase B 2nd Harmonic Content 0 0 to 99 9 0 1 ƒo F2 02E8 Winding 3 Phase C 2nd Harmonic Content 0 0 to 99 9 0 1 ƒo F2 02E9 Reserved...

Page 188: ... Reserved 032F Reserved 7TH HARMONIC 0330 Winding 1 Phase A 7th Harmonic Content 0 0 to 99 9 0 1 ƒo F2 0331 Winding 1 Phase B 7th Harmonic Content 0 0 to 99 9 0 1 ƒo F2 0332 Winding 1 Phase C 7th Harmonic Content 0 0 to 99 9 0 1 ƒo F2 0333 Winding 2 Phase A 7th Harmonic Content 0 0 to 99 9 0 1 ƒo F2 0334 Winding 2 Phase B 7th Harmonic Content 0 0 to 99 9 0 1 ƒo F2 0335 Winding 2 Phase C 7th Harmon...

Page 189: ...o F2 0375 Winding 2 Phase C 11th Harmonic Content 0 0 to 99 9 0 1 ƒo F2 0376 Winding 3 Phase A 11th Harmonic Content 0 0 to 99 9 0 1 ƒo F2 0377 Winding 3 Phase B 11th Harmonic Content 0 0 to 99 9 0 1 ƒo F2 0378 Winding 3 Phase C 11th Harmonic Content 0 0 to 99 9 0 1 ƒo F2 0379 Reserved 037F Reserved 12TH HARMONIC 0380 Winding 1 Phase A 12th Harmonic Content 0 0 to 99 9 0 1 ƒo F2 0381 Winding 1 Pha...

Page 190: ...hase B 16th Harmonic Content 0 0 to 99 9 0 1 ƒo F2 03C2 Winding 1 Phase C 16th Harmonic Content 0 0 to 99 9 0 1 ƒo F2 03C3 Winding 2 Phase A 16th Harmonic Content 0 0 to 99 9 0 1 ƒo F2 03C4 Winding 2 Phase B 16th Harmonic Content 0 0 to 99 9 0 1 ƒo F2 03C5 Winding 2 Phase C 16th Harmonic Content 0 0 to 99 9 0 1 ƒo F2 03C6 Winding 3 Phase A 16th Harmonic Content 0 0 to 99 9 0 1 ƒo F2 03C7 Winding 3...

Page 191: ... 20th Harmonic Content 0 0 to 99 9 0 1 ƒo F2 0407 Winding 3 Phase B 20th Harmonic Content 0 0 to 99 9 0 1 ƒo F2 0408 Winding 3 Phase C 20th Harmonic Content 0 0 to 99 9 0 1 ƒo F2 0409 Reserved 040F Reserved 21ST HARMONIC 0410 Winding 1 Phase A 21st Harmonic Content 0 0 to 99 9 0 1 ƒo F2 0411 Winding 1 Phase B 21st Harmonic Content 0 0 to 99 9 0 1 ƒo F2 0412 Winding 1 Phase C 21st Harmonic Content ...

Page 192: ...d Phase F18 0 phase A 0459 Wdg 1 Max Current Demand Date 2 registers F23 Jan 01 1996 045B Wdg 1 Max Current Demand Time 2 registers F22 00 00 00 000 045D Winding 2 Phase A Current Demand A F79 045E Winding 2 Phase B Current Demand A F79 045F Winding 2 Phase C Current Demand A F79 0460 Winding 2 Max Current Demand A F79 0 A 0461 Winding 2 Max Current Demand Phase F18 0 phase A 0462 Wdg 2 Max Curren...

Page 193: ...8 0516 W3 Load Watthours MWh F98 0518 W3 Source Varhours Mvarh F98 051A W3 Load Varhours Mvarh F98 07FF Reserved Event Recorder Addresses 0800 to 0FFF Read Only EVENT RECORDER 0800 Event Recorder Last Clear Date 2 registers F23 0802 Event Recorder Last Clear Time 2 registers F22 0804 Total Number of Events Since Last Clear 0 to 65535 1 F1 0 0805 Event Record Selector Index XX read write 1 to 65535...

Page 194: ...2 0 ƒo 084C Event XX Winding 2 Phase B 2nd Harmonic 0 0 to 99 9 0 1 ƒo F2 0 ƒo 084D Event XX Winding 2 Phase C 2nd Harmonic 0 0 to 99 9 0 1 ƒo F2 0 ƒo 084E Event XX Winding 2 Phase A 5th Harmonic 0 0 to 99 9 0 1 ƒo F2 0 ƒo 084F Event XX Winding 2 Phase B 5th Harmonic 0 0 to 99 9 0 1 ƒo F2 0 ƒo 0850 Event XX Winding 2 Phase C 5th Harmonic 0 0 to 99 9 0 1 ƒo F2 0 ƒo 0851 Event XX Winding 3 Phase A C...

Page 195: ...0 None 1014 Active Setpoint Group F60 0 Group 1 1015 Edit Setpoint Group F74 4 Active Grp 1016 Setpoint Group 2 Activate Signal F88 0 Disabled 1017 Setpoint Group 3 Activate Signal F88 0 Disabled 1018 Setpoint Group 4 Activate Signal F88 0 Disabled 1019 Clear Event Recorder Signal F88 0 Disabled 101A DNP port F99 0 None 101B Reserved 101F Reserved DEFAULT MESSAGES 1020 No Of Default Messages Selec...

Page 196: ...3 10D6 Select Operate Arm Timer Duration 1 to 65000 1 ms F1 10000 ms 10D7 Write Time Interval 0 to 65000 1 ms F1 0 ms 10D8 Inhibit Cold Restart F30 0 Disabled 10D9 Reserved 10FF Reserved TRANS FORMER 1100 Nominal Frequency 50 to 60 10 Hz F1 60 Hz 1101 Phase Sequence F27 0 ABC 1102 Transformer Type F28 3 Y d30 1103 Rated Winding Temperature Rise F37 1 65 C oil 1104 Type of Cooling Oil Immersed F39 ...

Page 197: ...5 Reserved 1167 Reserved HARMONICS 1168 Harmonic Derating Estimation F30 0 Disabled 1169 THD Minimum Harmonic Number F92 0 2nd 116A THD Maximum Harmonic Number F92 19 21st 116B Reserved 116F Reserved FLEXCURVES 1170 FlexCurve A Delay at 1 03 PKP 0 to 65000 1 ms F1 0 ms 1171 FlexCurve A Delay at 1 05 PKP 0 to 65000 1 ms F1 0 ms 1172 FlexCurve A Delay at 1 10 PKP 0 to 65000 1 ms F1 0 ms 1173 FlexCur...

Page 198: ...xCurve A Delay at 5 50 PKP 0 to 65000 1 ms F1 0 ms 119F FlexCurve A Delay at 5 60 PKP 0 to 65000 1 ms F1 0 ms 11A0 FlexCurve A Delay at 5 70 PKP 0 to 65000 1 ms F1 0 ms 11A1 FlexCurve A Delay at 5 80 PKP 0 to 65000 1 ms F1 0 ms 11A2 FlexCurve A Delay at 5 90 PKP 0 to 65000 1 ms F1 0 ms 11A3 FlexCurve A Delay at 6 00 PKP 0 to 65000 1 ms F1 0 ms 11A4 FlexCurve A Delay at 6 50 PKP 0 to 65000 1 ms F1 ...

Page 199: ...ient Temperature for June 50 to 125 1 C F4 20 C 1288 Average Ambient Temperature for July 50 to 125 1 C F4 20 C 1289 Average Ambient Temperature for August 50 to 125 1 C F4 20 C 128A Average Ambient Temperature for September 50 to 125 1 C F4 20 C 128B Average Ambient Temperature for October 50 to 125 1 C F4 20 C 128C Average Ambient Temperature for November 50 to 125 1 C F4 20 C 128D Average Ambie...

Page 200: ... Minimum 1 12F2 Analog Output 7 Maximum 33 12F3 Reserved 12FF Reserved LOGIC INPUTS 1300 Logic Input 1 Function F30 0 Disabled 1301 Logic Input 1 Name 9 registers F33 Logic Input 1 130A Logic Input 1 Asserted State F75 1 Closed 130B Logic Input 2 Function F30 0 Disabled 130C Logic Input 2 Name 9 registers F33 Logic Input 2 1315 Logic Input 2 Asserted State F75 1 Closed 1316 Logic Input 3 Function ...

Page 201: ... 2 Target F46 0 Self Test 13B2 Logic Input 3 Target F46 0 Self Test 13B3 Logic Input 4 Target F46 0 Self Test 13B4 Logic Input 5 Target F46 0 Self Test 13B5 Logic Input 6 Target F46 0 Self Test 13B6 Logic Input 7 Target F46 0 Self Test 13B7 Logic Input 8 Target F46 0 Self Test 13B8 Logic Input 9 Target F46 0 Self Test 13B9 Logic Input 10 Target F46 0 Self Test 13BA Logic Input 11 Target F46 0 Self...

Page 202: ...463 Virtual Input 4 Target F46 0 Self Reset 1464 Virtual Input 5 Target F46 0 Self Reset 1465 Virtual Input 6 Target F46 0 Self Reset 1466 Virtual Input 7 Target F46 0 Self Reset 1467 Virtual Input 8 Target F46 0 Self Reset 1468 Virtual Input 9 Target F46 0 Self Reset 1469 Virtual Input 10 Target F46 0 Self Reset 146A Virtual Input 11 Target F46 0 Self Reset 146B Virtual Input 12 Target F46 0 Self...

Page 203: ... Type F38 0 Trip 15AB Output 7 FlexLogic 20 registers F47 15BF Reserved 15CF Reserved OUTPUT RELAY 8 15D0 Output 8 Name 9 registers F33 Frequency Trip 3 15D9 Output 8 Operation F66 0 self resetting 15DA Output 8 Type F38 0 Trip 15DB Output 8 FlexLogic 20 registers F47 15EF Reserved 15FF Reserved TRACE MEMORY 1600 Number of Pre Trigger Cycles 1 to 15 1 cycles F1 12 cycles 1601 Trace Memory Trigger ...

Page 204: ...r 9 Pickup Delay 0 00 to 600 00 0 01 s F3 0 00 s 1D9A Timer 9 Dropout Delay 0 00 to 600 00 0 01 s F3 0 00 s 1D9B Timer 10 Start F62 0 End 1D9C Timer 10 Pickup Delay 0 00 to 600 00 0 01 s F3 0 00 s 1D9D Timer 10 Dropout Delay 0 00 to 600 00 0 01 s F3 0 00 s 1D9E Reserved 1DFF Reserved FORCE OUTPUT RELAYS 1E00 Force Output Relays Function F30 0 Disabled 1E01 Force Output Relay 1 F34 0 De energized 1...

Page 205: ...gle 0 to 359 1 Lag F1 120 Lag 1E3C Fault Winding 2 Phase C Current Magnitude 0 0 to 40 0 0 1 CT F2 10 1 0 CT 1E3D Fault Winding 2 Phase C Current Angle 0 to 359 1 Lag F1 240 Lag 1E3E Fault Winding 2 Ground Current Magnitude 0 0 to 40 0 0 1 CT F2 0 0 CT 1E3F Fault Winding 2 Ground Current Angle 0 to 359 1 Lag F1 0 Lag 1E40 Fault Winding 3 Phase A Current Magnitude 0 0 to 40 0 0 1 CT F2 10 1 0 CT 1E...

Page 206: ...ferential Function F30 1 Enabled 2021 Inst Differential Target F46 1 Latched 2022 Inst Differential Pickup 3 00 to 20 00 0 01 CT F3 800 8 00 CT 2023 Inst Differential Block F87 0 Disabled 2024 Reserved 203F Reserved WINDING 1 PHASE TIME O C 2040 Winding 1 Phase Time O C Function F30 1 Enabled 2041 Winding 1 Phase Time O C Target F46 1 Latched 2042 Winding 1 Phase Time O C Pickup 0 05 to 20 00 0 01...

Page 207: ...CT 2083 Winding 2 Phase Inst O C 1 Delay 0 to 60000 1 ms F1 0 ms 2084 Winding 2 Phase Inst O C 1 Block F87 0 Disabled 2085 Reserved 208F Reserved WINDING 3 PHASE INST O C 1 2090 Winding 3 Phase Inst O C 1 Function F30 1 Enabled 2091 Winding 3 Phase Inst O C 1 Target F46 1 Latched 2092 Winding 3 Phase Inst O C 1 Pickup 0 05 to 20 00 0 01 x CT F3 1000 10 00 x CT 2093 Winding 3 Phase Inst O C 1 Delay...

Page 208: ...ng 2 Neutral Time O C Reset F68 1 Linear 20E6 Winding 2 Neutral Time O C Block F87 0 Disabled 20E7 Reserved 20EF Reserved WINDING 3 NEUTRALTIME O C 20F0 Winding 3 Neutral Time O C Function F30 0 Disabled 20F1 Winding 3 Neutral Time O C Target F46 1 Latched 20F2 Winding 3 Neutral Time O C Pickup 0 05 to 20 00 0 01 CT F3 85 0 85 CT 20F3 Winding 3 Neutral Time O C Shape F36 0 Ext Inverse 20F4 Winding...

Page 209: ... 2 2150 Winding 3 Neutral Inst O C 2 Function F30 0 Disabled 2151 Winding 3 Neutral Inst O C 2 Target F46 1 Latched 2152 Winding 3 Neutral Inst O C 2 Pickup 0 05 to 20 00 0 01 CT F3 1000 10 00 CT 2153 Winding 3 Neutral Inst O C 2 Delay 0 to 60000 1 ms F1 0 ms 2154 Winding 3 Neutral Inst O C 2 Block F87 0 Disabled 2155 Reserved 215F Reserved WINDING 1 GROUND TIME O C 2160 Winding 1 Ground Time O C ...

Page 210: ...round Inst O C 1 Function F30 0 Disabled 21B1 Winding 3 Ground Inst O C 1 Target F46 1 Latched 21B2 Winding 3 Ground Inst O C 1 Pickup 0 05 to 20 00 0 01 x CT F3 1000 10 00 x CT 21B3 Winding 3 Ground Inst O C 1 Delay 0 to 60000 1 ms F1 0 ms 21B4 Winding 3 Ground Inst O C 1 Block F87 0 Disabled 21B5 Reserved 21BF Reserved WINDING 1 GROUND INST O C 2 21C0 Winding 1 Ground Inst O C 2 Function F30 0 D...

Page 211: ... Ground Fault Pickup 0 02 to 20 00 0 01 CT F3 8 0 08 CT 2213 Winding 3 Restricted Ground Fault Slope 0 to 100 1 F1 10 2214 Winding 3 Restricted Ground Fault Delay 0 00 to 600 00 0 01 s F3 10 0 10 s 2215 Winding 3 Restricted Ground Fault Block F87 0 Disabled 2216 Reserved 2245 Reserved WINDING 1 NEG SEQ TIME O C 2246 Reserved 224F Reserved 2250 Winding 1 Neg Seq Time O C Function F30 0 Disabled 225...

Page 212: ...A0 Winding 3 Neg Seq Inst O C Function F30 0 Disabled 22A1 Winding 3 Neg Seq Inst O C Target F46 1 Latched 22A2 Winding 3 Neg Seq Inst O C Pickup 0 05 to 20 00 0 01 CT F3 1000 10 00 CT 22A3 Winding 3 Neg Seq Inst O C Delay 0 to 60000 1 ms F1 0 ms 22A4 Winding 3 Neg Seq Inst O C Block F87 0 Disabled UNDER FREQUENCY 1 22A5 Reserved 22AF Reserved 22B0 Underfrequency 1 Function F30 0 Disabled 22B1 Und...

Page 213: ...F3 6050 60 5 Hz 22E4 Overfrequency Delay 0 00 to 600 00 0 01 s F3 500 5 00 s 22E5 Overfrequency Block F87 0 Disabled 22E6 Overfrequency Current Sensing F30 1 Enabled 22E7 Overfrequency Minimum Operating Voltage 0 10 to 0 99 0 01 VT F3 50 0 50 VT 22E8 Reserved 22EF Reserved 5th HARMONIC LEVEL 22F0 5th Harmonic Level Function F30 0 Disabled 22F1 5th Harmonic Level Target F46 0 Self reset 22F2 5th Ha...

Page 214: ...D Level Delay 0 to 60000 1 s F1 10 s 2335 Winding 2 THD Level Block F87 0 Disabled 2336 Reserved 233F Reserved WINDING 3 THD LEVEL 2340 Winding 3 THD Level Function F30 0 Disabled 2341 Winding 3 THD Level Target F46 0 Self reset 2342 Winding 3 THD Level Min Operating Current 0 03 to 1 00 0 01 CT F3 10 0 10 CT 2343 Winding 3 THD Level Pickup 0 1 to 50 0 0 1 ƒo F2 500 50 0 2344 Winding 3 THD Level D...

Page 215: ...9F Reserved ANALOG INPUT LEVEL 1 23A0 Analog Input Level 1 Function F30 0 Disabled 23A1 Analog Input Level 1 Target F46 0 Self reset 23A2 Analog Input Level 1 Pickup 1 to 65000 1 Units F1 10 Units 23A3 Analog Input Level 1 Delay 0 to 60000 1 s F1 50 s 23A4 Analog Input Level 1 Block F87 0 Disabled 23A5 Reserved 23AF Reserved ANALOG INPUT LEVEL 2 23B0 Analog Input Level 2 Function F30 0 Disabled 23...

Page 216: ...d 2405 Reserved 240F Reserved TAP CHANGER FAILURE 2410 Tap Changer Failure Function F30 0 Disabled 2411 Tap Changer Failure Target F46 0 Self reset 2412 Tap Changer Failure Delay 0 to 600 00 0 01 s F3 500 5 00 s 2413 Tap Changer Failure Block F87 0 Disabled 2414 Reserved 3FFF Reserved Trace Memory Addresses 4000 to 47FF Read Only TRACE MEMORY 4000 Trace Memory Last Clear Date 2 registers F23 4002 ...

Page 217: ...F1 0 5166 Force Analog Output 7 D A Count 0 to 4095 1 F1 0 CALIBRATION SAMPLE DATA 51A0 Winding 1 Phase A Current Sample F70 51A1 Winding 1 Phase B Current Sample F70 51A2 Winding 1 Phase C Current Sample F70 51A3 Winding 1 2 Ground Current Sample F70 51A4 Winding 2 Phase A Current Sample F70 51A5 Winding 2 Phase B Current Sample F70 51A6 Winding 2 Phase C Current Sample F70 51A7 Winding 2 3 Groun...

Page 218: ...283 hex F15 16 bits INSTALLED OPTIONS xxxx xxxx xxxx xxx1 Windings Per Phase 0 Two Windings 1 Three Windings xxxx xxxx xxxx xx1x Rating of Winding 1 Phase Current Inputs 0 1 A 1 5 A xxxx xxxx xxxx x1xx Rating of Winding 2 Phase Current Inputs 0 1 A 1 5 A xxxx xxxx xxxx 1xxx Rating of Winding 3 Phase Current Inputs 0 1 A 1 5 A xxxx xxxx xxx1 xxxx Rating of Winding 1 2 Ground Current Inputs 0 1 A 1 ...

Page 219: ...xxxx 0000 0000 1111 15 W1 Neutral Inst 1 OC xxxx 0000 0001 0000 16 W2 Neutral Inst 1 OC xxxx 0000 0001 0001 17 W3 Neutral Inst 1 OC xxxx 0000 0001 0010 18 W1 Neutral Inst 2 OC xxxx 0000 0001 0011 19 W2 Neutral Inst 2 OC xxxx 0000 0001 0100 20 W3 Neutral Inst 2 OC xxxx 0000 0001 0101 21 W1 Ground Time OC xxxx 0000 0001 0110 22 W2 Ground Time OC xxxx 0000 0001 0111 23 W3 Ground Time OC xxxx 0000 000...

Page 220: ...led xxxx 0000 0111 0110 118 Simulation Prefault xxxx 0000 0111 0111 119 Simulation Fault xxxx 0000 0111 1000 120 Simulation Playback xxxx 0000 0111 1001 121 Logic Input Reset xxxx 0000 0111 1010 122 Front Panel Reset Table 7 6 745 DATA FORMATS Sheet 5 of 25 CODE APPLICABLE BITS DEFINITION F24 con t xxxx 0000 0111 1011 123 Comm Port Reset xxxx 0000 0111 1100 124 Manual Trace Trigger xxxx 0000 0111 ...

Page 221: ...00 0100 1101 77 D d120 d180 0000 0000 0100 1110 78 D d120 y150 Table 7 6 745 DATA FORMATS Sheet 7 of 25 CODE APPLICABLE BITS DEFINITION F28 con t 0000 0000 0100 1111 79 D d120 y330 0000 0000 0101 0000 80 D d180 d0 0000 0000 0101 0001 81 D d180 d120 0000 0000 0101 0010 82 D d180 d180 0000 0000 0101 0011 83 D d180 d300 0000 0000 0101 0100 84 D d180 y150 0000 0000 0101 0101 85 D d180 y330 0000 0000 0...

Page 222: ...Table 7 6 745 DATA FORMATS Sheet 9 of 25 CODE APPLICABLE BITS DEFINITION F41 16 bits RTD TYPE 0000 0000 0000 0000 0 100 ohm Platinum 0000 0000 0000 0001 1 120 ohm Nickel 0000 0000 0000 0010 2 100 ohm Nickel 0000 0000 0000 0011 3 Monthly Average F42 16 bits ANALOG INPUT RANGE 0000 0000 0000 0000 0 0 1 mA 0000 0000 0000 0001 1 0 5 mA 0000 0000 0000 0010 2 4 20 mA 0000 0000 0000 0011 3 0 20 mA F43 16...

Page 223: ...st O C 1 0000 1010 10 Winding 2 Phase Inst O C 1 0000 1011 11 Winding 3 Phase Inst O C 1 0000 1100 12 Winding 1 Phase Inst O C 2 0000 1101 13 Winding 2 Phase Inst O C 2 0000 1110 14 Winding 3 Phase Inst O C 2 0000 1111 15 Winding 1 Neutral Time O C 0001 0000 16 Winding 2 Neutral Time O C 0001 0001 17 Winding 3 Neutral Time O C 0001 0010 18 Winding 1 Neutral Inst O C 1 0001 0011 19 Winding 2 Neutra...

Page 224: ...ATA FORMATS Sheet 13 of 25 CODE APPLICABLE BITS DEFINITION F47 con t 0000 0001 1 Virtual Output 2 0000 0010 2 Virtual Output 3 0000 0011 3 Virtual Output 4 0000 0100 4 Virtual Output 5 0000 1111 xxxx xxxx Token Timer Operated 0000 0000 0 Timer 1 0000 0001 1 Timer 2 0000 0010 2 Timer 3 0000 0011 3 Timer 4 0000 0100 4 Timer 5 0000 0101 5 Timer 6 0000 0110 6 Timer 7 0000 0111 7 Timer 8 0000 1000 8 Ti...

Page 225: ...nput 1 0 Not Asserted 1 Asserted xxxx xxxx xxxx xx1x Input 2 0 Not Asserted 1 Asserted xxxx xxxx xxxx x1xx Input 3 0 Not Asserted 1 Asserted xxxx xxxx xxxx 1xxx Input 4 0 Not Asserted 1 Asserted xxxx xxxx xxx1 xxxx Input 5 0 Not Asserted 1 Asserted xxxx xxxx xx1x xxxx Input 6 0 Not Asserted 1 Asserted xxxx xxxx x1xx xxxx Input 7 0 Not Asserted 1 Asserted xxxx xxxx 1xxx xxxx Input 8 0 Not Asserted ...

Page 226: ...ATA FORMATS Sheet 17 of 25 CODE APPLICABLE BITS DEFINITION F65 16 bits TRACE MEMORY CHANNEL 0000 0000 0000 0000 0 W1 Ia 0000 0000 0000 0001 1 W1 Ib 0000 0000 0000 0010 2 W1 Ic 0000 0000 0000 0011 3 W2 Ia 0000 0000 0000 0100 4 W2 Ib 0000 0000 0000 0101 5 W2 Ic 0000 0000 0000 0110 6 W3 Ia 0000 0000 0000 0111 7 W3 Ib 0000 0000 0000 1000 8 W3 Ic 0000 0000 0000 1001 9 W1 2 Ig 0000 0000 0000 1010 10 W2 ...

Page 227: ...2 0000 0000 0000 1100 12 Virtual Output 3 0000 0000 0000 1101 13 Virtual Output 4 0000 0000 0000 1110 14 Virtual Output 5 Table 7 6 745 DATA FORMATS Sheet 19 of 25 CODE APPLICABLE BITS DEFINITION F77 16 bits BAD TRANSFORMER SETTINGS ERROR 0000 0000 0000 0000 0 None 0000 0000 0000 0001 1 W1 W2 Ratio Mismatch 0000 0000 0000 0010 2 W1 W3 Ratio Mismatch 0000 0000 0000 0011 3 Load Loss 0000 0000 0000 0...

Page 228: ... Inv Curve 3 Table 7 6 745 DATA FORMATS Sheet 21 of 25 CODE APPLICABLE BITS DEFINITION F87 16 bits BLOCK SIGNAL 0000 0000 0000 0000 0 Disabled 0000 0000 0000 0001 1 Logic Input 1 0000 0000 0000 0010 2 Logic Input 2 0000 0000 0000 0011 3 Logic Input 3 0000 0000 0000 0100 4 Logic Input 4 0000 0000 0000 0101 5 Logic Input 5 0000 0000 0000 0110 6 Logic Input 6 0000 0000 0000 0111 7 Logic Input 7 0000 ...

Page 229: ... 6 745 DATA FORMATS Sheet 23 of 25 CODE APPLICABLE BITS DEFINITION F93 16 bits SIGNED VALUE AUTORANGING BASED ON WINDING 1 PHASE CT PRIMARY For CT PRIMARY 2 A Format Signed value 3 decimal places Example 1 234 stored as 1234 For 2 A CT PRIMARY 20 A Format Signed value 2 decimal places Example 12 34 stored as 1234 For 20 A CT PRIMARY 200 A Format Signed value 1 decimal place Example 123 4 stored as...

Page 230: ... 1 decimal place Example 123 4 stored as 1234 For 200 A CT PRIMARY 2000 A Format Signed value Example 1234 stored as 1234 For CT PRIMARY 2000 A Format Signed value scaled by 10 Example 12340 stored as 1234 F99 16 bits PORT USED FOR DNP 0000 0000 0000 0000 0 None 0000 0000 0000 0001 1 Com 1 0000 0000 0000 0010 2 Com 2 0000 0000 0000 0011 3 Front F100 16 bits COOLING TYPE FOR DRY TRANSFORMER 0000 00...

Page 231: ...ata Link Layer Confirmation Never Always Sometimes Configurable Note 1 Requires Application Layer Confirmation Never Always When reporting Event Data When sending multi fragment responses Sometimes Configurable Timeouts while waiting for Data Link Confirm None Fixed Variable Configurable Note 1 Complete Appl Fragment None Fixed Variable Configurable Application Confirm None Fixed Variable Configur...

Page 232: ...Input Change Events when no specific variation requested Never Binary Input Change With Time Binary Input Change With Relative Time Configurable Sends Unsolicited Responses Never Configurable Only certain objects Sometimes ENABLE DISABLE UNSOLICITED Function codes supported Sends Static Data in Unsolicited Responses Never When Device Restarts When Status Flags Change Default Counter Object Variati...

Page 233: ...ations 1 06 1 1 Binary Input 1 00 01 06 129 00 01 1 2 Binary Input With Status 1 00 01 06 129 00 01 2 0 Binary Input Change All Variations 1 06 07 08 2 1 Binary Input Change Without Time 1 06 07 08 129 17 28 2 2 Binary Input Change With Time 1 06 07 08 129 17 28 10 0 Binary Output All Variations 1 06 10 2 Binary Output Status 1 00 01 06 129 00 01 12 1 Control Relay Output Block 3 4 5 6 17 28 129 1...

Page 234: ... 4 Operated Class 1 Note 1 4 Logic Input 5 Operated Class 1 Note 1 5 Logic Input 6 Operated Class 1 Note 1 6 Logic Input 7 Operated Class 1 Note 1 7 Logic Input 8 Operated Class 1 Note 1 8 Logic Input 9 Operated Class 1 Note 1 9 Logic Input 10 Operated Class 1 Note 1 10 Logic Input 11 Operated Class 1 Note 1 11 Logic Input 12 Operated Class 1 Note 1 12 Logic Input 13 Operated Class 1 Note 1 13 Log...

Page 235: ...ll reflect the success or failure of the control attempt thus A Status of Request Accepted 0 will be returned if the command was accepted A Status of Request not Accepted due to Formatting Errors 3 will be returned if the Control Code field was incor rectly formatted If select operate was used a status of Arm Timeout 1 or No Select 2 is returned if the associated failure condi tion is detected An ...

Page 236: ... 10 130 F81 Winding 1 Ground Current Magnitude Class 1 Notes 5 9 11 131 F1 Winding 1 Loading Class 1 12 132 F78 Winding 1 Average Phase Current Magnitude Class 1 Note 6 13 133 F79 Winding 2 Phase A Current Magnitude Class 1 Note 7 14 134 F79 Winding 2 Phase B Current Magnitude Class 1 Note 7 15 135 F79 Winding 2 Phase C Current Magnitude Class 1 Note 7 16 136 F79 Winding 2 Neutral Current Magnitud...

Page 237: ... F2 Winding 3 Phase C Total Harmonic Distortion Class 1 Note 5 51 171 F3 System Frequency Class 1 Note 3 52 172 F1 Tap Changer Position Class 1 53 173 F3 System Line To Line Voltage Class 1 Note 5 54 174 F3 Volts Per Hertz Class 1 Note 5 55 175 F3 Line To Neutral Voltage Magnitude Class 1 Note 5 56 176 F4 Ambient Temperature Class 1 Note 5 57 177 F4 Hottest Spot Winding Temperature Class 1 Note 5 ...

Page 238: ...he scaling is determined by the value from Point 1 8 As for Note 6 except the affected formats are F80 and F95 and the scaling is determined by the value from Point 2 9 As for Note 6 except the affected format is F81 and the scaling is determined by the value read from Point 3 10 As for Note 6 except the affected format is F82 and the scaling is determined by the value read from Point 4 11 As for ...

Page 239: ...MES tests all features that can cause a trip including differential overcurrent over and under frequency elements AUXILIARY PROTECTION MONITORING FUNCTIONS PLACING RELAY INTO SERVICE SETPOINT TABLES 8 1 2 TESTING PHILOSOPHY The 745 is realized with digital hardware and software algorithms using extensive internal monitoring Consequently it is expected that if the input circuits CTs VTs power suppl...

Page 240: ...WET CONTACTS ARE CONNECTED TO VOLTAGES BELOW THE MAXI MUM VOLTAGE SPECIFICATION OF 300 V DC 8 1 4 CONVENTIONS The following conventions are used for the remainder of this chapter All setpoints and actual values are mentioned with their path as a means of specifying where to find the particular mes sage For instance the setpoint WINDING 1 PHASE CT PRIMARY which in the message structure is located u...

Page 241: ...n this section If you do not have a sophisticated test set then you will need the following con ventional equipment Variable current source able to supply up to 40 A depends on relay settings Variable power resistors to control current amplitude Ten turn 2 KΩ low power potentiometer Power rectifier to build a circuit to generate 2nd harmonics Accurate timing device Double pole single throw contact...

Page 242: ...nts have been enabled using the 745PC software or the relay front panel 5 Verify that the relay rated AC current matches the CT secondary value 6 Verify that the relay rated AC voltage matches the VT secondary value 7 Verify that the relay rated frequency setting matches the power system frequency 8 Open all blocking switches so as not to issue an inadvertent trip signal to line breakers 9 Verify ...

Page 243: ...ilter out high voltage transients radio frequency interference RFI and electromagnetic interference EMI The filter capacitors and transient suppressors could be damaged by application continuous high voltage Discon nect filter ground terminal G11 during testing of control power and trip coil supervision CT inputs VT inputs and output relays do not require any special precautions Low voltage inputs...

Page 244: ...s Check that the input state is detected and displayed as Asserted 6 Repeat for all the relay logic inputs which are used in your application 8 3 2 OUTPUT RELAYS 1 To verify the proper functioning of the output relays enable the Force Output Relays function by setting S6 TESTING Ö OUTPUT RELAYS Ö FORCE OUTPUT RELAYS FUNCTION Enabled The Test Mode LED on the front of the relay will come ON indicati...

Page 245: ...Winding 1 Phase A current is used as the reference for all angle measurements Iphase rms displayed Iphase input x CT ratio for that winding The phase angle will be 0 for all phase currents if the same current is injected in all phase input CTs Sequence com ponents will be EQ 8 1 4 Since the transformer load is calculated using the Phase A current the displayed load should be where EQ 8 2 5 Verify ...

Page 246: ... apply correction factors to match the current signals under steady state conditions Consider the case of a Y D30 power transformer with the following data using a 1 A CT secondary rating for the relay Winding 1 100 MVA 220 kV 250 1 CT ratio rated current is 262 4 A hence CT ratio of 250 1 Winding 2 100 MVA 69 kV 1000 1 CT ratio rated current is 836 8 A hence CT ratio of 1000 1 The 1000 1 CT ratio...

Page 247: ...e divided by the CT error correction factor of 0 797 as described above Therefore the value of differential current for Phase A when injecting 1 CT in Winding 2 only is EQ 8 9 The action of removing the zero sequence current results in a current equal to the zero sequence value introduced into phases B and C Hence the differential current for these two elements is EQ 8 10 Now applying 1 CT into Wi...

Page 248: ...ion of resistance versus temperature c AMBIENT TEMPERATURE BY MONTHLY AVERAGES 1 If the ambient temperature is entered as 12 monthly averages program the value for the month during which the relay is being commissioned 2 Examine the A2 METERING ÖØ AMBIENT TEMP Ö AMBIENT TEMPERATURE actual value to verify the programmed temper ature 3 Verify that values entered for other months do not affect the va...

Page 249: ...r each Analog Output 8 4 7 TAP POSITION 1 The Analog Input used to sense tap position is programmed with the S2 SYSTEM SETUP ÖØ ONLOAD TAP CHANGER set points 2 To verify the operation of this circuit connect a variable resistor across terminals A3 and A4 The resistor range should cover the full range of resistance produced by the tap changer mechanism The tap position is displayed in A2 METER ING ...

Page 250: ...ting when the element operates 3 Check that the Trip and Message LEDs are flashing and one of the following trip messages is displayed The above message will indicate either OPERATED or LATCHED depending on the S4 ELEMENTS ÖØ DIFFEREN TIAL Ö PERCENT DIFFERENTIAL ÖØ PERCENT DIFFERENTIAL TARGET setting 4 To independently verify that auto configuration causes the currents to be as measured follow the...

Page 251: ...Logic Input 1 The target should reset d VERIFICATION OF SOLID STATE OUTPUT 1 If the solid state output is used to drive auxiliary relays verify that these relays operate whenever the relay is in a trip condition Ensure that the current though the auxiliary coils is interrupted by an external contactor between each test 2 To avoid operating the breaker during the commissioning process when the soli...

Page 252: ...gnals to the relay as shown in the figure below Figure 8 6 CURRENT SIGNAL CONNECTIONS 2 If I1 1 5 CT and I2 0 the element is operated as all the current appears as a differential current 3 The slope is calculated from the values of Idifferential and Irestraint as follows 4 Slowly increase I2 As I2 is increased the element will reset when the differential current drops below the minimum pickup 5 As...

Page 253: ... shown below Current is supplied as an operating current to the Phase A element Figure 8 7 2ND HARMONIC RESTRAINT TESTING 1 Close switch S1 Set the AC current IAC to 2 rated CT secondary Set IDC to obtain harmonic content above the 2nd harmonic restraint setting under S4 ELEMENTS ÖØ DIFFERENTIAL ÖØ HARMONIC INHIBIT ÖØ HARMONIC INHIBIT LEVEL 2 Calculate the percent second harmonic content from the ...

Page 254: ...IZATION INHIBIT LEVEL 15 ENERGIZATION INHIBIT DURATION 5 s ENERGIZATION SENSING BY CURRENT Enabled ENERGIZATION INHIBIT MINIMUM ENERGIZATION CURRENT 0 10 CT 3 Preset current with harmonic content just above the ENERGIZATION INHIBIT LEVEL used during the energization period Apply the current signal and measure the operating time The time should be equal to energization period plus approximately 50 ...

Page 255: ... switch and record operating time of relay All the differential currents are calculated using the same principal used in Section 8 4 4 Transformer Type Selection on page 8 8 The differential current derivation is affected by phase shift compensation and zero sequence removal c TARGET OUTPUT CONTACT AND DISPLAY OPERATION Verify the correct operation of all targets and output contacts and display me...

Page 256: ...y 98 of the pickup level Once the relay drops out slowly increase the current until the trip contact closes The operate level should correspond to the pickup setting 2 Check that one of the following messages is displayed 3 The message will indicate LATCHED or OPERATED depending on the setting for the target c OPERATING TIME Using a table like the one shown below select three 3 or four 4 values of...

Page 257: ...that only the Phase Instantaneous Overcurrent 1 element operates the trip relays and any other output relays selected by the logic disable all protection features except Phase Instantaneous Overcurrent 1 Use the general test setup shown in Figure 8 9 General Test Setup on page 8 18 Connect the current supply to terminals X H1 and Y G1 to test the Winding 1 Phase A element Monitor the appropriate o...

Page 258: ...rvice at the same time WINDING 1 ELEMENT To ensure that only the Neutral Time Overcurrent element under test operates the trip relays and any other output relays selected by the logic disable all protection features except Neutral Time Overcurrent Use the general test setup shown in Figure 8 9 General Test Setup on page 8 18 Connect the current supply to terminals X H1 and Y G1 to test the Winding...

Page 259: ...rameters than the Winding 1 elements it is nec essary to repeat the full set of tests described above for each winding To test Winding 2 elements disable all protection elements except for W2 NEUTRAL TIME OVERCURRENT Connect the current signal to X H4 and Y G4 and repeat tests in this section To test Winding 3 elements disable all protection elements except for W3 NEUTRAL TIME OVERCURRENT Con nect...

Page 260: ... ele ments can be assigned a multitude of timing curves a table of expected operating times versus applied current should be prepared prior to testing The ground element measures the current signal connected to the ground current input CT H10 and G10 or F12 and E12 Refer to Time Overcurrent Curves on page 5 49 for information on timing curves There can only be one or two Ground Time Overcurrent el...

Page 261: ...le external contact triggering To perform such a test contact GE Multilin for detailed test instructions A simple verification of the reset mode selected with the S4 ELEMENTS ÖØ GROUND OC Ö W1 GND TIME OC ÖØ W1 GROUND TIME OC RESET setpoint is obtained using the setup in Figure 8 9 General Test Setup on page 8 18 The procedure con sists of repetitive operating time measurements in quick succession...

Page 262: ...of the following messages is displayed 3 Reduce the current until the element resets The reset level should be 97 of the operate level When the element resets the Trip Ground and Message LEDs should remain on if the W1 GND INST OC 1 TARGET was selected as Latched Otherwise only the Trip LED should stay on 4 Reset indicators and clear messages OPERATING TIME Using the setup shown in Figure 8 9 Gene...

Page 263: ...shown on the figure above 4 Verify the ground current and Phase A current are in phase 5 Verify the ground differential current is zero The polarities and wirings of the CTs for the RGF protection are correct if the external phase to ground fault current is seen on both relay terminals phase and ground in the same direction The response of the RGF protection is based on the magnitude of the ground...

Page 264: ... LED should remain on 4 Reset indicators and clear messages OPERATING TIME Select three 3 or four 4 delay times at which the timing is to be measured With the Interval Timer enabled set the cur rent level to the desired value and apply suddenly by closing the double pole switch Record the operate time and compare to the expected value Repeat for the all the desired values of current SLOPE 1 To mea...

Page 265: ...SEQ OC Ö W1 NEG SEQ TIME OC settings menu WINDING 1 ELEMENT To ensure that only the Negative Sequence Time Overcurrent element operates the trip relays and any other output relays selected by the logic disable all protection features except Negative Sequence Time Overcurrent Use the general test setup shown in Figure 8 9 General Test Setup on page 8 18 Connect the current supply to terminals X H1 ...

Page 266: ...ding To test these elements disable all protection elements except for Winding 2 Negative Sequence Time Overcurrent Con nect the current signal to X H4 and Y G4 Repeat all the tests described for the Winding 1 element in this section For Winding 3 connect the current signal to X H7 and Y G7 The blocking from logic input if enabled can be tested as described in earlier tests for other elements 8 5 ...

Page 267: ... to test the Winding 2 element Use X H7 and Y G7 for the Winding 3 element The blocking from logic input if enabled can be tested as described in earlier tests for other elements 8 5 13 FREQUENCY a SETUP The power system frequency is measured from the voltage input if it has been enabled If there is no voltage input it is measured from the Winding 1 Phase A current signal These tests require a var...

Page 268: ... and one of the following trip messages is displayed 10 Slowly increase the frequency until the Pickup LED and output relays reset Note the dropout level which should be the pickup plus 0 03 Hz Check that the Trip LED is still on The trip message will stay on if the UNDERFREQUENCY 1 TARGET setting is Latched if set to Self resetting the message will reset when frequency is above the setpoint 11 Fo...

Page 269: ...QUENCY Ö UNDERFREQUENCY 1 ÖØ UNDERFREQUENCY 1 DELAY setting 11 Provided that the operate times are not scattered over a wide range it may be desirable to repeat this test several times and average the results If there is a wide scatter verify the test setup and ensure the signal source behaves in a consistent manner The blocking from logic input if enabled can be tested as described in earlier tes...

Page 270: ... this element 11 Set the post trigger to 0 5 Hz above the setting of the Overfrequency element If necessary reset all targets and relays Reset the timer 12 Initiate the frequency step and timer start The Interval Timer records the operating time of element Compare this time to the S4 ELEMENTS ÖØ FREQUENCY ÖØ OVERFREQUENCY DELAY setting 13 Provided that the operate times are not scattered over a wi...

Page 271: ...g the necessary changes where appropriate VOLTAGE INPUT FUNCTION VOLTAGE INPUT ENABLED 1 Use a frequency ramping programmable voltage current source connected to terminals C11 and C12 for the voltage signal and H1 and G1 for the current signal Set the frequency to 60 00 Hz or 50 00 Hz and the voltage amplitude to the rated VT secondary voltage Set the current amplitude to rated CT secondary Note i...

Page 272: ...ELEMENTS ÖØ FREQUENCY ÖØ FREQUENCY DECAY ÖØ FREQUENCY DECAY DELAY time delay 8 5 14 OVEREXCITATION a VOLTS PER HERTZ The following procedure applies to both Volts Per Hertz elements make the necessary changes where appropriate The volts per hertz operating levels are set in terms of the relay input voltage divided by the frequency of that voltage 1 Disable all elements except Volts Per Hertz 1 Mon...

Page 273: ...ST SPOT LIMIT PICKUP operating level the element should operate Verify all programmed relay operations as per FlexLogic settings Verify that all the targets and messages are as expected and programmed The time delay can be verified with a watch as the delay is normally set in minutes b AGING FACTOR LIMIT The Aging Factor value is also a function of load ambient temperature and transformer ratings ...

Page 274: ...mately 2 less than the operate value Verify that the Phase Pickup and Alarm LEDs reset if the target function is set to Self resetting The Trip LED should remain latched OPERATING TIME To measure the basic operating time of this element preset a fundamental and DC component composite current signal to cause the element to operate Using the setup of Figure 10 1 apply the current suddenly at the sam...

Page 275: ...d DC component composite current signal to cause the element to operate Using the setup of Figure 8 1 Test Setup on page 8 3 apply the current suddenly at the same time the timer is triggered The measured operating time should correspond to the time delay setting for the element 8 6 3 TRANSFORMER OVERLOAD The transformer overload element uses the Phase A current of each winding to compute a transf...

Page 276: ...inal inspection to confirm that all setpoints are correct 3 Set the 745 clock date and time 4 Clear all historical values stored in the relay by entering Yes at A3 EVENT RECORDER ÖØ EVENT DATA CLEAR Ö CLEAR EVENT RECORDER 5 Remove all test connections supplies monitoring equipment from the relay terminals and relay panels except for equipment to be used to monitor first transformer energization Re...

Page 277: ... 1997 Electromagnetic Compatibility Requirements Part 2 Industrial Environment IEC100 4 3 EN 61000 4 3 Immunity to Radiated RF EN 61000 4 6 Immunity to Conducted RF Manufacturer s Name General Electric Multilin Inc Manufacturer s Address 215 Anderson Ave Markham Ontario Canada L6E 1B3 Manufacturer s Representative in the EU Christina Bataller Mauleon GE Multilin Avenida Pinoa 10 48710 Zamudio Spai...

Page 278: ...ed with all transportation charges prepaid to an authorized service centre or the factory Repairs or replacement under warranty will be made without charge Warranty shall not apply to any relay which has been subject to mis use negligence accident incorrect installation or use not in accor dance with instructions nor any unit that has been altered outside a GE Multilin authorized factory outlet GE...

Page 279: ...DEMAND actual values 6 11 setpoints 5 85 CURRENT METERING 6 5 6 6 6 7 CURVES definite time 5 53 FlexCurves 5 53 IAC 5 52 IEC 5 51 IEEE 5 50 types 5 49 D DATE 6 3 DEFAULT MESSAGES 5 27 DEFINITE TIME CURVE 5 53 DEMAND DATA CLEAR 6 11 DEMAND METERING actual values 6 10 6 11 setpoints 5 36 DIELECTRIC STRENGTH TESTING 8 5 DIFFERENTIAL instantaneous differential 5 48 percent differential 5 41 setpoints ...

Page 280: ...s 5 80 INVERSE CURVE 1 5 76 IRIG B 3 14 K KEYPAD actual key 4 4 control keys 4 3 enter key 4 4 escape key 4 4 help key 4 4 message keys 4 4 next key 4 4 number keys 4 4 reset key 4 4 setpoint key 4 3 value keys 4 4 KNEEPOINT 8 15 L LEDs alarm 4 3 description 4 2 differential blocked 4 2 ground 4 3 in logic diagrams 5 39 in service 4 2 load limit reduced 4 3 LOCAL 4 2 message 4 2 phase A 4 3 phase ...

Page 281: ...N 5 8 PHASE B INDICATOR 4 3 PHASE C INDICATOR 4 3 PHASE INSTANTANEOUS OVERCURRENT setpoints 5 55 testing 8 19 8 20 PHASE OVERCURRENT 5 49 PHASE SEQUENCE 3 8 PHASE SHIFTS description 5 22 table 5 22 three phase transformers 5 7 PHASE TIME OVERCURRENT setpoints 5 53 testing 8 17 PHASORS ABC sequence 5 7 ACB sequence 5 8 PICKUP INDICATOR 4 3 PLACING THE RELAY INTO SERVICE 8 38 POWER METERING 6 12 PRE...

Page 282: ...saving setpoints 4 10 toolbar summary 4 5 SOFTWARE REVISION 6 17 SOLID STATE OUTPUT TEST CIRCUIT 8 13 SOLID STATE TRIP OUTPUT 3 11 SPECIFICATIONS 1 4 STATUS INDICATORS 4 2 SYSTEM STATUS INDICATORS 4 3 T TAP CHANGER 6 10 TAP CHANGER FAILURE 5 87 TAP MONITOR FAILURE 8 35 TAP POSITION 8 11 TAP POSITION INPUT 3 10 5 6 TARGET MESSAGES 6 18 TECHNICAL SUPPORT 6 17 TEMPERATURE ambient 5 34 6 11 8 9 8 10 R...

Reviews: