Revision A
Transport Pro
9-11
2012659-042
Checkout: Recommended Tests and Checkout Procedures
Required Tools/Equipment
See the chart below for the equipment necessary to perform this checkout
procedure. Equivalent equipment may be substituted.
Power Test
All control panel indicators will illuminate until the power-up sequence
is complete. After approximately 10 seconds you should see a display.
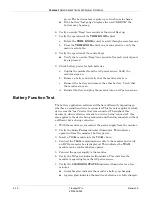
1. Remove all batteries and unplug the monitor from the AC power
source to turn the monitor off.
2. Restore the batteries to the monitor and plug the monitor into the AC
power source to turn the monitor on.
3. Verify the monitor turns on and verify the DC power indicator is
illuminated.
4. Verify all of the control panel indicators illuminate on power up.
5. Verify the DC power indicator on the monitor stays illuminated.
NOTE
If the DC power indicator stays on, but the display is blank, the
monitor is likely in “standby mode” (battery charging). Press and
hold the
Power
button for approximately 0.25 seconds to enter
the normal mode.
If the DC power indicator is on, continue with the tests.
If either of the
Charging Status
indicators is yellow, wait for
the batteries to fully charge and the indicators to illuminate
Foot and battery door
None
None
Handle
Recommended Electrical Safety Tests and Checkout Procedures
Replacement or
Upgrade
Checkout Procedures
Electrical Safety Tests
Item
Manufacturer/Model
TRAM 100-851N module
GE
Multifunctional Micro-simulator
MARQ-III
Oscilloscope
Tektronix 2215
External power supply
GE
Known good battery
GE
TRAM communication cable
GE
Standard category 5 cross-over cable
GE
Summary of Contents for Transport Pro
Page 1: ...Transport Pro Patient Monitor Service Manual Software Version 2 2024579 018 Revision A ...
Page 9: ...Revision A Transport Pro 1 1 2012659 042 1 Introduction ...
Page 12: ...1 4 Transport Pro Revision A 2012659 042 Introduction Safety Message Definitions ...
Page 13: ...Revision A Transport Pro 2 1 2012659 042 2 Equipment Overview ...
Page 28: ...2 16 Transport Pro Revision A 2012659 042 Equipment Overview Theory of Operation ...
Page 29: ...Revision A Transport Pro 3 1 2012659 042 3 Installation ...
Page 33: ...Revision A Transport Pro 4 1 2012659 042 4 Configuration ...
Page 38: ...4 6 Transport Pro Revision A 2012659 042 Configuration Monitor Settings ...
Page 39: ...Revision A Transport Pro 5 1 2012659 042 5 Maintenance ...
Page 47: ...Revision A Transport Pro 6 1 2012659 042 6 Troubleshooting ...
Page 57: ...Revision A Transport Pro 7 1 2012659 042 7 Ordering Parts ...
Page 59: ...Revision A Transport Pro 7 3 2012659 042 Ordering Parts Exploded View Exploded View 622A ...
Page 62: ...7 6 Transport Pro Revision A 2012659 042 Ordering Parts Hardware ...
Page 63: ...Revision A Transport Pro 8 1 2012659 042 8 Disassembly ...
Page 83: ...Revision A Transport Pro 9 1 2012659 042 9 Checkout ...
Page 97: ...Revision A Transport Pro A 1 2012659 042 A Technical Specifications ...
Page 100: ...A 4 Transport Pro Revision A 2012659 042 Technical Specifications External Power Supply ...
Page 101: ...Revision A Transport Pro B 1 2012659 042 B Electromagnetic Compatibility ...
Page 109: ......

