background image

Installation Instructions

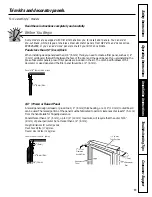
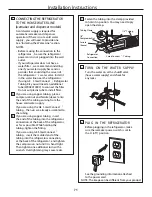
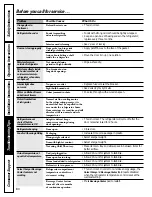
DISCONNECT THE POWER
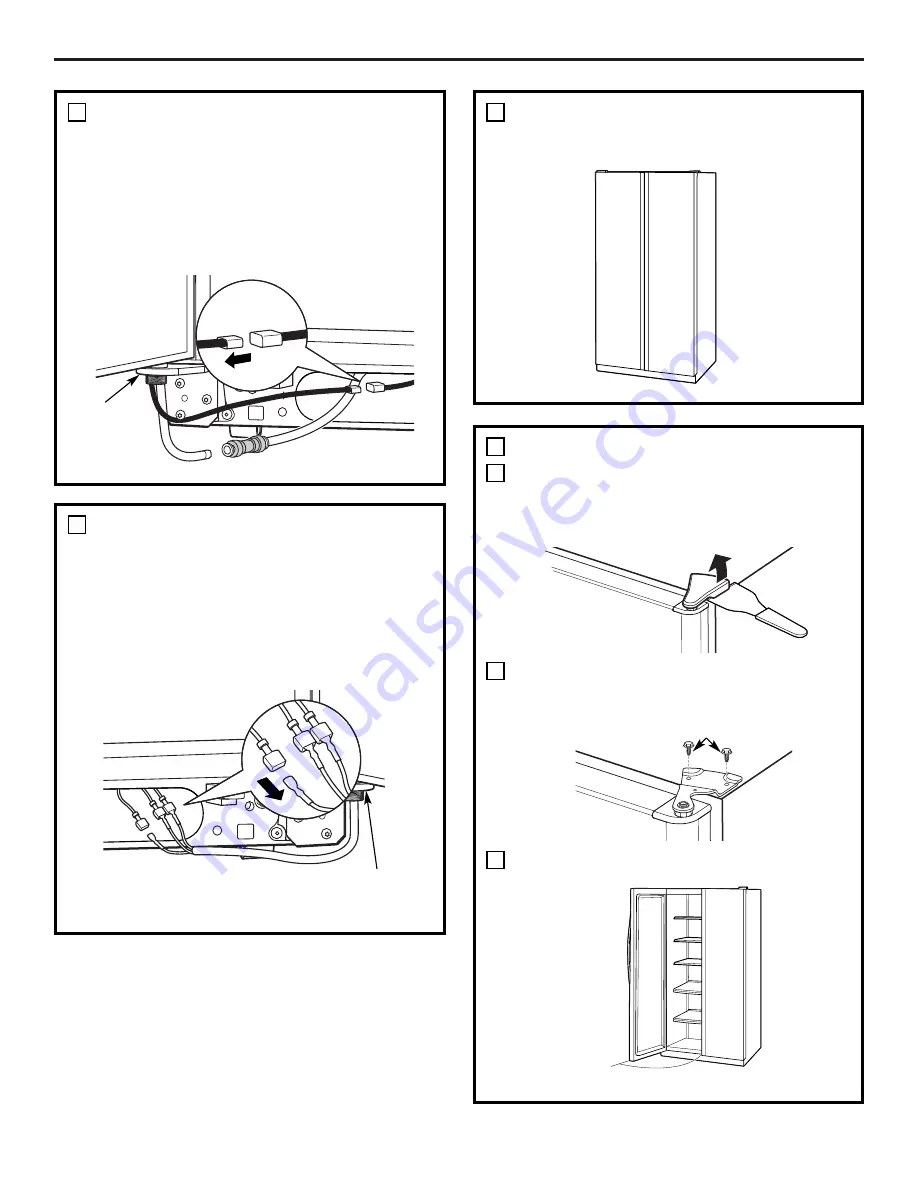
COUPLING (on some models)

If the refrigerator has a water dispenser,

there is a power line (harness) from the
cabinet into the bottom hinge on the
freezer door that must be disconnected.
To disconnect, pull apart at the coupling.

4

Bottom
freezer
hinge

DISCONNECT THE ELECTRICAL
CONNECTORS (on some models)

If the refrigerator has a refreshment
center, 

there are electrical connectors

(harnesses) from the cabinet into the
bottom hinge on the refrigerator door 
that must be disconnected.
To disconnect, pull apart each connector.

5

Bottom
refrigerator 
hinge

CLOSE THE FREEZER AND
REFRIGERATOR DOORS

6

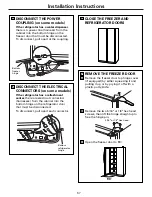
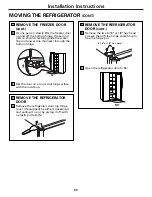
REMOVE THE FREEZER DOOR

Remove the freezer door top hinge cover
(if equipped) by either squeezing it and
pulling it up or by prying it off with a
plastic putty knife.

Remove the two 5/16" or 1/8" hex head
screws, then lift the hinge straight up to
free the hinge pin.

Open the freezer door to 90.

°

7

A

C

B

5/16

"

or 1/8

"

hex head

90

°

67

Summary of Contents for TURBOCOOL 23

Page 1: ...de R L de C V Carr Federal 51 km 110 Poblado de Ojo Seco Tramo Celaya Salvatierra Lea cuidadosa y completamente este manual Leer las instrucciones t cnicas antes de instalar este artefacto Leer las i...

Page 2: ...infla mables cerca de este o cualquier otro aparato Aleje los dedos fuera de las reas donde se puede pinchar los dedos los espacios entre las puertas y entre las puertas y los gabinetes son necesaria...

Page 3: ...ancias recomendamos estrictamente no utilizar un adaptador para clavija Sin embargo si se decidiera usar un adaptador donde los c digos locales lo permitan es necesario hacer una conexi n temporal a u...

Page 4: ...dor Esta caracter stica exclusiva especial en la torre de aire a lo largo de la pared posterior del refrigerador y del t nel de aire en la posici n inferior de la pared posterior del con gelador Coloc...

Page 5: ...congelador El aire del congelador se usa en la funci n Custom Cool Las pruebas muestran un mayor nivel de humedad en la secci n de alimentos frescos en refrigeradores ClimateKeeper2 frente a las unid...

Page 6: ...ntinuar una caracter stica antes de que termine En el caso de los modelos con pantalla de LCD Vaya al men de funciones y presione el bot n OFF C mo usar En el caso de los modelos que no tienen panta l...

Page 7: ...ductos l cteos levante el frente de forma recta luego levante y saque Sosteniendo el lado izquierdo y derecho del centro de bebidas levante directamente hacia arriba y hacia afuera Deje el adaptador e...

Page 8: ...filtro en seis meses Llene el cartucho de reemplazo con agua de la llave para permitir que ocurra un mejor flujo a partir del dispensador inmediatamente despu s de la instalaci n Alinee la flecha del...

Page 9: ...pantalla emergente en la pantalla de LCD para recordarle que debe reemplazar el filtro de agua Puede revisar el estado del filtro de agua de manera manual Vaya a Home luego a Options luego a Dispense...

Page 10: ...ara confir mar el reemplazo Modelos que no tienen pantalla LCD Presione la tecla RESET FILTER en algunos mo delos en el dispensador y mant ngala presionada durante tres segundos NOTA Un cartucho de fi...

Page 11: ...se encuentra m s abajo Este entrepa o se puede sacar y cambiar y tambi n puede reubicarse igual que los entrepa os deslizables a prueba de derramamientos En algunos modelos este entrepa o no puede usa...

Page 12: ...m s altos que el punto inferior en el cubo Entrepa os profundos para la puerta Extensores de entrepa os desmontables profundizan y rodean los entrepa os de la puerta brindando m s espacio y mayor fle...

Page 13: ...cteos Pegue otra vez el estante a los lados de la secci n de productos l cteos Encaje el lado posterior en los apoyos moldeados en la puerta Luego empuje hacia abajo en el frente de la secci n La sec...

Page 14: ...gaveta Gavetas con humedad ajustable Deslice el control hasta llegar a la posici n HI alto para proporcionar el alto nivel de humedad recomendado para la mayor a de los vegetales Deslice el control ha...

Page 15: ...a partida de hielo ha ca do en el cubo dispensa de 3 a 4 cubos de hielo Despu s de 6 horas adicionales dispensa de 3 a 4 cubos otra vez Estos pasos restaurar n su nivel de hielo en la menor cantidad d...

Page 16: ...Para bloquear el dispensador Presione la tecla LOCK Bloqueo durante 3 se gundos para cerrar el dispensador y el panel de control Para desbloquearlo presione la misma te cla durante 3 segundos nuevame...

Page 17: ...ente una cucharada 15 ml de bicarbonato de sodio por cada cuarto 1 litro de agua Esta soluci n limpia y neutraliza olores Enjuague y seque El uso de cualquier soluci n de limpieza que no sea la recome...

Page 18: ...desaguar el sistema del suministro de agua en algunos modelos para evitar da os a la propiedad causados por inundaci n En caso de mudanza Asegure todos los elementos sueltos como entrepa os y recipien...

Page 19: ...ectamente hacia fuera Levante la cubierta de la luz y jale de ella Despu s de reemplazar la bombilla con una bombilla de electrodom sticos del mismo voltaje o inferior reemplace la cubierta y el mango...

Page 20: ...ra los paneles sobre medida Alimentos frescos 38 libras 17 kg m ximo Puerta del congelador 28 libras 13 kg m ximo 1 4 6 mm M x Paneles de 1 4 6 mm de grosor o menos Algunos modelos est n equipados con...

Page 21: ...eles necesitan recortarse 25 Dimensiones CustomStyle de los paneles precortados Las reas superiores de los paneles necesitan recortarse Corte 1 8 3 mm Corte 1 8 3 mm 5 16 8 mm 5 16 8 mm Panel del cong...

Page 22: ...de relleno hacia dentro detr s del panel decorativo esto se requiere en algunos de los paneles para puerta Repita la operaci n para el panel de los alimentos frescos Si su modelo tiene un dispensador...

Page 23: ...la moldura lateral debajo de la moldura de la parte inferior como se ilustra Sujete la moldura lateral contra la cara delantera de los paneles decorativos y sujete la moldura lateral debajo de la mold...

Page 24: ...cubierta por la garant a Si el refrigerador ya ha sido instalado remueva la parrilla base Ver el Paso 2 en C mo mover el Refrigerador entonces pase al Paso 5 en C mo instalar el Refrigerador Instrucci...

Page 25: ...cabeza Phillips 2 Si el refrigerador debe pasar por alguna entrada menor de 38 de ancho entonces las puertas deben ser removidas Proceda al paso 3 NO REMUEVA las manijas Si todas las entradas son m s...

Page 26: ...res el ctricos alambrados desde el gabinete hasta la bisagra del fondo del refrigerador que deben ser desconectados Para desconectar separe cada conectador 5 Bisagra del fondo del refrigerador CIERRE...

Page 27: ...uperficie donde no se ralle con la parte interna hacia arriba 7 D E 90 REMUEVA LA PUERTA DEL REFRIGERADOR Remueva la cubierta de la bisagra superior de la puerta del refrigerador si viene equipado apr...

Page 28: ...reemplazar las puertas simplemente de reversa a los pasos del 3 al 8 Sin embargo note lo siguiente Cuando se encuentre bajando las puertas hacia la bisagra del fondo cerci rese de que una segunda per...

Page 29: ...de plomer a CustomStyle 23 33 de ancho de 23 25 25 26 27 29 Lados 1 8 4 mm 1 8 4 mm Superior 1 25 mm 1 25 mm Posterior 1 2 13 mm 1 25 mm 24 61 cm Gabinete Agua Electricidad 3 4 19 mm de espacio libre...

Page 30: ...tuber as de GE SmartConnect las tuercas est n ya ensambladas a la tuber a Si est usando una tuber a de cobre inserte el extremo de la tuber a en la conexi n del refrigerador en la parte posterior del...

Page 31: ...abierta Levante el frente aproximadamente 5 8 16 mm del piso Los rodillos se ajustan para que el refrigerador est colocado firmemente en el piso y no tambalee Los rodillos se ajustan para que el refri...

Page 32: ...mm 879 mm 738 mm D 1261 mm 1271 mm 1271 mm 1156 mm E 1273 mm 1255 mm 1247 mm 1232 mm F 1051 mm 1093 mm 1099 mm 989 mm G 1386 mm 1381 mm 1381 mm 1361 mm H 1140 mm 1150 mm 1149 mm 1023 mm La altura no i...

Page 33: ...pl sticas aprobadas para el suministro de agua son las tuber as para el refrigerador SmartConnect de GE WX08X10002 WX08X10006 WX08X10015 y WX08X10025 Al conectar su refrigerador a un Sistema de Agua d...

Page 34: ...uministro de agua Antes de comprar aseg rese de que una v lvula tipo silla cumple con los c digos de plomer a en su localidad Instrucciones para la instalaci n CIERRE EL SUMINISTRO PRINCIPAL DE AGUA A...

Page 35: ...en Massachusetts Consulte con un plomero licenciado CONECTE LA TUBER A A LA V LVULA 7 V lvula de apagado tipo silla Tuerca de compresi n Tuerca de empaque V lvula de salida F rula manga Abra el sumini...

Page 36: ...refrigerador se conecta por primera vez Esto pasa a medida que el refrigerador se enfr a hasta la temperatura correcta Los reguladores electr nicos se abren y se cierran para ofrecer un enfriamiento p...

Page 37: ...a Revise si un paquete mantiene la puerta abierta requieren m s tiempo de Clima caluroso o aperturas Eso es normal operaci n Se arrancan y frecuentes de la puerta se paran a para Controles de temperat...

Page 38: ...ea Los controles no es bastante fr o Cubos peque os o huecos Filtro de agua tapado Reemplace el cartucho del filtro con uno nuevo o con el tap n El dispensador de hielo Dispositivo de hielo apagado En...

Page 39: ...l filtro reci n Deje correr el agua desde el dipensador por 3 minutos dispensador instalado aprox 11 2 gal ns No sale agua y el Est tapada la l nea de agua Llame a un plomero dispositivo para hacer o...

Page 40: ...L 0 225 mg L 10 0 2283 mg L 0 000500 mg L 0 000500 mg L 99 78 99 77 0 075 mg L Atrazine 0 003 mg L 0 009 mg L 10 0 0087 mg L 0 0005 mg L 0 0005 mg L 94 22 93 33 0 003 mg L Probado utilizando una tasa...

Page 41: ...BE COLOMBIA Calle 75 22 50 Alta Suiza Manizales Caldas Colombia Notas 41 Usuario Aduanero Permamente 141 Para Argentina Importado por Kronen Internacional S A Valentin G mez 151 Haedo B1706FMA Buenos...

Page 42: ...y recommend that any servicing be performed by a qualified individual Setting either or both controls to the Off position does not remove power to the light circuit Do not refreeze frozen foods which...

Page 43: ...t to roll over or damage the power cord USE OF ADAPTER PLUGS Adapter plugs not permitted in Canada Because of potential safety hazards under certain conditions we strongly recommend against the use of...

Page 44: ...T light will come on and the display will show the set temperature To change the temperature tap either the WARMER or COLDER pad until the desired temperature is dis played Once the desired temperatur...

Page 45: ...ost ad vanced refrigeration system delivering optimum temperature and humidity performance to keep food garden fresh longer and reduce freezer burn while maintaining E star level efficiency The Climat...

Page 46: ...lock position How to Use Empty the pan Place the Chill Thaw tray in the pan Place the items on the tray and close the pan completely LCD Models Access by Home Options Refrigerator Options CustomCool P...

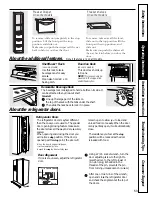
Page 47: ...Beets Onions Meat Setting 32 F Raw Meat Fish and Poultry How to Use the Beverage Center How to Remove and Replace the Beverage Center Some CustomCool models feature a beverage cen ter It is designed...

Page 48: ...ater from the tap to allow for better flow from the dispenser immediately after installation Line up the arrow on the cartridge and the cartridge holder Place the top of the new cartridge up inside th...

Page 49: ...p up screen will appear on the LCD screen to remind you to replace the water filter You can check the status of the water filter manually Access By Home Options Dispenser Options Reset Water Filter No...

Page 50: ...dels on the dispenser for 3 seconds NOTE A newly installed water filter cartridge may cause water to spurt from the dispenser Filter Bypass Plug You must use the filter bypass plug when a replace ment...

Page 51: ...e chute Not all features are on all models Refrigerator bin Freezer tilt out bin Snugger Door Wine Beverage Rack on some models This rack holds up to 5 cans one bottle of wine or one 2 liter bottle of...

Page 52: ...ves all the way back in before you close the door Slide Out Freezer Shelves on some models To remove slide out to the stop position lift the front past the stop position and slide out Make sure you pu...

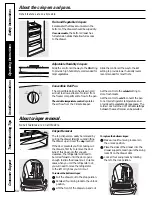
Page 53: ...frigerator doors Refrigerator Doors The refrigerator doors may feel different than the ones you are used to The special door opening closing feature makes sure the doors close all the way and are secu...

Page 54: ...ck position About the crispers and pans Not all features are on all models Fruit and Vegetable Crispers Excess water that may accumulate in the bottom of the drawers should be wiped dry On some models...

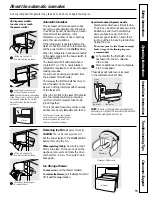
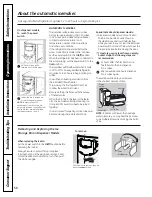
Page 55: ...ed 12 hours after the first batch of ice has fallen into the bin dispense 3 to 4 cubes After an additional 6 hours dispense 3 to 4 cubes again These steps will restore your ice level in the shortest a...

Page 56: ...it will hold itself up while you take ice out or turn the icemaker power switch on and off Be sure to put the bin back in place before closing the door To restore your ice level from an empty bucket s...

Page 57: ...models LCD Models Access By Home Options Dispenser Options Pre cise Fill Set Amount Activate By Using the arrow buttons to select the de sired amount Press MORE UNITS to select between CUPS OUNCES PI...

Page 58: ...re out of sponge or cloth when cleaning around switches lights or controls Use warm water and baking soda solution about a tablespoon 15 ml of baking soda to a quart 1 liter of water This both cleans...

Page 59: ...r icemaker supply line on some models Preparing for Vacation Preparing to Move Secure all loose items such as shelves and drawers by taping them securely in place to prevent damage When using a hand t...

Page 60: ...the convertible meat drawer control knob by pulling straight out Lift the light shield up and pull it out After replacing the bulb with an appliance bulb of the same or lower wattage replace the shiel...

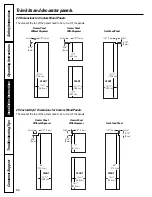
Page 61: ...limitations for custom panels Fresh Food 38 lbs 17 kg max Freezer Door 28 lbs 13 kg max 1 4 6 mm Max Panels 1 4 6 mm thick or less Some models are equipped with trim kits that allow you to install do...

Page 62: ...cm FRONT 23 Dimensions for Custom Wood Panels The areas at the top of the panels need to be cut out of the panels 25 CustomStyle Dimensions for Custom Wood Panels The areas at the top of the panels n...

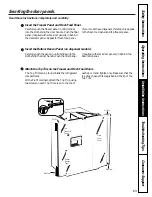
Page 63: ...Top Trim Insert the Freezer Panel and Fresh Food Panel Carefully push the freezer panel in until it slides into the slot behind the door handle Push the filler panel required with some door panels in...

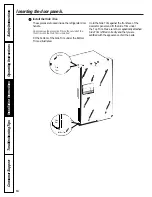
Page 64: ...e Trim under the Bottom Trim as illustrated Hold the Side Trim against the front face of the decorator panels and fit the Side Trim under the Top Trim Make sure the magnetically attached Side Trim is...

Page 65: ...lation is not covered under the Warranty If the refrigerator has already been installed remove the base grille see Step 2 in Moving the Refrigerator then skip to Step 5 in Installing the Refrigerator...

Page 66: ...wo Phillips head screws 2 If the refrigerator must go through any entrance that is less than 38 wide the doors must be removed Proceed to Step 3 DO NOT remove the handles If all entrances are more tha...

Page 67: ...ent center there are electrical connectors harnesses from the cabinet into the bottom hinge on the refrigerator door that must be disconnected To disconnect pull apart each connector 5 Bottom refriger...

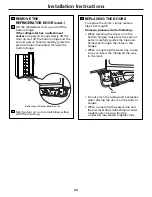
Page 68: ...ttom hinge Set the door on a non scratching surface with the inside up 7 D E 90 REMOVE THE REFRIGERATOR DOOR Remove the refrigerator door top hinge cover if equipped by either squeezing it and pulling...

Page 69: ...EPLACING THE DOORS To replace the doors simply reverse steps 3 through 8 However please note the following When lowering the doors onto the bottom hinges make sure the second person carefully guides t...

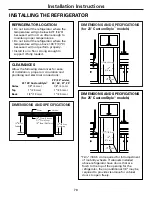
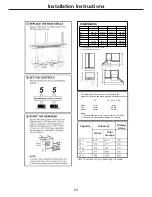
Page 70: ...rances for ease of installation proper air circulation and plumbing and electrical connections 23 33 wide 23 25 CustomStyle 25 26 27 29 Sides 1 8 4 mm 1 8 4 mm Top 1 25 mm 1 25 mm Back 1 2 13 mm 1 25...

Page 71: ...use cold water supply If you are using the GE Smar tConnect tubing the nuts are already assembled to the tubing If you are using copper tubing insert the end of the tubing into the refrigerator connec...

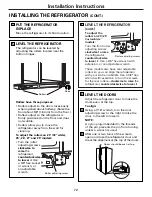
Page 72: ...loses easily when opened about halfway Raise the front about 5 8 16 mm from the floor Rollers adjust so the refrigerator is firmly positioned on the floor and does not wobble Rollers allow you to move...

Page 73: ...23 mm The height does not include hinges The depth includes handles DIMENSIONS 23 25 26 27 y 29 Sides 4 mm 4 mm Top 25 mm 25 mm Bottom 13 mm 25 mm Note The following provides a space for easy installa...

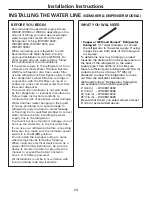
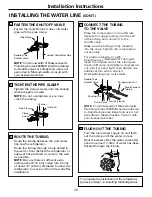
Page 74: ...ter supply line to the refrigerator To prevent burns and product damage do not hook up the water line to the hot water line If you use your refrigerator before connecting the water line make sure the...

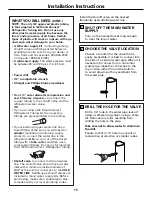
Page 75: ...ith a tube cutter and then use a compression fitting Do not cut formed end from GE SmartConnect Refrigerator tubing Shutoff valve to connect to the cold water line The shutoff valve should have a wate...

Page 76: ...through the tubing FLUSH OUT THE TUBING 8 INSTALLING THE WATER LINE CONT Installation Instructions SmartConnect Tubing Fasten the shutoff valve to the cold water pipe with the pipe clamp NOTE Commonw...

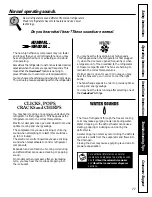
Page 77: ...ergy savings You may hear the fans running after selecting one of the CustomCool settings CLICKS POPS CRACKS and CHIRPS You may hear cracking or popping sounds when the refrigerator is first plugged i...

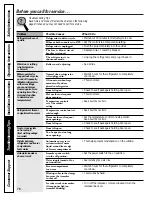
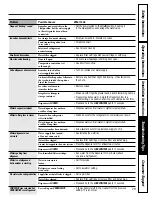
Page 78: ...op often Temperature controls See About the controls to maintain even set at the coldest temperatures setting Refrigerator or freezer Temperature control not set See About the controls compartment too...

Page 79: ...s do not form Dispenser is LOCKED Press and hold the LOCK CONTROL pad for 3 seconds Water has poor taste odor Water dispenser has not been Dispense water until all water in system is replenished used...

Page 80: ...In the refrigeration process it is normal that heat be expelled in the area under the refrigerator Some floor coverings are sensitive and will discolor at these normal and safe temperatures Refrigerat...

Page 81: ...L 0 001000 mg L 98 78 98 65 0 04 mg L 1 4 dichlorobenzene 0 075 mg L 0 225 mg L 10 0 2283 mg L 0 000500 mg L 0 000500 mg L 99 78 99 77 0 075 mg L Atrazine 0 003 mg L 0 009 mg L 10 0 0087 mg L 0 0005...

Page 82: ...Colombia Dentro de Bogot 571 489 7900 Fuera de Bogot 01800 051 6223 AV Miguel Hidalgo Reg 92 MZ 47 Lote 10 CP 77516...

Page 83: ...j 02257 422380 San Nicol s Morelli Oscar Luis Viale 362 03461 428955 San Pedro Gomez Juan C Los Andes 1480 03329 423253 Santa Teresita Higa Gast n La Rioja 47 Mar de Aj 02257 422380 Tandil Fernandez M...

Page 84: ...02946 442254 Gral Roca Fernandez Feliciano Tres Arroyos 986 02941 15641909 Viedma Bagnato Salvador 25 de Mayo 575 02920 423420 Villa Regina Cristel Luis L Av Cipolletti 1240 02941 464821 Metan Avila...

Page 85: ...aje provocadas por corto circuito sobrecargas accidentales en la l nea de alimentaci n o sobrecargas por causas de descargas el ctricas Da os por uso de partes que no sean genuinas Da os en el product...

Page 86: ...cten el circuito el ctrico de conexi n o si los da os fueran producidos por causa de fuerza mayor o casos fortuitos y los ocasionados por mudanzas o transados En ning n caso KRONEN INTERNATIONAL S A A...

Page 87: ...Notas...

Page 88: ...Notas...

Reviews: