Summary of Contents for Typhoon 9200

Page 1: ...uy your excess underutilized and idle equipment along with credit for buybacks and trade ins Custom engineering so your equipment works exactly as you specify Critical and expedited services Leasing R...

Page 2: ...GE Healthcare Typhoon Operating Instructions Original instructions...

Page 3: ......

Page 4: ...nnections 24 3 5 Spare parts and accessories 25 4 Operation 27 4 1 Operation overview 27 4 2 Starting the instrument and Typhoon Scanner Control software 28 4 3 Preparations before start 29 4 4 Perfor...

Page 5: ...Typhoon Operating Instructions 28 9623 56 AA 7 3 Ordering information 70 Appendix A Accessories 71 A 1 Storage phosphor screens 71 A 2 Exposure cassettes 71 A 3 Emission filters 72 A 4 Beamsplitters 7...

Page 6: ...must be met You should have a general understanding of the use of a personal computer running Microsoft Windows in the version provided with your product You should be acquainted with the use of gener...

Page 7: ...cent or chemiluminescent samples The Typhoon system is intended for research use only and shall not be used in any clinical procedures or for diagnostic purposes Safety notices These Operating Instruc...

Page 8: ...formation This section lists the directives and standards that are fulfilled by the Typhoon system Manufacturing information CE Conformity Requirement Content Name and address of manufacturer GE Healt...

Page 9: ...lthcare Regulatory compliance of connected equipment Any equipment connected to Typhoon should meet the safety requirements of EN 61010 1 IEC61010 1 or relevant harmonized standards Within the Europea...

Page 10: ...wing components Typhoon instrument Scans exposed Storage phosphor screens fluorescent samples and chemiluminescent samples Blue laser module Contains the blue laser and the power supply for the laser...

Page 11: ...instrument The illustration below shows the main parts of the Typhoon instrument The right side of the instrument is shown Part Description 1 Power indicator light 2 Fuse holder 3 Power switch 4 Typho...

Page 12: ...ns for reuse The illustration below shows the main parts of the Image eraser Figure 1 1 Main parts of Image eraser 1 4 Control software The Typhoon Scanner Control software is used for control and sup...

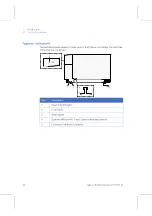
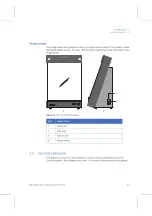
Page 13: ...1 Introduction 1 4 Control software 12 Typhoon Operating Instructions 28 9623 56 AA...

Page 14: ...ed in the user documentation Follow the instructions provided to avoid personal injury or damage to the equipment General precautions Personal protection WARNING Do not operate the Typhoon instrument...

Page 15: ...lthcare WARNING Protective ground The equipment must always be connected to a grounded power outlet WARNING Make sure that the instrument is placed on a stable flat bench with adequate space for venti...

Page 16: ...r optic cable becomes damaged do not continue to use the instrument WARNING Typhoon 9400 and 9410 If the covers of the blue laser module become damaged do not use the instrument WARNING Do not attempt...

Page 17: ...laser The blue laser with power at 30 mW is accessible in the interior of the module The safety interlocks in the Typhoon instrument are designed to prevent you from being exposed to the laser beams I...

Page 18: ...mple lid open B and from the back C are shown Part Label Description 1 Serial number certification label 2 CAUTION Avoid exposure to the laser beam when the lid is open 4 7 1 5 6 2 A 1 B C D E F G H I...

Page 19: ...the laser light directly can cause blindness 4 Fuse specification 5 WARNING Read the user documentation before using the system Do not open any covers or replace parts unless specifically stated in t...

Page 20: ...from the back B 1 2 3 4 6 5 A B Part Label Description 1 Serial number certification label 2 CAUTION Class 3B Laser product when open and interlock defeated Avoid exposure to the beam Do not attempt t...

Page 21: ...fically stated in the user documentation 5 WARNING Indicates that hazardous voltages are generated inside the instrument 6 The Blue laser module conforms to the international standard IEC 60825 Part L...

Page 22: ...sentative of the manufacturer for information concerning the decommissioning of equipment This symbol indicates that the product contains hazardous materials in excess of the limits established by the...

Page 23: ...ent materials must be separated and recycled according to national and local environmental regulations Recycling of hazardous substances Typhoon instrument contains hazardous substances Detailed infor...

Page 24: ...rt See back cover for contact information 3 3 Unpacking Check the equipment for any apparent damage before starting installation Document any damage carefully and contact your GE Healthcare representa...

Page 25: ...et connections Connect the Ethernet cable A between the computer and the Typhoon instrument Connect the computer to LAN B using a second Ethernet cable NOTICE Make sure to use the red crossover Ethern...

Page 26: ...into a grounded power outlet C specified in Section 7 1 Specifications on page 69 3 5 Spare parts and accessories For correct up to date information on spare parts and accessories visit www gelifescie...

Page 27: ...3 Installation 3 5 Spare parts and accessories 26 Typhoon Operating Instructions 28 9623 56 AA...

Page 28: ...or performing a scanning is described in the table below Step Action Instructions in 1 Start the instrument and Typhoon Scanner Control software Section 4 2 2 Expose Storage phosphor screen to a sampl...

Page 29: ...chemiluminescent scanning When scanning a fluorescent or a chemiluminescent sample the sample is placed inside the instrument and is scanned directly For fluorescent scanning there are a standard set...

Page 30: ...is communicating with the Blue laser module the Connection light C middle turns green c When the Typhoon instrument completes the self test the Laser On light C bottom turns green This takes approxima...

Page 31: ...s follows Remove dust particles by filtering all the stock solutions used to prepare the sample sample matrix and buffers Use clean rinsed containers When diluting clean reagents to working concentrat...

Page 32: ...he laser power at 488 nm Multilabel fluorescence Detects samples labeled with two three or four fluorochromes and creates a multichannel image To minimize the spectral overlap from the fluorochromes t...

Page 33: ...olutely clean before you pour the gel Grease and fingerprint oils from the plates can stick to the gel surface and attract dust and fluorescent dyes Agarose gels Make sure the agarose is completely di...

Page 34: ...Erase the screen until the recorded signal is fully removed Because a TR screen is not possible to decontaminate protect the Image eraser and the screen from possible contamination by placing plastic...

Page 35: ...standard samples The Normal setting takes approximately 10 minutes Select Extended G position in if the background or residual image is high e g the original image contained readings of 104 counts an...

Page 36: ...sette to expose the screen to the sample Expose thick samples such as wet gels or TLC plates which are too thick to fit in an Exposure cassette together with a screen in a light tight drawer or simila...

Page 37: ...lace the samples close together align the lanes and rows of the sample with the edges of the grid so that the scanned image will be straight 4 Make a note of the coordinates of the upper left B and lo...

Page 38: ...guides F making sure the screen fits into the guides correctly e Close the Exposure cassette by rotating each clamp counterclockwise until it stops at the pin and then flipping the lever over to lock...

Page 39: ...icks D Sample Storage phosphor screen exposure Note This section is valid only when performing Storage phosphor screen autoradiography 1 Perform Storage phosphor screen autoradiography at room tempera...

Page 40: ...e the screen on the glass platen and start the scan If the instrument is in the Sleep state click the Initialize Scanner button to bring the instrument to the Ready state The Instrument will be in War...

Page 41: ...p s clockwise so that they no longer cover the screen For unmounted screens Open the latch and raise the lid of the cassette b Remove the Storage phosphor screen If the sample sticks to the screen gen...

Page 42: ...mation how to scan several samples simultaneously and how to scan sandwich gels and microarrays please refer to the Typhoon User s Guide Note Make sure you place the sample in the correct position whe...

Page 43: ...tered or numbered grid segment is marked by two dots c Align the lanes and rows of the sample with the edges of the grid on the glass platen so that the scanned image will be straight d Make a note of...

Page 44: ...dy to scan Note If you just turned on the instrument the Ready message appears after approximately 5 minutes However for best performance the instrument should be warm up for the full 30 minutes befor...

Page 45: ...truction below 1 Enter desired User name in the Setup area Fig 4 1 A 2 Select desired scan acquisition mode in the Acquisition Mode list Fig 4 1 B Storage Phosphor to select Storage phosphor scan acqu...

Page 46: ...ow opens a Select number of scans by ticking corresponding boxes under Use 1 4 b For each scan select Emission Filter PMT voltage Laser and Sensitivity c Link scans under Link With d Click OK If chemi...

Page 47: ...st Resolution with the 50 and 25 m pixel sizes Best Sensitivity Use this parameter if you require higher sensitivity limit of detection than resolution Use Best Sensitivity with the larger pixel sizes...

Page 48: ...e up toward the left side of the instrument The top of the sample is face down toward the backside of the instrument The top of the sample is face down toward the right side of the instrument The top...

Page 49: ...amples Pressing wet or soft samples can damage the instrument In addition pressing a soft sample can distort the scanned image Note In the Storage phosphor scan acquisition mode the Press Sample param...

Page 50: ...r and 400 data lines per grid square Note For Chemiluminescent scanning the amount of time required to scan using this pixel size could exceed the signal intensity of the chemiluminescent sample 25 Fo...

Page 51: ...e See Typhoon User s Guide for instructions how to create and use a template 16 Close the sample lid and press it down until the latch clicks The sample or screen is ready to scan Starting a scan Note...

Page 52: ...e removable media after scanning is completed c Click Save to start the scan d Before the Typhoon instrument begins the scan an initialization process occurs Depending on the state of the instrument a...

Page 53: ...sible to perform quantitative analysis on the portions of the image that are saturated A saturated image can be used only for viewing the shapes and positions of the spots on the sample 4 5 Procedures...

Page 54: ...emove the sample from the Exposure cassette and dispose of the sample using the established procedure in your laboratory b Check the Storage phosphor screen for contamination Checking for contaminatio...

Page 55: ...of the Typhoon instrument to the off position to turn off the Typhoon instrument The power indicator light turns off Note You can continue to use the computer after you turn off the Typhoon instrument...

Page 56: ...strument dry completely before use 5 2 User maintenance schedule WARNING Disconnect power Always disconnect power from the instrument before performing any maintenance task Interval Instructions refer...

Page 57: ...a gel or blot appears in theScan In Progress window the instrument is contaminated If a white or gray image appears the image was probably created by background contamination and the instrument is not...

Page 58: ...lid should not come in contact with contaminants However it is good laboratory practice to check the surface periodically for contamination For example you can perform a wipe test or use the procedure...

Page 59: ...r on the image the screens is ready to use Cleaning GP screens Use a soft cotton cloth and an intensifying screen cleaner for example Kodak Intensifying Screen Cleaner Follow the manufacturer s instru...

Page 60: ...clean and free of radioactive contamination when you erase screens Otherwise the screens will be exposed to radioactive contamination during the erasure process To clean the Image eraser follow the in...

Page 61: ...only You cannot change the fuses in the Blue laser module If the Blue laser module does not power on contact Technical Support WARNING Disconnect power Always disconnect power from the instrument bef...

Page 62: ...er cord 2 Place the end of a small flathead screwdriver into the groove Fig 5 1 A to the left of the fuse box and pry to open the fuse box Figure 5 1 Opening the fuse box of the Typhoon instrument 3 P...

Page 63: ...ll groove Fig 5 2 B above the fuse window and pry to open the fuse box 4 Place the screwdriver in the groove Fig 5 2 C on the upper edge of the fuse holder Fig 5 2 D and pry out the fuse holder When t...

Page 64: ...5 3 A that hold the clip support Fig 5 3 B and diffuser screen Fig 5 3 C in position 3 Lift off the clip support and diffuser screen 4 Unscrew the bulb and fixture from each receptacle Fig 5 3 D 5 Sc...

Page 65: ...bulbs 64 Typhoon Operating Instructions 28 9623 56 AA 8 Connect the power cord to a grounded mains outlet and turn on the Image eraser Figure 5 3 Replace bulbs in the Image eraser Erase Time I m a g...

Page 66: ...turn on the surge protector Faulty wall outlet Check the outlet or try another one Fuses have blown Change the fuses see Section 5 7 The instrument is on but cannot communicate with the computer Usag...

Page 67: ...urned on Check the instrument state in the Typhoon Scanner Control window If it is in the Sleep state click Initialize Scanner to turn on the laser Faulty laser If the light is not on 30 seconds after...

Page 68: ...ssage Scan aborted hardware error please try to scan again or a message that does not give instructions for resolving the problem The red scan indicator light blinks PC communication failed Restart th...

Page 69: ...6 Troubleshooting 6 3 Image 68 Typhoon Operating Instructions 28 9623 56 AA 6 3 Image For troubleshooting regarding image related problems refer to Typhoon User s Guide...

Page 70: ...1500 W Fuse specification Typhoon instruments T6 3 AL 250V Fuse specification Blue laser module T1 6 AL 250V Dimensions Typhoon instruments h w d cm 48 118 78 Dimensions Blue laser module h w d cm 48...

Page 71: ...56 AA 7 2 Literature For further information regarding the Typhoon refer to the following Typhoon User s Guide Typhoon Trio User s Guide Addendum Typhoon Installation Instructions 7 3 Ordering inform...

Page 72: ...A 1 Available sizes and types of Storage phosphor screens A 2 Exposure cassettes In general the Storage phosphor screens are exposed to a sample in an Exposure cassette Four styles of Exposure casset...

Page 73: ...between 545 nm and 565 nm and has a transmission peak centred at 555 nm Use this filter with fluorochromes such as R6G and HEX 580 nm band pass filter 580 BP 30 Transmits light between 565 nm and 595...

Page 74: ...l custom beam splitter You can use the beamsplitters with multilabel fluorescent samples to create multichannel images Table A 3 lists the three standard beamsplitters Table A 3 Standard beamsplitters...

Page 75: ...Appendix A Accessories A 4 Beamsplitters 74 Typhoon Operating Instructions 28 9623 56 AA...

Page 76: ......

Page 77: ...9 All goods and services are sold subject to the terms and conditions of sale of the company within GE Healthcare which supplies them A copy of these terms and conditions is available on request Conta...

Page 78: ...uipment Have surplus equipment taking up shelf space We ll give it a new home Learn more Visit us at artisantg com for more info on price quotes drivers technical specifications manuals and documentat...

Reviews: