background image

10

49-60745-3  

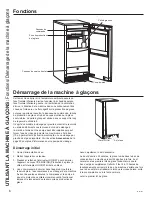
14-7/8 PO

ENTRÉE D’AIR

SORTIE D’AIR

FAÇADE DE PORTE EN TÔLE 0,75 PO

PORTE D’ARMOIRE MIN. 0,63 PO

29-7/8 PO

33-7/8 PO 


22 PO

2-3/4 PO

4-3/8 PO

3-3/4 PO

1-1/2 PO

2-1/2

PO

3-1/4 PO

7-3/8 PO

RACCORD DE COMPRESSION 1/4 PO 
POUR ENTRÉE D’EAU POTABLE

3-7/8 PO

20-3/8 PO

TROU D’ACCÈS AU DRAIN DE PLANCHER

AJUSTEMENT DE PIED 1 PO

4 ENDROITS

CORDON 
ÉLECTRIQUE 115 V

ACCÈS AU DRAIN – TUYAU 
FLEXIBLE 5/8 PO D.I. X 7/8 PO D.E.

DIMENSIONS

Instructions d’installation

INSTRUCTIONS D’INST

ALLA

TION

Summary of Contents for UCC15

Page 1: ...ION INSTRUCTIONS ICE MACHINE 17 3578 01 49 60745 3 01 17 GEA UCC15 ENGLISH FRANÇAIS ESPAÑOL SAFETY INFORMATION 3 USING THE ICE MACHINE Packaging 5 Controls 5 Features 6 Starting the Ice Machine 6 INSTALLATION INSTRUCTIONS Grounding the Ice Machine 7 Before You Begin 7 Location and Preparation 7 Advance Planning 9 Dimensions 10 Door Swing 11 Door Panel 12 Plumbiing 14 Placement of the Ice Machine 1...

Page 2: ...into every GE Appliances product and we think you will too Among other things registration of your appliance ensures that we can deliver important product information and warranty details when you need them Register your GE appliance now online Helpful websites and phone numbers are available in the Consumer Support section of this Owner s Manual You may also mail in the pre printed registration c...

Page 3: ...ust be performed by a qualified service professional Ŷ 5HSODFH DOO SDUWV DQG SDQHOV EHIRUH RSHUDWLQJ Ŷ R QRW VWRUH RU XVH JDVROLQH RU RWKHU IODPPDEOH vapors and liquids in the vicinity of this or any other appliance Ŷ HFDXVH RI SRWHQWLDO VDIHW KD DUGV XQGHU FHUWDLQ conditions we strongly recommend against the use of an extension cord However if you must use an extension cord it is absolutely neces...

Page 4: ... The ice maker should always be plugged into its own YROW DPS FLUFXLW 7KLV SURYLGHV WKH EHVW performance and also prevents overloading house ZLULQJ FLUFXLWV ZKLFK FRXOG FDXVH D ILUH KD DUG IURP overheated wires Never unplug your ice maker by pulling on the power cord Always grip plug firmly and pull straight out from the outlet Repair or replace immediately all power cords that have become frayed ...

Page 5: ...r abrasive cleaners to remove tape or glue These products can damage the surface of RXU LFH PDNHU RU PRUH LQIRUPDWLRQ VHH PSRUWDQW Safety Instructions 1 POWER ON OFF Press to turn the ice machine on or off 2 ICE MAKING Glows white when the unit is ON 3 CHECK WATER Glows red when there is not water supplied to the machine 4 TIME TO CLEAN Glows yellow when it s time to clean the machine The light wi...

Page 6: ...ce bin is full the ice machine will shut off It will automatically restart when the ice level falls either from use or normal meltage Discard the first bin full of ice This machine takes in room temperature air at the lower right front and forces warm air out the lower left front Restricting the airflow or operating the machine in a hot or cold environment will adversely affect the ability of the ...

Page 7: ...Proper installation is the responsibility of the installer Product failure due to improper installation is not covered under the Warranty ICE MACHINE LOCATION AND PREPARATION This ice machine is designed to be used indoors in a controlled environment or outdoors within certain limits It is made up of two major systems the ice making system and the ice storage system The ice making system is a cont...

Page 8: ...y built up mineral scale can shorten machine life To keep the machine operating properly these impurities or minerals will have to be regularly dissolved by an acid cleaner Directions for this may be found in the Care and Cleaning section Filters and Treatment In general it is always a good idea to filter the water A proper water filter can remove taste and odors as well as particles We recommend ...

Page 9: ...d to install a drain pump to the appliance and pump the water to the point of drainage See Accessories Pump models will pump VWRU IHHW KLJKW Installation over a crawl space or basement Either D JUDYLW GUDLQ RU D SXPS PD EH XVHG RU SXPS VHH Accessories If there is not enough room behind the machine for a drain waste receptacle the drain will have to be below the floor NOTE When installed in a corne...

Page 10: ...FRONT 63 MIN CABINET DOOR 29 7 8 33 7 8 22 2 3 4 4 3 8 1 1 2 2 1 2 3 1 4 DRAIN FLEXIBLE TUBING 5 8 I D x 7 8 I D POTABLE WATER INLET 1 4 COMPRESSION FITTING 3 7 8 20 3 8 FLOOR DRAIN ACCESS HOLE DIMENSIONS Installation Instructions INSTALLATION INSTRUCTIONS ...

Page 11: ...nel is attached it must be removed to access hinge screws and to reverse the handle position 9 Remove the original lower door hinge and move it to the opposite side upper location Secure using original screws IMPORTANT If installing a stainless steel door panel or custom panel skip to INSTALLING THE DOOR PANEL section QVWDOO SRFNHW FRYHUV DQG KROH SOXJV RQWR GRRU 11 Place the keyhole slot on the h...

Page 12: ...verall height of the cabinet opening ZKHUH WKH LFH PDFKLQH ZLOO EH LQVWDOOHG IORRU WR ERWWRP RI WKH FRXQWHUWRS HGJH HWHUPLQH GHVLUHG WRHNLFN KHLJKW ERWWRP RI GRRU WR WKH IORRU 7KLV FDQ EH HTXDO WR WKH DGMDFHQW cabinet s toekick height 3 The clearance between the countertop and the top RI WKH LFH PDFKLQH VKRXOG EH DW OHDVW 4 Subtract the toekick height and the clearance from the opening height to d...

Page 13: ... 5 7 Return the gasket to its original position 8 Attach the door to the cabinet using the original screws IMPORTANT In some situations the door can open too far and damage adjacent cabinets To prevent WKLV LQVHUW D 6WRS 3LQ LQ KDUGZDUH SDFNHW LQWR WKH provided hole in the top and bottom hinges Drive the pin into the hole until the head is flush with the hinge 9 Slide the hinge covers from the har...

Page 14: ...tall specifications follow steps 3 6 to drain the unit through the base If not proceed to 6 3 Remove the clamp and barbed elbow and take off the plastic cover in the base pan below the drain hose Screw 6HFXULQJ URQW Service Panel 4 Connect a straight 5 8 barbed connector to the drain hose securing with the supplied hose clamp 5 Cut an 8 piece of 5 8 OD x 7 8 OD tygon FOHDU SODVWLF WXELQJ 6OLGH RQH...

Page 15: ...ition the unit in the installation opening 3 Turn on the water supply Make sure that the icemaker is plugged in and the power is on 4 Slide the unit into the installation opening paying special attention to water supply and drain connections Do not kink 5 Pour a couple of quarts of water into the ice VWRUDJH ELQ RQ GUDLQ SXPS HTXLSSHG PDFKLQHV WKH drain pump should start and water should pump out ...

Page 16: ...ginal screws Condenser surface Cleaning the Ice Storage Bin 7KH LFH VWRUDJH ELQ VKRXOG EH VDQLWL HG RFFDVLRQDOO W LV XVXDOO FRQYHQLHQW WR VDQLWL H WKH ELQ DIWHU WKH LFH making system has been cleaned and the bin is empty VDQLWL LQJ VROXWLRQ FDQ EH PDGH RI R RI KRXVHKROG EOHDFK DQG JDOORQV RI KRW ZDWHU 8VH a clean cloth and wipe the interior of the ice storage bin ZLWK WKH VDQLWL LQJ VROXWLRQ 3RXU ...

Page 17: ... will stop the cleaning process 9 Pour a gallon of hot water into the bin to flush out the drain 10 Clean the bin liner of mineral scale by mixing some ice machine scale remover and hot water and using that solution to scrub the scale off of the liner 11 Rinse the liner with hot water 12 6DQLWL H WKH ELQ LQWHULRU 13 Replace the ice removed in step 1 if applicable 14 Push and release the ON OFF but...

Page 18: ...ter supply is low The control system checks for water every PLQXWHV KHQ WKH ZDWHU VXSSO LV restored the machine will automatically reset Time to Clean light is on Clean the ice making system following directions in the Care and Cleaning section Noise The ice machine is designed for quiet operation but will make some noise during the ice making cycle During a IUHH LQJ F FOH LW LV QRUPDO WR KHDU WKH...

Page 19: ...U DFWRU 6HUYLFH HQWHUV RU DQ DXWKRUL HG XVWRPHU DUH technician To schedule service online visit us at www geappliances com RU FDOO SSOLDQFHV DW 5 6 3OHDVH KDYH RXU VHULDO QXPEHU DQG RXU PRGHO QXPEHU DYDLODEOH ZKHQ FDOOLQJ IRU VHUYLFH Q DQDGD FDOO WARRANTY GE Appliances Ice Machine Warranty EXCLUSION OF IMPLIED WARRANTIES RXU VROH DQG H FOXVLYH UHPHG LV SURGXFW UHSDLU DV SURYLGHG LQ WKLV LPLWHG DUU...

Page 20: ...to extend the kickplate over the legs is available That kit number is 5 To order go to www GEApplianceParts com or call 877 959 8688 In Canada visit www GEAppliances ca or call Cabinet Stability In some free standing installations it may be prudent to add an anti tip bracket that secures the back of the cabinet to a wall That kit number is 5 To order go to www GEApplianceParts com or call 877 959 ...

Page 21: ...49 60745 3 21 NOTES Notes ...

Page 22: ...rranty is still in effect You can purchase it on line anytime GE Appliances Services will still be there after your ZDUUDQW H SLUHV Q WKH 86 GEAppliances com ge service and support shop for extended service plans htm RU FDOO GXULQJ QRUPDO EXVLQHVV KRXUV In Canada GEAppliances ca en support purchase extended warranty RU FDOO Parts and Accessories Individuals qualified to service their own appliance...

Page 23: ...ION MACHINE À GLAÇONS 17 3578 01 49 60745 3 01 17 GEA UCC15 INFORMATION DE SÉCURITÉ 3 UTILISANT LA MACHINE À GLAÇONS Déballage 5 Commandes 5 Fonctions 6 Démarrage de la machine à glaçons 6 INSTALLATION INSTRUCTIONS Mise à la terre de la machine à glaçons 7 Avant de commencer 7 Emplacement et préparation 7 Planification préalable 9 Dimensions 10 L ouverture de porte 11 Panneau de porte 12 Plomberie...

Page 24: ... Appliances et nous pensons que vous le serez aussi Dans cette optique nous vous rappelons que l enregistrement de votre électroménager vous assure la communication de renseignements importants sur le produit et la garantie lorsque vous en avez besoin Enregistrez votre électroménager GE en ligne dès maintenant Des sites Web et des numéros de téléphone utiles figurent dans la section Soutien au con...

Page 25: ...ffectuées par un professionnel qualifié Ŷ 5HPHWWH WRXWHV OHV SLqFHV HW SDQQHDX HQ SODFH DYDQW d utiliser l appareil Ŷ 1H VWRFNH SDV RX Q XWLOLVH SDV G HVVHQFH RX G DXWUHV vapeurs et liquides inflammables à proximité de cet appareil ou de tout autre appareil électroménager Ŷ 1RXV GpFRQVHLOORQV IRUWHPHQW O XWLOLVDWLRQ G XQH UDOORQJH à cause des risques potentiels dans certaines conditions Cependant ...

Page 26: ...re circuit de 115 volts 60 Hz 15 ampères Cette précaution procure le meilleur rendement et prévient aussi la surcharge des circuits électriques du domicile qui peuvent poser un risque d incendie par surchauffe des fils Ne débranchez jamais la machine à glaçons en tirant sur le cordon électrique Prenez toujours fermement la fiche en main et tirez pour la sortir de la prise 5pSDUH RX UHPSODFH LPPpGL...

Page 27: ... colle Ces produits peuvent endommager la surface de la machine à glaçons Pour plus d informations voir Consignes de sécurité importantes 1 POWER ON OFF Press to turn the ice machine on or off 2 ICE MAKING Production de glace Brille en blanc lorsque l appareil est allumé 3 CHECK WATER Vérifier l eau Brille en rouge lorsque la machine n est plus alimentée en eau 4 TIME TO CLEAN Nettoyage requis Bri...

Page 28: ...ein et redémarre lorsque le niveau baisse suite à la consommation ou à la fonte normale Jeter le premier lot de glace Cette machine aspire l air à température ambiante depuis sa face frontale inférieure droite et expulse l air chaud depuis sa face frontale inférieure gauche La restriction de la circulation d air ou l utilisation de la machine dans un environnement très chaud ou froid aura un effet...

Page 29: ...bière ne sont pas seulement insalubres mais leurs étiquettes peuvent se détacher et obstruer le drain IMPORTANT Ne laissez jamais la machine fonctionner sans la nettoyer régulièrement Celle ci durera plus longtemps si elle est tenue propre Un nettoyage régulier devrait être effectué au moins une fois l an préférablement deux Certaines conditions de l eau pourront nécessiter le nettoyage plus fréqu...

Page 30: ... minéraux devront être dissous régulièrement au moyen de nettoyant acide Consultez la section Entretien et nettoyage pour connaître la façon de procéder Filtres et traitement En général il est toujours judicieux de filtrer l eau Un filtre à eau approprié peut éliminer les goûts et les odeurs de même que les particules Nous recommandons d utiliser un filtre j HDX SSOLDQFHV WHO TXH OH PRGqOH 5 4 VXU...

Page 31: ...fectue à l arrière et ajoute quelques centimètres à la profondeur de l armoire Installation sur dalle Vous devez installer une pompe de vidange sur l appareil et pomper l eau jusqu au drain Voir la section Accessoires La pompe pourra pomper sur une hauteur d un étage 3 m 10 pi Installation au dessus d un vide sanitaire ou d un sous sol Il faut utiliser soit un drain par gravité soit une pompe Pour...

Page 32: ...O 4 3 8 PO 3 3 4 PO 1 1 2 PO 2 1 2 PO 3 1 4 PO 7 3 8 PO RACCORD DE COMPRESSION 1 4 PO POUR ENTRÉE D EAU POTABLE 3 7 8 PO 20 3 8 PO TROU D ACCÈS AU DRAIN DE PLANCHER AJUSTEMENT DE PIED 1 PO 4 ENDROITS CORDON ÉLECTRIQUE 115 V ACCÈS AU DRAIN TUYAU FLEXIBLE 5 8 PO D I X 7 8 PO D E DIMENSIONS Instructions d installation INSTRUCTIONS D INSTALLATION ...

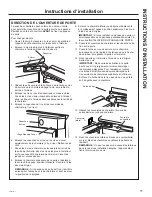
Page 33: ... porte est fixé il doit être enlevé pour l accès aux vis de charnière et pour inverser la position de la poignée 9 Enlevez la charnière inférieure d origine et déplacez la à l emplacement opposé position supérieure Fixez la à l aide des vis d origine IMPORTANT Si vous installez un panneau de porte en acier inoxydable ou un panneau personnalisé sautez à OD VHFWLRQ 167 7 21 8 3 11 8 3257 10 Posez le...

Page 34: ...allée plancher jusqu au bas du bord du comptoire de cuisine 2 Déterminez la hauteur du coup de pied bas de la porte jusqu au plancher Elle peut être égale à la hauteur du coup de pied de l armoire adjacente 3 Le dégagement entre le comptoir et le dessus de la machine à glaçons doit être d au moins 1 8 po 4 Soustrayez la hauteur du coup de pied et le dégagement de la hauteur de l ouverture pour dét...

Page 35: ...W G pWDQFKpLWp j VD SRVLWLRQ LQLWLDOH 8 Fixez la porte à l armoire à l aide des vis d origine IMPORTANT Dans certaines situations la porte peut s ouvrir trop largement et ainsi endommager les armoires adjacentes Pour l empêcher insérez une butée d arrêt trousse de quincaillerie dans le trou existant des charnières supérieure et inférieure Enfoncez la butée dans le trou jusqu à ce que sa tête soit ...

Page 36: ...es spécifications de pré installation suivez les étapes 3 à 6 pour vidanger l appareil par la base Sinon allez à l étape 6 3 Enlevez la bride et le coude cannelé puis retirez la pellicule plastique sur la tôle basale sous le tuyau de vidange Vis qui fixe le panneau de service frontal 5DFFRUGH XQ FRQQHFWHXU FDQQHOp GURLW GH SR DX tuyau de vidange le fixant à l aide de la bride fournie RXSH XQH ORQJ...

Page 37: ...eil dans l ouverture de l installation 3 Ouvrez l alimentation d eau Assurez vous que la machine à glaçons est branchée et qu elle est sous tensino ON 4 Glissez l appareil dans l ouverture en portant une attention particulière aux raccords à l alimentation d eau et au drain Attention aux plis 5 Versez quelques litres d eau dans le bac de conservation de la glace sur les machines qui en sont équipé...

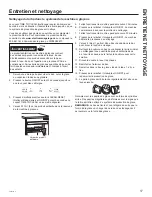
Page 38: ...de la glace Le bac de conservation de la glace doit être désinfecté à l occasion Il est commode de le désinfecter après le nettoyage du système de production de glace lorsqu il est vide On peut obtenir une solution désinfectante en mélangeant 1 oz 30 ml de javellisant domestique dans 7 6 litres 2 gallons d eau très chaude 95 F 115 F Utilisez un linge propre et essuyez l intérieur du bac avec la so...

Page 39: ... d eau très chaude dans le bac pour rincer le tuyau de vidange 10 Nettoyez la doublure du bac pour éliminer le tartre minéral en mélangeant une quantité de produit antitartre dans de l eau très chaude puis frottez la doublure avec cette solution 5LQFH OD GRXEOH j O HDX WUqV FKDXGH 12 Désinfectez l intérieur du bac 5HPHWWH GDQV OH EDF OD JODFH YLGpH j O pWDSH V LO D lieu 14 Pressez puis relâchez l ...

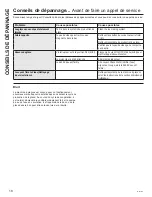
Page 40: ... le voyant Check Water Vérifier l eau clignote en rouge alors le débit d eau est faible Le voyant Time to Clean Nettoyage requis est allumé Nettoyez le système de la machine à glaçons selon les instructions de la section Entretien et nettoyage Bruit La machine à glaçons est conçue pour un fonctionnement silencieux mais elle pourra émettre des sons durant le cycle de production de la glace Au cours...

Page 41: ...pSDUDWLRQV HQ YHUWX GH OD JDUDQWLH VRQW IRXUQLV SDU QRV HQWUH GH 6HUYLFH G 8VLQH RX SDU XQ WHFKQLFLHQ DXWRULVp XVWRPHU Care Pour prévoir une réparation consultez notre site electromenagersge ca fr soutien demande de service ou appelez le 800 661 1616 Veuillez avoir votre numéro de série et votre numéro de modèle à portée de main lorsque vous appelez pour obtenir un service EXCLUSION DES GARANTIES ...

Page 42: ...tendus au point d être visibles Un ensemble de rallonge de coup de pied est offert pour dissimuler les pieds de nivellement Le numéro de l ensemble HVW 5 3RXU FRPPDQGHU DOOH VXU OH VLWH electromenagersge ca ou composez le 800 661 1616 Stabilité de l armoire Pour certaines installations autonomes il peut être prudent d ajouter une ferrure antibasculement qui fixe le derrière de l armoire au mur Le ...

Page 43: ...49 60745 3 21 NOTES Notes ...

Page 44: ...22 49 60745 3 NOTES Notes ...

Page 45: ...49 60745 3 23 NOTES Notes ...

Page 46: ...Vous pouvez vous la procurer en ligne en tout temps Les services GE Appliances seront toujours disponibles après l expiration de la garantie Aux États Unis GEAppliances com ge service and support shop for extended service plans htm ou composez le 800 626 2224 durant les heures normales de bureau Au Canada GEAppliances ca en support purchase extended warranty ou composez le 800 290 9029 Pièces et a...

Page 47: ...INSTALACIÓN MÁQUINA DE HIELO 17 3578 01 49 60745 3 01 17 GEA UCC15 INSTRUCIONES DE SEGURIDAD 3 USO DE LA MÁQUINA DE HIELO Embalaje 5 Controles 5 Funciones 6 Activación de la Máquina de Hielo 6 INSTRUCCIONES DE INSTALACIÓN Conexión a Tierra de la Máquina de Hielo 7 Antes de Empezar 7 Ubicación y Preparación 7 Planificación Avanzada 9 Dimensiones 10 Apertura de la Puerta 11 Panel de la Puerta 12 Plo...

Page 48: ... creemos que usted también Entre otras cosas el registro de su electrodoméstico asegura que podamos entregarle información importante del producto y detalles de la garantía cuando los necesite Registre su electrodoméstico GE ahora a través de Internet Sitios Web y números telefónicos útiles están disponibles en la sección de Soporte para el Consumidor de este Manual del Propietario También puede e...

Page 49: ...eberán ser realizadas por un Profesional del Servicio Técnico calificado Ŷ 5HHPSODFH WRGDV ODV SLH DV SDQHOHV DQWHV GHO XVR Ŷ 1R JXDUGH QL XVH JDVROLQD X RWURV YDSRUHV LQIODPDEOHV líquidos cerca de este u otros electrodomésticos Ŷ HELGR D ORV SRVLEOHV ULHVJRV VREUH OD VHJXULGDG EDMR ciertas condiciones recomendamos enfáticamente no usar prolongadores Sin embargo si se debe usar un prolongador es a...

Page 50: ...La máquina de hielo siempre debe estar enchufada en su propio circuito de 115 voltios 60 Hz 15 amp Esto garantiza el mejor funcionamiento y además previene la sobrecarga de los circuitos del hogar lo cual podría ocasionar riesgos de incendio debido al recalentamiento de cables Nunca desenchufe la máquina de hielo tirando del cable de corriente Siempre tome su enchufe firmemente y empuje el mismo h...

Page 51: ...n dañar la superficie de la máquina de hielo Para más información lea la sección de Instrucciones Importantes de Seguridad 1 POWER ON OFF Encender Apagar Active esta función para encender o apagar la máquina de hielo 2 ICE MAKING Producción de Hielo Brilla en blanco cuando la unidad está en ON Encender 3 CHECK WATER Controlar el Agua Brilla en rojo cuando no hay suministro de agua a la máquina 4 T...

Page 52: ...lo Panel frontal de servicio Inicio 1 Abra el suministro de agua 2 Encienda la corriente eléctrica 3 Presione y libere el botón ON OFF Encender Apagar para iniciar la máquina La luz ICE MAKING Producción de Hielo junto al interruptor de encendido apagado brillará en blanco 4 El agua comenzará a circular en la unidad Cuando el depósito esté lleno el agua comenzará a ser drenada desde la máquina Lue...

Page 53: ...stalación apropiada es la responsabilidad del instalador La falla del producto debido a una instalación inadecuada no está cubierta por la garantía UBICACIÓN Y PREPARACIÓN DE LA MÁQUINA DE HIELO Esta máquina de hielo fue diseñada para uso interior en un DPELHQWH FRQWURODGR R HQ H WHULRU GHQWUR GH FLHUWRV OtPLWHV Está compuesta por dos sistemas principales el sistema de producción de hielo y el sis...

Page 54: ...e la máquina Para que la máquina se mantenga funcionando correctamente estas impurezas o minerales deberán ser disueltas de forma regular con limpiadores ácidos Las instrucciones para realizar esto pueden ser encontradas en la sección de Cuidado y Limpieza Filtros y Tratamiento En general siempre es una buena idea filtrar el agua Un filtro de agua apropiado puede eliminar el gusto y los olores com...

Page 55: ...OWH OD VHFFLyQ GH FFHVRULRV DV bombas bombearán hasta una altura de 1 piso 10 pies Instalación en un entrepiso o sótano Se podrá usar el GHVDJ H SRU JUDYHGDG R XQD ERPED 3DUD XVDU XQD ERPED consulte la sección de Accesorios Si no hay suficiente espacio detrás de la máquina para un receptáculo de GHVDJ H GHVHFKRV HO GHVDJ H GHEHUi HVWDU SRU GHEDMR GHO piso NOTA Cuando se instale en un rincón es pos...

Page 56: ...L DESAGÜE POR EL PISO FRENTE DE LA PUERTA DE CHAPA METÁLICA DE 3 4 SI EL KIT DE LA PUERTA ESTÁ INSTALADO PUERTA DEL GABINETE DE UN MÍN DE 63 UNIÓN DE COMPRENSIÓN DE ENTRADA DE AGUA DE COBRE DE 1 4 DE DIÁM EXT PROVISTA ACCESO AL DESAGÜE TUBERÍA FLEXIBLE DE DESAGÜE DE 5 8 DE DIÁM INT x 7 8 DE DIÁM EXTACCESS FLEXIBLE TUBING DIMENSIONES Instrucciones de instalación INSTRUCCIONES DE INSTALACIÓN ...

Page 57: ...ando los tornillos originales NOTA Si el panel de la puerta está adherido debe ser retirado para acceder a los tornillos de la bisagra y para invertir la posición de la manija 9 Retire la bisagra inferior original y mueva la misma hacia el lado opuesto de la puerta en la ubicación superior Asegure la misma usando los tornillos originales IMPORTANTE Si instalará un panel para puerta de DFHUR LQR LG...

Page 58: ...rtura del gabinete donde la máquina de hielo será instalada desde el piso hasta la SDUWH LQIHULRU GHO H WUHPR GH OD PHVDGD HWHUPLQH OD DOWXUD GHVHDGD GHO yFDOR SDUWH LQIHULRU GH la puerta hasta el piso Esto puede equivaler a la altura del zócalo del gabinete adyacente 3 El espacio entre la mesada y la parte superior de la máquina de hielo debe ser de por lo menos 1 8 4 Reste la altura del zócalo y...

Page 59: ...so 5 7 Vuelva a colocar la junta en su posición original 8 Adhiera la puerta al gabinete usando los tornillos originales IMPORTANTE En algunas situaciones la puerta se puede abrir demasiado y dañar los gabinetes adyacentes A fin de evitar esto inserte un Perno de Bloqueo incluido en el paquete de herramientas en el agujero provisto en las bisagras superior e inferior Coloque el perno en el agujero...

Page 60: ...reinstalación siga las pasos 3 a 6 SDUD GUHQDU OD XQLGDG D WUDYpV GH OD EDVH H QR VHU DVt proceda al paso 6 3 Retire la abrazadera y el codo con púas y quite la tapa plástica de la bandeja de la base debajo de la PDQJXHUD GH GHVDJ H Tornillo que Asegura el Panel de Servicio Frontal 4 Conecte un conector con púas de 5 8 a la manguera GH GHVDJ H DVHJXUDQGR OD PLVPD FRQ OD DEUD DGHUD para manguera pr...

Page 61: ...d en la abertura de la instalación 3 Abra el suministro de agua Asegúrese de que la máquina de hielo esté enchufada y encendida HVOLFH OD XQLGDG SRU OD DEHUWXUD GH OD LQVWDODFLyQ prestando especial atención al suministro de agua y a las FRQH LRQHV GHO GHVDJ H Evite torceduras 5 Vierta un par de cuartos de galón de agua en la hielera HQ PiTXLQDV HTXLSDGDV FRQ ERPED GH GHVDJ H OD ERPED GH GHVDJ H VH...

Page 62: ...s Superficie el condensador Limpieza de la Hielera La hielera debe ser higienizada de forma ocasional Normalmente es conveniente higienizar la misma luego de que el sistema de producción de hielo haya sido limpiado y que la hielera esté vacía Se puede hacer una solución de limpieza con 1 onza de blanqueador hogareño y 2 galones de agua caliente 95 F 115 F Use una tela limpia y limpie el interior d...

Page 63: ... galón de agua caliente en el cesto y deje correr el GHVDJ H 10 Elimine el sarro mineral del cobertor del cesto mezclando limpiador de sarro de la máquina de hielo y agua caliente y usando dicha solución para eliminar el sarro frotando sobre el cobertor 11 Enjuague el cobertor con agua caliente 12 Higienice el interior del cesto 13 Reemplace el hielo eliminado en el paso 1 si corresponde 14 Presio...

Page 64: ...lando en Rojo el suministro de agua es bajo La luz de Time to Clean Hacer la Limpi eza está activada Limpie el sistema de la máquina de hielo siguiendo las instrucciones de la sección de Cuidado y Limpieza Ruido La máquina de hielo fue diseñada para un funcionamiento silencioso pero hará cierto nivel de ruido durante el ciclo de SURGXFFLyQ GH KLHOR XUDQWH XQ FLFOR GH FRQJHODPLHQWR HV normal escuch...

Page 65: ...ces también proveerá sin costo todo el trabajo y el servicio relacionado con el reemplazo de la parte que presente defectos en el sistema de refrigeración sellado GEAppliances com Todo el servicio de garantía es provisto por nuestros Centros de Servicio de Fabricación o un técnico autorizado de Servicio al Cliente Customer Care Para programar una visita del servicio técnico visítenos en GEApplianc...

Page 66: ... de ese kit es WR02X25708 Para ordenar visite www GEApplianceParts com o comuníquese al 877 959 8688 En Canadá visite www GEAppliances ca o comuníquese al 800 331 1616 Estabilidad del Gabinete En algunas instalaciones con pedestal es prudente agregar un soporte antivolcaduras que asegure la parte trasera del gabinete a una pared El número de ese kit es WR01X25709 Para ordenar visite www GEApplianc...

Page 67: ...49 60745 3 21 NOTAS Notas ...

Page 68: ... FRQR FD ORV GHVFXHQWRV HVSHFLDOHV TXH HVWiQ GLVSRQLEOHV PLHQWUDV VX garantía aún está vigente La puede adquirir en cualquier momento a través de Internet Los servicios de GE Appliances aún estarán allí cuando su garantía caduque En EE UU GEAppliances com ge service and support shop for extended service plans htm o comuníquese al 800 626 2224 durante el horario de atención comercial Piezas y Acces...

Reviews: