background image

Summary of Contents for Unitized Spacemaker WSM2420

Page 1: ...and the safety of others are very important We have provided many important safety messages in this manual and on your appliance Always read and obey all safety messages This is the safety alert symbol This symbol alerts you to potential hazards that can kill or hurt you and others All safety messages will follow the safety alert symbol and either the word DANGER or WARNING These words mean You ca...

Page 2: ...s Floor drain Siphon break Part Number 285320 additional drain hose Part Number 285702 and connector kit Part Number 285442 Drain hose too short Drain hose Part Number 285664 and connector kit Part Number 285442 Lint clogged drain Drain protector Part Number 367031 Water faucets 2 longer water fill hoses beyond reach of fill 6 ft 1 8 m Part Number 76314 hoses 10 ft 3 0 m Part Number 350008 E _J F ...

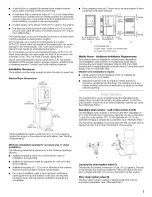
Page 3: ...ion and Safety Title 24 HUD Part 280 Mobile home installations require Metal exhaust system hardware which is available for purchase from your dealer Special provisions must be made in mobile homes to introduce outside air into the dryer The opening such as a nearby window should be at least twice as large as the dryer exhaust opening 71 _A 182 25 cm 27 69 22 ore 23 7 8 cm Most installations requi...

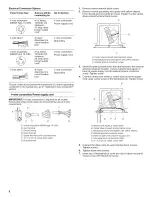
Page 4: ... section Use a 4 wire conductor cord when the dryer is installed in a mobile home or an area where local codes do not permit grounding through the neutral If using a power supply cord Use a UL listed power supply cord kit marked for use with clothes dryers The kit should contain 4 wire receptacle 14 30R Then choose a 4 wire power supply cord with ring or spade terminals and UL listed strain relief...

Page 5: ...Hazard Use 10 gauge somid copper wire Use a UL misted strain relief Disconnect power before making emectricaJ connections Connect neutral wire white or center wire to center terminal simver Ground wire green or bare wire must be connected to green ground connector Connect remaining 2 suppmy wires to remaining 2 terminals gold Securety tighten aimeBectrica connections FaiJure to do so can resuJt in...

Page 6: ...ocal codes do not permit the use of 3 wire C D connections B F E G A 4 wire receptacle NEMA type 14 30R B 4 prong plug C Ground prong D Neutral prong E Spade terminals with upturned ends F _ 1 9 cm UL listed strain relief G Ring terminals A Center silver colored terminal block screw B Neutral grounding wire green with yellow stripes C Internal ground conductor screw 3 Move the green painted screw ...

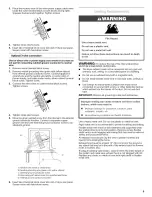
Page 7: ... place the hooked end of the wire under the screw of the terminal block hook facing right squeeze hooked end together and tighten screw See example below 1 Remove center terminal block screw 2 Remove appliance ground wire green with yellow stripes from internal ground conductor screw Fasten it under center silver colored terminal block screw A Neutral wire white or center wire B Center silver colo...

Page 8: ...ryer rear panel Secure cover with hold down screw 3 wire connection Direct Wire Use where local codes permit connecting cabinet ground conductor to neutral wire Direct wire cable must have 5 ft 1 52 m of extra length so dryer can be moved if needed Strip 3W 8 9 cm of outer covering from end of cable Strip insulation back 1 2 5 cm If using 3 wire cable with ground wire cut bare wire even with outer...

Page 9: ...t use a metal foil vent Fai ure to follow these instructions can resu t in death or fire WARNING To reduce the risk of fire this washer dryer MUST BE EXHAUSTED OUTDOORS The dryer exhaust must not be connected into any gas vent chimney wall ceiling or a concealed space of a building Do not use an exhaust hood with a magnetic latch Do not install flexible metal vent in enclosed walls ceilings or flo...

Page 10: ...e dryer will keep the lid open 2 Pull the foam packing ring out of the washer NOTE Keep the foam ring and use it when transporting your washer dryer This packing material is used to keep the washer tub stable during transport Proper connection of the drain hose protects your floors from damage due to water leakage To prevent the drain hose from coming off or leaking it must be installed according ...

Page 11: ... to get rid of particles in the water lines that might clog the inlet valve screens Connect the inlet hoses to the washer 6 Attach the hose with the blue coupling to the cold water top inlet valve Screw on coupling by hand until it is seated on the washer Using pliers tighten the couplings with an additional two thirds turn NOTE Do not overtighten Damage to the valves can result S A Cold water inl...

Page 12: ...692790 white 3977784 biscuit Follow the instructions in the kit to install Kits are available from the dealer from whom you purchased your washer dryer i i T J i L B C A Standard rear offset exhaust installation B Rear exhaust for offset close clearance connection C Left or right side exhaust installation Alternate installations for close clearances Venting systems come in many varieties Select th...

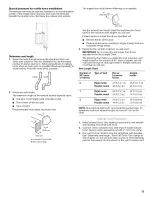
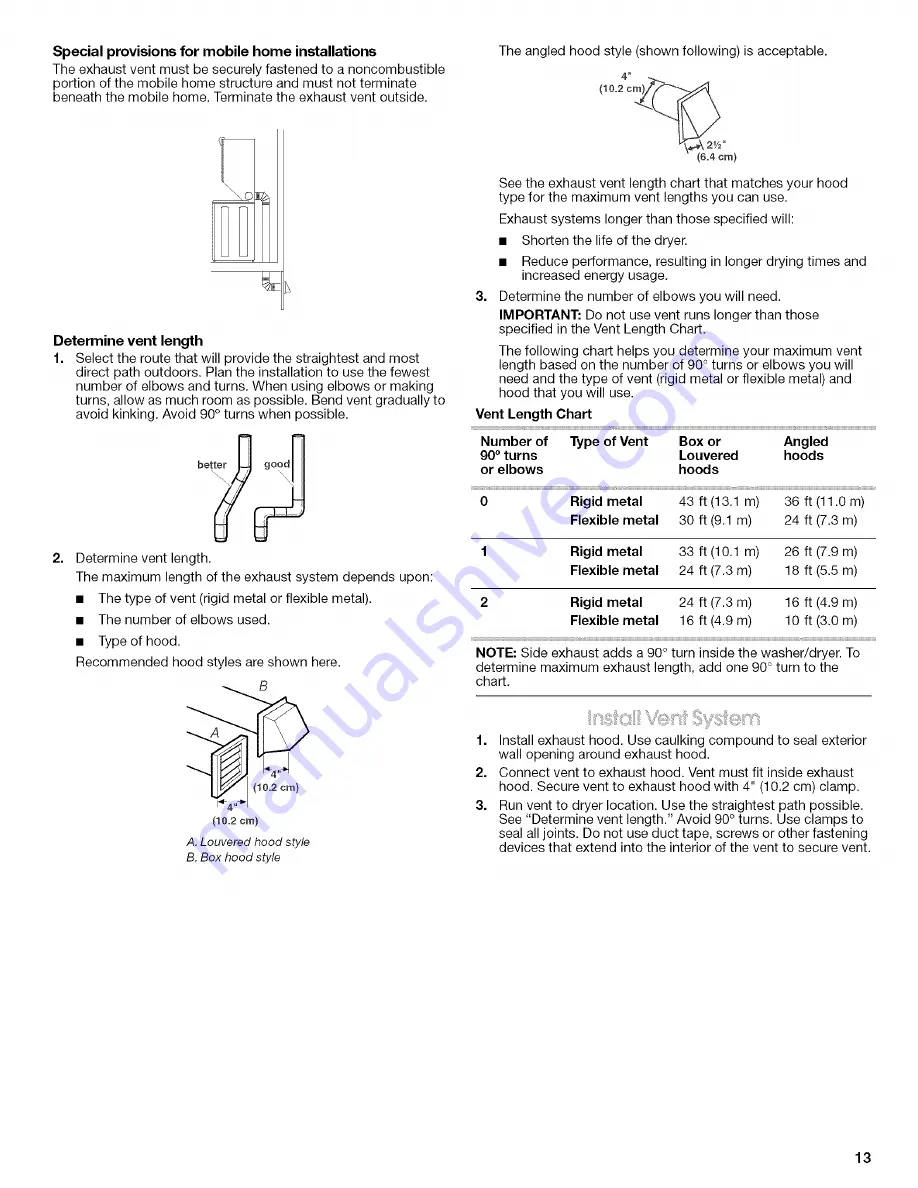
Page 13: ...es and increased energy usage 3 Determine the number of elbows you will need IMPORTANT Do not use vent runs longer than those specified in the Vent Length Chart The following chart helps you determine your maximum vent length based on the number of 90 turns or elbows you will need and the type of vent rigid metal or flexible metal and hood that you will use Vent Length Chart Number of Type of Vent...

Page 14: ...r is level and front leveling feet are tight See Level Washer Dryer 6 Plug into a grounded outlet Turn on power 7 Check to be sure the water faucets are on 8 Check for leaks around faucets and inlet hoses 9 Remove the blue protective film on the console and any tape remaining on the washer dryer 10 Read your Use and Care Guide 11 Wipe the dryer drum interior thoroughly with a damp cloth to remove ...

Page 15: ...15 ...

Page 16: ...8557471A 2004 All rights reserved Benton Harbor Michigan 49022 10 04 Printed in U S A ...

Reviews: