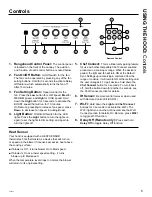
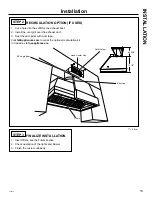
background image

12

29-6325

ADVANCE PLANNING

Duct Install Planning

■  This hood is designed to be vented vertically 

through the ceiling. Use a 8" round duct. Use 

locally supplied elbows to vent horizontally 

through the rear wall. 

■  Use metal ductwork only.
■  Determine the exact location of the vent hood.
■  

Plan the route for venting exhaust to the outdoors. 

To maximize the ventilation performance of the 

vent system:
1.  Minimize the duct run length and number of 

transitions and elbows.

2.  Maintain a constant duct size.
3.  Seal all joints with duct tape to prevent any leaks.

NOTE:

 Flexible vent is not recommended. Flexible 

vent creates back pressure and air turbulence that 

greatly reduces performance.

■  Maximum equivalent duct length for 100 CFM: 

150 foot for vent hoods.

■  Install a wall cap or roof cap with damper at the 

exterior opening. Purchase the wall or roof cap 

and any transition and length of duct needed in 

advance.

■  

When applicable, install any makeup (replacement) 

air system in accordance with local building 

code requirements. Visit 

GEAppliances.com

 for 

available makeup air solutions.
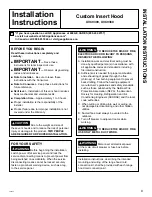
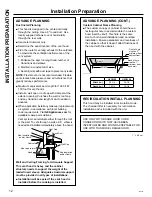
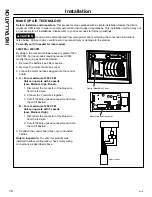
Vent system can terminate either through the roof 

or the wall. To vent through a wall, a 90⁰ elbow is 

needed and installed immediately above the hood.

Wall and Ceiling Framing for Adequate Support
 This vent hood is heavy and the cabinet 

structure needs to support the weight of the 

loaded insert sleeve. Adequate structural support 

must be provided in all types of installations. 

■  Installation will be easier if the vent hood is 

installed before the cooktop is installed.

RECIRCULATION INSTALL PLANNING

This hood may be installed in recirculation mode. 

The charcoal filter is necessary for recirculation 

installation and is included with the unit.

Installation Preparation

INSTALLATION PREPARATION

ADVANCE PLANNING (CONT.)

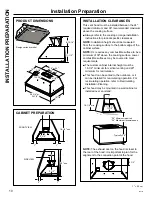
Custom Cabinet Frame Planning

■  

The custom canopy or cabinet should have a 

rectangular hole to accommodate the custom 

hood insert by itself. This hole is the same 

size for both a wall installation and an island 

installation. Ensure parallelism and levelness of 

the cabinet so that it doesn't affect flushness of 

the hood with the cabinet.

Width

Front of hole 

must be 3" 

minimum from 

cabinet front

Back of hole 

must be 1" 

minimum from 

back wall

Depth

UVC9300

UVC9360

Width (in.)

28-1/4

34-1/4

Depth (in.)

19-1/8

19-1/8

Roof Cap

Round Duct

Wall Cap

Add Insulation 

and/or Caulk

Add Insulation 

and/or Caulk

Cabinet

Add tape to joint

Hood

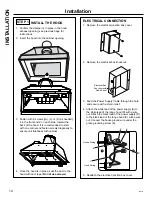
USE ONLY WITH RANGE HOOD CORD 

CONNECTION KITS THAT HAVE BEEN 

INVESTIGATED AND FOUND ACCEPTABLE FOR 

USE WITH THIS MODEL RANGE HOOD.

1" = 2.5 cm

Summary of Contents for UVC9300

Page 1: ...nagersge ca fr INSERT HOODS Custom 29 6325 5 19 MCC SAFETY INFORMATION 3 USING THE HOOD Controls 5 Chef Connect 6 Wi Fi Connect 6 CARE AND CLEANING Filters 7 Surfaces 8 Lights 8 INSTALLATION INSTRUCTIONS 9 TROUBLESHOOTING TIPS 17 LIMITED WARRANTY 18 ACCESSORIES 19 CONSUMER SUPPORT 20 UVC9300 UVC9360 OWNER S MANUAL INSTALLATION INSTRUCTIONS GE is a trademark of the General Electric Company Manufact...

Page 2: ...to every GE Appliances product and we think you will too Among other things registration of your appliance ensures that we can deliver important product information and warranty details when you need them Register your GE appliance now online Helpful websites and phone numbers are available in the Consumer Support section of this Owner s Manual You may also mail in the pre printed registration car...

Page 3: ... OR EXPLOSIVE MATERIALS AND VAPORS CAUTION TO REDUCE RISK OF FIRE AND TO PROPERLY EXHAUST AIR BE SURE TO DUCT AIR OUTSIDE DO NOT VENT EXHAUST AIR INTO SPACES WITHIN WALLS OR CEILINGS OR INTO ATTICS CRAWL SPACES OR GARAGES WARNING TO REDUCE THE RISK OF INJURY TO PERSONS IN THE EVENT OF A RANGE TOP GREASE FIRE OBSERVE THE FOLLOWING A SMOTHER FLAMES with a close fitting lid cookie sheet or metal tray...

Page 4: ...to accumulate on fan or filter D Use proper pan size Always use cookware appropriate for the size of the surface element WARNING TO REDUCE THE RISK OF FIRE ELECTRIC SHOCK OR INJURY TO PERSONS OBSERVE THE FOLLOWING A Installation work and electrical wiring must be done by qualified person s in accordance with all applicable codes and standards including fire rated construction B Sufficient air is n...

Page 5: ...s on a cooktop or range When the device is paired the light and fan will turn ON at the Default Sync Settings upon receiving a command from the range or cooktop It will remain ON at that setting until the user changes it To pair devices hold down the Chef Connect button for 3 seconds To turn it back off hold the button down for another 3 seconds see the Chef Connect section for details 6 IR Sensor...

Page 6: ...igned to provide you with two way communication between your appliance and smart device By using the GE Appliances Wi Fi Connect features you will be able to control essential hood operations such as fan speed light functions timer clock function delay off and filter reset using your smartphone or tablet What you will need Your GE Appliances hood uses your existing home Wi Fi network to communicat...

Page 7: ...ishwasher Do not use abrasive cleaners NOTE Some discoloration of the filter may occur in the dishwasher Baffle Metal Grease Filter To install Insert the top of the baffle into the track behind the control panel The arrows on the side of the baffle should be pointing towards the front of the unit Slide the baffle up and push the bottom end back until it firmly seats into place To remove Use front ...

Page 8: ...e brush lines with a damp soft sponge To inquire about purchasing stainless steel appliance cleaner or polish or to find the location of a dealer nearest you please call our toll free number National Parts Center 800 626 2002 GEApplianceParts com In Canada call 800 661 1616 or visit geappliances ca Charcoal Filter for recirculation installation only NOTE DO NOT rinse or put charcoal filter in an a...

Page 9: ...ese vent hoods and to reduce the risk of personal injury or damage to the product TWO PEOPLE ARE REQUIRED FOR PROPER INSTALLATION WARNING Disconnect all electrical power at the main circuit breaker or fuse box before installing WARNING TO REDUCE THE RISK OF FIRE ELECTRIC SHOCK OR INJURY TO PERSONS OBSERVE THE FOLLOWING A Installation work and electrical wiring must be done by qualified person s in...

Page 10: ...e bottom edge of the cabinet surface NOTE UL requires any combustible surface to be a minimum of 30 above the cooking surface Lower combustible surfaces may be covered to meet requirements The custom cabinet internal height must be 18 1 2 minimum for vertical venting and 29 minimum for recirculation This hood can be vented to the outdoors or it can be installed for recirculating operation For reci...

Page 11: ...nd other boxed parts Remove and properly discard the protective plastic wrapping and other packaging materials TOOLS AND MATERIALS REQUIRED NOT SUPPLIED 762Dia5 Pencil and tape measure Wire Cutter Stripper Step ladder Ladder Phillips and flat blade screwdrivers Level Level 2 Safety glasses Safety Glasses 8 ducting and caps as needed Aluminized duct tape Duct Tape Electric drill and appropriate bit...

Page 12: ...nd installed immediately above the hood Wall and Ceiling Framing for Adequate Support This vent hood is heavy and the cabinet structure needs to support the weight of the loaded insert sleeve Adequate structural support must be provided in all types of installations Installation will be easier if the vent hood is installed before the cooktop is installed RECIRCULATION INSTALL PLANNING This hood ma...

Page 13: ... the equipment grounding conductor can result in a risk of electric shock Check with a qualified electrician or service representative if you are in doubt whether the appliance is properly grounded PREPARE HOUSE ELECTRICAL WIRING The custom cabinet must allow spacing for house wiring to reach junction box located in diagram below If unit is installed over an island the wiring must come from ceilin...

Page 14: ... in place seal the duct to the hood with duct tape Do not use screws ELECTRICAL CONNECTION 1 Remove the electrical junction box cover 2 Remove the electrical box knockout 3 Feed the Power Supply Cable through the hole and secure with a strain relief 4 Attach the white lead of the power supply A to the white lead of the range hood D with a wire nut Attach the black lead of the power supply B to the...

Page 15: ...stom cabinetry STEP 2 RECIRCULATION OPTION IF USED 1 Cut a hole into the soffit for the exhaust duct 2 Install the vent grill over the exhaust duct 3 Seal the duct joints with duct tape Visit GEAppliances com to order the optional recirculation kit In Canada visit geappliances ca Hood Center Line Soffit Cutout 90 Angle Boot 8 ducting Filters 6 15 16 11 1 2 1 2 5 cm ...

Page 16: ...g reduced CFM modify the wiring as described below 1 Remove the baffles see Filters section 2 Remove the control board box cover 3 Locate the motor harness plugged into the control board 4 A For a maximum of 390 CFM Unit can operate with 4 speeds Low Medium High Boost 1 Disconnect the connector of the blue wire from the red wire 2 Connect the 2 red wires together 3 Cut off the blue unused connecto...

Page 17: ...the Vent Hood Insufficient makeup replacement air Sufficient makeup replacement air is required for exhausting appliances to operate to rating Check with local building codes which may require or strongly advise the use of makeup air Visit GEAppliances com for available makeup air solutions Early light failure Light wattage is too high Replace with correct wattage Fan automatically turns on and ca...

Page 18: ...rchaser and any succeeding owner for products purchased for home use within the USA If the product is located in an area where service by a GE Appliances Authorized Servicer is not available you may be responsible for a trip charge or you may be required to bring the product to an Authorized GE Appliances Service location for service In Alaska the limited warranty excludes the cost of shipping or ...

Page 19: ...efer to the Consumer Support page for phone numbers and website information The following products and more are available Accessories Parts Power Cord Kit Make up Air Kit Charcoal Filter Recirculation Kit Remote Control Cleaning Supplies CitruShine Stainless Steel Wipes CERAMA BRYTE Stainless Steel Appliance Cleaner Bar Keepers Friend Soft Cleanser ...

Page 20: ...there after your warranty expires In the US GEAppliances com extended warranty or call 800 626 2224 during normal business hours In Canada contact your local extended warranty provider Remote Connectivity For assistance with wireless network connectivity for models with remote enable visit our website at GEAppliances com connected home smart appliances or call 800 220 6899 in the US Parts and Acce...

Page 21: ... 6325 5 19 MCC ÉLECTROMÉNAGERS GE CONSIGNES DE SÉCURITÉ 23 UTILISATION DE LA HOTTE Commandes 25 Chef Connect 26 Connexion Wi Fi 26 ENTRETIEN ET NETTOYAGE Filtres 27 Surfaces 28 Lumières 28 INSTRUCTIONS D INSTALLATION 29 CONSEILS DE DÉPANNAGE 37 GARANTIE LIMITÉE 38 ACCESSOIRES 39 SERVICE À LA CLIENTÈLE 40 UVC9300 UVC9360 ENGLISH FRANÇAIS MANUEL DE L UTILISATEUR ET INSTRUCTIONS D INSTALLATION GE est...

Page 22: ... nous pensons que vous le serez aussi À cet égard l enregistrement de votre appareil nous assure que nous pourrons vous fournir des informations importantes sur votre appareil et des détails sur sa garantie si vous en avez besoin Enregistrez votre électroménager GE en ligne dès maintenant Des sites Web et des numéros de téléphone utiles sont disponibles dans la section Service à la clientèle de ce...

Page 23: ...IRE LES RISQUES D INCENDIE ET ASSURER L ÉVACUATION ADÉQUATE DE L AIR ASSUREZ VOUS D ACHEMINER LES CONDUITS VERS L EXTÉRIEUR N ÉVACUEZ PAS L AIR DANS DES ESPACES INTRA MURAUX DANS LE PLAFOND DANS LE GRENIER DANS UN VIDE SANITAIRE OU DANS LE GARAGE AVERTISSEMENT POUR RÉDUIRE LES RISQUES DE BLESSURES S IL SURVIENT UN FEU DE GRAISSE SUR LA CUISINIÈRE SUIVEZ LES CONSIGNES SUIVANTES A ÉTOUFFEZ LES FLAMM...

Page 24: ...siles de dimensions appropriées Utilisez toujours des casseroles dont la taille correspond à celle de l élément de cuisson AVERTISSEMENT POUR DIMINUER LES RISQUES D INCENDIE DE CHOC ÉLECTRIQUE OU DE BLESSURES SUIVEZ LES CONSIGNES SUIVANTES A L installation et le câblage électrique doivent être effectués par une personne qualifiée conformément à tous les codes et à toutes les normes en vigueur en p...

Page 25: ...tibles comme une surface de cuisson ou une cuisinière Lorsque la connexion avec l appareil est établie la lumière et le ventilateur s allument selon les paramètres de synchronisation par défaut de la commande envoyée par la cuisinière ou la surface de cuisson Ils resteront programmés ainsi jusqu à ce que l utilisateur modifie les paramètres de synchronisation par défaut Pour connecter les appareil...

Page 26: ...re hotte GE est conçue pour vous fournir une communication bidirectionnelle entre votre appareil et un périphérique intelligent En utilisant les fonctionnalités Wi Fi Connect des électroménagers GE vous serez en mesure de contrôler les principales opérations de la hotte telles que les paramètres de vitesse du ventilateur d éclairage de minuterie horloge d arrêt différé du ventilateur et de réiniti...

Page 27: ...elle N utilisez pas de nettoyant abrasif REMARQUE Le lavage au lave vaisselle peut entraîner une certaine décoloration du filtre Filtre à graisse pour cloison métallique Pour installer le filtre Insérez le haut de la cloison dans le rail derrière le tableau de commande Les flèches situées sur le côté du déflecteur doivent être orientées vers l avant de l appareil Glissez la cloison vers le haut et...

Page 28: ...onge douce et humide Pour toute question concernant l achat de produit de nettoyage ou à polir pour appareil en acier inoxydable ou pour connaître l emplacement du détaillant le plus près de chez vous veuillez appeler notre numéro sans frais Centre national des pièces 1 800 626 2000 www electromenagersge ca Au Canada téléphonez au 1 800 661 1616 ou visitez www electromenagersge ca Filtre à charbon...

Page 29: ...ECTUÉE PAR DEUX PERSONNES AVERTISSEMENT Coupez l alimentation électrique au disjoncteur principal ou à la boîte de fusibles avant de commencer l installation AVERTISSEMENT POUR DIMINUER LES RISQUES D INCENDIE DE CHOC ÉLECTRIQUE OU DE BLESSURES SUIVEZ LES CONSIGNES SUIVANTES A L installation et le câblage électrique doivent être effectués par une personne qualifiée conformément à tous les codes et ...

Page 30: ...ion doit être mesurée à partir de la surface de cuisson jusqu à la partie la plus basse de la surface de l armoire REMARQUE UL exige que toute surface combustible se situe à au moins 30 po 76 2 cm au dessus de la surface de cuisson Les surfaces combustibles inférieures peuvent être couvertes pour répondre aux exigences La hauteur interne de l armoire sur mesure doit être de 18 1 2 po 47 cm ou plus...

Page 31: ...tres boîtes de pièces Enlevez et jetez l emballage en plastique et les autres matériaux d emballage de façon adéquate OUTILS ET MATÉRIAUX NÉCESSAIRES NON FOURNIS 762Dia5 Crayon et ruban à mesurer Wire Cutter Stripper Escabeau Ladder Tournevis Phillips et tournevis plat Niveau Level 2 Lunettes de sécurité Safety Glasses Conduits de 8 po 20 3 cm et capuchons au besoin Ruban adhésif en toile revêtu d...

Page 32: ... est nécessaire et doit être installé au dessus de la hotte Charpente murale et de plafond pour un support adéquat Cette hotte est lourde et la structure de l armoire doit supporter le poids du support d insertion chargé Pour soutenir la hotte la charpente murale doit être adéquate L installation sera plus facile si la hotte est installée avant la surface de cuisson PLANIFICATION D UNE INSTALLATIO...

Page 33: ... à la terre de la hotte AVERTISSEMENT Un raccordement inadéquat du conducteur de terre de l équipement peut accroître les risques de choc électrique En cas de doute quant à la mise à la terre de l appareil consultez un électricien qualifié ou un représentant du service après vente PRÉPARATION DU CÂBLAGE ÉLECTRIQUE L armoire sur mesure doit permettre un dégagement suffisant entre le câblage et la b...

Page 34: ...otte avec du ruban adhésif N utilisez pas de vis BRANCHEMENT ÉLECTRIQUE 1 Retirez le couvercle de la boîte de jonction 2 Retirez la plaque sectionnable de la boîte électrique 3 Passez le câble d alimentation par le trou et fixez le avec un réducteur de tension 4 Raccordez le fil blanc de l alimentation électrique A au fil blanc de la hotte D à l aide d un capuchon de connexion Raccordez le fil noi...

Page 35: ... 1 Percez un trou dans la retombée de plafond du conduit d échappement 2 Installez la grille d aération sur le conduit d évacuation 3 Scellez les joints du conduit avec du ruban adhésif Visitez electromenagersGE ca pour commander l ensemble de recyclage de l air en option Au Canada visitez geappliances ca Ligne centrale de la hotte Ouverture de la retombée de plafond Boîtier de raccordement de 90 ...

Page 36: ...débit par minute modifiez le câblage comme décrit ci dessous 1 Retirez les cloisons consultez la section Filtres 2 Retirez le couvercle du panneau de commande 3 Localisez le harnais de moteur branché au panneau de commande 4 A Pour un maximum de 390 pi min 11 m min l unité peut fonctionner avec 4 vitesses basse moyenne élevée ou suralimentée 1 Débranchez du fil rouge le raccord du fil bleu 2 Conne...

Page 37: ...e Air d appoint de remplacement insuffisant Une quantité d air d appoint de remplacement suffisante est nécessaire pour que les appareils d évacuation fonctionnent selon la capacité pour laquelle ils ont été conçus Consultez les codes du bâtiment locaux ceux ci pourraient exiger ou fortement recommander l usage d air d appoint Visitez www electromenagersge ca pour connaître les solutions d air d a...

Page 38: ...eur initial ainsi qu à tout propriétaire subséquent d un produit acheté au Canada en vue d une utilisation domestique au Canada Si le produit se situe dans une zone où aucun réparateur agréé par Électroménagers GE n est disponible vous devrez peut être assumer les frais de déplacement de celui ci ou apporter le produit à un atelier de réparation agréé par Électroménagers GE En Alaska la garantie l...

Page 39: ...pour obtenir les numéros de téléphone et des informations sur le site Web Les produits suivants et d autres sont offerts Accessoires Pièces Ensemble du cordon d alimentation Système d air d appoint Filtre à charbon Nécessaire de recyclage de l air Télécommande Fournitures de nettoyage Lingettes CitruShineMC pour acier inoxydable Nettoyant pour électroménager en acier inoxydable CERAMA BRYTEMD Bar ...

Page 40: ...e après expiration de votre garantie Aux États Unis GEAppliances com extended warranty ou appelez le 1 800 626 2224 durant les heures normales de bureau Au Canada communiquez avec le fournisseur de la garantie prolongée Connectivité à distance Pour de l assistance concernant la connectivité réseau sans fil pour les modèles avec activation à distance visitez notre site Web à GEAppliances com connec...

Reviews: