D
IRECTION
5771498-100, R
EVISION
6
V
ENUE
™ S
ERVICE
M
ANUAL
3-26
Section 3-5 - Completing the Setup
P R E L I M I N A R Y
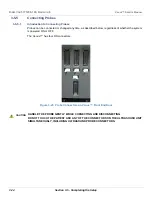
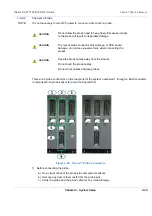
To connect a probe to one of the upper sockets 1, 2, or 3
:
1) Hold the probe connector vertically with the cable pointing upward.
2.) Prior to inserting the probe, ensure that the connector locking handle is positioned to the left.
3) Align the connector with the probe port and carefully push into place.
4) Push the connector locking handle to the right to secure the probe connector.
5) Carefully position the probe cord so it is free to move and is not resting on the floor.
To connect a probe to one of the lower socket 4
1) Hold the probe connector vertically with the cable pointing downward.
2.) Prior to inserting the probe, ensure that the connector locking handle is positioned to the right
3) Align the connector with the probe port and carefully push into place.
4) Push the connector locking handle to the left to secure the probe connector.
5) Carefully position the probe cord so it is free to move and is not resting on the floor.
3-5-5-3
Disconnect Probes
Follow these steps to disconnect the RS probes, as applicable:
1) Move the connector locking lever to the
left
to unlock the connector (For lower socket 4, move the
connector locking lever to the
right
)
2) Carefully remove the connector from the port.
3) Ensure that the probe head is clean before placing the probe in its storage case.
For cleaning instructions, see the
User Manual
.
3-5-6
Power on/Boot up
For procedure, see:
3-5-7
Power Shut Down
For procedure, see:
3-5-8
Complete Power Down
For procedure, see:
Summary of Contents for Venue R1
Page 477: ......

