GE
D
IRECTION
FQ091019, R
EVISION
2
V
IVID Q
N S
ERVICE
M
ANUAL
3-98
Section 3-10 - Connectivity Setup
3-10-3
Connectivity Configuration
NOTE:
If connected to a stand-alone network (Peer-to-Peer network with a Vivid q N scanner, an
EchoPAC PC work station and eventually a network printer), you should use default delivery
settings.
3-10-3-1
Introduction
To be able to use the network functions when connected to a hospital network, the scanner must have
a proper network address.
•
Before you can set up the scanner, you need to collect some information. Refer to the
"Worksheet
for DICOM Network Information in Figure 2-2 on page 2-10.
Typically, the source for this
information is the network administrator.
•
Follow the steps below to prepare the scanner for use on the network.
3-10-3-2
Select TCP/IP Set-up Screen
1.) Press
CONFIG
(
F2
) and log on as
Adm
, as described in
"Log On to the System as ADM" on page
.
2.) If not already selected, select CONNECTIVITY from the bottom of the screen.
3.) Select the TCP/IP TAB (it is named Tcpip).
.
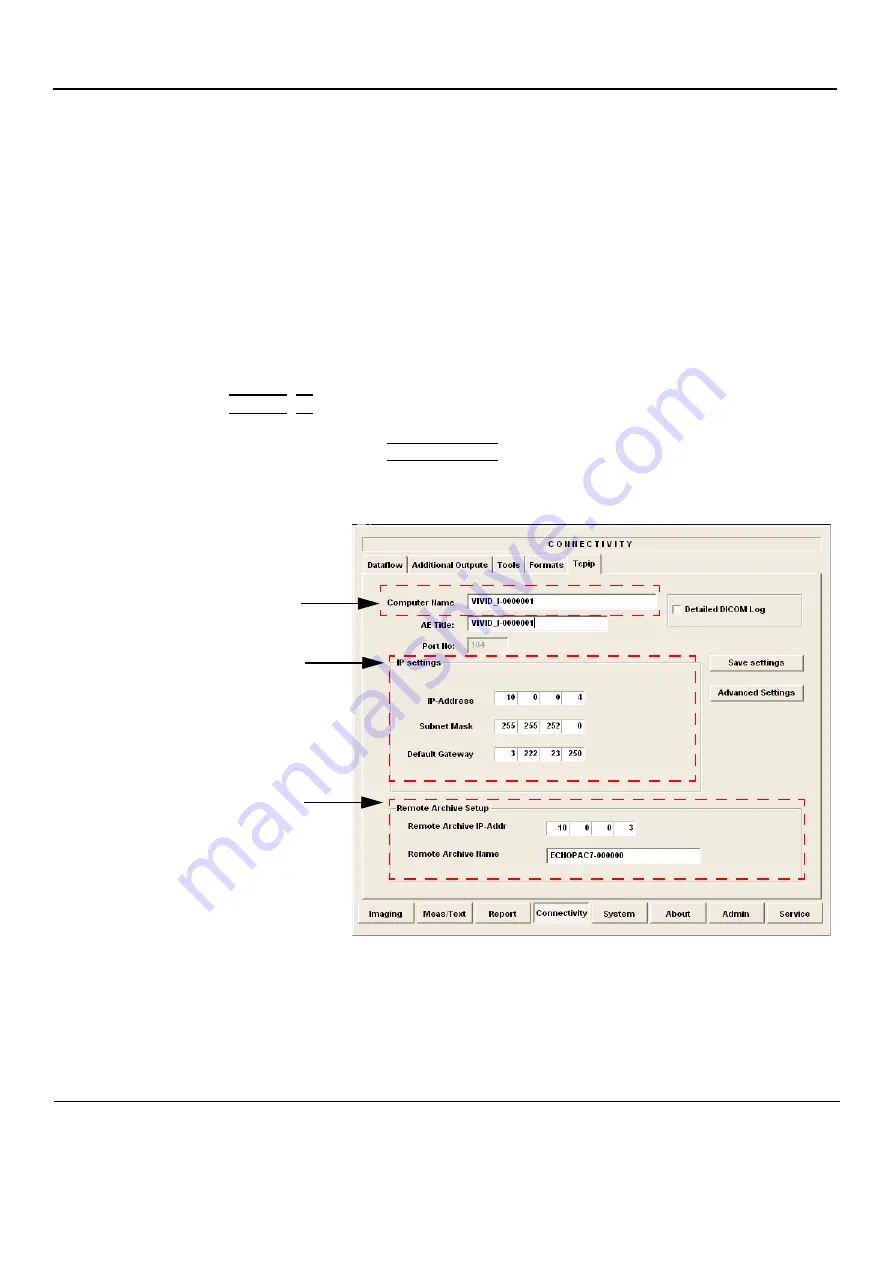
Figure 3-100 TCP/IP Set-up Screen for Vivid q N, Overview (Example)
Computer Name:
For Vivid q N, this name is on the form:
Vivid_I-00nnnn
, where “00nnnn” is a number
(nnnn is the scanner’s serial number).
IP Settings:
IP Settings area for the Vivid q N scanner.
Remote Archive Setup area:
IP settings area for a Remote Archive.
Example: EchoServer.
Default Setup:
Remote Archive IP-Addr: 10.0.0.4
Remote Archive Name: EchoPAC7-000001


