background image

52

BEFORE YOU CALL FOR SERVICE…

(continued)

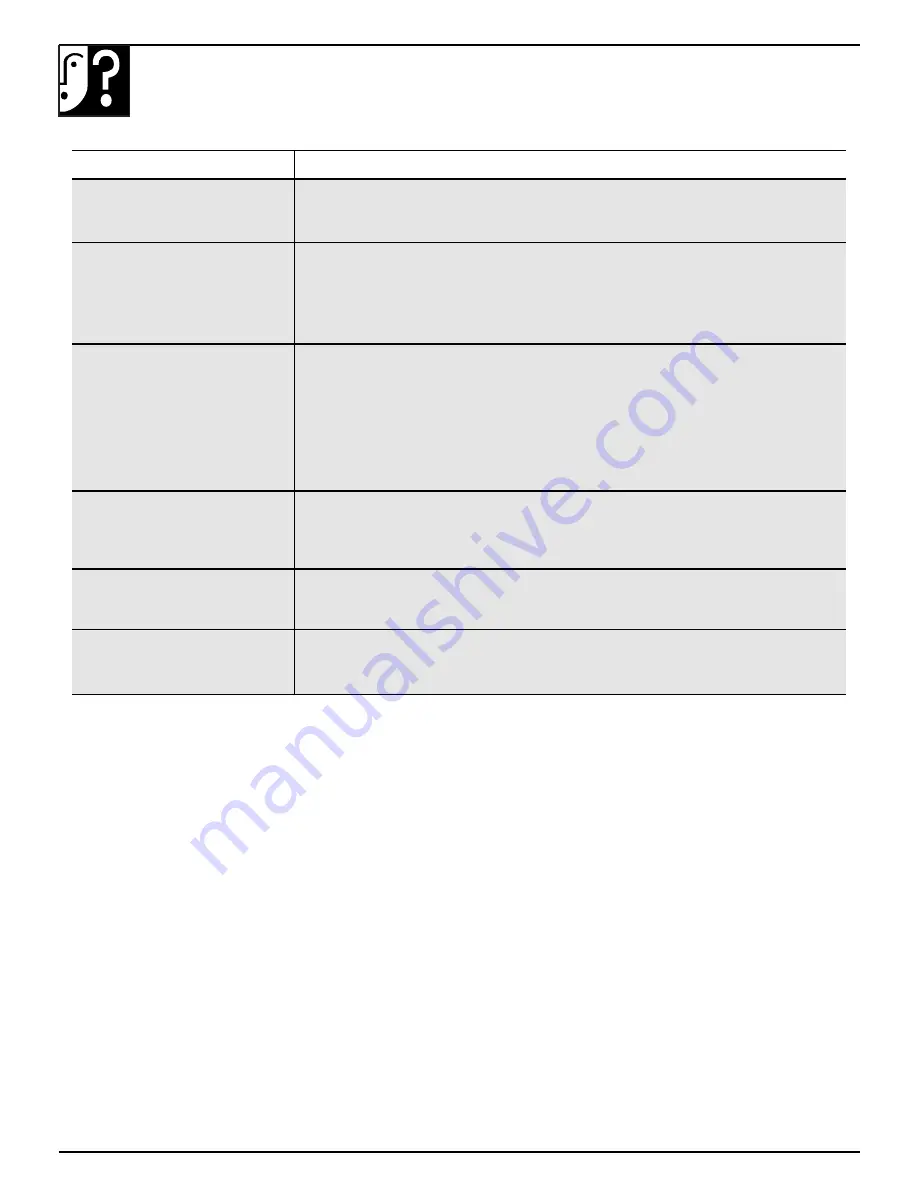
PROBLEM

POSSIBLE CAUSE

OVEN DOOR

• Press the CLEAR/OFF pad. Allow the oven to cool and then, on models with 

ACCIDENTALLY LOCKED

a door latch, unlock the door.

WHILE BAKING

“DOOR” APPEARS 

• Self-cleaning cycle has been selected but latch handle was not moved all the 

IN THE DISPLAY

way to the right. Move the latch handle.

(on models with a door latch)

• Latch handle was moved to the right but a program other than self-cleaning 

was selected. Move the latch handle to the right only when setting the 
self-cleaning cycle.

“F—AND A NUMBER”

• If the time display flashed “F—and a number,” you have a function error code.

FLASH IN THE DISPLAY

If a function error code appears during the self-cleaning cycle, check the oven 
door latch (on some models). The latch handle may have been moved, even if 
only slightly, from the latched position. Make sure the latch is moved to the 
right as far as it will go. Press the CLEAR/OFF pad. Allow the oven to cool for 
one hour. Put the oven back into operation. 

• Disconnect all power to the range for 5 minutes and then reconnect power. 

If the failure code repeats, then call for service.

OVEN CONTROL

• This is reminding you to enter a bake temperature (see the Baking section).

SIGNALS AFTER ENTERING 
COOKING TIME, DELAY
START or START TIME

RAINBOW EFFECT IN  

• This is normal. It is caused by the heat treatment applied to the oven window.

THE OVEN WINDOW
(on some models)

STRONG ODOR

• Improper air/gas ratio in oven. Adjust oven burner air shutter.
• An odor from the insulation around the oven liner is normal for the first few 

times oven is used. This is temporary.

If you need more help…call, toll free:
GE Answer Center

®

800.626.2000
consumer information service

Summary of Contents for XL44 Series

Page 1: ...f Your Control 13 15 Timed Baking 20 21 Surface Cooking 8 9 Control Settings 8 Care and Cleaning 31 36 Broiler Pan and Grid 34 Burner Assembly 31 33 Cooktop 33 36 Door Removal 34 Oven Bottom 33 Oven Vents 36 Self Cleaning Instructions 27 30 Storage Drawer 35 Before You Call For Service 50 52 Thermostat Adjustment Do It Yourself 22 More questions call GE Answer Center 800 626 2000 Preparation 37 46...

Page 2: ...service and want you to be pleased If for some reason you are not happy with the service you receive here are three steps to follow for further help FIRST contact the people who serviced your appliance Explain why you are not pleased In most cases this will solve the problem NEXT if you are still not pleased write all the details including your phone number to Manager Consumer Relations GE Applian...

Page 3: ... appliance Locate the range out of kitchen traffic path and out of drafty locations to prevent pilot outage on standing pilot models and poor air circulation Be sure all packing materials are removed from the range before operating it to prevent fire or smoke damage should the packing material ignite Be sure your range is correctly adjusted by a qualified installer for the type of gas natural or L...

Page 4: ...tch as it heats Always use the LITE position on electric ignition models or the HI position on standing pilot models when igniting the top burners and make sure the burners have ignited Never leave the surface burners unattended at high flame settings Boilovers cause smoking and greasy spillovers that may catch on fire Adjust the top burner flame size so it does not extend beyond the edge of the c...

Page 5: ... The hot air and steam that escapes can cause burns to hands face and eyes Keep the oven free from grease buildup Pulling out the shelf to the shelf stop is a convenience in lifting heavy foods It is also a precaution against burns from touching hot surfaces of the door or oven walls The lowest position R is not designed to slide Do not heat unopened food containers Pressure could build up and the...

Page 6: ...6 FEATURES OFYOUR RANGE Features and appearance may vary MASK FOR SHELVES 1 2 3 4 5 6 7 8 9 10 11 13 15 14 16 18 19 20 17 10 12 ...

Page 7: ...ners 4 5 8 9 27 31 33 9 Fluorescent Top Light on some models 3 16 36 10 Oven Control Clock and Timer 10 12 18 20 23 25 27 30 35 11 Oven Vents 4 5 17 36 12 Cooktop 4 5 8 9 33 36 13 Surface Burner Control Knobs 4 8 35 14 Oven Door Latch on some models 11 18 20 23 Use for self cleaning cycle only 25 27 30 15 Oven Shelves with Stop Locks 5 17 20 23 easily removed or repositioned on shelf supports 26 2...

Page 8: ...flame size If the knob stays at LITE it will continue to click When one burner is turned to LITE all the burners spark Do not attempt to disassemble or clean around any burner while another burner is on An electric shock may result which could cause you to knock over hot cookware In case of a power failure you can light the surface burners on your range with a match Hold a lighted match to the bur...

Page 9: ...ed because it heats quickly and evenly Most foods brown evenly in an aluminum skillet Use saucepans with tight fitting lids when cooking with minimum amounts of water Cast Iron If heated slowly most skillets will give satisfactory results Enamelware Under some conditions the enamel of some cookware may melt Follow cookware manufacturer s recommendations for cooking methods Glass There are two type...

Page 10: ... by small amounts Press and hold the pad to increase the time or temperature by larger amounts 12 DECREASE Short taps to this pad decrease the time or temperature by small amounts Press and hold the pad to decrease the time or temperature by larger amounts 13 START Must be pressed to start any cooking or cleaning function 14 KITCHEN TIMER ON OFF Press this pad to select timer function The timer do...

Page 11: ... temperature the starting and length of cooking time for Timed Bake and the starting and length of cleaning time for Self Clean 12 CLEAR OFF Press this pad to cancel all oven operations except clock and timer 13 START Must be pressed to start any cooking or cleaning function 14 KITCHEN TIMER ON OFF Press this pad to select timer function The timer does not control oven operations The timer can tim...

Page 12: ...ll beep one time The seconds will not be displayed until the last minute is reached When the timer reaches 00 the control will beep 3 times followed by one beep every 6 seconds until the KITCHEN TIMER ON OFF pad is pressed The 6 second tone can be canceled by following the steps in the Special Features of Your Oven Control section under Tones at the End of a Timed Cycle How to Set the Timer 1 Pres...

Page 13: ... may be canceled To cancel the 6 second beep 1 Press the BAKE and BROIL HI LO pads at the same time for 2 seconds until the display shows SF 2 Press the KITCHEN TIMER ON OFF pad The display shows CON BEEP continuous beep Press the KITCHEN TIMER ON OFF pad again The display shows BEEP This cancels the one beep every 6 seconds 3 Press the START pad SPECIALFEATURES OFYOUR OVEN CONTROL on models with ...

Page 14: ...and BROIL HI LO pads at the same time for 2 seconds until the display shows SF 2 Press the COOKING TIME pad The display will show Hld OFF Press the COOKING TIME pad again to activate the feature The display will show Hld ON 3 Press the START pad to activate the cook and hold feature and leave the control set in this special features mode 12 Hour 24 Hour or Clock Black Out Your control is set to us...

Page 15: ...ge this to use the Centigrade selections 1 Press the BAKE and BROIL HI LO pads at the same time for 2 seconds until the display shows SF 2 Press the BROIL HI LO pad The display will show F Fahrenheit If this is your choice press START 3 Press the BROIL HI LO pad again The display will show C Centigrade If this is your choice press START Changing the Speed of the or Pads on some models As you use t...

Page 16: ...lit until power is restored This is because the flow of gas is automatically stopped and will not resume when power is restored until the glow bar has reached operating temperature Fluorescent Top Light on some models Oven Light Use the pad on the upper control panel to turn the light on and off Use the switch on the lower control panel to turn the light on or off Oven Moisture As your oven heats ...

Page 17: ...ottom B C D and E top It also has a special low shelf position R for roasting extra large items such as a large turkey the shelf is not designed to slide out at this position Shelf positions for cooking are suggested in the Baking Roasting and Broiling sections E D C B A R Oven Shelves The shelves are designed with stop locks so when placed correctly on the shelf supports they will stop before com...

Page 18: ...asseroles B or C Roasting B or R D E C B A R Preheating Preheat the oven if the recipe calls for it Preheat means bringing the oven up to the specified temperature before putting the food in the oven To preheat set the oven at the correct temperature selecting a higher temperature does not shorten preheat time Preheating is necessary for good results when baking cakes cookies pastry and breads For...

Page 19: ... sheet for baking since the shiny foil pan reflects heat away from the pie crust the cookie sheet helps retain it For best browning when baking several 8 or 9 cakes stagger them so one pan is not directly above another Warped or bent pans will cause uneven baking results and poorly shaped products A cake baked in a pan larger than the recipe recommends will usually be crisper thinner and drier tha...

Page 20: ...r pads to set the baking time The oven temperature and the cooking time that you entered will be displayed 5 Press the START pad The display shows the oven temperature that you set and the cooking time countdown The display starts changing once the temperature reaches 100 F The oven will continue to cook for the programmed amount of time then shut off automatically 6 Press the CLEAR OFF pad to cle...

Page 21: ... and the cooking time countdown At the end of cooking time the oven will turn off and the end of cycle tone will sound 8 Press the CLEAR OFF pad to clear the end of cycle tone if necessary Remove the food from the oven Remember even though the oven shuts off automatically foods continue cooking after the controls are off NOTE The low temperature zone of this range between 150 F and 200 F is availa...

Page 22: ...ooler Press the pad to increase the temperature in 1 degree increments 4 Press the pad to decrease the temperature in 1 degree increments 4 When you have made the adjustment press the START pad to go back to the time of day display Use your oven as you would normally NOTE This adjustment will not affect the broiling or self cleaning temperatures It will be retained in memory after a power failure ...

Page 23: ... out at this position Roasting is really a baking procedure used for meats Therefore oven controls are set for Baking or Timed Baking You may hear a slight clicking sound indicating the oven is working properly Timed Baking will turn the oven on and off automatically Most meats continue to cook slightly while standing after being removed from the oven The standing time recommended for roasts is 10...

Page 24: ... under 5 pounds more time for larger roasts Make sure poultry is thawed before roasting Unthawed poultry often does not cook evenly Some commercial frozen poultry can be cooked successfully without thawing Follow directions given on package label Oven Approximate Roasting Time Internal Type Temperature Doneness in Minutes per Pound Temperature F Meat 3 to 5 lbs 6 to 8 lbs Tender cuts rib high qual...

Page 25: ...the grid and stay cooler thus preventing excessive spatter and smoking Q Should I salt the meat before broiling A No Salt draws out the juices and allows them to evaporate Always salt after cooking Turn the meat with tongs piercing the meat with a fork also allows the juices to escape When broiling poultry or fish brush each side often with butter Q Why are my meats not turning out as brown as the...

Page 26: ...Space evenly Up to 8 patties take 1 2 to 3 4 inch thick about same time Beef Steaks Rare 1 inch thick C 9 7 Steaks less than 1 inch thick will cook Medium 1 to 11 2 lbs C 12 5 6 through before browning Well Done C 13 8 9 Rare 1 inch thick C 10 6 7 Slash fat Medium 2 to 21 2 lbs C 12 15 10 12 Well Done C 25 16 18 Chicken 1 whole B 30 35 15 20 Brush each side with melted butter Broil skin 2 to 21 2 ...

Page 27: ...Do not rub or clean the door gasket the fiberglass material of the gasket has an extremely low resistance to abrasion An intact and well fitting oven door gasket is essential for energy efficient oven operation and good baking results If you notice the gasket becoming worn frayed or damaged in any way or if it has become displaced on the door you should have it replaced 4 Close the door and make s...

Page 28: ...t is off slide the latch handle to the left as far as it will go and open the door If your range does not have a latch the door will unlock automatically Quick Reminder 1 Prepare the oven for cleaning 2 Close and latch the oven door If your range does not have a latch the door will lock automatically 3 Press the SELF CLEAN pad 4 Press the or or number pads 5 Press the START pad If you wish to chan...

Page 29: ... The self clean cycle will automatically begin when the Start Time is reached The word ON will appear in the display when the self clean cycle begins When the oven locks the words LOCKED DOOR will be displayed and a short time later the door will be locked in position It will not be possible to open the oven door until the temperature drops below the lock temperature When the clean cycle is finish...

Page 30: ...sound I hear during cleaning normal A Yes This is the sound of the metal heating and cooling during both the cooking and cleaning functions Q Should there be any odor during the cleaning A Yes there will be an odor during the first few cleanings Failure to wipe out excessive soil might also cause a strong odor when cleaning Q What causes the hair like lines on the enameled surface of my oven A Thi...

Page 31: ...d on food soak the surface burner in a solution of mild liquid detergent and hot water Soak the surface burner for 20 to 30 minutes For more stubborn stains use a cleanser like Soft Scrub brand or Bon Ami brand Rinse well to remove any traces of the cleanser that might clog the surface burner openings Do not use steel wool because it will clog the surface burner openings and scratch the surface bu...

Page 32: ...d and cap NOTE Before removing the burner heads and caps remember their size and location Replace them in the same location after cleaning The electrode of the spark igniter is exposed when the burner head is removed When one burner is turned to LITE all the burners spark Do not attempt to disassemble or clean around any burner while another burner is on An electric shock may result which could ca...

Page 33: ...ther flammable vapors and liquids in the vicinity of this or any other appliance Brushed Chrome Cooktop on some models Clean the brushed chrome top with warm soapy water or Bon Ami brand cleanser and immediately dry it with a clean soft cloth Take care to dry the surface following the grain To help prevent finger marks after cleaning spread a thin film of baby oil on the surface Wipe away excess o...

Page 34: ...d or damaged in any way or if it has become displaced on the door you should have it replaced Outside of the door Use soap and water to thoroughly clean the top sides and front of the oven door Rinse well You may also use a glass cleaner to clean the glass on the outside of the door Spillage of marinades fruit juices tomato sauces and basting materials containing acids may cause discoloration and ...

Page 35: ...r vinegar and water rinse with clean water and polish dry with a soft cloth Do not use abrasive cleansers strong liquid cleaners plastic scouring pads or oven cleaners on the control panel they will damage the finish A 50 50 solution of vinegar and hot water works well The control knobs may be removed for easier cleaning To remove a knob pull it straight off the stem If knob is difficult to remove...

Page 36: ...ance and location vary Lift up Cooktop on models with standard twin burners Removable Kick Panel on some models The kick panel may be removed for cleaning under the range To remove lift up the bottom of the panel slightly to disengage the panel from the tabs at the base of the range Pull the bottom of the panel forward until the spring clips are released at the top of the panel To replace insert t...

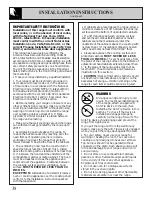
Page 37: ... is completed CONSUMER Keep this Use and Care Guide and the Installation Instructions for future use This appliance must be properly grounded WARNING Improper installation adjustment alteration service or maintenance can cause injury or property damage Refer to this guide For assistance or additional information consult a qualified installer service agency manufacturer dealer or the gas supplier N...

Page 38: ...centered over the appliance Clearance between the cooking surface and the ventilation hood surface MUST NEVER BE LESS THAN 24 INCHES EXCEPTION Installation of a listed microwave oven or cooking appliance over the cooktop shall conform to the installation instructions packed with that appliance If cabinets are placed above the range allow a minimum clearance of 30 between the cooking surface and th...

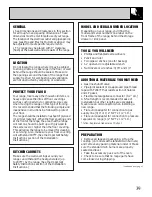
Page 39: ... floor covering will withstand 180 F See the Important Safety Instructions section of the Installation Instructions MODEL AND SERIAL NUMBER LOCATION Depending on your range you ll find the model and serial numbers on a label on the front frame of the range behind the storage drawer or kick panel TOOLS YOU WILL NEED Phillips and flat blade screwdrivers Pencil and ruler Two pipe wrenches one for bac...

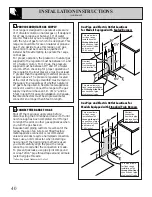
Page 40: ...must be between 4 and 13 of water column For LP gas the pressure supplied must be between 10 and 13 of water column When checking for proper operation of the regulator the inlet pressure must be at least 1 greater than the operating manifold pressure as given above The pressure regulator located at the inlet of the range manifold must remain in the supply line regardless of whether natural or LP g...

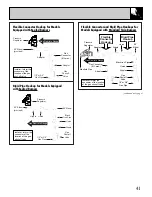
Page 41: ...s shut off valve 1 2 or 3 4 Gas Pipe Adapter Gas Shut off Valve Pressure Regulator 90 Elbow provided Nipple Union 90 Elbow Black Iron Pipe Union Nipple Gas Shut off Valve 1 2 or 3 4 Gas Pipe Gas Flow into Range Installer Inform the consumer of the location of the gas shut off valve Installer Inform the consumer of the location of the gas shut off valve Manifold Pipe Adapter Flex Connector 6 ft max...

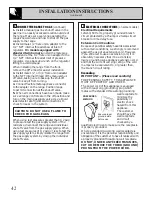
Page 42: ... shut off valve in the gas line in an easily accessed location outside of the range Make sure everyone operating the range knows where and how to shut off the gas supply to the range 2 Install male 1 2 flare union adapter to the 1 2 NPT internal thread elbow at inlet of regulator On models equipped with standard twin burners install the male pipe thread end of the 1 2 flare union adapter to the 1 ...

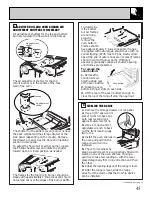
Page 43: ...es of connector and pull out of range back B Usage Situations where Appliance Power Cord will be Disconnected Infrequently An adapter may be used only on a 15 amp circuit Do not use an adapter on a 20 amp circuit Where local codes permit a TEMPORARY CONNECTION may be made to a properly grounded two prong wall receptacle by the use of a UL listed adapter available at most hardware stores The larger...

Page 44: ...S Seal any openings in the wall behind the range and in the floor under the range when hookups are completed 4 Quality of Flames The combustion quality of burner flames needs to be determined visually If burner flames look like A call for service Normal burner flames should look like B or C depending on the type of gas you use With LP gas some yellow tipping on outer cones is normal A Yellow flame...

Page 45: ...er or the kick panel depending on the model Remove the drawer or panel See the Care and Cleaning section in this guide To adjust the flow of air to either burner loosen the Phillips head screw and rotate the shutter toward open or closed position as needed The flames for the top broil burner should be steady with approximately 1 blue cones and should not extend out over the edges of the burner baf...

Page 46: ...o convert back to natural gas INSTALLING THE ANTI TIP DEVICE 1 Mark the wall where the RIGHT EDGE of the range is to be located Be sure to allow for the countertop overhang if you intend to install the range next to cabinets 2 Locate the outside edge of the device 21 8 toward the center of the range from the marked edge of the range 3 Using the device as a template mark the position of the hole fo...

Page 47: ...47 NOTES ...

Page 48: ...48 NOTES ...

Page 49: ...49 NOTES ...

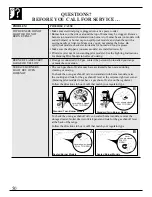
Page 50: ...tact the person who installed your range LARGE OR YELLOW or made the conversion SURFACE BURNERS The oven gas shut off valve may have accidentally been moved during LIGHT BUT OVEN cleaning or moving DOES NOT To check the oven gas shut off valve on standard twin burner models raise the cooktop and look for the gas shut off lever at the extreme right rear corner Standing pilot models do not have a ga...

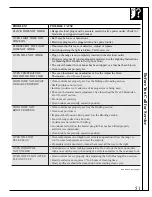
Page 51: ...ct cookware or cookware of improper size is being used The oven thermostat needs adjustment See the Adjust the Oven Thermostat Do It Yourself section Clock not set correctly Oven bottom not securely seated in position FOOD DOES NOT Oven controls not properly set See the Broiling section BROIL PROPERLY Oven door not closed Improper shelf position being used See the Broiling section Food is being co...

Page 52: ...tch on some models The latch handle may have been moved even if only slightly from the latched position Make sure the latch is moved to the right as far as it will go Press the CLEAR OFF pad Allow the oven to cool for one hour Put the oven back into operation Disconnect all power to the range for 5 minutes and then reconnect power If the failure code repeats then call for service OVEN CONTROL This...

Page 53: ...otection or you may request your money back on the remaining value of your contract No questions asked It s that simple Protect your refrigerator dishwasher washer and dryer range TV VCR and much more any brand Plus there s no extra charge for emergency service and low monthly financing is available Even icemaker coverage and food spoilage protection is offered You can rest easy knowing that all y...

Page 54: ...nt Complete and mail your Consumer Product Ownership Registration today Have the peace of mind of knowing we can contact you in the unlikely event of a safety modification After mailing the registration below store this document in a safe place It contains information you will need should you require service Our service number is 800 GE CARES 800 452 2737 Read your Owner s Manual carefully It will...

Page 55: ...nd courteously And you can call any time GE Answer Center service is open 24 hours a day 7 days a week Service Contracts 800 626 2224 You can have the secure feeling that GE Consumer Service will still be there after your warranty expires Purchase a GE contract while your warranty is still in effect and you ll receive a substantial discount With a multiple year contract you re assured of future se...

Page 56: ...AL DAMAGES In Alaska the warranty is the same except that it is LIMITED because you must pay to ship the product to the service shop or for the service technician s travel costs to your home All warranty service will be provided by our Factory Service Centers or by our authorized Customer Care servicers during normal working hours Should your appliance need service during the warranty period or be...

Reviews: