background image

GE Monogram

®

Assembly Instructions

Before you Begin – Read these instructions completely and carefully.
Note To Installer: Be sure to leave these instructions with the Consumer.
Note to Consumer: Keep these instructions with your Use and Care Book for future reference.

Assembly of this grill cart requires basic mechanical
skills. Proper assembly is the responsibility of the
installer.

For Monogram local service in your area,
1-800-444-1845.
For Monogram service in Canada, 1-888-880-3030.
For Monogram Parts and Accessories, call
1-800-626-2002.

If you have questions concerning the installation of
this product, call the GE Answer Center

®

 Consumer

Information Service at 800.626.2000, 24 hours a day,
7 days a week.

If you received a damaged Grill Cart, you should
contact your dealer.
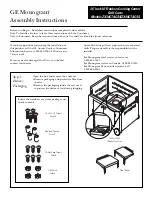
Step 1:
Remove
Packaging

Open the box and remove the contents.
• Remove packaging and protective film from

shelves.

• Remove the packaging inside the cart used

to protect the slide-out tray during shipping

 Side Shelves

Locate the hardware accessory package and
check contents.

10-24 x 1-1/2 Screws

Count 4

Aluminum Spacers

Count 4

Phillips Head Screws

Count 6

1/4-20 Nuts

Count 4

36" and 48" Outdoor Cooking Center

Grill Carts

Models ZX36CTACSS/ZX48CTACSS

Grill Cart With

Slide-Out Tank Tray

Summary of Contents for ZX48CTACSS

Page 1: ... 626 2002 If you have questions concerning the installation of this product call the GE Answer Center Consumer Information Service at 800 626 2000 24 hours a day 7 days a week If you received a damaged Grill Cart you should contact your dealer Step 1 Remove Packaging Open the box and remove the contents Remove packaging and protective film from shelves Remove the packaging inside the cart used to ...

Page 2: ...grill onto the cart The grill should be behind the lip on the front of the cart Check to be sure the grill rests securely and fits square on the cart The screw holes at the front and back should be aligned 3 8 wrench or socket Phillips head screwdriver Gloves to protect against sharp edges Remove the top screw in the front shelf slide on the left and right sides Retain screws Le gril est extrememe...

Page 3: ...n the top of each front slide Slide shelf supports up and into the chan nels on the sides of the cart When the shelf reaches stops at the top fold the shelf out horizontally The shelf should rest securely in the channels Install the long 10 24 screws and spacers below the shelf supports Secure with nuts on the inside of the cart 2 on each side The spacers and screws will prevent the shelf from sli...

Page 4: ... at General Electric Therefore materials appearance and specifications are subject to change without notice Monogram General Electric Company Louisville KY 40225 Pub No 49 80008 Dwg No 164D3333P226 2000 GE Appliances N D 536 2 00 32562 Installation 36 and 48 Grill Cart Assembly Step 4 Install Side Shelves continued To fold the shelves down Lift the shelf up until it clears the channels Fold down a...

Reviews: