55
09665
-0
8.
20
18-
Gb
12 I Assembly of compressor
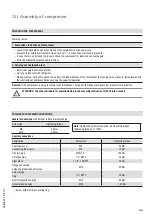
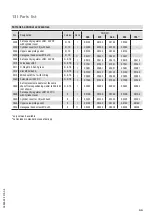
Torques for screwed connections
ATTENTION Take the reminders for commissioning in the assembly instruction for FK40 into account!
Designation
Screw size
Tightening torque
Shaft seal cover
M8
34 Nm
Connecting rod screws
M6
15 Nm
Oil drain plug
M22x1.5
1)
100 Nm
Oil intake plug
1/4“ NPTF
25 Nm
Sight glass
1 1/8“-18 NPTF
25 Nm
Flange connection
M10
60 Nm
Soldering gland-shut-off valves
Screw plugs
1/8“ NPTF
25 Nm
Plug
Electromagnetic coupling
M12
85 Nm
Decompression valve
M24
100 Nm
1)
= Screw with aluminium sealing ring
Screw size
Tightening torque
M8
34 Nm
M10
60 Nm
Special connections
General connections
with flat seal in fibre or metal design
Note:
Tighten the screws cross-wise in at least two stages
(tightening torque 50 / 100%) .
Working course
1. Evacuation / leak check of compressor
Connect the discharge and suction sides of the compressor to a vacuum pump
Evacuate the compressor from both sides; vacuum < 1.5 mbar. Check increase in pressure
In case there is an increase in pressure, check the compressor for leaks and evacuate again
Fill in the stipulated amount of oil (2.0 litres)
2. Carrying out the function test
Install the compressor in the system
Carry out a leak test with refrigerant
Make a test run. During this, check the oil level, the leak-tightness of the compressor, the running noise, pressure, temperatures and
the functioning of additional devices such as the capacity regulation
Remark:
If the compressor is going to remain in the warehouse, charge it with nitrogen (at about 3 bar pressure) for protection.
Checking the compressor


