background image

 Installation   

Refrigerator 


Instructions


Model GPE12

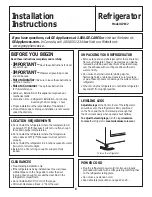
LEVELING LEGS

Adjustable legs at the front corners of the refrigerator 

should be set so the refrigerator is firmly positioned  

on the floor, and the front is raised just enough that  

the door closes easily when opened about halfway.
To adjust the leveling legs, turn the legs clockwise  

to raise the refrigerator, counterclockwise to lower it.

If you have questions, call GE Appliances at 1.800.GE.CARES or visit our Website at: 

GEAppliances.com. In Canada, call 1.800.561.3344 or Visit our Website at: 

 www.geappliances.ca.

To raise the refrigerator

BEFORE YOU BEGIN

Read these instructions completely and carefully.


IMPORTANT –


Save these instructions for local 

inspector’s use.


IMPORTANT –


Observe all governing codes 

and ordinances.

•  

Note to Installer –

 Be sure to leave these instructions 

with the Consumer.

•  

Note to Consumer –

 Keep these instructions  

for future reference.

•  Skill level – Installation of this appliance requires basic 

mechanical skills.

• Completion time –  Refrigerator Installation -15 minutes 

Reversing the Door Swing - 1 hour

•  Proper installation is the responsibility of the installer. 
•  Product failure due to improper installation is not covered 

under the Warranty.

LOCATION REQUIREMENTS

•  Do not install the refrigerator where the temperature will 

go below 60°F (16°C) because it will not run often enough 

to maintain proper temperatures.

•  Do not install the refrigerator where the temperature 

will go above 100°F (37°C) because it will not perform 

properly.

•  Do not install the refrigerator in a location exposed to water 

(rain, etc.) or direct sunlight.

•  Install it on a floor strong enough to support it fully 

loaded.

CLEARANCES

•  Free-standing installation only.
•  If the refrigerator is being installed next to a wall, leave 

sufficient space on the hinge side to allow the door 

to swing open enough to access the clear bins in the 

refrigerator compartment.

•  Do not install within 5” (13 cm) of the range.
•  Minimum Clearances:  Back – 3” from the wall

UNPACKING YOUR REFRIGERATOR

•  Remove tape and any labels (except for the rating label) 

from your refrigerator. Tape or glue residue can also be 

removed by rubbing a small amount of liquid dish soap 

over the adhesive with your fingers. Wipe with warm 

water and dry.

•  Do not use sharp instruments, rubbing alcohol, 

flammable fluids, or abrasive cleaners to remove tape 

or glue. These products can damage the surface of your 

refrigerator.

•  When moving the refrigerator, do not tilt the refrigerator 

beyond 45° from upright position.

POWER CORD

•  Plug the refrigerator power cord into its own properly 

grounded wall outlet with a voltage rating matching that 

on the refrigerator rating plate. 

•  Do not use an extension cord. 
•  Read all safety precautions on pages 2 and 3.

8

Summary of Contents for GPE12

Page 1: ...anty 16 Consumer Support Back Page Refrigerator Top Freezer 245D2030P001 49 60749 12 15 GE Write the model and serial numbers here Model ____________________ Serial ____________________ You can find them on a label inside the refrigerator GPE12 Owner s Manual and Installation Instructions Réfrigérateurs Congélateur supérieur Refrigeradores Congelador superior Manuel d utilisation et d installation...

Page 2: ...eful closing doors when children are in the area Do not refreeze frozen foods which have thawed completely In refrigerators with automatic icemakers avoid contact with the moving parts of the ejector mechanism or with the heating element that releases the cubes Do not place fingers or hands on the automatic ice making mechanism while the refrigerator is plugged in To reduce the risk of injury when...

Page 3: ...place immediately all power cords that have become frayed or otherwise damaged Do not use a cord that shows cracks or abrasion damage along its length or at either end When moving the refrigerator away from the wall be careful not to roll over or damage the power cord CONNECTING ELECTRICITY WARNING Electrical Shock Hazard Plug into a grounded 3 prong outlet Do not remove the ground prong Do not us...

Page 4: ...the fresh food and freezer compartments frequency of door opening and temperature of food when placed in either compartment The thermistor located at the bottom of the fresh food control housing is one of the key elements for temperature control Keep all items away from blocking the thermistor as this will reduce the sensitivity of the thermistor and cause temperature issues Food may freeze or bec...

Page 5: ... V LQ OXNHZDUP ZDWHU RQO do not put them in an automatic dishwasher Ice maker Accessory Kit An ice maker accessory kit is available from your dealer The IM 4D or IM 6D accessory kit will work with your refrigerator To order go to GEApplianceparts com or call 800 626 2002 In Canada call 800 661 1616 NOTE The step shelf in the freezer MUST be placed in the lowest position when the ice maker is insta...

Page 6: ...will stay new looking and rust free for years Apply a coat of kitchen appliance wax when the refrigerator is new and then at least twice a year Cleaning the Inside To help prevent odors leave an open box of baking soda in the fresh food and freezer compartments Unplug the refrigerator before cleaning If this is not practical wring excess moisture out of sponge or cloth when cleaning around switche...

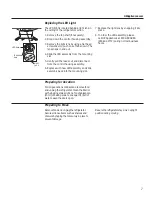
Page 7: ... the LED Light The LED light is located behind a light lens in the celling of the refrigerator section 1 Remove the top shelf if necessary 2 Drop down the control housing assemlby 3 Remove the light lens by using a flat head screwdriver to push one of tabs down The lens snaps in and out 4 Slide the LED assembly from the mounting slot 5 Gently pull the leads out and disconnect from the control hous...

Page 8: ...tor where the temperature will go below 60 F 16 C because it will not run often enough to maintain proper temperatures Do not install the refrigerator where the temperature will go above 100 F 37 C because it will not perform properly Do not install the refrigerator in a location exposed to water rain etc or direct sunlight Install it on a floor strong enough to support it fully loaded CLEARANCES ...

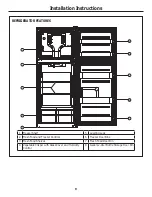
Page 9: ...s 1 Freezer Shelf 5 Leveling Legs 2 Fresh Food and Freezer Controls 6 Freezer Door Bins 3 Fresh Food Shelves 7 Fresh Food Door Bin 4 Vegetable Crisper with Glass Cover and Humidity Control 8 Gallon 2 Liter Bottle Storage Door Bin 6 6 7 8 7 1 2 3 4 5 ...

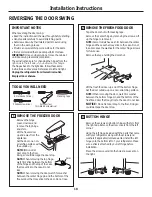
Page 10: ... REMOVE THE FREEZER DOOR Remove the hinge cover Unscrew and remove the top hinge and shim Lift the freezer door up and away from the appliance Set the door on a non scratching surface with the outside up NOTICE Do not let door drop to the floor Doing so could damage the door stop NOTE When removing the top hinge watch for shim between the bottom of the hinge and the top of the case that may stick ...

Page 11: ... stop 5 REHANG THE FRESH FOOD DOOR Make sure the washer s are in place on the bottom hinge pin Make sure the door is aligned horizontally and vertically Place the fresh food door on the bottom hinge close the door and tape it in place with masking tape Remove the screw covers from the left edge of the door and insert it into the hole on the opposite side 6 INSTALL CENTER HINGE ON THE LEFT Remove t...

Page 12: ... or popping sounds when the refrigerator is first plugged in This happens as the refrigerator cools to the correct temperature The compressor may cause a clicking or chirping sound when attempting to restart this could take up to 5 minutes Expansion and contraction of cooling coils during and after defrost can cause a cracking or popping sound On models with an ice maker after an ice making cycle ...

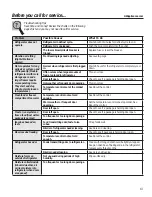
Page 13: ... Warm weather or frequent door openings Set the temperature control one step colder See About the control Door left open Check to see if a package is holding door open Frost or ice crystals on frozen food frost within package is normal Door left open Check to see if a package is holding door open Too frequent or too long door openings Ice cubes have odor taste Food transmitting odor taste to ice c...

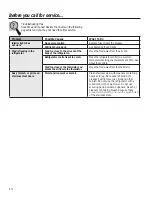
Page 14: ...tor and blocks the air flow to the thermistor Move the food away from the thermistor Rust tarnish or grime on stainless steel doors Moist environment or salt air Clean stainless steel with cleaners containing oxalic acid e g Bar Keepers Friend Soft Cleanser will remove rust lime and other tarnish Do not wipe the refrigerator with a soiled dish cloth or wet towel Do not use scouring pads powdered c...

Page 15: ...15 Notes GEAppliances com ...

Page 16: ...arge or you may be required to bring the product to an Authorized GE Appliances Service location for service In Alaska the warranty excludes the cost of shipping or service calls to your home Some states do not allow the exclusion or limitation of incidental or consequential damages This warranty gives you specific legal rights and you may also have other rights which vary from state to state To k...

Page 17: ...réfrigérateur 25 Inversion de l ouverture des portes 26 27 Troubleshooting Tips Bruits normaux de fonctionnement 28 Avant d appeler un réparateur 29 30 Soutien au consommateur Garantie 31 Soutien au consommateur 32 Écrivez ici le numéro de modèle et le numéro de série Modèle ________________________ Série __________________________ Vous les trouvez sur une étiquette dans le coin supérieur gauche d...

Page 18: ...ables à proximité de cet appareil ou de tout autre appareil électroménager Nous déconseillons fortement l utilisation d une rallonge à cause des risques potentiels dans certaines conditions Cependant si l utilisation d un cordon prolongateur est nécessaire ce dernier doit obligatoirement être homologué UL aux USA ou CSA au Canada à trois brins avec mise à la terre pour appareil électroménager et d...

Page 19: ... la sortir de la prise Réparez ou remplacez immédiatement tout cordon électrique usé ou endommagé N utilisez pas un cordon fissuré ou présentant des dommages dus aux frottements soit sur sa longueur ou aux extrémités Lorsque vous éloignez votre réfrigérateur du mur faites attention à ne pas le faire rouler sur le cordon d alimentation afin de ne pas l endommager BRANCHEMENTS ÉLECTRIQUES AVERTISSEM...

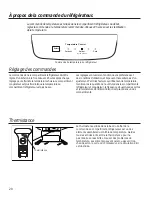
Page 20: ...réquence d ouverture des portes et la température de l aliment lorsqu il est placé dans un des compartiments La commande de température est située dans le compartiment réfrigérateur Au début réglez la commande à la température recommandée Allouez 24 heures pour la stabilisation de la température 20 Commande de température du réfrigérateur Temperature Control Select Coldest Colder Recommended Cold ...

Page 21: ...re de cubes désiré Lavez les moules à glaçons avec de l eau tiède seulement Ne les placez pas dans un lave vaisselle automatique Ensemble de machine à glaçons Un ensemble de machine à glaçons est offert par votre revendeur L ensemble IM 4D ou IM 6D est compatible avec votre réfrigérateur Pour commander composez le 1 800 661 1616 NOTE La tablette étagée du congélateur DOIT être placée à la position...

Page 22: ...lle pendant de nombreuses années Appliquez une couche de cire pour cuisine électroménagers à la réception du réfrigérateur puis au moins deux fois l an par la suite Nettoyage de l intérieur Pour aider à empêcher les odeurs laissez une boîte ouverte de bicarbonate de soude dans les compartiments réfrigération et congélation Débranchez votre réfrigérateur avant de le nettoyer Si ce n est pas pratiqu...

Page 23: ...lacer l ampoule DEL Lentille Lampe DEL Enclencher dans les languettes La lampe DEL est située derrière la lentille dans le plafond de la section réfrigérateur 1 Enlevez la tablette supérieure si nécessaire 2 Abaissez le boîtier de la commande 3 Enlevez la lentille de la lampe à l aide d un tournevis à lame plate afin de pousser une des languettes vers le bas La lentille s encliquète lors de son re...

Page 24: ...difficile d y maintenir une température correcte N installez pas le réfrigérateur dans un endroit où la température ambiante sera supérieure à 37 C il ne fonctionnera pas correctement N installez pas le réfrigérateur dans un endroit exposé à l eau pluie etc ou directement aux rayons solaires Installez le réfrigérateur sur un plancher suffisamment solide pour le supporter à pleine charge DÉGAGEMENT...

Page 25: ... Commande de température du congélateur et congélateur 6 Compartiments de porte du congélateur 3 Tablettes du réfrigérateur 7 Compartiment de porte du réfrigérateur 4 Vegetable Crisper with Glass Cover and Hu midity Control 8 Compartiment de porte pour ranger une bouteille de 2 litres 6 6 7 8 7 1 2 3 4 5 ...

Page 26: ...ercle de charnière Dévissez et retirez la charnière supérieure et la rondelle de calage Soulevez la porte du congélateur puis tirez la vers vous pour la dégager Placez la porte sur une surface antiégratignure avec la surface extérieure vers le haut REMARQUE Lors du retrait de la charnière supérieure assurez vous que la rondelle de calage entre le bas de la charnière et le dessus de la carrosserie ...

Page 27: ... RACCROCHAGE DE LA PORTE DU RÉFRIGÉRATEUR Assurez vous que la ou les rondelles sont en place sur l axe de charnière inférieure Assurez vous que la porte est alignée à l horizontale et la verticale Placez la porte du réfrigérateur sur la charnière inférieure fermez la porte puis enrubannez la en place avec du ruban cache Enlevez les capuchons de vis du bord gauche de la porte et insérez les dans le...

Page 28: ... ou des claquements lorsque le réfrigérateur est branché pour la première fois Cela se produit lorsque le réfrigérateur se refroidit à la bonne température Le compresseur peut causer un clic ou un grésillement lors de la tentative de redémarrage cela peut prendre 5 minutes L expansion et la contraction des serpentins de refroidissement pendant et après le dégivrage peuvent causer un craquement ou ...

Page 29: ... Voir la section À propos de la commande Météo chaude ou ouvertures de porte fréquentes Réglez la commande de température d une unité plus froid Voir la section À propos de la commande La porte est restée ouverte Vérifiez qu un paquet d aliments n empêche pas la porte de bien se fermer Du givre ou des cristaux de glace se forment sur les aliments congelés du givre à l intérieur paquets d aliments ...

Page 30: ...des commandes Des aliments sont trop près de la thermistance et bloquent la circulation d air vers celle ci Gardez les aliments à l écart de la thermistance De la rouille du ternissement ou de la saleté est visible sur les portes en acier inoxydable Environnement humide ou air salé Nettoyez l acier inoxydable à l aide de nettoyants qui contiennent de l acide oxalique p ex la marque Bar Keepers Fri...

Page 31: ...u apporter l appareil à un centre de service autorisé GE En Alaska cette garantie exclut le coût d expédition ou de dépannage à votre domicile Certains états n acceptent pas d exclusion ou de limites aux dommages indirects consécutifs Certains droits particuliers vous sont dévolus en vertu de la présente garantie et peuvent s accompagner d autres droits qui varient selon votre lieu de résidence Po...

Page 32: ...es VISA MasterCard et Discover acceptées Les directives stipulées dans le présent manuel peuvent être effectuées par n importe quel utilisateur Les autres réparations doivent généralement être effectuées par un technicien qualifié Soyez prudent car une réparation inadéquate peut affecter le fonctionnement sécuritaire de l appareil Vous trouverez dans les pages jaunes de votre annuaire le numéro du...

Page 33: ...ada 40 Funciones del Refrigerador 41 Cómo invertir el vaivén de la puerta 42 43 Consejos para la identificación y solución de problemas Sonidos normales de la operación 44 Solución de Problemas 45 46 Apoyo al cliente Garantía U S 50 Apoyo al cliente 51 Escriba los números de modelo y de serie aquí Modelo ______________________ Serie ________________________ Usted puede encontrarlos en una etiqueta...

Page 34: ... cuando los niños se encuentren en el área No vuelva a congelar comidas que hayan estado totalmente congeladas en forma previa En refrigeradores con máquinas de hacer hielo automáticas evite el contacto con las partes móviles del mecanismo eyector o con el elemento de calefacción que libera los cubos No coloque los dedos ni las manos en el mecanismo de la máquina de hielo automática mientras el re...

Page 35: ...0 amperes Esto garantiza el mejor funcionamiento y además previene la sobrecarga de los circuitos del hogar lo cual podría ocasionar riesgos de incendio debido al recalentamiento de cables Nunca desenchufe el refrigerador tirando del cable de corriente Siempre tome su enchufe firmemente y empuje el mismo hacia afuera para retirarlo Repare o reemplace de inmediato todos los cables de corriente pela...

Page 36: ...timentos de alimentos frescos y del congelador la frecuencia de apertura de la puerta y la temperatura de los alimentos cuando se los coloca en cualquiera de los dos compartimentos 36 Control de temperatura de comida fresca Temperature Control Select Coldest Colder Recommended Cold Termistor The thermistor located at the bottom of the fresh food control housing is one of the key elements for tempe...

Page 37: ...e hielo sólo en DJXD WLELD QR ODV FRORTXH HQ HO ODYDSODWRV Ice maker kit de accesorios Su vendedor tiene disponible un kit de accesorios para la máquina de hielo Los kits de accesorios IM 4D o IM 6D funcionarán con su refrigerador Para realizar una orden ingrese a GEApplianceparts com o comuníquese al 800 626 2002 NOTA La repisa intermedia del freezer se DEBERÁ colocar en la posición más baja cuan...

Page 38: ...erá como nueva y libre de herrumbre durante años Aplique una mano de cera para cocinas aparatos al refrigerador nuevo y luego por lo menos dos veces por año Limpieza de la parte interior Para ayudar a prevenir olores deje una caja abierta de bicarbonato de sodio en los compartimentos de alimentos frescos y del congelador Desenchufe el refrigerador antes de limpiarlo Si esto no resulta práctico seq...

Page 39: ...ED Calce en las Lengüetas La luz LED está ubicada detrás de una lente luminosa en el cielo raso de la sección del refrigerador 1 Retire la repisa superior si es necesario 2 Baje el ensamble de la unidad de control 3 Retire la lente luminosa usando un destornillador de punta plana para presionar una de las lengüetas hacia abajo Las lentes se calzan dentro y fuera 4 Deslice el ensamble de la luz LED...

Page 40: ...egamento Estos productos pueden dañar la superficie del refrigerador Al mover el refrigerador no lo incline más de 45º desde su posición vertical CABLE DE CORRIENTE Enchufe el cable de corriente del refrigerador en su propio tomacorriente correctamente conectado a tierra con un índice de voltaje que coincida con la placa de calificación del refrigerador No use un prolongador Lea todas las precauci...

Page 41: ...les 2 Control de temperatura del refrigerador y del freezer 6 Cestos de Puerta del Freezer 3 Estantes del refrigerador 7 Cesto de la Puerta 4 Cajón de verduras con tapa de vidrio y control de la humedad 8 Cesto de la Puerta para Almacenamiento de Botellas de un Galón 2 Litros 6 6 7 8 7 1 2 3 4 5 ...

Page 42: ...EL CONGELADOR Retire la tapa de la bisagra Destornille y retire la bisagra superior y la cuña Levante la puerta de alimentos frescos hacia arriba y afuera del electrodoméstico Coloque la puerta sobre una superficie que no raye con la parte exterior hacia arriba NOTA Al retirar la bisagra superior tenga cuidado con la cuña entre la parte inferior de la bisagra y la parte superior de la caja que pue...

Page 43: ...VUELVA A COLGAR LA PUERTA DE ALIMENTOS FRESCOS Asegúrese que las arandelas estén en su lugar en el perno inferior de la bisagra Asegúrese de que la puerta esté alineada tanto de forma horizontal como vertical Coloque la puerta del congelador en la bisagra inferior cierre la puerta y ciérrela con cinta adhesiva Retire las tapas de los tornillos desde el extremo izquierdo de la puerta e inserte las ...

Page 44: ...uede escuchar sonidos como de crujido o estallidos cuando el refrigerador se conecta por primera vez Esto pasa a medida que el refrigerador se enfría hasta la temperatura correcta El compresor puede causar un chasquido o un gorjeo cuando intenta volver a arrancar esto puede tomar hasta 5 minutos Expansión y contracción de las bobinas durante o después del ciclo de descongelación puede causar sonid...

Page 45: ...normal Se dejó la puerta abierta Constate que un paquete no esté manteniendo la puerta abierta Clima caluroso o aperturas frecuentes de la puerta Esto es normal Control de temperatura configurado en el nivel más frío Ver Sobre el control El compartimento de alimentos frescos o del congelador están muy calientes El control de temperatura no se ha configurado lo suficientemente frío Ver Sobre el con...

Page 46: ...frigerador Los alimentos se encuentran muy cerca de la ventilación de aire en la parte trasera del refrigerador Aleje los alimentos de la ventilación de aire El control del refrigerador está configurado en una temperatura muy baja Mueva el control del refrigerador a una configuración más elevada subiendo una unidad por vez La comida está demasiado cerca del termistor y bloquea el flujo de aire has...

Page 47: ...47 Notas GEAppliances com ...

Page 48: ...48 Notas ...

Page 49: ...49 Notas GEAppliances com ...

Page 50: ...s Daños consecuentes o incidentales causados por posibles defectos de este producto Producto no accesible para brindar el servicio requerido Cualquier daño sobre la terminación deberá ser informado dentro de las 48 horas luego de la entrega del electrodoméstico Productos que no presenten defectos ni estén rotos o que estén funcionando de acuerdo con lo descrito en el Manual del Propietario Para re...

Page 51: ... comprarla en línea en cualquier momento o llamar al 800 626 2224 durante horas normales de oficina GE Consumer Home Services estará aún ahí cuando su garantía termine Piezas y accesorios GEAppliancesparts com Aquellos individuos con la calificación necesaria para reparar sus propios electrodomésticos pueden pedir que se les manden las piezas o accesorios directamente a sus hogares aceptamos las t...

Page 52: ...800 626 2224 during normal business hours GE Consumer Home Services will still be there after your warranty expires In Canada consult your local listings for an extended warranty provider Parts and Accessories GEAppliancesparts com Individuals qualified to service their own appliances can have parts or accessories sent directly to their homes VISA MasterCard and Discover cards are accepted Order o...

Reviews: