background image

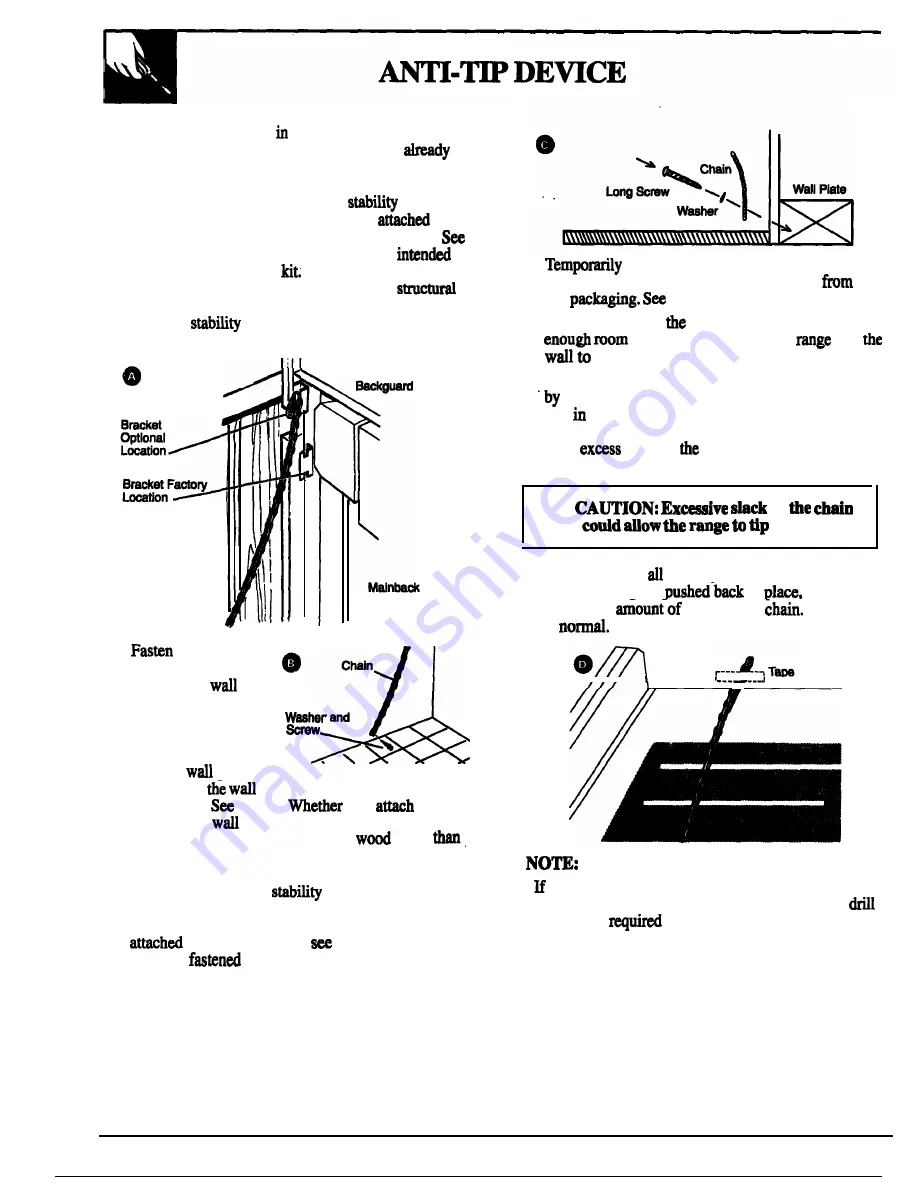
1. Before placing range   the counter, notice the

location of the stability bracket which is 
attached to the back of the range. This location
should work for most instigations. However, it may
be more convenient to hook the 

 chain to

the unit when the stability bracket is 

 to

the upper set of holes in the back of the range. 
Fig. A. The upper level set of holes are 

 for

use with a backsplash 

 If the backsplash is not

being used, make sure that there are no 
supports for the countertop which will interfere
with the 

 bracket when located in the

upper set of holes,

Chain

2. 

 one end of

the stability chain to
the floor or 

 with

the long screw and
washer supplied. See
Fig. B. Make certain
the screw is going
into the 

 plate at

Chain

 and

.

the base of 


 or one of the studs in the base

of the wall. 

 Fig. C. 

 you 

 the

chain to the 

 or floor, be certain that the screw

is in 

at least 3/4 inch thickness of 

 other 

baseboard and that there are no electrical wires or
plumbing in the area which the screw could
penetrate. Attach the 

 chain in a location

which will allow the chain to be in line with the
bracket side to aide as much as possible when

 to the unit. Test to 

 if the chain is

securely 

 by tugging on the chain.

3. 

 attach the loose end of the chain

to the rear of the countertop with the tape 
the 


 Fig. D.

4. Place the range in 

 counter cutout leaving just


 between the back of the 

 and 

   reach the stability bracket, 

5. Hook the loose end of the chain onto the bracket

 slipping the nearest link of the chain into the

slot   the bracket. See Fig. A and make sum the

chain is palled as tight as possible and that there
is no 

 slack in 

 chain after the chain is

attached to the bracket.

A


 in 


 over.

6. 

Slide the range 

 the way back into the counter.

Once the range is 

 in 

 there will

be small 

 slack in the 

 This

is 

/ / /

 .

m

.   attaching to masonry, you can buy suitable screws

and anchors at hardware stems. Use a masonry 
to drill the 

 holes.

If 

range is removed for cleaning or any other reason,

make sure chain is reattached.

3 2

Summary of Contents for JSP26

Page 1: ...13 M Oven Door 30 Fan 14 15 17 18 20 22 25 26 Salf leaning instructions 24 27 Light Bulb Replacement 14 31 Shahs 3 1 Oven Vent 4 Surface Units and Drip Pans 29 Roasting Roasting Guida 20 21 Self laani...

Page 2: ...on Card that came with your range Before sending in this card please write these numbers here Mdel Number Send Number Use these numbers in any correspondence or service calls concerning your range Hyo...

Page 3: ...ing shodd be referred to a qtified technician AWAWING M e tip d m mdd prevent a enti tip of the _ a h it to tie WW or fioorby insmng the hti devi suppIid M sure the cti fits securely into the slot in...

Page 4: ...Remember The inside surface of the oven may be hot when the door is openti s When cooking pork follow the directions exactly and always cook the meat to an inted temperature of at least 170 F This as...

Page 5: ...amage range parts and wiring W not use al foti to lhe the dtip or anywhere in the oven except as described in this guide Msuse could resdt in a shock fim kard or damage to the range Never the cooktop...

Page 6: ...FEA s OF YOm UGE Models JSP26 JSPm JSP31 JSP34 IL I 6...

Page 7: ...ven light on and off 11 Oven Vent Iocated under right rear surface unit 4 29 12 Anti p Device 3 32 13 Oven Control Cl and er 8 9 12 13 1 7 1 9 2 8 14 Surface Unit ON Indimtor Light 9 15 Automatic Oven...

Page 8: ...e heat settings as quickly as gas or induction Electric coils stay hot enough to continue cooking for a shofi time after they are turned off Heat travels to the glass surf and then to the cookware so...

Page 9: ...in 2 k the knob either clockwise or counterclockwise to the desired heat setting Be sure you turn the control knob to 0 when you tish cooking Coohg Gtide for Udng Heat Seti ick start for cooking bring...

Page 10: ...avy weight cookware Aluminum cookware conducts heat faster than other metis Cast iron and coated cast iron cookware are slow to absorb heat but generally cook evenly at low to medium heat settings Ste...

Page 11: ...t allow the canner to be wntered on the surface unit use smaller di e r pots for good canning results 2 Hat bottomd canners must be ud Do not use canners with flanged or rippled bottoms often found in...

Page 12: ...unction SW the Operating the Self Cleaning Oven s tion 8 COOK TWE Press this pad for Timed Baking operations 9 STOP T E Use this pad along with the COOK TIME or AUTO SELF CLEAN pad to stop automatical...

Page 13: ...il desired time is reached word MER disappears tim the dispky If R is not diapkyed press the MR ON 0 pad fmg then fo ow the instructions above to set the timer End of Cycle Tone sphy Messag The end of...

Page 14: ...n the control panel to turn the oven light on when the door is closed SheUP itions The oven has four shelf supports identified in this illustration as A ttom B C and D top Shelf positions for cooking...

Page 15: ...nue to run after the oven is Off Tome tie oven pem d BA qde press the BA pad and then the CREASE or DWREASE pad to get the new temp oven Shelves ge the oven shelf or shelves in he desired locations wh...

Page 16: ...CooMes When b ing cookies flat cookie sheets without sides produce better looking cookies Cookies baked in a jelly roll pan short sides dl around may have darker edges and pde or light browning may oc...

Page 17: ...recipe Muires preheating you may need to add additiond time to the length of the Cook Time 2 Mss the CREASE pad until the desired length of baking time appears in tie display D 3 hss the BAKE pad BAKE...

Page 18: ...n the display n5 Press the BAKE pad BAKE A 6 Press the INCREASE or DECREASE pad until the desired temperature is displayed The oven will turn on automaticd y v e me WOrd ON ad will displayed The Cook...

Page 19: ...temperature setting of your new oven These thermometers may vary 2W0 degrees To A wt the Thermmtat 1 hss the B pad BAKE A 2 Select an oven temperature between 500 F and 550 F 3 Immdately before the B...

Page 20: ...tion No prehating is ss 2 Check tie weight of the meat Place it fat side Up or for poultry breast side up on roasting rack in a s low pan The melting fat will baste the meat Select a as close to the s...

Page 21: ...ound for roasts under 5 pounds more time for larger roasts nDe Meat Tender cuts rib high quality sirloin tip rump or top round Lamb leg or bone in shoulder Veal shoulder leg or loin Pork loin rib or s...

Page 22: ...e to run after the oven is turnd off J 1 You can use aluminum foil to ltie Without the slits the fofl wi your broiler pan and broiler rack prevent fat and meat jui s from However you must mold tbe foi...

Page 23: ...inutet 48 Food Arrange in single layer Bacon Ground Bwf Space evenly Up to 8 patties take about same time 10 7 Well Done c Beef Stiks 6 8 12 10 5 6 11 l 6 25 l 15 Steaks less than 1 inch thick cook th...

Page 24: ...en the oven is heated Buff these areas with a dry cloth not clean the gasket Clean the top sides and outside tint of the oven door with soap and water h not use abrasives or oven deanere Make sum the...

Page 25: ...self cl cycle will automatically begin after tLEAN is displayed and tie time for the clean cycle is set The words ON and UK will appear in the display when the door aumntic ly l ks It will not be pos...

Page 26: ...LF 2 After closing the door press theA o CLEAN SELF CLEAN pad A A 3 Press the CREASE or DWREASE pad enter Clean Time v e u4 Press the S P TME pad STOP ff and the earliest Stop Time you A can set will...

Page 27: ...s This is the sound of the metal heating and cooling during both the cooking and cleaning functions Q Shotid there h any odor during the cleaning A Yes there will be an odor during the first few clmin...

Page 28: ...n cleaners on the control pmel they wi damage the finish A 5W50 solution of vinegar and hot waterworks well The control knobs my be removed for easier dedng Before removing the knobs for cleaning plea...

Page 29: ...by hand Place them in a covered continer or a plastic bag with 1 4 cup ammonia to loosen the soil Then scrub with a soap find scouring pad if necessary Rinse with clean water and polish with a clean s...

Page 30: ...asion An intact and we fitting oven door gasket is essential for energy efficient oven operation and good baking results If you notiw the gasket koming worn frayed or damaged in any way or if it has b...

Page 31: ...f the oven Before replacing the bulb disconnect electrical wer to the range at the main fuse or circuit breaker panel or unplug the range from the electrical outiet Ut the bulb cool completely before...

Page 32: ...s or plumbing in the area which the screw could penetrate Attach the stabitity chain in a location which will allow the chain to be in line with the bracket side to aide as much as possible when attac...

Page 33: ...t pm Cookware is not suiti for broiling Low voltage S the Broiling section Wuminum foil used on tie broiler pan and rack has not been fiti properly and slit as mmenti Ova controls not set properly See...

Page 34: ...PROBLEM t SS LE CAUSE 34...

Page 35: ...umers with impaired hearing or speech who have Braille controls for a variety of access to a TDD or a conventional teletypewriter may GE appliances and a brochure to call 80 TDMEAC 80M3 322 to request...

Page 36: ...r Use and re matefial s Failure of the pradud if it is used If vou then have anv auestions for other than its intended DUrDOSS I akut opemting the p ud please or used mmmemially ntaot your lerorour Un...

Reviews: