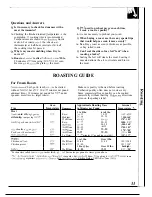
ANTI-TIP DEVICE
A
WARNING
●
All ranges can tip.
Injury could result.
●
Install the Anti-tip device
packed with the range.
●
See the Installation
Instructions.
●
The Anti-tip device must
remain engaged.
Stability Device Installation Instructions
Tools needed:
●
Phillips head screwdriver
Once the range is in position, open the lower
compartment by grasping the handle and pulling the
door flat down. Place the washer over the stability
●
Template (packed with the range)
—- . .
mounting device and securely tighten with the wing
Locate the stability mounting device on the
per
nut. See Fig. 2.
the template instructions. Secure the stability
mounting device to the floor with the two wood
screws provided. See Fig. 1.
NOTE: attaching to masonry, you can buy suitable
and anchors at hardware stores. Use a masonry
to drill the required holes.
Move the range directly in front of the cutout.
Standing in front of the range, tilt it toward you.
Maneuver the range into the cutout. Keep the back
raised in order to clear the blower. The stability
bracket attached to the range should be positioned
over the stability mounting device.
Stability
mounting
1!
Fig. 1
I
i
Secure two wood
screws to the floor
See the template
1
I
the range is moved for cleaning,
A
servicing or any reason, be sure the
anti-tip device is re-engaged properly
when the range is replaced. Failure to
take this precaution could result in
tipping of the range and cause injury.
To insure the device is installed and engaged properly,
open the lower compartment and inspect the device.
Make sure the stability bracket and stability mounting
device are in place.
Fig.
w
I
I
Stability
bracket
attached to
2
Stability
‘\
mounting
device
47

