REVERSING THE DOOR SWING
When reversing the door swing:
• Read the instructions all the way though
before starting.
• Handle parts carefully to avoid scratching paint.
• Set screws down by their related parts to avoid
using them in the wrong places.
• Provide a non-scratching work surface for
the doors.
These instructions are for changing the
hinges from the right side to the left side.
If you ever want to change the hinges back to the
right side, follow these same instructions
(merely reverse all references to left and right).
TOOLS REQUIRED
• Phillips screwdriver
• Putty knife or thin-blade screwdriver
• 5/16
″
hex head socket driver
• 7/32
″
hex head socket driver
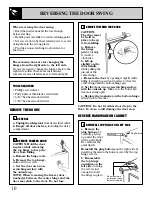
REMOVE THE FRESH FOOD DOOR
CAUTION:
The door must
be held in
place to keep
it from falling
a. Remove
the hinge
pin by turning
it counter-
clockwise.
b. Lift up
slightly on the
door handle
while pulling the
pin out of the
center hinge.
c. Remove the door by opening it
slightly
while
lifting it straight up and out in order to clear the
center hinge and the bottom hinge pin.
d. Set the door on a non-scratching surface
with the outside up. Make sure the butter bin
does not swing open.
e. Replace the washer(s) on the bottom hinge
if they stick to the door.
3
GENERAL
a. Unplug the refrigerator from its electrical outlet.
b. Empty all door shelves, including the dairy
compartment.
1
REMOVE FREEZER DOOR
CAUTION: Hold the door
in place while removing
the top hinge to keep the
door from falling.
a. Remove the hinge cover.
b. Remove the top hinge,
shim and two screws.
c. Set the door on a non-
scratching surface with
the outside up.
NOTE: When removing the freezer door,
washer(s) between the center hinge and the
door may stick to the door. Do not lose.
2
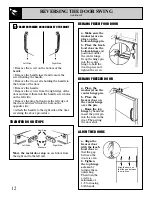
REINSTALL TOP HINGE ON LEFT SIDE
a. Remove the
plug buttons by
carefully prying
up under the edge
with a putty knife.
Be careful of the
paint finish.
Reinstall the plug buttons on the right side by
inserting them into the holes vacated by the top
hinge screws.
b. Reassemble
the top hinge
and shim on the
left side, turning
the screws just
enough to hold
the hinge in place.
1
REMOVE THE DOORS
REVERSE HARDWARE ON CABINET
10
CAUTION: Do not let either door drop to the
floor. To do so could damage the door stop.
Be sure screws
go through these
holes for left side
Plug Buttons
Summary of Contents for UseandCareGuide
Page 18: ...18 NOTES ...
Page 36: ...18 NOTES ...

