background image

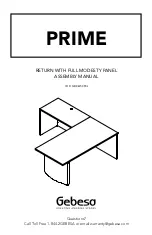
PRIME

RETURN WITH FULL MODESTY PANEL

ASSEMBLY MANUAL

COD: GBR615090L

Questions?

Call Toll Free 1-844-2GEBESA or email warranty@gebesa.com

Summary of Contents for PRIME

Page 1: ...PRIME RETURN WITH FULL MODESTY PANEL ASSEMBLY MANUAL COD GBR615090L Questions Call Toll Free 1 844 2GEBESA or email warranty gebesa com...

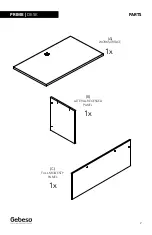
Page 2: ...PARTS 2 ASCEND L SHAPE A WORKSURFACE 1x B LATERAL RECESSED PANEL 1x C FULL MODESTY PANEL 1x PRIME DESK...

Page 3: ...L SHAPE SCREWS 3 PRIME DESK D MINIFIX TITUS E MINIFIX BOLT F MINIFIX CAP 6x 6x 6x REQUIRED ASSEMBLY TOOLS NOT INCLUDED H FLAT BRACKET 2x I 8x5 8 WOOD SCREW G ADJUSTABLE LEVELER J 8x1 1 2 WOOD SCREW 2x...

Page 4: ...STEPS 4 ASCEND L SHAPE 1 Set leveler G to the lateral recessed panel B PRIME DESK...

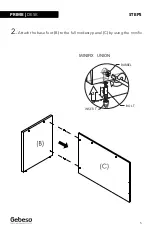
Page 5: ...STEPS 5 ASCEND L SHAPE 2 Attach the base foot B to the full modesty panel C by using the minifix PRIME DESK BARREL BOL T INSER T MINIFIX 3 2 1 BARREL BOL T INSER T MINIFIX UNION 3 2 1...

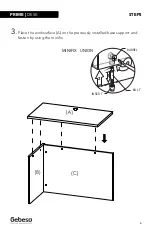
Page 6: ...EPS 6 ASCEND L SHAPE 3 Place the worksurface A on the previously installed base support and fasten by using the minifix PRIME DESK BARREL BOL T INSER T MINIF 3 2 1 BARREL BOL T INSER T MINIFIX UNION 3...

Page 7: ...UNION STEPS 7 ASCEND L SHAPE 4 Verify structure and assembly integrity PRIME DESK...

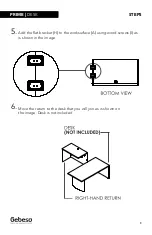
Page 8: ...CEND L SHAPE 5 Add the flat bracket H to the worksurface A using wood screws I as is shown in the image PRIME DESK 6 Move the return to the desk that you will join as is shown on the image Desk is not...

Page 9: ...STEPS 9 ASCEND L SHAPE 7 Secure the return to the desk using wood screws PRIME DESK I J...

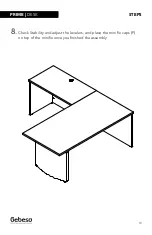
Page 10: ...STEPS 10 ASCEND L SHAPE 8 Check Stability and adjust the levelers and place the mini fix caps F on top of the minifix once you finished the assembly PRIME DESK...

Page 11: ...Questions Call Toll Free 1 844 2GEBESA or email warranty gebesa com...

Page 12: ......

Reviews: