background image

15 

8. Guarantee 

 
Gebuwin BV guarantees for a period of 2 years the materials and workmanship of the GEBUWIN hand-driven 
winches. 

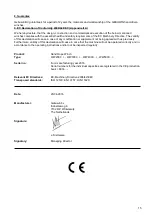
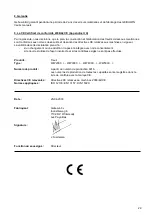
9. EC Declaration of Conformity 2006/42 EEC (Appendix II A) 
 

We hereby declare, that the design, construction and commercialised execution of the below mentioned 
winches complies with the essential health and safety requirements of the EC Machinery Directive. The validity 
of this declaration will cease in case of any modification or supplement not being agreed with us previously. 
Furthermore, validity of this declaration will cease in case that the machine will not be operated correctly and in 
accordance to the operating instructions and/or not be inspected regularly. 


Product:


Hand Rope Winch 

Type:


WW2000 ../.., WW3000 ../.., WW4000 ../.., WW5000 ../.. 


Serial no.: 


from manufacturing year 2016. 


Serial numbers for the individual capacities are registered in the CE production  


book > 6016

….  


Relevant EC Directives:


EC-Machinery Directive 2006/42/EEC 

Transposed standards:


ISO 12100; EN 13157; DIN 15020; 


Date:   


20-04-2016 


Manufacturer:   


Gebuwin bv 


Industrieweg 6 


7102 DZ  Winterswijk 


The Netherlands 


Signature: 


J. Siertsema 

 
Signatory: 


Managing


Director 


Summary of Contents for WW2000 D/FS Series

Page 1: ...n Toutes modifications réservées Gebruiksaanwijzing Pagina 2 Operating instructions Page 9 Betriebsanleitung Seite 16 Mode d emploi Page 23 Wormwiellieren Wormgear winches Schneckenradwinden Treuils à vis sans fin WW2000 FS FSB WW3000 FS FSB WW4000 FS FSB WW5000 FS FSB NL GB F D ...

Page 2: ...1 ...

Page 3: ...ing continue gebruik gebruik in een omgeving waarin gewerkt wordt met agressieve en of explosiegevaarlijke stoffen Technische veranderingen aan de lieren en of het monteren van randapparaten zijn alleen geoorloofd na schriftelijke toestemming van de fabrikant De bediening montage eventuele reparaties en het onderhoud van de lier mogen alleen gedaan worden door deskundige personen die daartoe aange...

Page 4: ...ag van de trommel blijven de bovenkant van de laatste kabellaag dient 11 2 x de kabeldiameter vrij te zijn van de uiterste rand van de trommelflens de kabel dient onder voorspanning op de trommel gewikkeld te worden nooit in de kabeloploop grijpen pak de kabel alleen met veiligheidshandschoenen aan neem de juiste kabelcapaciteit in acht lasthaken moeten veiligheidskleppen hebben lasthaken moeten v...

Page 5: ...belberging per comp m 59 59 44 44 44 44 36 36 Max aantal kabellagen per comp 9 9 6 6 6 6 5 5 Slingerkracht 1e kabellaag daN 24 11 24 11 27 14 27 14 35 13 35 13 58 17 58 17 Overbrenging 1 38 1 76 1 38 1 76 1 52 1 104 1 52 1 104 1 60 1 180 1 60 1 180 1 60 1 180 1 60 1 180 Hijshoogte per slingeromw 1e laag mm 12 5 12 5 11 6 11 6 11 4 11 4 12 4 12 4 Max slipmoment afrolbeveiliging Nm 340 340 340 340 E...

Page 6: ...l naar boven aflopen Bij de WW serie en sommige uitvoeringen van de VL serie kan de kabel ook van onderen horizontaal naar achteren lopen Pas op Bij een verkeerde kabellooprichting werkt de rem niet De kabellengte dient zodanig lang te zijn dat bij de last in de onderste positie er minstens 3 windingen op de trommel blijven De bevestiging van de kabel gebeurt door middel van de opgebouwde kabelkle...

Page 7: ...i eerst de kabel trommel ca 40 mm in richting A draai daarna de vrijloophandel rood in richting C De kabeltrommel is nu vrij Koppelen Draai de vrijloophandel in richting B Draai aan de kabeltrommel tot deze blokkeert De lier is nu klaar om te hijsen De FSB uitvoeringen zijn voorzien van een instelbare slipkoppeling De slipkoppeling zorgt ervoor dat de kabel in vrijloop toestand gecontroleerd kan w...

Page 8: ... opbouw krom getrokken vet aanbrengen schoonmaken met een oplosmiddel en opnieuw vet aanbrengen bevestigingsvlak vlakken en lier opnieuw monteren De last wordt niet vastgehouden de kabel is verkeerd op de trommel gewikkeld waardoor de draairichting van de slinger verkeerd om is remschijven versleten of defecte remschijven de kabel juist aanbrengen remschijven controleren en vervangen De lastdrukre...

Page 9: ...et ons is afgestemd in geval van niet juist of incorrect gebruik van de lier en het niet uit voeren van de vereiste controles Product Lier Type WW2000 WW3000 WW4000 WW5000 Productienummer Vanaf productienummer 6016 Productienummers voor alle capaciteiten worden in het controleboek met het CE merk geregistreerd Relevante EG richtlijnen EG machine richtlijn 2006 42 EG Toegepaste normen ISO 12100 EN ...

Page 10: ...r of 4 The winches are not suitable for mechanized drive continuous use use in an area in which aggressive and or explosive substances are used Technical alterations and or the attachment of marginal devices to the winches are permitted only with the manufacturer s written consent Servicing mounting possible repairs and the winch maintenance are permitted only by specialized persons who have been ...

Page 11: ...aded the top of the last cable layer must have 11 2 x the cable diameter clearance between the outer edge of the drum flange the cable must be prestressed when being wrapped around the drum never reach into the cable assembly only grasp hold of the cable when wearing safety gloves adhere to the correct cable capacity loading hooks must be fitted with safety catches according to the regulations loa...

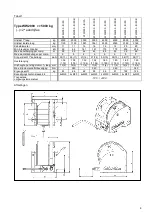
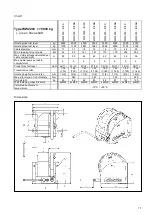
Page 12: ...orage calculated per cable compartment m 59 59 44 44 44 44 36 36 Max cable layers per cable compartment 9 9 6 6 6 6 5 5 Crank force first layer daN 24 11 24 11 27 14 27 14 35 13 35 13 58 17 58 17 Transmission ratio 1 38 1 76 1 38 1 76 1 52 1 104 1 52 1 104 1 60 1 180 1 60 1 180 1 60 1 180 1 60 1 180 Hoisting height per crank rev mm 12 5 12 5 11 6 11 6 11 4 11 4 12 4 12 4 Max slip torque of roll of...

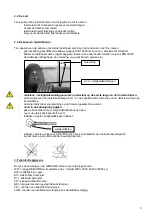
Page 13: ... are also equipped with an adjustable slipping clutch on the cable drum This slipping clutch makes it possible to have a controlled discharge of the cable in the free spool mode 3 2 Mounting instructions The winch must be mounted with the bolts as set out in chart 1 To avoid tension build up in the winch housing pay attention to the following there must be a smooth surface at the mounting bolt pos...

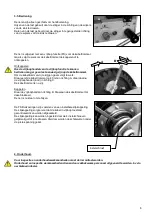
Page 14: ...ions to engage and disengage the cable drum To disengage To be able to operate the Free spool clutch handle red lever there must be no load on the drum Set the cable drum free by turning the drum 4 cm in direction A Then turn the clutch handle in direction C The drum is now free to spool of the cable To engage Turn the clutch handle in direction B Rotate the cable drum in direction B until it lock...

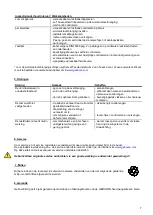
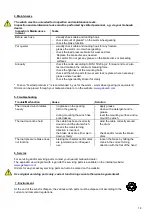
Page 15: ...ebsite www gebuwin com 5 Troubleshooting Trouble Malfunction Cause Solution The unloaded winch rotates heavily no grease on the gearing dirt on the gearing during mounting the winch has pulled askew apply grease clean with a detergent and re grease level the mounting surface and re mount the winch The load cannot be held the cable has been incorrectly wound round the drum which means the crank tur...

Page 16: ...nt not being agreed with us previously Furthermore validity of this declaration will cease in case that the machine will not be operated correctly and in accordance to the operating instructions and or not be inspected regularly Product Hand Rope Winch Type WW2000 WW3000 WW4000 WW5000 Serial no from manufacturing year 2016 Serial numbers for the individual capacities are registered in the CE produ...

Page 17: ...ereinsatz Einsatz in einer Umgebung in der mit aggressiven bzw explosionsgefährlichen Stoffen gearbeitet wird Technische Veränderungen an den Winden bzw das Montieren von Randapparaturen sind nur nach vorheriger schriftlicher Zustimmung des Herstellers gestattet Die Bedienung Montage eventuelle Reparaturen und Wartung der Winde dürfen nur durch Fachpersonal erfolgen die dazu angestellt und befugt ...

Page 18: ...ndestens 3 Sicherheitswindungen müssen unter Last auf der ersten Lage auf der Trommel bleiben die Oberseite der letzten Seillage muss frei liegen vom äußersten Rand der Trommelflansch und zwar muss der Abstand das 11 2 fache des Seildurchschnitts betragen Das Seil muss unter Vorspannung auf die Trommel aufgewickelt werden Niemals in das laufende Seil greifen Fassen Sie das Seil nur mit Sicherheits...

Page 19: ...Reißkraft Seil kN 63 63 161 161 179 179 252 252 Max Seilaufnahme berechnet pro Seilabteilung m 59 59 44 44 44 44 36 36 Max Anzahl Seillagen pro Seilabteilung 9 9 6 6 6 6 5 5 Kurbelkraft erste Seillage daN 24 11 24 11 27 14 27 14 35 13 35 13 58 17 58 17 Übertragung 1 38 1 76 1 38 1 76 1 52 1 104 1 52 1 104 1 60 1 180 1 60 1 180 1 60 1 180 1 60 1 180 Hubhöhe pro Kurbelumdrehung mm 12 5 12 5 11 6 11 ...

Page 20: ...n Schlupfkupplung auf der Seiltrommel ausgerüstet Diese Schlupfkupplung ermöglicht es das Seil in Freilaufstellung kontrolliert von der Seiltrommel abzurollen 3 2 Montageanleitung Die Winde sollte mit den in den Tabelle 1 aufgeführten Bolzen montiert werden Um dem Auftreten von Druck im Windegehäuse vorzubeugen sollte auf Folgendes geachtet werden eine glatte Fläche an der Stelle der Befestigungsb...

Page 21: ...ie folgt Drehen Sie die Seiltrommel zunächst etwa 40 mm in Richtung A Drehen Sie den Freilaufhebel rot in Richtung C Die Seiltrommel läuft jetzt im Freilauf Einkuppeln Drehen Sie den Freilaufhebel in Richtung B Drehen Sie die Seiltrommel bis sie stehen bleibt Die Winde ist jetzt bereit zum Heben Die FSB Ausführungen sind mit einer einstellbaren Schlupfkupplung ausgerüstet Diese Schlupfkupplung erm...

Page 22: ...z in der Überbringung Winde wurde beim Aufbau schief gezogen Fett anbringen säubern mit einem Lösungsmittel und erneut Fett anbringen Montagefläche abflachen und Winde erneut montieren Die Last wird nicht festgehalten das Seil wurde verkehrt herum auf die Trommel gewickelt wodurch die Drehrichtung der Kurbel verkehrt herum ist Bremsscheiben verschlissen oder Bremsscheiben defekt das Seil richtig h...

Page 23: ...mt wurde Im Falle des unsachgemäßen oder unkorrekten Betriebes der Winde und wenn die erforderlichen Kontrollen nicht ausgeführt wurden Produkt Handseilwinde Typ WW2000 WW3000 WW4000 WW5000 Serien Nr Ab Baujahr 2016 Seriennummernkreise für die einzelnen Tragfähigkeiten werden in dem CE Produktionsbuch festgehalten 6016 Einschlägige EG Richtlinien EG Maschine Richtlinien 2006 42 EG Angewandte Norme...

Page 24: ...ilisation en continu une utilisation dans un environnement dans lequel on utilise des matières dangereuses et ou explosives Des changements techniques sur les treuils et ou le montage des périphériques sont uniquement admis après l accord écrit du fabriquant Le pilotage le montage des réparations éventuelles et la maintenance du treuil peuvent être effectués uniquement par des personnes compétente...

Page 25: ...grés au moins 3 spires de sécurité doivent rester sous la charge sur la première couche du tambour le dessus de la dernière couche du câble doit être libre de 11 2 x le diamètre du câble du bride tambour le câble doit être enroulé sous précontrainte sur le tambour ne jamais toucher la montée de câble tenir le câble uniquement avec des gants de sécurité respecter la capacité du câble les crochets d...

Page 26: ... rupture du câble min kN 59 59 161 161 179 179 252 252 Protection du câble calculée par compartiment du câble m 59 59 44 44 44 44 36 36 Nombre de couches de câble max par compartiment 9 9 6 6 6 6 5 5 Force pendulaire 1ère couche daN 22 11 22 11 27 14 27 14 35 13 35 13 58 17 58 17 Proportion transmission 1 38 1 76 1 38 1 76 1 52 1 104 1 52 1 104 1 60 1 180 1 60 1 180 1 60 1 180 1 60 1 180 Hauteur d...

Page 27: ...é selon les boulons indiqués dans les tableaux 1 Afin d éviter la tension dans le boîtier du treuil il faut être attentif à une surface plate sur les zones de fixation des boulons s assurer que la portance d un mur ou toute autre construction soit suffisante afin de garantir un bon déroulement du câble le treuil doit être monté de niveau Tous les écrous des boulons de fixation doivent être vissés ...

Page 28: ...tion A tournez après le levier rouge dans la direction C Le guide câble est libre Engrener Tournez le levier dans la direction B Pivotez le guide câble jusqu à ce qu il soit bloqué Maintenant vous pouvez lever la charge Les versions FSB sont équipées d un accouplement à friction réglable L accouplement à friction permet de dérouler la câble de façon contrôlée Le limiteur de couple peut être réglé ...

Page 29: ... Résoudre Le treuil tourne lourdement sans charge l n y pas die graisse sur la transmission impuretés dans la transmission le treuil s est courbé lors du montage graisser nettoyer avec un solvant et graisser de nouveau remonter la plaque de fixation et le treuil La charge n est pas retenue le câble n a pas été monté correctement sur le tambour ce qui modifie le sens de rotation de la pendule les d...

Page 30: ... si un changement ou une addition n a pas été intégré avec notre consentement si le treuil est utilisé de façon incorrecte et si les contrôles exigés ne sont pas effectués Produits Treuil Type WW2000 WW3000 WW4000 WW5000 Numéro de produit A partir du numéro de production 6016 Les numéros de production de toutes les capacités sont enregistrés dans le livre de contrôle avec la marque CE Directives C...

Reviews: