Section 6 Install On
-
Lap Proprietary HDMI
-
A & USB
-
A to
Dock Port Cable(Optional)
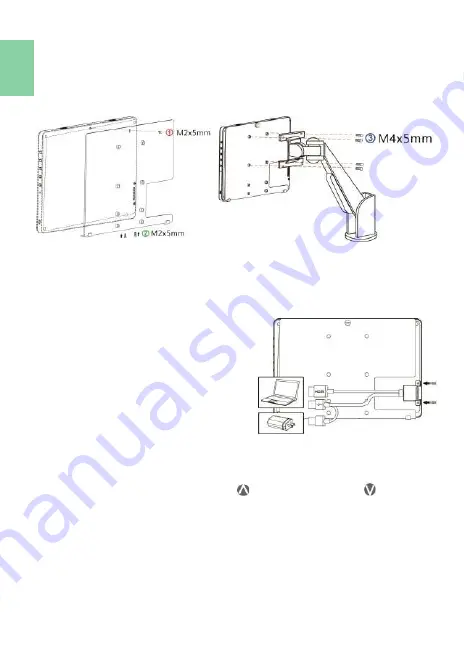
In the Fig. shown, remove the rubber bung at the rear of the monitor firstly.
Insert "On
-
Lap Proprietary HDMI
-
A & USB
-
A to Dock Port Cable" to the rear port of
1102, and then screw it up. Plug in USB
-
A
connector to computer's USB port; HDMI
-
A connector to computer's HDMI port.
Please press the menu button of the mon-
itor to enter OSD menu and choose
"HDMI 2" as "Input Source."
Chapter 3 Hot Keys, LED and OSD Instructions
Section 1 Hot Keys & LED Indications
Notice: If need to adjust “Increase/up ” or “Decrease/down ”
continuously , press the button and don't release. Do not press two
buttons at the same time, or it may cause no response or fault response.
LED Light Description
:
LED Light: It shows
green
light when turning on On
-
Lap Monitor and shows
Orange
light when stand by. There is no light when the monitor is off.
6
Section 5 Mount On
-
Lap 1102I to VESA 75 Monitor Arm or
Wall Mount (With 1102 Multi Mount Kit)(Optional)
As the fig., firstly use three M2x5mm screws to fix the monitor to the Moni-
tor Bracket. Then use four M4x5mm screws to fix the Monitor Bracket to the
arm.
Summary of Contents for 1102I
Page 1: ...ユーザーガイド On Lap 1102I ...
Page 7: ...Chapter 1 Parts of On Lap Product Accessories Section 1 Parts Description 1 ...
Page 19: ...IV ...
Page 20: ...V ...
Page 21: ...13 ...
Page 22: ...14 ...
Page 23: ...横置き表示の最低角度は 40 です 吸着面 をブルーの線より高いところに置かないでくださ い それよりも高いところにおくと倒れることがあ ります 15 ...
Page 24: ... 16 ...
Page 25: ...17 ...
Page 26: ...18 LED OSD LED ...
Page 27: ... 19 ...
Page 28: ...20 3 ...
Page 29: ...8 21 ...
Page 30: ... R53848 RoHS 22 ...


