background image

ご使用上の注意事項と警告および製品保証について


この表示に従わなかった場合、けがをする恐れや製品に物理的な破
損が生じる可能性があることを示します。


1. 外出時には、必ずモニタに保護カバーを装着してパネル面を内側にして携帯し

てください。モニタが押されたり鋭利な物に接触しないようご注意ください。


2. USB または映像入出力ケーブルを挿入する前に、挿入方向が正しいかどうか

確認してください。コネクタを抜く際は必ず

USB

ポートまたは映像入力ポー

トの方向に平行に引き抜いてください。強い力でコネクタを揺らさないよう
にしてください。反対方向(上下逆向き)に挿入したり、その他適切でない
取扱いによって

USB

ポートや映像入力ポートが破損した場合、保証期間中で

あっても無償修理サービスは適用されません。 


3. On

-

Lap モニタの電源入力規格は

5V 2A DC

電流です。

5V

以上の電流を流す

とモニタの故障を引き起こすおそれがあります。この故障は保証対象外とな
りますのでご了承ください。

PC

USB

ポート

x2

か当社製

5V 2A AC

アダ

プタに接続して電源供給することをお薦めいたします。


4. On

-

Lap モニタや付属の保護カバーにはマグネットがついています。

PC

ハードディスクやその他磁気の影響を受けて破損するおそれのある物品に近
づけないでください。

PC

が起動中またはスリープ状態にあるときは、保護カ

バーのマグネット部分には近づけないでください。


5. モニタのお手入れ時の注意事項:お手入れ前には、電源を抜き、やわらかい

布でモニタをやさしく拭きます。落としにくい汚れがある場合は、固く絞っ
た布で拭き取ります。ベンゼン、アルコール、シンナー、アンモニア、研磨
剤を含む洗剤またはその他腐食性のある洗剤や高圧洗浄機を使用しないでく
ださい。これらの使用により修理不可能な損害を受けたり、表面に落ちない
痕が残る可能性があります。


6. 製品が倒れたり、床に落ちることで重大な損傷につながる可能性があります

ので、揺れるなど不安定な机、棚またはカートの上に置かないでください。
また、動いている車内での使用や持続的に振動している場所への設置も避け
てください。


7. 耐水性ではありません。水に近い場所で使用しないようにしてください。


8. 本体ケースは分解しないでください。 


Summary of Contents for On-Lap 1305H

Page 1: ...Manual of 1305 Read Me Before Usage Operating Video...

Page 2: ...ection 3 Store the Monitor in the Protective Cover 5 Section 4 Connect to Headphone or Speaker 5 Chapter 3 Hot Keys LED and OSD Instructions 6 Section 1 Hot Keys LED Indications 6 Section 2 OSD Descri...

Page 3: ...V WEEE V 13 1 13 2 14 14 1 14 2 16 3 17 4 17 LED OSD 18 1 LED OSD 18 2 OSD 19 21 1 Windows 10 21 2 Mac OS X 21 22 1 22 2 23 3 23 24...

Page 4: ...uckle of protec tive cover away from your desktop when the PC is in sleep mode or boost ing 5 Cleaning On Lap Monitor Unplug the power input before cleaning Please use soft cloth to clean touch screen...

Page 5: ...caused by hitting or cracking monitor accidentally or purposely or collapsing or overturning monitor II LCD Pixel Statement There is slightly uneven brightness on the screen when displaying different...

Page 6: ...the emission limits 3 The manufacturer is not responsible for any radio or TV interference caused by unauthorized modification to this equipment It is the responsibilities of the user to correct such...

Page 7: ...point for the recycling of waste electrical and electronic equipment For more information about where you can drop off your waste equipment for recycling please contact your local city office your ho...

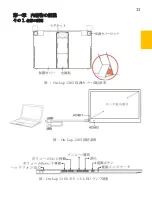
Page 8: ...ter 1 Parts of On Lap Product Accessories Section 1 Parts Description Fig Part description of 1305 Cover Stand Fig 1305 Buttons LED Lights Audio Jack Description Fig On Lap 1305 Monitor Connection Por...

Page 9: ...tions Section 1 Installation of Horizontal Display The min viewing angle of horizontal display is 40 degrees Do not attach the magnetic buckle higher than the blue line otherwise it may cause the moni...

Page 10: ...e monitor into the Protective Cover Rotate down the Cover Locks to prevent the monitor from sliding out P S If the monitor does not get enough power from a single USB port it may cause splash screen o...

Page 11: ...firstly and take out the monitor then trun the monitor s back side to the Protective Cover Do keep the but tons on the topside 1 Put the bottom half of the monitor into the Protective Cover 2 Put the...

Page 12: ...cause the scratches and the Cover Locks cannot be locked on Section 4 Connect to Headphone or Speaker On Lap 1305 s audio jack supports both analog audio and digital audio optical outputs When your d...

Page 13: ...ed to adjust Increase up or Decrease down continuously press the button and don t release Do not press two buttons at the same time or it may cause no response or fault response LED Light Description...

Page 14: ...de Section 2 OSD Description When turning on On Lap monitor at the first time the Language Select menu appears on the left top Please press Menu Select button to choose the language you like then the...

Page 15: ...black borders to fill the 16 9 screen When select Original the monitor displays the image in its origi nal size 2 Overscan only available when inputing HDMI video signal ex 1080P 720P Enabling this f...

Page 16: ...ror Displays Select one of the blue rectangles and drag to the desired position 7 Power On Off Indicator Select Off to turn off the Power On Off Indica tor 8 Power Button Lock Select On to lock the Po...

Page 17: ...78 H 178 V CR 10 Response Time 12 5 ms Typ Video Input HDMI 2 Audio Output Earphone Jack HDCP Support Yes HDCP CEC Support Yes Plug and Play VESA DDC2B C1 Power Consumption 8W Power Consumption Standb...

Page 18: ...0 60 000 1280x768 60Hz 47 776 59 870 1280x800 60Hz 49 702 59 810 1280x960 60Hz 60 000 60 000 1280x1024 60Hz 63 981 60 020 1360x768 60Hz 47 712 60 015 1366x768 60Hz 47 712 59 790 1360x1024 60Hz 63 606...

Page 19: ...se use headphone for audio output 3 Please check volume settings whether Mute has been turned on or not 4 Theearphonejackonlyoutputsthroughaheadphone AudioJackcan tbeconnectedtothelaptopasaudiooutput...

Page 20: ...1 2 USB USB USB 3 On Lap 5V 2A DC 5V PC USB x2 5V 2A AC 4 On Lap PC PC 5 6 7 8...

Page 21: ...IV 9 10 30 10 2 2 1 11 1 2 3 4 5V 5 6...

Page 22: ...99 99 0 01 WEEE Rear Dock EU EU V...

Page 23: ...1 On Lap 1305 On Lap 1305 LED On Lap 1305 13...

Page 24: ...On Lap1305 HDMI A USB A 1 2m 1 USB A to USB A 1 2m 1 AC 5V Max 2A 1 1 2 1 2 1 40 14...

Page 25: ...Cover Lock 1 2 Cover Lock On Lap1305 PC PC USB AC USB A to USB A PS PC USB 1 USB AC 15...

Page 26: ...60 16 2 Cover Lock 1 2 Cover Lock On Lap1305 PC PC USB AC...

Page 27: ...Cover Lock 4 On Lap1305 Headphone Out PC DVD HDMI On Lap1305 5 1 On Lap1305 Headphone Out 3 17 USB A to USB A PS PC USB 1 USB AC...

Page 28: ...LED OSD 1 LED LED On Lap OFF 18...

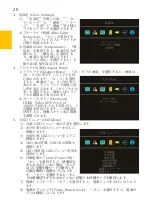
Page 29: ...On Off OSD OSD Up OSD OSD Down OSD OSD 2 OSD On Lap Language Select Language Select Language Select 1 OSD 2 Display Settings 1 ECO Mode 50 2 Auto Adjust 19...

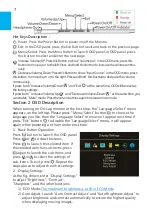
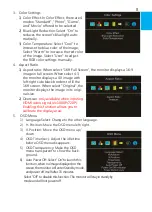
Page 30: ...Blue Light Reduction 3 Color Temperature RGB 4 Aspect Ratio 1 Aspect Ratio 16 9 16 9 4 3 4 3 2 Overscan HDMI Video 1080P 720P 5 OSD OSD Menu 1 OSD 2 OSD 3 OSD 4 OSD OSD 5 OSD OSD 6 Auto Power Off 15 7...

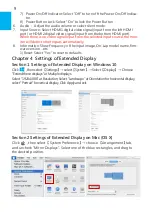
Page 31: ...21 6 0 7 Input Source HDMI 1 HDMI HDMI 2 HDMI 8 Information On Lap Reset 1 Windows10 1920x1080 2 Mac OS X...

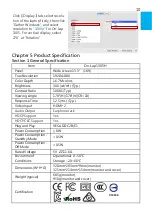
Page 32: ...n Lap1305H 13 3 16 9 1920x1080 1677 300 cd m Typ 1000 1 Typ 178 H 178 V CR 10 12 5 ms Typ HDMI 2 HDCP HDCP CEC VESA DDC2B C1 8W 0 5W Off 0 5W 5V 1 6A 0 50 20 60 W H T 320mm 203mm 9mm 325mm 214mm 15 4m...

Page 33: ...810 1280x960 60Hz 60 000 60 000 1280x1024 60Hz 63 981 60 020 1360x768 60Hz 47 712 60 015 1366x768 60Hz 47 712 59 790 1360x1024 60Hz 63 606 59 836 1400x1050 60Hz 65 317 59 978 1440x900 60Hz 55 935 59 8...

Page 34: ...No Signal 1 2 HDMI On Lap HDMI 1 2 AC 3 1 2 On Lap 1305 3 0 4 PC PC Out of Range Out of Range On Lap HDMI 24...

Page 35: ...GeChic Corporation 5F 3 No 138 Zhongming S Rd West Dist Taichung Taiwan R O C Customer Service service gechic com Rev 2017 11 24 www gechic com...

Page 36: ...1 http www gechic com http www tekwind co jp products GEC category php On Lap1305H No...

Reviews: