7
the sub
-
items, and press or to select the settings of sub
-
items. To exit, press . Re-
peat the steps above to adjust the other settings.
2.
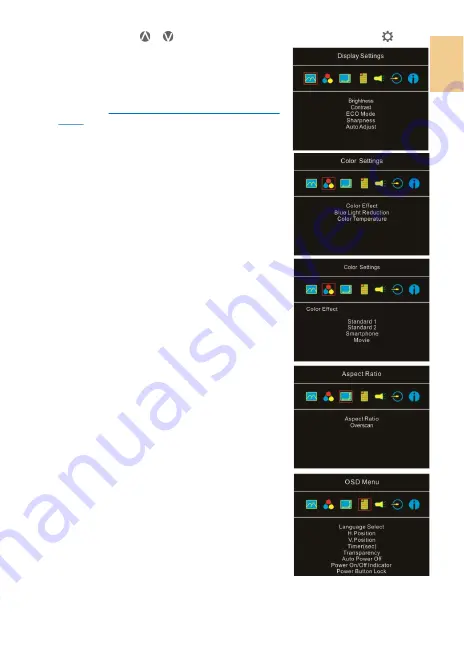
Display Settings
As the fig. shown, enter "Display Settings" to adjust
"Brightness", "Contrast", "Sharpness", and the other func-
tions.
1)
ECO Mode:
The maximum brightness is at 50 in ECO
Mode
.
2)
Auto Adjust: Launch "Auto Contrast Adjust" and
"Auto Brightness Adjust" to adjust brightness and
contrast automatically to ensure the highest quality
when displaying moving images.
3.
Color Settings
1)
Color Effect: If the PC image output format is RGB
Limited, it is recommended to select "Standard 1"; if
it is RGB Full format, it is recommended to select
"Standard 2". Select "Phone" mode to make the
colors more vivid; select "Movie" mode to display the
dark scene more clearly.
2)
Blue Light Reduction: Select "On" to reduces the
screen's blue light automatically.
3)
Color Temperature: Select "Cool" to increase the blue
color of the image; Select "Warm" to increase the red
color of the image. Select "User" to adjust the RGB
color settings manually.
4.
Aspect Ratio
1)
Aspect ratio: When select "16:9 Full Screen", the
monitor displays a 16:9 image in full screen. When
select 4:3, the monitor displays a 4:3 image with left
-
right side black borders to fill the 16:9 screen. When
select "Original", the monitor displays the image in its
original size.
2)
Overscan:
only available when inputting HDMI video
signal (ex:1080P/720P). Enabling this function allows
you to calibrate the display area.
5.
OSD Menu
1)
Language Select: Change to the other language.
2)
H. Position: Move the OSD menu left/right.
3)
V. Position: Move the OSD menu up/down
4)
OSD Timer (sec): Adjust the idle time before OSD
menu disappears.
5)
OSD Transparency: Make the OSD menu transparent
to show the background.
6)
Auto Power Off: Select "On" to launch this function, when no
image displayed on the screen, the monitor will enter Standby
mode, and power off itself after 15 minutes.
Select "Off" to
disable this function. The monitor will stay in standby mode and
will not power off.
7)
Power On/Off Indicator: Select "Off" to turn off the
Power On/Off Indicator.
8)
Power Button Lock: Select "On" to lock the Power
Button.
6.
Audio
:
Adjust the audio volume or select silent mode.
Summary of Contents for On-Lap 1306E-R
Page 1: ...On Lap 1306H R On Lap 1306E R User Manual...
Page 3: ...IV V V 12 12 13 13 13 15 15 16 17 17 17 18 20 20 20 21 21 22 22 23...
Page 19: ...11 1 2 3 4 5V 5 6 99 99 0 01 WEEE Rear Dock EU EU B VCCI B V...
Page 20: ...12 1 On Lap 1306 On Lap 1306 LED On Lap 1306...
Page 22: ...2 Cover Lock 1 2 Cover Lock 40 12cm 2 1 3 2 14...
Page 28: ...2 Mac OS X On Lap 1306 1080p 1 Windows10 1920x1080 20...
Page 32: ...1 On Lap1306 No...


