background image

30

1

+

Keypad functions

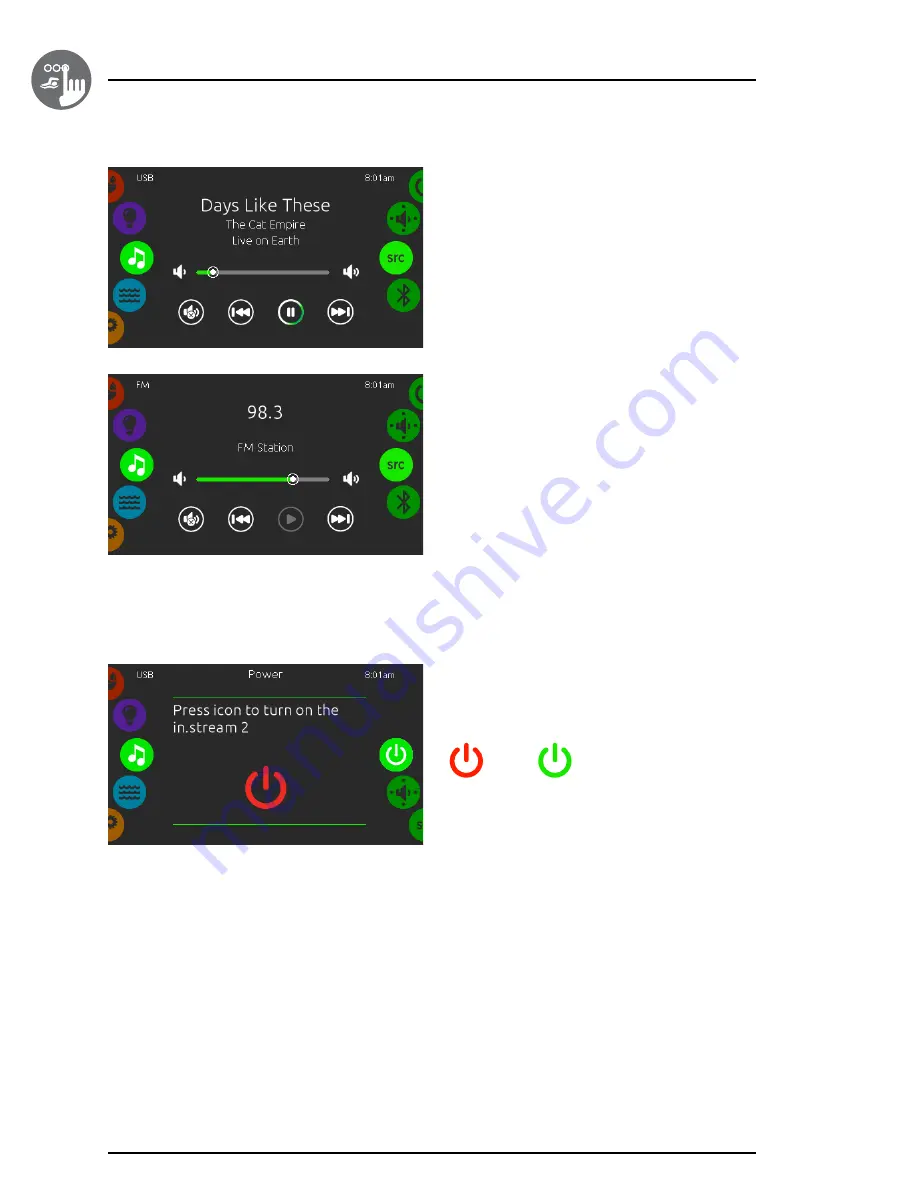
in.stream 2 functions

This menu is available only if the in�stream 2 audio station 
is detected in the spa accessories�

The audio page will allow you to control the active audio 
source� Note that only the functions that apply to the 
selected source will be available� From this page, you can 
also access the following:

• in.stream 2 on/off

• speaker settings

• audio source selection

• disconnect bluetooth

To select an item, slide the right wheel until the desired
icon is highlighted in the middle�

For more information about the in�stream 2 audio station, 
please refer to the in�stream 2 techbook�

in.stream 2 power

To turn the in�stream 2 on or off, tap the icon located in 
the center of the screen�

On (red)

Off (green)

Summary of Contents for in.k1000+

Page 1: ...Qc G2E 5W6 Canada 1 800 78 GECKO www geckoalliance com Printed in Canada 9919 101605 A Rev 12 2018 Groupe Gecko Alliance inc 2018 All trademarks or registered trademarks are the property of their res...

Page 2: ...ge 14 Sleep 14 Settings 14 Water Care 15 Modifying schedules 16 Maintenance 16 Reminders 17 Standby 17 Date and Time 17 Keypad settings 18 Temperature units 19 Display page 19 Contrast page 19 Languag...

Page 3: ...ION THAT IS POTENTIALLY DAMAGING AND OR DANGEROUS TO THE OPERATOR OR SURROUNDINGS THIS INCLUDES BUT IS NOT LIMITED TO FIRE FLOODING OR OTHER WATER DAMAGE DIELECTRIC BREAKDOWNS PRESENCE OF HIGH VOLTAGE...

Page 4: ...its swim spa training program in k1000 can transform any swim spa into the ultimate training machine Directly on the keypad training sessions can be customized by setting flow intensities durations a...

Page 5: ...4 1 Overview Side view 0 26 6 6 mm 1 69 43 mm Front view 7 49 190 mm 5 17 131 mm 3 5 89 mm MAX in k1000 dimensions...

Page 6: ...5 1 Overview in k1001 dimensions Side view 0 26 6 6 mm 1 93 49 mm Front view 6 23 158 mm 3 91 99 mm 3 5 89 mm MAX...

Page 7: ...ation and stick the template on the chosen location Cut out an opening according to the template see illustration Clean the installation surface and peel the adhesive gasket from the back of the keypa...

Page 8: ...7 1 Installation Drilling template 3 19 90 mm 5 5 140 mm 0 19 5 mm...

Page 9: ...8 1 Drilling template Installation 1 75 44 mm TYP 1 5 38 mm TYP 2 5 64 mm TYP...

Page 10: ...ing in k1000 to the spa pack To connect the in k1000 keypad simply insert its in link connector into the appropriate keypad connector of the pack enclosure as illustrated Main keypad in k1000 The vent...

Page 11: ...Installation Installation errors Upon connecting the in k1000 to the spa pack you may see one of two error messages Please follow the instructions in the message or contact your dealer for more inform...

Page 12: ...n screen The main screen gives you access to your accessories and water temperature At the bottom of the screen you will see any error or maintenance messages that are present in k1000 keypad layout a...

Page 13: ...dicates that the in touch module is detected but is not connected to a Wi Fi network An animated icon indicates that the in touch module is connecting to a Wi Fi network For more information about the...

Page 14: ...erature Cooling to xx x will appear below When the set value is higher than the current temperature Heating to xx x will be indicated under the value Spa menu From the home page you can access the fol...

Page 15: ...tenance Date Time Keypad Electrical Config Wi Fi Miscellaneous About To select an item slide the right wheel until the desired icon is highlighted in the middle or press on the menu name Keypad functi...

Page 16: ...will apply to the main filtration pump most likely pump 1 If your spa uses a circulation pump configured to run 24 hours the screen will show you the purge setting instead of filtration The purges are...

Page 17: ...desired line Confirm your action when prompted You can modify the programmed schedules by selecting one and adjusting the schedule You have several possibilities for the schedule Mon Fri weekend ever...

Page 18: ...reset the time once a task has been completed To reset a task select it by pressing the curved arrow then confirm when prompted Once you have confirmed the task will be reset You can also use the opt...

Page 19: ...hange the hour minute and time format Simply swipe up and down the column you want to change and select the desired value When done touch the calendar icon at the right of the screen Keypad settings I...

Page 20: ...Display page Use this page to change the display orientation Contrast page Use this page to change the keypad contrast Keypad functions Temperature units Choose the desired units to display temperatu...

Page 21: ...elect a 4 digit code The same code will be needed to unlock the keypad Next time he wants to lock the keypad he will be prompted again to select a 4 digit code same functionality as a Safe in a hotel...

Page 22: ...chosen unit configuration must support a slave unit If after rebooting the chosen configuration does not support SwimSpa installations the in k1000 will return after approximately 45 seconds to this c...

Page 23: ...ction methods please see the in touch techbook After a few seconds the available networks will appear on the screen as well as their signal strength Swipe Up or Down the list to select your network If...

Page 24: ...he pack filtration over temperature feature When Warm Weather is OFF the filtration over temperature is disabled and your spa filtering will continue even if the water temperature is high Miscellaneou...

Page 25: ...ay If hide option is selected smart winter mode message will only appear when a SWM purge is in action Otherwise the message will always appear when the spa is in a SWM condition If hide option is sel...

Page 26: ...ing Training Drills selection Swim Settings To select an item slide the right wheel until the desired icon is highlighted in the middle When ready press Start to begin the workout session Resume and S...

Page 27: ...ime is desired set Duration to 0 second Light requires an in mix installed This page allows you to select which in mix zone to use for swim feedback If at least one zone is selected for feedback it wi...

Page 28: ...tep time Transition This training drill will perform a series of equal steps at random intensities Cardio This training drill will perform two successive steps at high intensity for one step at low in...

Page 29: ...on of the 20 available steps will be adjusted to fit the duration selected on the main screen When the personalized pattern is completed press Confirm to save your changes and return to the swim windo...

Page 30: ...session is shown A swimmer icon is also displayed on the screen and will move toward the right as the swim session progresses A yellow countdown decreases during the warm up portion of the swim sessio...

Page 31: ...source will be available From this page you can also access the following in stream 2 on off speaker settings audio source selection disconnect bluetooth To select an item slide the right wheel until...

Page 32: ...stream 2 you can disconnect it by pressing the Disconnect button at the bottom of the screen Doing so will also prevent the in stream 2 from automatically reconnecting to this specific device until i...

Page 33: ...user manual in clear on off A 5 second press on the power down key is required to turn off the in clear This prevents accidental desactivation of the sanitation system Step 1 On red Step 2 Off yellow...

Page 34: ...ivated 5 minutes after starting a pump Modify the maintenance level The maintenance level can be changed and must be tested with a bromine level tester The tester should report between 3 5 ppm If the...

Page 35: ...een The second way is by touching the light bulb icons located on each side of the intensity bar Synchronizing zones The synchronization desynchronization icon allows you to match the color of the sel...

Page 36: ...xm2 Fuse 2 is blown F3 in xm2 Fuse 3 is blown ER1 SwimSpa config slave unit is missing Hr Hardware error was detected Thermal fuse UPL The spa pack does not have valid software Please insert valid in...

Page 37: ...es and or options available for the in k1000 keypad and the earliest software version at which this feature option is available All later versions greater than the earliest version continue to support...

Page 38: ...0607 008087 IN K1001 V2 CL GE1 in k1001 25 cable 0607 008088 IN K1001 V2 CL 25FT GE2 Environmental Operating temperature 4 F 20 C to 149 F 65 C Storage temperature 22 F 30 C to 185 F 85 C Water ingres...

Page 39: ...Qc G2E 5W6 Canada 1 800 78 GECKO www geckoalliance com Printed in Canada 9919 101605 A Rev 12 2018 Groupe Gecko Alliance inc 2018 All trademarks or registered trademarks are the property of their res...

Reviews: