2- Connect the main power
Don't forget that the voltage is determined by the cable used (120 or 240 V cable)!
1- Connect all outputs & keypads
OUT1
OUT2
OUT3
OUT4
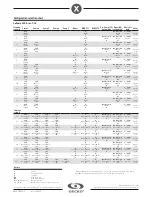
3- Select spa configuration (see chart next page)
3
At first startup the keypad display
will show
õ
L 1
OR
LL 1
.
Use the
Up/Down
key to choose the
new low level configuration number.
Press the
Program
key to confirm the
selection.
2
1
L1 - Light connector
CO - Communication link
C - Main keypad connector
OUT5
Ground
Ground
L2
N
L1
L1
Ground
L2
L1
For 120 V (*3 wires)
* If connected to a 3 wire system all
240 V components will not work.
The heat.wav heater is factory configured 240 V/4 kW (or 2 kW), but it can
be converted to a dedicated 120 V / 1 kW by a simply switching the cable
connection port. Option available on North American models only.
Heat.wav specification summary:
t 4VQQPSUT7PS7
t 1SPUFDUFECZFYUFSOBMCSFBLFS OPUGVTFE
t *ODPMPZ
®
or Titanium (optional) heater element for greater protection
against corrosion.
Connection for 240 V / heater (4 kW)
Connection for 120 V / heater (1 kW)
Ground
N
L1
For 240 V (4 wires)
WARNING!
All connections must be made by a qualified electrician in accor-
dance with the national electrical code and any state, provincial or local electrical
code in effect at the time of the installation. This product must always be connec-
ted to circuit protected by a Ground Fault Circuit Interrupter (GFCI).
2.a- Electrical wiring
2.b- Heater voltage
Note:
4
o re-enter the Low level
selection menu, hold the
Pump 1
õ
key for 30 seconds.
Note
If the keypad does not have a
Program
õ
or
õ
Filter
key, use the
Light
õ
key instead.
Note:
For the
Color keypad series
õ
select
Settings menu
, go into
Electrical config
and choose the
appropriate Low level.
For more information, see our
website: www.geckoalliance.com
GFCI
b
60 A
48 A
50 A
40 A
40 A
32 A
30 A
24 A
20 A
16 A
15 A
12 A
Press and hold the
Program
key
for 20 seconds until you access the
breaker setting menu.
Note:
For the
Color keypad series
õ
select
Settings menu
, go into
Electrical config
and choose Input
current.
Use the
Up/Down
key to select
the desired value. Then press the
Program
key to confirm the selection.
Note:
If the keypad does not have the
Program
or
Filter
key, use the
Light
key instead.
The values displayed by the system
DPSSFTQPOEUPPGUIFNBYJNVN
amperage capacity of the GFCI.
4- Select breaker current
(10 to 20 A dedicated to 120 V)
3
2
1
For more information, see our
website: www.geckoalliance.com
Quick Start Card
in.xe-5
™
North American version


