background image

Trailer Item No.: 02520


GEDA

 Transport Trailer


Instruction Manual 

32 / 36 

BL135GB Issue 01/2017 

10.2 

Checks before driving off 

  4 mast sections each 2 metres mounted. 

  Mast protection shield pushed down. 

  Platform entries / exits closed and locked. 

  Base unit moved up. 

  Adequate support load. 

  No additional loads on the trailer. 

  Support wheel moved up and secured. 

  Max. payload not exceeded. 

  Lighting fully functional. 

  Tyre pressure / tyre thread adequate. 

  No loose parts or parts that may be lost detected. 


10.3 

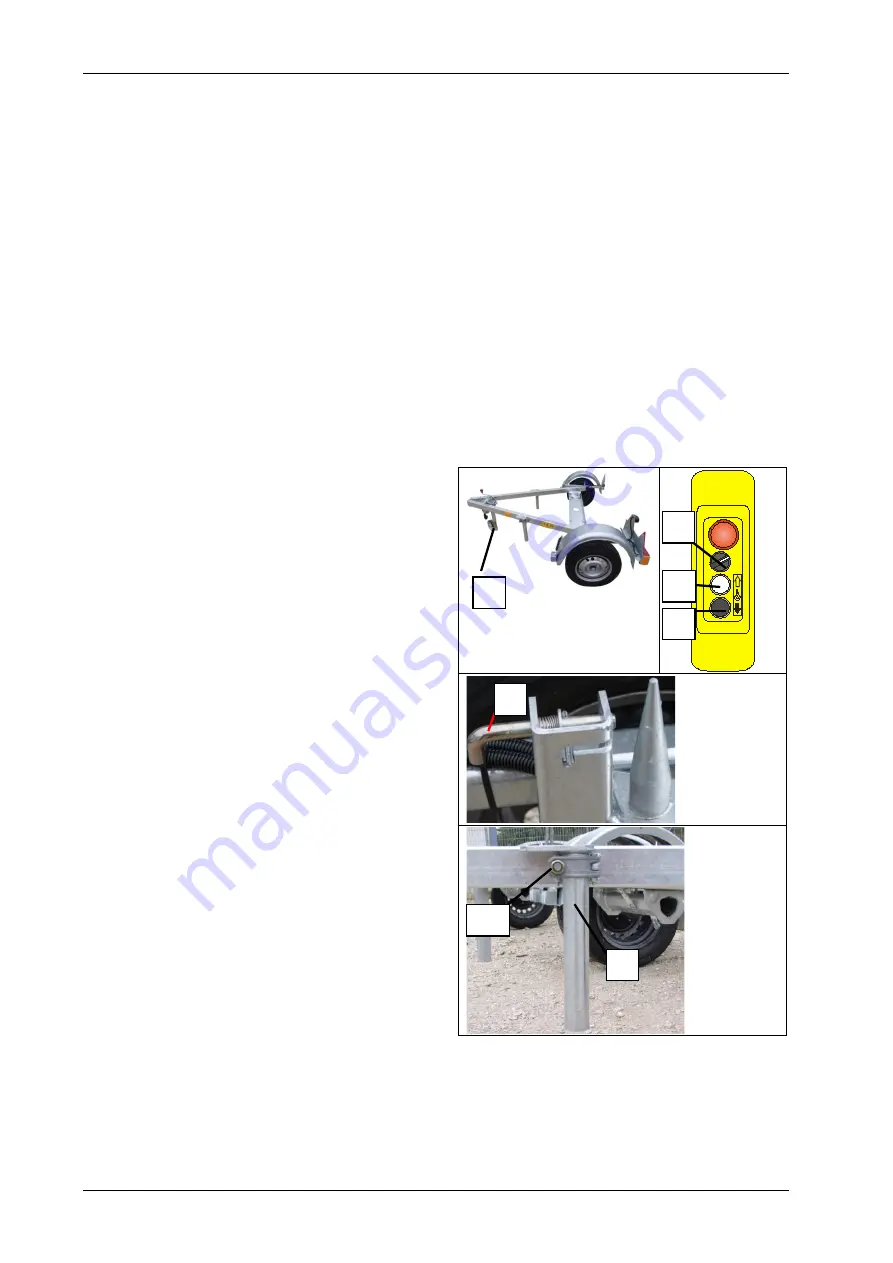
Unloading the construction hoist 

 Lower the support 

wheel (1). 

 Secure the trailer against 

rolling away. 

 Detach the trailer from the 

tractor. 

 Push the trailer to the set-

up site. 

 Secure the trailer against 

rolling away.  

 Connect the construction 

hoist electrically. 

 Turn key switch (5) to 

position 

I

 (manual 

operation). 

 Press the 

UP

 (2) button 

on the pendant control 

until the foot section rests 

on the floor. 

 Open the locking 

device (4) of the guide 

toward the rear. 

 Loosen the holding tubes 

(6) on screw (6a), swivel 

toward the outside and 

lower. 


 Press the 

UP

 (2) button until the platform is positioned freely above 

the trailer. 

 Remove the trailer and secure it against rolling away. 

 Lower the platform by pressing the 

DOWN

 (3) button. 


I

II

6a 

Summary of Contents for 01181

Page 1: ...Original operating manual Instruction manual Transport trailer Item No 01181 For GEDA 500 Z 500 Z Duo 500 Z ZP 300 Z ZP 300 Z Item No 02520 For GEDA 200 Z 300 Z 300 ZG ...

Page 2: ......

Page 3: ... NECESSARY INFORMATION 11 7 3 CHECKING THE CORRECT CONDITION AND USE 11 7 4 INSPECTIONS 11 8 SAFETY NOTICES TO BE COMPLIED WITH GENERAL 12 9 TRAILER ITEM NO 01181 14 9 1 PREPARING THE TRAILER FOR LOADING UNLOADING 14 Pulling releasing the parking brake 14 9 1 1 Adjusting the overrun device 14 9 1 2 Hooking up the contact breaking cable 15 9 1 3 9 2 TRANSPORT OF GEDA 500 Z 500 Z DUO AND 500 Z ZP 16...

Page 4: ...Identification data GEDA Transport Trailer Instruction Manual 4 36 BL135GB Issue 01 2017 ...

Page 5: ...9 0 9 06 98 09 50 E mail info geda de Website www geda de 1 3 Representations Bergkamen Subsidiary Gera Subsidiary GEDA Dechentreiter GmbH Co KG North West Marie Curie Strasse 11 59192 Bergkamen Rünthe Tel 49 0 2389 9874 32 Fax 49 0 2389 9874 33 GEDA Dechentreiter GmbH Co KG East Ernst M Jahr Strasse 5 07552 Gera Tel 49 0 365 55280 0 Fax 49 0 365 55280 29 USA Subsidiary Russia Subsidiary GEDA USA ...

Page 6: ...following details with each order for spare parts Trailer type Year of construction Name of component Item No Order quantity Operating voltage if applicable 2 Technical data Trailer 01181 02520 Weight empty 240 kg 135 kg Max permissible gross weight 1300 kg 750 kg Max support load 100 kg 75 kg Min support load 4 of the trailer load but no more than 25 kg of trailer load required Minimum clearance ...

Page 7: ...s 2 2 1 All details refer to screws in strength class 8 8 Tightening torque Tightening torque M 8 25 Nm M 16 210 Nm M 10 49 Nm M 18 300 Nm M 12 86 Nm M 20 425 Nm M 14 135 Nm M 24 710 Nm Tightening torques for electrical screw connections 2 2 2 Tightening torque Tightening torque M 4 1 2 Nm M 12 15 5 Nm M 5 2 Nm M 16 30 Nm M 6 3 Nm M 20 52 Nm M 8 6 Nm M 24 80 Nm M 10 10 Nm M 30 150 Nm ...

Page 8: ...y constitute schematic diagrams The fundamental function and operation are not affected by this 5 Warnings Activities associated with specific hazards to life and limb or potential damage to the machine are indicated by warnings The instructions given in the warnings must be observed Warning level Consequence Probability DANGER Death serious injury is imminent WARNING Serious injury possible CAUTI...

Page 9: ... Non intended use non compliance with the manual staffing by insufficiently qualified personnel and the use of non approved spare parts releases the manufacturer from any liability 6 2 Limits of trailers Trailers may only be used when complying with the technical data the max permissible load capacity and max min support load the national regulations and registration rules for trailers in public r...

Page 10: ...Detaching a wheel after initial operation or a wheel change Make sure to retighten the wheel nut after 20 100 km Tipping during loading and unloading Make sure the trailer is sufficiently supported Trailer topples over at excessive speed 6 5 Other applicable documents The following documents must be observed in addition to this manual The EU operating license The instructions of the overrun device...

Page 11: ...on of the hoist Finally the operating company must check that each person is capable of operating the machine and trailer correctly and without assistance This training must be documented and repeated at regular intervals New personnel may only operate the trailer under the supervision and instruction of experienced personnel 7 2 Accessibility to necessary information The operating company must ma...

Page 12: ...ea Unauthorised persons must be kept away Rectify any faults that occur which fall within the context of your responsibility Inform your superior immediately if faults occur outside your area of responsibility The trailer must only be moved on foundations with a sufficient load capacity Use only suitable non combustible or aggressive cleaning agents Do not use any steam jet cleaners high pressure ...

Page 13: ... hoist All connections are correctly made The load is correctly secured No parts are protruding into the travel path No tools or other parts are on the trailer Load capacity is observed The min max support load is observed If the parking brake is pulled the trailer Item No 01181 may still roll backwards for approx 25 cm until the max braking force has been reached Make sure to remember this when p...

Page 14: ...rking brake strongly beyond the dead point 1 Releasing the parking brake Press and hold the locking device knob Return the brake lever to the starting position Adjusting the overrun device 9 1 2 Pull out the spring cotter on the immobilising handle Release the immobilising handle Adjust the overrun device toward the top bottom Pull the immobilising handle firmly by hand blow with rubber mallet if ...

Page 15: ...d the neck of the ball Engage the hook connector on the cable Option 1 Sling the hook connector through the eye provided on the tractor Option 2 Hook the hook connector on the cable Sling the contact breaking cable around the neck of the cable through the eye provided Engage the hook connector on the cable Option 3 Place the contact breaking cable around the neck of the ball and the clamping brack...

Page 16: ...control Plug the pendant control 2 into the cable bin Turn key switch 3 to position I manual operation DANGER Danger to life Staying under the raised platform is prohibited Push the UP button 4 Move the platform upward until the trailer can be placed under the platform Disassembly of protection grid underneath the hoist car If transport platforms are equipped with protection grid underneath the ho...

Page 17: ...platform that the springs are hooked again into the fifth lattice section counting from the frame Unhook the protection grid underneath the hoist car on both hook connectors and remove it from under the platform Align the trailer with the support wheel 5 horizontally Open the interlocking 6 Pull out the locking pin 9 toward the rear and lock it Push the trailer under the platform and align it so t...

Page 18: ...ecure the trailer by tightening the parking brake and putting the wheel chocks underneath Press the DOWN 8 button until the platform rests on the trailer Close the interlocking 6 and secure the transport platform with the screw Release the locking pin 9 from the locking device and close it 9 6 ...

Page 19: ...nnect the electrical connection of the transport platform Connect the trailer with the coupling of the tractor Crank up the support wheel release the parking brake and remove the wheel chocks Checks before driving off 9 2 1 Platform entries exits closed and locked Base unit moved up Adequate support load No additional loads on the trailer Support wheel moved up and secured Max payload not exceeded...

Page 20: ...he parking brake and secure the trailer in addition with wheel chocks Connect the transport platform electrically Press the UP 4 button on the pendant control until the foot section rests on the flooring Open the interlocking 6 Pull out the locking pin 9 toward the rear and lock it Press the UP 4 button until the platform is positioned freely above the trailer Remove the trailer and secure it agai...

Page 21: ...section must be mounted on the base mast to load or unload the base unit If the ramp is mounted at the front side it must be disassembled for transport with the trailer Mounting the adapter frame for GEDA 300 Z ZP Pull out the locking pin 9 toward the rear and lock it Fold down the screw of the interlocking 6 Insert the frame 10 in the interlocking 6 and the guides 7 Bolt the adapter frame 10 toge...

Page 22: ...rms and mounted again on the next platform Swivelling the license plate holder toward the outside Loading is performed as outlined in chapter 9 2 Swivel the license plate holder 12 or the trailer back and lock it after loading The trailer is now ready to transport the GEDA 300 Z ZP Unloading is performed as outlined in chapter 9 2 2 Release the locking device 11 of the license plate holder 12 and ...

Page 23: ...on the base mast to load or unload the base unit The controls of explosion proof machines have different controls than those shown in this manual Refer to the machine instruction manuals to operate those machines Mounting the adapter frame for GEDA 300 Z 9 4 1 5 Support wheel 13 Holding tubes 14 Platform support Left 15 Platform support Right 16 Platform centring piece Left 17 Platform centring pi...

Page 24: ...der the raised platform is prohibited Turn the key switch 17 of the platform control to the operating position and remove the key Insert the pendant control 2 in the switch box on the ground station Turn the selector switch 3 to position I manual operation Push the UP button 4 Move the platform upward approx 1 05 m until the trailer can be placed under the platform Attach the mast section or as an...

Page 25: ... the platform comes to rest exactly on both platform supports 14 15 and platform centring pieces 16 17 of the trailer after lowering it Secure the trailer by tightening the parking brake and putting the wheel chocks underneath Press the DOWN 8 button until the platform rests on the trailer Turn the holding tubes 13 into the platform push them down and fasten them Release the locking pin 9 from the...

Page 26: ...t section Release the DOWN button 8 in due time Disconnect the electrical connection of the transport platform Connect the trailer with the coupling of the tractor Crank up the support wheel release the parking brake and remove the wheel chocks Push the mast protection shield 20 down WARNING Serious accidents damage to following vehicles Push the mast protection shield down before each transport M...

Page 27: ...e and secure the trailer in addition with wheel chocks Connect the transport platform electrically Press the UP 4 button on the pendant control until the foot section rests on the floor Loosen the holding tubes 13 and swivel them out from the platform Pull out the locking pin 9 toward the rear and lock it Press the UP 4 button until the platform is positioned freely above the trailer Remove the tr...

Page 28: ...manual operation Push the mast protection shield 4 down Push the mast protection shield down before each transport Mast protection shield will otherwise be caught by the wind when travelling and lifted out of the holding device Fasten 4 mast sections 5 as shown to the holding lugs Utilize only mast sections 2 metres long WARNING Serious accidents damage to following vehicles Loss of trailer due to...

Page 29: ... the rear Make sure the holding tubes 7 have been lowered and swivelled outside Push the UP button 1 Move the platform upward until the trailer can be placed under the platform Push the trailer under the platform align it and secure it against rolling away Press the DOWN button 2 and carefully lower the platform onto the trailer Make sure when lowering the platform that it comes to rest in both gu...

Page 30: ...al 30 36 BL135GB Issue 01 2017 Loosen the holding tubes 7 on the screw 7a Lift the holding tubes and turn them inside until they come to rest between the protective grating and the base plate of the platform Fix the holding tube with the screw 7a I II 1 2 6 7 7a ...

Page 31: ...sion with the license plate holder or ground station switch box Press and hold the DOWN 2 button Carefully move up the foot section until the DOWN limit switch 10 switches off automatically Disconnect the electrical connection of the construction hoist Connect the trailer with the coupling of the tractor Crank up the support wheel The trailer and construction hoist are now ready for transport I II...

Page 32: ...nstruction hoist Lower the support wheel 1 Secure the trailer against rolling away Detach the trailer from the tractor Push the trailer to the set up site Secure the trailer against rolling away Connect the construction hoist electrically Turn key switch 5 to position I manual operation Press the UP 2 button on the pendant control until the foot section rests on the floor Open the locking device 4...

Page 33: ...ions are enclosed Mounting the fastenings Insert the fastenings 1 in the corresponding holes of the platform Screw the nut 2 onto the thread until it is located behind the cross hole in the thread Secure nut with grooved pin with gorge or cotter pin against losing it Fastening the mast sections Insert the fastenings 1 into the groove of the mast sections Turn the fastenings Secure the mast by tigh...

Page 34: ...k tyres before each use for damage thread depth and tyre pressure 11 2 Trailer 01181 fault table Malfunction Cause Correction Insufficient braking Excessive friction losses in transfer device Corrosion on the connecting rod Connecting rod pushes in all the way Lubricate transfer device and brake cable and ensure easy movement Check the brake settings Reverse travel difficult or blocked Brake syste...

Page 35: ......

Page 36: ...GEDA Dechentreiter GmbH Co KG Mertinger Strasse 60 86663 Asbach Bäumenheim Tel 49 0 9 06 98 09 0 Fax 49 0 9 06 98 09 50 E Mail info geda de Web www geda de BL135 GB Edition 01 2017 ...

Reviews: