background image

17 


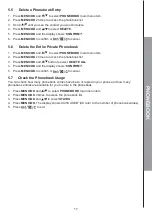
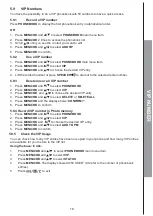
5.5 

Delete a Phonebook Entry


1.  Press 

MENU/OK 

and    

/     

to select 

PHONEBOOK

 main menu item.


2.  Press 

MENU/OK 

2 times to access the phonebook list 


3.  Scroll    

/    

until you see the contact you want to delete.


4.  Press 

MENU/OK 

and    

/    

to select 

DELETE

.


5.  Press 

MENU/OK 

and the display shows 

CONFIRM?

”.


6.  Press 

MENU/OK 

to confirm or 

to cancel.


5.6 

Delete the Entire Private Phonebook


1.  Press 

MENU/OK 

and    

/     

to select 

PHONEBOOK

 main menu item.


2.  Press 

MENU/OK 

2 times to access the phonebook list 


3.  Press 

MENU/OK 

and    

/    

button to select 

DELETE ALL

.


4.  Press 

MENU/OK 

and the display shows 

CONFIRM?

”.


5.  Press 

MENU/OK 

to confirm or 

to cancel.


5.7 

Check the Phonebook Usage


You can check how many phonebook entries have been occupied in your phone and how many 
phonebook entries are available for you to store in the phonebook.


1.  Press 

MENU/OK 

and    

/     

to select 

PHONEBOOK

 main menu item.


2.  Press 

MENU/OK 

2 times to access the phonebook list 


3.  Press 

MENU/OK 

and    

/    

to select 

STATUS

.


4.  Press 

MENU/OK. 

The display shows XX/50 USED” (XX refer to the number of phonebook entries).


5.  Press 

 to exit


PH

O

N

E

B

OO

K


Summary of Contents for CL595

Page 1: ...USER GUIDE UK ...

Page 2: ...all 13 4 6 Adjust Earpiece and Speakerphone Volume 13 4 7 Mute a Call 13 4 8 Modify the tonality during a call 13 4 9 Emergency Call without Main Power 13 4 10 Redial the Last Number 14 4 10 1 Redial a Number from the Redial List 14 4 10 2 Store a Redial Number into the Phonebook 14 4 10 3 Delete a Redial Number 14 4 10 4 Delete the Entire Redial List 14 4 11 Find the Handset if you have an additi...

Page 3: ...k list function 24 8 5 Activation of the function for the private or unavailable number 25 9 INTERCOM FUNCTION 25 10 DATE AND HOUR SETTING 25 10 1 Set the date format 25 10 2 Set the time format 25 10 3 Set the date and time 25 11 TEXT LANGUAGE SETTING 25 12 PHONE SETTINGS 26 12 1 Base Settings 26 12 1 1 Set the Ringer Melody for Internal Calls 26 12 1 2 Set the Ringer Melody for External Calls 26...

Page 4: ...GM 34 17 5 4 Playback the Outgoing Message OGM 34 17 5 5 Delete a Personalized OGM SET OGM to DEFAULT 34 17 5 6 Set the Answer Delay 35 17 5 7 Set the Recording Time of Incoming Message 35 17 5 8 Activate Remote Access 35 17 5 8 1 Change the 4 Digit Remote Access PIN 35 17 5 8 2 Activate or Deactivate the Remote access 36 17 5 9 Function message alert 36 17 5 10 Remote Operations 37 18 TROUBLESHOO...

Page 5: ...perate normally by following the operating instructions If the product has been dropped and the cabinet has been damaged If the product exhibits a distinct change in performance 8 Avoid using a telephone other than a cordless type during an electricalstorm There may be a remote risk of electric shock from lightning 9 Do not use the telephone to report a gas leak in the vicinity of the leak 10 For ...

Page 6: ...pliances such as televisions microwave ovens radios personal computers wireless devices or other cordless phones avoid facing radio frequency transmitters such as external antennas of mobile phone cell stations avoid plugging it into the same circuit as other major household electrical appliances because of the potential for interference Try moving the appliance or the base unit to another powerou...

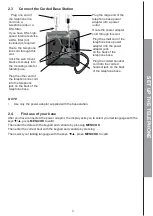
Page 7: ... Route the power adapter cord through this slot Plug the small end of the telephone base power adapter into the power adapter jack on the back of the telephone base Plug the corded handset cord into the corded handset jack on the back of the telephone base NOTE Use only the power adapter supplied with the basestation 2 4 First use of your base After you have connected the power adaptor the display...

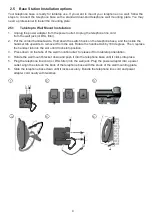
Page 8: ...honebase and then slide the handset tab upwards to remove it from the slot Rotate the handset tab by 180 degrees Then replace the handset tab into the slot until it locks into position 3 Press down on the tabs of the wall mount bracket to release it from tabletop orientation 4 Rotate the wall mount bracket down and push it into the telephone base until it clicks into place 5 Plug the telephone lin...

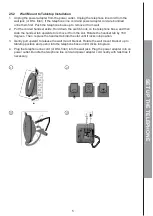
Page 9: ... the handset tab upwards to remove it from the slot Rotate the handset tab by 180 degrees Then replace the handset tab into the slot until it locks intoposition 3 Gently pull upward to release the wall mount bracket Rotate the wall mount bracket up to tabletop position and push it into the telephone base until it clicks into place 4 Plug the telephone line cord or DSL filter into the wall jack Plu...

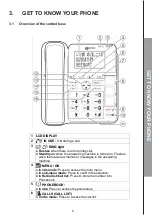
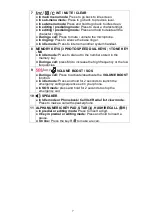
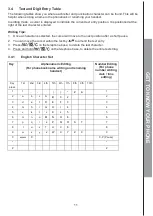
Page 10: ...ine is turned on Flashes when there are new memos or messages in the answering machine 4 MENU OK In idle mode Press to access the main menu In sub menu mode Press to confirm the selection In Redial list Call list Press to store the number into Phonebook 5 PHONEBOOK In idle Press to access the phonebook 6 CALLS CALL LIST In idle mode Press to access the call list GET TO KNOW YOUR PHONE ...

Page 11: ...M4 In idle mode Press to dial out to the number stored in the memory key During a call press M4 to increase the high frequency or the low frequencies 9 VOLUME BOOST SOS During a call Press to activate deactivate the VOLUME BOOST function In idle mode Press and hold for 2 seconds to launch the emergency calling sequence set in your phone In SOS mode press and hold for 2 seconds to stop the emergenc...

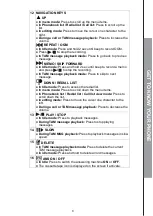
Page 12: ...e DOWN REDIAL LIST In Idle mode Press to access the redial list In menu mode Press to scroll down the menu items In Phonebook list Redial list Call list view mode Press to scroll down the list In editing mode Press to move the cursor one character to the left During a call or TAM message playback Press to decrease the volume 13 PLAY STOP In Idle mode Press to playback messages During TAM message p...

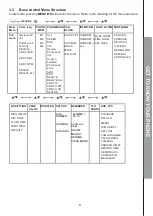
Page 13: ...E CALLSCREEN TAM MSG ANSWER DELAY RECORD TIME REMOTE ACC CHANGE PIN MSG ALERT Main Menu CALL loog LOG PHOTO MEM PHONEBOOKCALL BLOCK INTERCOM DATE TIME TEXT LANG Sub menu Review Call list Under a call list entry DETAILS ADD TO PB ADD TO BL ADD TO PM DELETE DELETE ALL M1 M2 M3 M4 ALL SPEED DIAL VIP Review Phonebook list Under a selected Phonebook entry ADD EDIT DELETE DELETE ALL ADD VIP ADD TO PM AD...

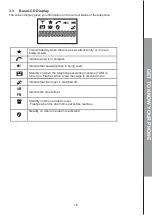
Page 14: ... is in progress Indicate that speakerphone is being used Steadily on when the telephone answering machine TAM is turned on Flashes when a new message is received in the answering machine Indicate that the ringer is switched off AM PM Indicate the time format Steadily on when an alarm is set Flashes when the alarm time set before reaches Steadily on when one alarm is activated GET TO KNOW YOUR PHON...

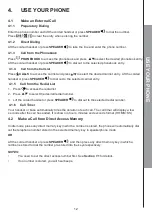
Page 15: ...n after a short pause 2 You can move the cursor within the text by to amend the text entry 3 Press on the telephone base to delete the lastcharacter 4 Press and hold onthe telephone base to delete the entire text string 3 4 1 English Character Set Key Alphanumeric Editing For phonebook name editing and renaming handset Number Editing For phone number editing date time editing Key press 1st 2nd 3rd...

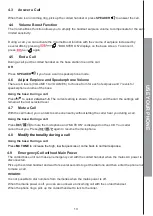
Page 16: ...all from the Redial List 1 Press to access the redial list 2 Press to select the desired redial number 3 Lift the corded handset or press SPEAKER to dial out to the selected redial number 4 1 6 Call Timer Your handset or base automatically times the duration of each call The call timer will display a few seconds after the call has ended It is shown in hours minutes and seconds format HH MM SS 4 2 ...

Page 17: ... is shown When you end the call the settings will remain at the last selected level 4 7 Mute a Call With the call muted you can talk to someone nearby without letting the caller hear you during a call Using the base During a call Press to mute the microphone and MUTE ON is displayed on the LCD Your caller cannot hear you Press again to resume the microphone 4 8 Modify the tonality during a call Us...

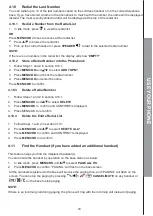
Page 18: ...enter the name Press MENU OK to confirm 4 10 3 Delete a Redial Number 1 Follow Steps 1 and 2 in section 4 10 1 2 Press MENU OK and to select DELETE 3 Press MENU OK to confirm and CONFIRM is displayed 4 Press MENU OK to reconfirm 4 10 4 Delete the Entire Redial List 1 Follow Steps 1 and 2 in section 4 10 1 2 Press MENU OK and to select DELETE ALL 3 Press MENU OK to confirm and CONFIRM Is displayed ...

Page 19: ...fer an External Call if you have added an additional handset Using the corded base During an external call 1 Press MENU OK and to select INTERCOM 2 Press MENU OK and choose the desired handset you want to intercom with then press MENU OK 3 The external call is put on hold automatically and the called handset rings 4 Press on the called handset to establish an internalcall 5 Hang up the corded hand...

Page 20: ...Phonebook Entry 1 Enter the phonebook list in press the key 2 Enter the first character of your desired name of the phonebook entries by multi tap 5 3 View a Phonebook Entry 1 Press PHONEBOOK to display the first phonebook entry in alphabetical order OR 1 Press MENU OK and to select PHONEBOOK main menu item 2 Press MENU OK 2 times to access the phonebook list 3 Press to select and view the desired...

Page 21: ... MENU OK 2 times to access the phonebook list 3 Press MENU OK and button to select DELETE ALL 4 Press MENU OK and the display shows CONFIRM 5 Press MENU OK to confirm or to cancel 5 7 Check the Phonebook Usage You can check how many phonebook entries have been occupied in your phone and how many phonebook entries are available for you to store in the phonebook 1 Press MENU OK and to select PHONEBO...

Page 22: ... number stored in the selected key 4 Press MENU OK and to select EDIT 5 Press MENU OK to edit the number 6 Press MENU OK to edit the name 7 Press MENU OK to confirm 5 8 2 View a fast dial number You have the possibility to check the fast dial information in follow the procedure 1 Follow steps from 1 to 3 in section 5 8 1 2 Press MENU OK to select VIEW 3 Press to exit 5 8 3 Delete the Fast Dial Num...

Page 23: ...er 1 Press MENU OK and to select PHONEBOOK 2 Press MENU OK and to select VIP 3 Press MENU OK and to choose the desired VIP entry 4 Press MENU OK and to select DELETE or DELETE ALL 5 Press MENU OK and the display shows CONFIRM 6 Press MENU OK to confirm 5 9 4 Record VIP number in Photo memory 1 Press MENU OK and to select PHONEBOOK 2 Press MENU OK and to select VIP 3 Press MENU OK and to choose the...

Page 24: ...l call or with unknown number OUT OF AREA will be displayed In standby if three unanswered calls are received 3 CALLS will be displayed 6 1 View the Call List All unanswered calls are saved in calls log with the latest call putting at the top of the list When the call list is full the oldest call will be replaced by a new call The unanswered call which has not been read is marked with icon 1 Press...

Page 25: ...MENU OK and check the phone number 4 Press MENU OK and the name will bedisplayed 5 Edit the name ifnecessary Use the key INT MUTE CLEAR to delete a character 6 Press MENU OK to confirm The display shows OK 6 5 Store a Call List Number into a Photo memory Follow Section 6 1 to access the call list 1 Press MENU OK and to select ADD TO PM 2 Press MENU OK and to select the Photo memory 3 Press MENU OK...

Page 26: ...ss MENU OK to save 7 2 Record a voice tag You have the option to enter a voice name in choose VOICE TAG and RECORD at the point 3 of the section 7 1 If you receive a call with the number registered with a voice tag you can hear the voice name on the base and on the handset NOTES To use a picture big button memory in idle mode press the picture on the base If you want to pass the call from the spea...

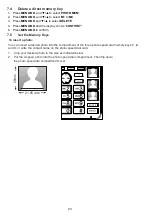
Page 27: ... OK to confirm 7 5 Set the Memory Keys To insert a photo You can insert a desired photo into the compartment of the three photo speed dial memory keys 1 2 and 3 or write the contact name on the photo speed dial card 1 Crop your desired photo to the size as indicated below 2 Put the cropped photo into the photo speed dial compartment Then flip down the photo speed dial compartment cover 21 95 mm BO...

Page 28: ...OK and to choose the desired blocked phone number 3 Press MENU OK and to select EDIT 4 Press MENU OK and edit the number with the key 5 Press MENU OK and edit the name with the key 6 Press MENU OK to store 8 3 Delete an or all black list number 1 Follow steps from 1 to 3 in section 5 8 1 2 Press MENU OK and to choose the desired blocked phone number 3 Press MENU OK and to select DELETE or DELETE A...

Page 29: ... Press MENU OK and to select your desired date format DD MM YY or MM DD YY 2 Press MENU OK to confirm 10 2 Set the Time Format 1 Press MENU OK and to select DATE TIME 2 Press MENU OK and to select TIME FORM 3 Press MENU OK and to select your desired time format 12 HR or 24 HR 4 Press to confirm 10 3 Set the Time 1 Press MENU OK and to select DATE TIME 2 Press MENU OK and to select SET DATE 3 Press...

Page 30: ...xternal ringer A total of 5 melodies are provided for your selection 1 Press MENU OK and to select SETTINGS 2 Press MENU OK and to select RING SETUP 3 Press MENU OK and to select EXT RING 4 Press MENU OK and the display will show MELODY 5 Press MENU OK and to select the desired ringer melody for external calls 6 Press MENU OK to confirm 12 1 3 Set the Ringer Volume You can adjust the volume level ...

Page 31: ... time SHORT 100ms 3 MEDIUM 300ms LONG 600ms 4 Press MENU OK to confirm 12 1 6 First ring function Sometimes our phone rings one time to inform that we have any voice message on the line To remove this ringer you must activate the function 1 Press MENU OK and to select BS SETTINGS 2 Press MENU OK and to select FIRST RING 3 Press MENU OK and to select ON or OFF 4 Press MENU OK to confirm 12 1 7 Rese...

Page 32: ...the base display After a short delay if the registration is successful there will be a confirmation beep and the handset display will go back to idle mode with the new handset number shown The base display will also go back to idle mode 6 Press INT MUTE CLEAR at any time to cancel 13 RESEARCH ONE HANDSET only with additional handset You can make a research of your handsets in using the function PA...

Page 33: ... the SOS 1 number to SOS 4 number A call will be first dialed to the SOS 1 number If the SOS 1 number does not answer in 60 seconds the call be will made to the SOS 2 number and so on See note NOTE The other party receiving the SOS message must press any number on their phone to open the SOS call Thereafter by pressing any number on their phone every two minutes will keep the emergency call open e...

Page 34: ...an press any key to disable the alarm NOTES a Key press is still applicable if handset keypad is locked and when the alarm time is reached b The alarm volume level is the same as the settings of the handset ringer volume If the handset ringer is set to OFF the alarm still sounds at VOLUME 1level c During an external call or an internal call if an alarm is set and when the alarm time is reached the...

Page 35: ...teps from 1 to 2 in section 15 1 2 Press MENU OK and to select VOICE MEMO 3 Press MENU OK and select RECORD 4 Press MENU OK and start your message after the beep 5 Press MENU OK to stop the recording your message is playing 15 5 Delete or play a voice memo Alarm 1 Follow steps from 1 to 2 in section 15 4 2 Press MENU OK and to select DELETE or PLAY 3 Press MENU OK to delete or play the memo messag...

Page 36: ... messages andmemos 2 Press PLAY STOP if you want to stop the playback 3 Press once if you want to repeat the current message from the beginning or press twice to skip back to the previous message during message playback 4 Press if you want to skip forward to the next message during message playback 5 Press DELETE if you want to delete the current message beingplayed 6 Press SLOW to reduce the spee...

Page 37: ...ine messages Memo recording can still function even when the answering machine is turned off 1 Press MENU OK and to select ANS SYS 2 Press MENU OK and to select MEMO 3 Press MENU OK to start recording the memo and RECORDING is shown on the display 4 Press MENU OK to save and end your memo recording The new memo will then play back automatically Let it play to the end or press MENU OK again to stop...

Page 38: ...OK and to select RECORD 5 Press MENU OK to start recording your personalized OGM and RECORDING is displayed on the screen 6 Press MENU OK to stop and save your personalized OGM Your new saved OGM will playback automatically Alternatively press to return to previous screen without saving the personalizedOGM 17 5 4 Playback the Outgoing Message OGM Using the base direct key Press briefly to listen t...

Page 39: ...to select the desired answer delay 5 Press MENU OK to confirm 17 5 7 Set the Recording Time of Incoming Message You can set the maximum length of the recording time of the incoming messages 1 Press MENU OK and to select ANS SYS 2 Press MENU OK and to select SET TAM 3 Press MENU OK and to select REC TIME 4 Press MENU OK and to select your desired recording time Available options 60S 120S 180S or UN...

Page 40: ...turn on or off the remote access respectively 5 Press MENU OK to confirm 17 5 9 Function message alert When you have a new message you can hear a beep every 10 seconds If you want deactivate this beep follow the procedure 1 Press MENU OK and to select ANS SYS 2 Press MENU OK and to show SET TAM 3 Press MENU OK and to select MSG ALERT 4 Press MENU OK and to select OFF 5 Press MENU OK to confirm ANS...

Page 41: ...on Keys Functions While message is not playing While message is playing 2 Delete the current message playback 4 Repeat playing the current message from the beginning Press twice to skip backward to the previous message 5 Play the message 6 Skip forward to play the next message 7 Turn on the answering machine 8 Stop the current message playback 9 Turn off the answering machine Enter the 4 digit rem...

Page 42: ...h Make sure the telephone line cord is plugged firmly into the telephone base and the telephone wall jack Unplug the electrical power to the telephone base Wait for approximately 15 seconds then plug it back in Allow up to one minute for the handset and telephone base to synchronize Disconnect the telephone base from the telephone wall jack and plug in a working telephone If the other telephone do...

Page 43: ...igital telephones intercoms room monitors televisions VCRs personal computers kitchen appliances and other cordlesstelephones If your telephone is plugged in with a modem or a surge protector plug the telephone or modem surge protector into a different location If this doesn t solve the problem re locate your telephone or modem farther apart from each other or use a different surge protector The l...

Page 44: ...ECHNICAL SPECIFICATIONS Basic Information Power Supply Base Input 100 240V 50 60Hz output 6V 450mA adapter Values may vary according to environment Depending on initial battery charge TECHNICAL SPECIFICATIONS ...

Page 45: ...quipment For your own safety take caution when using electric appliances during storms Cleaning your telephone Your telephone has a durable plastic casing that should retain its luster for many years Clean it only with a soft cloth slightly dampened with water or a mildsoap Do not use excess water or cleaning solvents of any kind NOTE Remember that electrical appliances can cause serious injury if...

Page 46: ... visit our website at www geemarc com The guarantee does not cover accidents negligence or breakages to any parts The product must not be tampered with or taken apart by anyone who is not an authorized Geemarc representative The Geemarc guarantee in no way limits your legal rights IMPORTANT YOUR RECEIPT IS PART OF YOUR GUARANTEE AND MUST BE RETAINED AND PRODUCED IN THE EVENT OF A WARRANTY CLAIM Pl...

Page 47: ...oducts at the end of their useful life are recycled in the best way When this product is finished with please do not put it in your domestic waste bin Please use one of the following disposal options Remove the batteries and deposit them in an appropriate WEEE skip Deposit the product in an appropriate WEEE skip Or hand the old product to the retailer If you purchase a new one they should accept i...

Page 48: ...UG CL595_En_v0 1 01707 387602 ...

Reviews: