page | 8
Before using the DVI Detective, the unit must be programmed with an EDID. In most
cases, the DVI Detective should be programmed with the EDID of the display (or other sink
device) to which you are connecting the source. Once programmed, the EDID data will be
read by the source, providing all the necessary details of the type of signal that the display
(or other sink device) can process. Although any DVI Detective can be programmed with
any EDID, the display (or other sink device) must be able to support those features.
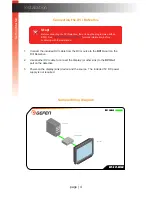
1. Begin by powering-on the display (or other sink device) containing the EDID
to be recorded.
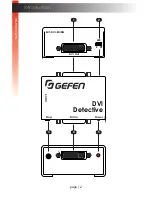
2. Connect a DVI cable from the sink device to the
DVI Out
port on the DVI Detective.
3. Move the
WR
switch to the
“E”
position in order to allow the EDID to be written
to the DVI Detective.
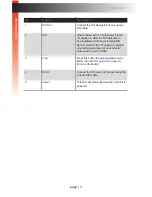
4. Connect the included 5V DC power supply to the DVI Detective. The
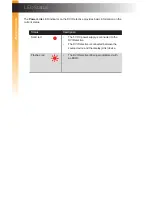
Power
LED,
on the other side of the unit, will glow solid red.
5. Press and release the
Prog
button. The
Power
LED will flash as the EDID
is recorded.
6. Once the EDID has been recorded, the
Power
LED will glow bright red.
7. Move the
WR
switch to the “
D
” position to prevent accidental erasure of the EDID.
8. The EDID programming process is complete.
9. See
Connecting the DVI Detective (page 4)
.
EDID Programming
B
asic Oper
ation
B
asic Oper
ation
DVI In
DVI
Detective
Power
Prog
5V DC
EXT-DVI-EDIDN
WR
DVI Out
E D
Write-enabled
DVI In
DVI
Detective
Power
Prog
5V DC
EXT-DVI-EDIDN
WR
DVI Out
E D
Prog
button


