page | 3
Introduction
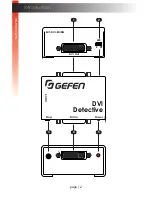
ID
Name
Description
1
DVI Out
Connect the DVI display to this port using a
DVI cable.
2
WR
Write-enable switch. Flip this switch to the
“E” position to allow the DVI Detective to
be programmed with an (external) EDID.
Set this switch to the “D” position to disable
programming and prevent an accidental
erasure of the current EDID.
3
Prog
Press this button to begin programming an
EDID. See
EDID Programming (page 8)
for more information.
4
DVI In
Connect the DVI source to this port using the
included DVI cable.
5
Power
This LED will glow bright red when the unit is
powered.
Ge
tting S
tar
ted


