background image

151

50940193/DP0415

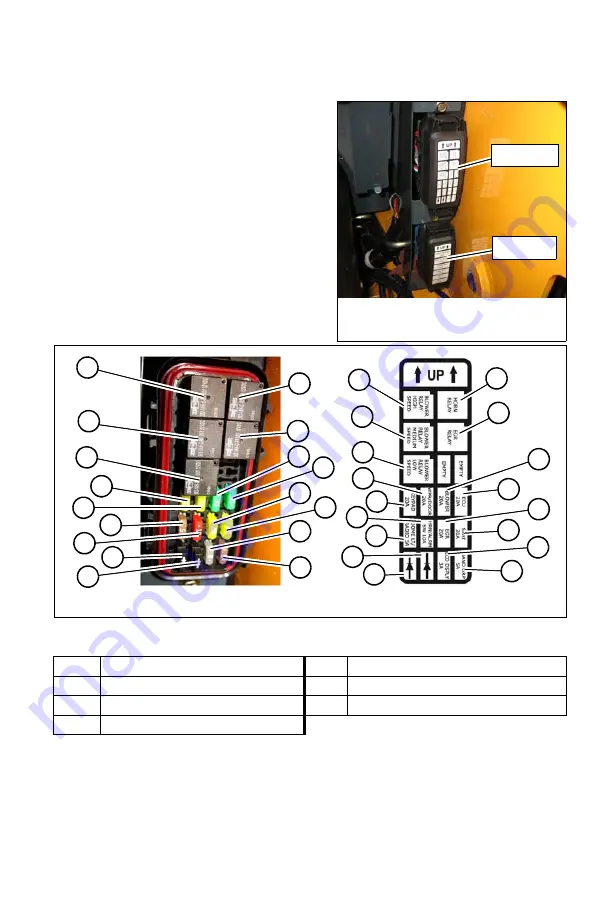
Fuses, Relays and Diodes

Important: 

Blown fuses indicate electrical system malfunctions. Determine what caused 

the fuse to blow and repair the problem before replacing the fuse.

The fuse, relay and diode boxes are located in 
the engine compartment, just behind the cab, 
on the right side of the machine.

.

Table 19: Relay Locations (Figure 115)

Relay

Circuit

Relay

Circuit

A

High-speed cab blower fan relay

B

Horn relay

C

Medium-speed cab blower fan relay

D

Exhaust Gas Recirculation (EGR) relay

E

Low-speed cab blower fan relay

Figure 114 – Fuse, Relay 

and Diode Boxes Location

Fig. 115

Fig. 116

Figure 115 – Relays/Fuses/Diodes Box Map

A

C

E

F

G

J

K

P

Q

B

D

H

I

L

M

N

O

A

C

E

G

F

K

J

Q

P

B

D

H

I

L

M

N

O

Summary of Contents for R135

Page 1: ...R135 R135 EU R135 X Series R150 R150 EU R150 X Series R165 R165 EU R165 X Series Skid Steer Loaders Operator s Manual Form No 50940193 DP0415 English Revision D...

Page 2: ...OR LIMITATION OF THESE WARRANTIES AND YOU MAY HAVE GREATER RIGHTS UNDER YOUR STATE LAW GEHL WARRANTY DOES NOT INCLUDE 1 Transportation to selling dealer s business location or at the option of the Or...

Page 3: ...ls 47 Operation 81 Maintenance 121 Troubleshooting 159 Specifications 183 Index 197 R135 R150 R165 Skid Steer Loader Operator s Manual TABLE OF CONTENTS LOADER INFORMATION Purchased from Date of Purch...

Page 4: ...l s listed below conforms to EC Directives 2004 108 EC EMC 97 23 EC Pressure Equipment 2006 42 EC Machinery and 2000 14 EC Noise Emission as amended by 2005 88 EC 7 In accordance with EN ISO Standards...

Page 5: ...otentially hazardous situation that if not avoided could result in serious injury or death The word CAUTION indicates a potentially hazardous situation that if not avoided may result in minor or moder...

Page 6: ...storage location is provided inside the operator s compartment for storing this Operator s Manual After using this manual return it to the storage location This manual is considered a permanent part o...

Page 7: ...et 7 Lift Arm Support Device 13 Fuel Cap Cover 2 Restraint Bar 8 Auxiliary Couplers 14 Seat Plate according to ISO 7096 3 Front Work Lights 9 Roll Over Falling Object Protective System ROPS FOPS 15 Ti...

Page 8: ...er use The operator must always consider potential safety risks and hazards during operation Accident prevention regulations all other generally recognized regulations on safety and occupational medic...

Page 9: ...mbers Machine Model Number ____________________________________ Machine Serial Number ____________________________________ Engine Model Number ____________________________________ Engine Serial Number...

Page 10: ...ot approved by Manitou Americas Use of non approved attachments or unauthorized modifications is prohibited Using Attachments Read all documentation provided with attachments to learn how to safely op...

Page 11: ...0 43 m3 15 0 ft 3 1524 mm 60 in 597 mm 23 5 in 983 mm 38 7 in 0 48 m3 16 9 ft 3 1676 mm 66 in 597 mm 23 5 in 1021 mm 40 2 in 0 54 m3 19 0 ft 3 Pallet Forks N A N A 1067 mm 42 in N A N A N A 1219 mm 48...

Page 12: ...612 mm 24 1 in 808 mm 31 8 in 0 40 m3 14 1 ft 3 1778 mm 70 in 660 mm 26 0 in 965 mm 38 0 in 0 59 m3 20 9 ft 3 Light Material Bucket 1676 mm 66 in 597 mm 23 5 in 1021 mm 40 2 in 0 54 m3 19 0 ft 3 1778...

Page 13: ...nvolves more than just vibration levels on the machine The worksite how the machine is used and proper training all play important roles in reducing vibration exposure Vibration exposure results from...

Page 14: ...s and potholes 2 Choose proper equipment for the job Use machines with the proper power and capacity Select machines with good suspension seats Look for controls that are easy to use Ensure good visib...

Page 15: ...isher is neither included as standard equipment nor available as an option from Manitou Americas Inc Important Inspect the fire extinguisher at regular intervals as recommended by the fire extinguishe...

Page 16: ...PF Regen Engine Oil Oil Pressure Warning Engine Stop Engine Start Engine Run Engine Malfunction Shutdown Coolant Temp Warning Self Leveling Hitch Lock Hitch Unlock Windshield Washer Rear Washer Safety...

Page 17: ...t cannot be eliminated by mechanical means but only by exercising intelligence care and common sense Such hazards include hillside operation overloading instability of the load poor maintenance and us...

Page 18: ...d 1 Move the drive controls to their neutral position 2 Lower the lift arm and attachment completely If the lift arm must be left in the raised position BE SURE to properly engage the lift arm support...

Page 19: ...ting can cause ether or other starting fluid to detonate causing injury or damage Always perform a daily inspection of the machine before using it Walk around the machine and look for damage loose or...

Page 20: ...ck the restraint bar for proper operation The restraint bar when raised deactivates the lift tilt controls auxil iary hydraulics and applies the parking brake Additional Safety Equipment Certain opera...

Page 21: ...cause the operator to react suddenly and cause an accident Use a spotter or signal person when working near bridges phone lines worksite scaffolds or other obstructions Check indicators and displays...

Page 22: ...ing sharp turns and the load may shift greatly increasing the possibility of an overturn Do not turn the machine when lifting loads As loads are lifted stability decreases which can increase the possi...

Page 23: ...ts Severing of body parts can result If unable to exit out the front of the cab remove the rear window by pulling the emer gency rear window release triangle until the window seal is pulled out of the...

Page 24: ...the North American One Call Referral Sys tem at 8 1 1 in the U S or 1 888 258 0808 in the U S and Canada for the local Dig ger s Hotline number or the proper local authorities for utility line locati...

Page 25: ...g tem perature or if it is overheated At operating temperatures engine coolant is extremely hot and under pressure Always wait for the engine to cool before attempting to relieve pressure and remove t...

Page 26: ...he machine Any modification made with out authorization from Manitou Americas could create a safety hazard for which the machine owner would be responsible Keep mounting brackets and hose and cable ro...

Page 27: ...chine if it has a frozen battery because battery could explode Thaw a frozen battery before charging it or attaching jumper cables Flush eyes with water for 10 15 minutes if battery acid is splashed i...

Page 28: ...No 2002 129 by the U S National Institute for Occupational Safety and Health NIOSH indicates a significant risk of chronic silicosis for workers exposed to inhaled crystalline silica over a working l...

Page 29: ...the transport vehicle according to Loading and Transporting the Machine on a Transport Vehicle on page 113 to prevent unintentional movement Safety Decals The machine has decals that provide safety i...

Page 30: ...50940193 DP0415 ANSI Style Safety and Information Decals Figure 2 ANSI Style Safety and Information Decal Locations B RIGHT LEFT TOP FRONT OPERATOR S POSITION D T P D O N D Q D A E C K H G J I M L R F...

Page 31: ...OPER DIESEL FUEL ONLY AVOID INJURY OR DEATH Keep out from under work tool unless lift arm is supported No riders Never use work tools as work platform 137655 DANGER A Located on the front panel below...

Page 32: ...TING FAN Keep hands out or stop engine H WARNING DANGER Located on the left door pillar facing the operator DANGER AVOID INJURY OR DEATH Keep hands feet and body inside cab when operating Keep out fro...

Page 33: ...quipment to ground 2 Reduce throttle stop engine 3 Apply brake remove key 4 Check safety interlocks Located on the right door pillar facing the operator WARNING WARNING AVOID INJURY OR DEATH Maintain...

Page 34: ...Y OR DEATH Read Operator s Manual and all safety signs before using machine The owner is responsible to ensure all users are instructed on safe use and maintenance Check machine before operating Servi...

Page 35: ...e when leaving lift arm raised for service 137637 DANGER T Located on the left lift arm near the lift arm support DANGER Hose removal or component failure can cause lift arm to drop Always use lift ar...

Page 36: ...Style Used Internationally Safety and Information Decals Figure 3 ISO Style Used Internationally Safety and Information Decal Locations B RIGHT LEFT TOP FRONT OPERATOR S POSITION D T P D O N D Q D A E...

Page 37: ...cardboard to find leaks E Burn hazard Allow radiator to cool before removing cap Loosen cap slowly to avoid burns F Suffocation hazard Operate only in a well ventilated area A B C D E F C Located next...

Page 38: ...ler neck Located inside the engine compartment WARNING ROTATING FAN Keep hands out or stop engine H Located on the left door pillar facing the operator DANGER AVOID INJURY OR DEATH WARNING AVOID OVERT...

Page 39: ...afety interlocks Located on the left door pillar facing the operator Located on the right door pillar facing the operator DANGER AVOID INJURY OR DEATH A Crush hazard Keep out from under lift arm unles...

Page 40: ...s Manual Contact dealer or manufacturer for information and service parts O Service Decal Located on the inside of the left lift arm pillar P SAFETY ALERT A Check machine before operation according to...

Page 41: ...arm to drop Always use lift arm support device when leaving lift arm raised for service Located on attachment bracket power hitch only R 50354137 Located on attachment bracket manual hitch only S Loca...

Page 42: ...otective system serial number 2 Seat plate according to ISO 7096 3 Product plate with Product Identification Number and e g model type designation 4 Engine plate with e g type designation product and...

Page 43: ...erating procedures Read and thoroughly understand all safety decals before operating the machine Do not operate the machine unless all factory installed guards and shields are properly installed and s...

Page 44: ...ew strap installed by an authorized dealer Important Keep seat belt s clean Use only soap and water to wash seat belt s cleaning solvents can damage the seat belt s Fastening Unfastening the Seat Belt...

Page 45: ...r s compartment and sitting in the seat The restraint bar is securely anchored to the ROPS FOPS The operator must be seated with the restraint bar in its lowered position to start or operate the machi...

Page 46: ...ted in the on position for continuous operation with the restraint bar raised and operator out of the seat See Auxiliary Hydraulic System on page 79 Safety Interlock System Test Each time before using...

Page 47: ...pplied ROPS FOPS The ROPS FOPS Roll Over Falling Object Protective Structure is designed to protect the operator from falling objects and during a tip over accident if the operator is secured inside t...

Page 48: ...person inside the machine and another person outside the machine to apply and or disengage the support device The lift arm support must be kept in proper operating condition at all times Important A s...

Page 49: ...he support device 1 Start the engine 2 Raise the lift arm fully 3 Stop the engine 4 Verify that the lift arm is being held in the raised position by the safety interlock system Important With the key...

Page 50: ...n The optional battery disconnect switch is located in the engine compartment Turning the switch to the OFF position disconnects the battery from the electrical system On machines equipped with the op...

Page 51: ...ety if the machine is used with unapproved attachments A Accessory Keypad page 51 F HVAC Vent Nozzle K Right Hand Control page 67 B Ignition Keyswitch page 59 G Cup Holder L Operator s Seat page 39 C...

Page 52: ...tivated Hydraglide Indicator Indicates HydraglideTM lift arm cushion is activated Engine Pre heat Indicator Is lit when ignition keyswitch is in the ON RUN position and engine pre heat is required goe...

Page 53: ...uring normal operation this indicator should be OFF Engine Malfunction Indicator Is lit when the engine electronic control unit ECU has detected an error condition Refer to Engine Diagnostic Trouble C...

Page 54: ...s See Beacon Position Work Lights on page 74 Self Leveling Cancel Cancels self leveling function LED above button is on when self leveling is off Power A Tach System Hitch Lock Press and hold to lock...

Page 55: ...dshield Wiper Button Turns windshield wiper on off Slow medium and fast settings are available See Windshield Wiper Washer on page 75 Windshield Washer Button Activates windshield washer See Windshiel...

Page 56: ...ght and turns on the road lights If the road lights are on all lights turn off if this button is pressed High Beam Button Activates optional road lights high beam Hazard Lights Button Activates option...

Page 57: ...n Used for general screen navigation and other various functions depending upon screen and context P Increase Brightness Return Button Used for different functions depending upon screen and context Us...

Page 58: ...ion if all appropriate conditions are met Used to return to previous screen Corresponds to the symbol on the display screen R Regen Inhibit Button DPF models Press for 5 seconds to inhibit DPF reset r...

Page 59: ...F Models on page 116 Note Strike through line through the symbol is displayed in red when DPF regeneration is inhibited Ambient engine compartment temperature Diesel Particulate Filter DPF regeneratio...

Page 60: ...warning region Indicates elevated coolant temperature G Engine coolant temperature red stop warning region Indicates serious coolant overheating condition Note Running the engine in an overheated cond...

Page 61: ...ion Procedures DPF Models on page 116 Secondary Screens All Secondary Screens Secondary screens are accessed by holding down the ok button N Figure 20 for 10 seconds while the Dual Gauge Display scree...

Page 62: ...is displayed at the top left of the screen T Use buttons P and Q Figure 20 to scroll through the messages See Engine Diagnostic Trouble Codes DTC on page 171 for specific error code details DM2 Screen...

Page 63: ...tronic control modules showing real time machine component control state Status colors indicate the following Green Active Black Inactive Output Status Displays output information from electronic cont...

Page 64: ...re 22 engine speed is controlled with throttle lever and optional foot throttle P Figure 24 if installed Throttle knob T is the primary throttle control The throttle is set with the lever to the desir...

Page 65: ...trols lift arm raise lower float and attachment tilt See Lift Tilt Control Right T Bar on page 63 C Two Speed Selection Button Toggles between high and low speed travel modes See Two Speed Drive Optio...

Page 66: ...hile moving forward or in reverse can be made by twisting the T bar while also pushing it forward or pulling it back Moving the T bar farther from neutral increases the speed steadily to the maximum t...

Page 67: ...r straight rearward C To tilt the attachment forward and down twist the right T bar clockwise D To tilt the attachment up and back twist the right T bar counter clockwise The lift arm can be tilted wh...

Page 68: ...Toggles between high and low speed travel modes See Two Speed Drive Option on page 69 D Horn Button Activates horn E Hydraglide Button Activates Hydraglide See Hydraglide Ride Control System Option on...

Page 69: ...ssive speed and quick control movements without regard for conditions and circumstances are hazardous and could result in loss of control and cause an accident Moving the joystick farther from neutral...

Page 70: ...ck move the right joystick forward and to the left G To raise the lift arm while tilting the attachment forward and down move the right joystick rearward and to the right H To raise the lift arm while...

Page 71: ...ve Control Hand Controls on page 68 B Right Hand Control Controls travel drive forward reverse turn and speed See Drive Control Hand Controls on page 68 C Two Speed Selection Button Toggles between hi...

Page 72: ...ine Operate the controls gradually and smoothly Excessive speed and quick control movements without regard for conditions and circumstances are hazardous and could cause an accident G Auxiliary Hydrau...

Page 73: ...nd down push the front of the right foot pedal down D To tilt the attachment up and back push the back of the right foot pedal down Note The speed of the lift tilt motion is directly proportional to t...

Page 74: ...switch between high and low two speed drive ranges When the high speed two speed drive range is activated the high speed indicator on the control pad is lit Figure 34 Two Speed Drive Control Button Le...

Page 75: ...ar B all the way forward Figure 27 into the detent float position This position allows the lowered lift arm to float while traveling over changing ground conditions 3 To remove lift arm from the deten...

Page 76: ...al all the way down A into the detent This position allows the lowered lift arm to float while traveling over changing ground conditions 3 To remove lift arm from the detent float position use your he...

Page 77: ...E again to deactivate When Hydraglide is activated the Hydraglide indicator on the control pad is lit Note Hydraglide is automatically deactivated when the machine is shut off Important Do not use Hyd...

Page 78: ...to activate the beacon the rear red position lights and the front and rear work lights Both LEDs Y and U is lit when the beacon the red position lights and the front and rear work lights are on Note...

Page 79: ...utton are lit according to the selected setting Press button B a fourth time to deactivate the rear window wiper C Windshield Washer Push and hold button C to activate the windshield washer spray and...

Page 80: ...seconds if the ignition is turned on or if the light is rotated by pressing on either side T Figure 40 of the light Accessory Plug The 12V accessory plug C Figure 41 is located at the bottom of the r...

Page 81: ...ment onto the hitch Rotate the lever all the way to the left to disengage the locking pins Refer to Connecting Attachments on page 96 for more information To prevent unexpected release of the attachme...

Page 82: ...the control keypad until flags P Figure 46 move as far as they can to the center of the hitch To extend the hitch pins to the locked position With the machine running and the parking brake disengaged...

Page 83: ...iliary hydraulics are used with attachments requiring hydraulic power Always be sure the auxiliary hydraulic control is in neutral before starting the loader or disconnecting the auxiliary hydraulic c...

Page 84: ...ed in the opposite direction To latch continuous auxiliary hydraulic flow hold rocker switch F fully on in either direction and push and hold trigger button G for five seconds When the rocker switch a...

Page 85: ...the engine and using the machine Correct repair any problems before using the machine Table 11 Pre Start Checks Check Refer To Fuel tank filled Adding Fuel on page 135 Engine oil level correct Checki...

Page 86: ...ed Operator s Seat on page 39 Seat belt fastened Seat Belt on page 40 Table 12 Checks During Operation Check Refer To After Starting the Engine During Operation Engine oil pressure and charge indicato...

Page 87: ...eps A and your shoes before entering the cab Always face the machine when entering exiting When entering exiting the cab Do not jump on or off the machine Never climb onto or exit a moving machine Ope...

Page 88: ...s removed for any reason make sure to re connect the door electrical connection E Figure 53 when the door is replaced Operating the machine with the door electrical connection E disconnected can resul...

Page 89: ...y reach The operator must be able to move all controls through the complete range of motion 3 Close the door if so equipped Perform the seat switch safety interlock test on page 42 4 Fasten the seat b...

Page 90: ...g are recommended Replace the engine oil with the proper viscosity oil according to the engine opera tor s manual Make sure the battery is fully charged Install an optional block heater on the engine...

Page 91: ...2 4 Check for proper steering operation 5 Check for excessively smoky exhaust Engine Troubleshooting on page 159 Black smoke indicates poor and or incomplete diesel fuel combustion Blue smoke indicate...

Page 92: ...achine at the maximum rated operating capacity Do not run the engine at a high speed for extended periods of time Increase the load gradually while varying the engine speed Follow the maintenance sche...

Page 93: ...door if so equipped and the engine compartment Take the keys with you Brake Release Operation Option The machine may have as an option a brake release system installed The brake release system releas...

Page 94: ...he operator s seat once the engine is running Start the engine from the operator s seat with all controls in neutral NEVER make jumper cable connections directly to the starter solenoid of either engi...

Page 95: ...e jumper cable to the positive terminal A Figure 58 on the discharged battery Important Prevent the other positive jumper cable clamp from touching any metal other than the positive remote battery ter...

Page 96: ...ne Signal your intention to move by sounding the horn Traveling should be performed with the attachment in transport position See Attachment Transport Position on page 94 Avoid sudden stops starts or...

Page 97: ...emblem purchased locally to the back of the machine For highway operation install the optional flashing beacon Important Follow the applicable legal regulations of the country and locality where the m...

Page 98: ...idents and unstable balance conditions that can cause loss of control Carry materials 200 300 mm 8 12 above the ground A Figure 60 and adjust as necessary to clear obstacles Generally carry the load a...

Page 99: ...m Option Hydraglide cushions lift arm loads during transport It provides a smoother ride over uneven surfaces When ride control is activated the lift arm may drop slightly without a load or several in...

Page 100: ...Power A Tach system quick attach hitch Press the Power A Tach sys tem unlock button I on the control keypad until safety flags H have moved all the way in 2 Tilt the attachment plate forward and drive...

Page 101: ...sure the locking lever is rotated all the way to the right as viewed while facing back at the machine from the front and the locking pins F Figure 63 extend down through the attachment frame Locking...

Page 102: ...stem manual hitch Move hitch lock lever G all the way to the right Power A Tach system quick attach hitch Press the Power A Tach sys tem unlock button I on the control keypad until safety flags H have...

Page 103: ...y hydraulics circuit by pushing the attachment coupler firmly into the auxiliary coupler Figure 66 Route the hydraulic hoses so they do not get pinched when the attachment is tilted forward and back D...

Page 104: ...switch F Figure 67 on the right T bar joystick or hand control back and forth to relieve pressure in the auxiliary hydraulics circuit 3 Turn off the ignition Remove the ignition key and take it with...

Page 105: ...seful when using pallet forks Important Self leveling operates only when the lift arm is raised when the lift arm is lowered B self leveling is not activated Note Self leveling is activated by default...

Page 106: ...g Operation information starting on page 16 Always follow the information included in the Safety section Serious injury or death can occur if the safety information is not followed Always maintain a s...

Page 107: ...llow the recommendations in Fields of Application on page 6 Digging with a Bucket 1 Figure 70 Approach the digging site with the lift arm slightly raised Tilt the bucket forward until the cutting edge...

Page 108: ...p up material 5 Reduce engine speed and back out of the material 6 Set the bucket to transport position See Attachment Transport Position on page 94 Dumping a Load onto a Pile 1 Figure 72 Approach the...

Page 109: ...e the lift arm and loaded bucket and raise the bucket until the lower edge of the bucket clears the truck bed 2 Drive slowly forward and stop with the bucket over the inside of the truck 3 Tilt the bu...

Page 110: ...ches from the ground Slowly drive forward until the front edge of the bucket extends halfway over the edge of the hole or embankment 2 Tilt the bucket forward to dump the material 3 Tilt back and rais...

Page 111: ...back and raise it to scoop up material Grading Grading Without Float 1 Figure 77 Raise the bucket slightly and tilt it forward 2 Release material from the bucket while traveling forward 3 Tilt the bu...

Page 112: ...sult 1 Figure 78 Lower the bucket to the ground 2 Activate the lift arm float See Lift Arm Float on page 94 for information about the float feature 3 Tilt the bucket forward so it stands on the cuttin...

Page 113: ...Load both fork arms evenly Lift transport and unload loads only on firm and level ground with sufficient load bearing capacity Always transport the load close to the ground as is safely possible Obse...

Page 114: ...or have damaged pallets stacking containers Do not stack loads on top of loads which may have shifted Always tilt pallet forks back slightly during transport to help retain the load Do not use bent cr...

Page 115: ...wly raise the pallet forks Do not raise the pallet forks any higher than required Make sure to not exceed pallet fork load center and or lifting capacity 9 Lower the load immediately if you are unsure...

Page 116: ...the load with a stack 18 Slowly and carefully lower the lift arm until the load is placed 19 Make sure the fork arms are no longer bearing weight and are free to be retracted 20 Make sure the area aro...

Page 117: ...avity of the load over the centerline of the transport vehicle Distribute partial loads to ensure an even load across the axles of the transport vehicle Secure the machine properly so it cannot move d...

Page 118: ...ight in the cab of the transport vehicle Note Before transporting the machine through heavy rain close off the exhaust pipe with a cap or suitable adhesive tape Towing Towing the machine is not recomm...

Page 119: ...ift the machine with a load in the bucket or on the pallet forks Lift equipment used and its installation is the responsibility of the party conducting the lift All rigging MUST comply with applicable...

Page 120: ...automatically but can be inhibited by the operator Increases exhaust gas temperatures Reset regeneration occurs approximately every 100 hours of operation See Reset Regeneration on page 117 Note Reset...

Page 121: ...re 80 displays on the screen Reset Regeneration Inhibit DPF regeneration inhibit prevents reset regeneration from occurring Permanently inhibiting regeneration is not recommended as this will eventual...

Page 122: ...ionary regeneration as soon as possible when the stationary regeneration request screen displays Postponing stationary regeneration for extended periods will cause significant reduction in engine powe...

Page 123: ...Stationary regeneration takes approximately 25 30 minutes It is not necessary to stay in the machine during stationary regeneration Keep the machine under observation while regeneration is in progress...

Page 124: ...nce DPF soot filter replacement is required when the DPF Diesel Particulate Filter Service Screen Figure 86 displays Note Contact your dealer when the DPF Service screen displays Figure 86 Stationary...

Page 125: ...medical assistance could result in gangrene or other serious damage to tissue Do not smoke or allow any open flames in the area while checking or servicing the hydraulic battery and fuel systems becau...

Page 126: ...uipment failures and contribute to unsafe operating conditions Do not perform maintenance or service not included in this manual Maintenance and service not included in this manual should be performed...

Page 127: ...e 154 X Check tire pressures page 149 X Check bucket cutting edge page 148 X Test safety interlock system page 42 X Check hydraulic cylinder piston rods for damage wear clean if necessary X Check ROPS...

Page 128: ...fter X Change engine oil and filter page 133 Xb b After first 50 hours of operation every 250 hours thereafter X Change cab air filter if applicable page 144 Xc c Replace if needed X Lubricate all lev...

Page 129: ...125 50940193 DP0415 Maintenance Log Log maintenance when it is performed in the following table Table 17 Maintenance Log Date Hours Maintenance Procedure...

Page 130: ...126 50940193 DP0415 Table 17 Maintenance Log Date Hours Maintenance Procedure...

Page 131: ...127 50940193 DP0415 Table 17 Maintenance Log Date Hours Maintenance Procedure...

Page 132: ...n See Fluid Capacities Lubricants on page 183 for proper grease specifications Wipe dirt from the fittings before and after applying grease to prevent contamination Replace any missing or damaged fitt...

Page 133: ...ire hazard Tilting the ROPS FOPS Never operate the machine with the ROPS FOPS in the raised position or removed Be sure to reinstall the anchor bolts washers and locknuts before using the machine Torq...

Page 134: ...n with anchor hardware A Figure 87 Torque to 43 Nm 32 lb ft Lifting the Machine Use the following procedure to raise the skid steer loader so all four tires are off the ground for service Do not rely...

Page 135: ...e ground raise the machine add more blocks or raise the jackstands and lower the machine onto the blocks 5 Repeat this procedure for the front tires When complete all four tires will be off the ground...

Page 136: ...open 3 Additionally the radiator swings out providing greater access to the engine a Pull down on spring pin lock C Figure 92 to release pin D Lift pin D out of the bracket b Swing the radiator outwa...

Page 137: ...tch it Remove the dipstick from the engine 6 Wipe the dipstick with a clean cloth and replace it in the engine Push it in until it is fully inserted 7 Remove the dipstick again The oil level should be...

Page 138: ...left rear wheel Important Dispose waste engine oil according to environmental laws or take to a recycling center for proper disposal DO NOT pour waste engine oil onto the ground or down a drain 6 Rem...

Page 139: ...ray out when removing any fuel system component Wipe up spills immediately NEVER use a shop rag to catch draining leaking fuel Vapors from the rag are flammable and explosive Failure to follow these i...

Page 140: ...ng fuel through the fuel filler neck opening Important See Fluid Capacities Lubricants on page 183 and the engine operation manual for proper fuels Use of improper fuels can cause engine damage 5 When...

Page 141: ...on the water separator to the ON position 9 Prime the fuel system by turning the ignition key to the ON position without starting the engine for 30 seconds Repeat this step 3 times to ensure the fuel...

Page 142: ...Safety Shutdown Procedure on page 14 2 Wait until the engine has cooled 3 Turn fuel valve lever V Figure 99 on the water separator to the OFF position 4 Remove the fuel filter W Figure 100 using a fi...

Page 143: ...every 250 hours of use or every 6 months or if the filter is damaged oil or soot laden Be sure the air cleaner intake hose clamps and mounting bracket hardware are properly tightened Changing Air Fil...

Page 144: ...odels DPF soot filter replacement is required when the DPF Diesel Particulate Filter Service Screen Figure 102 displays Note Contact your dealer when the DPF Service screen displays V Belt Maintenance...

Page 145: ...he radiator Note Use a low silicate ethylene glycol based coolant mixed with quality water and supplemental coolant additives SCAs suitable for heavy duty diesel engines See Fluid Capacities Lubricant...

Page 146: ...r with coolant Note Use a low silicate ethylene glycol based coolant mixed with clean water and supplemental coolant additives SCAs suitable for heavy duty diesel engines See Fluid Capacities Lubrican...

Page 147: ...R150 R165 Locate sight gauge Y Figure 107 in the left engine compartment wall The oil level should be in the middle A of the sight gauge Model R135 Remove the hydraulic tank filler dipstick cap H Imp...

Page 148: ...raulic tank filler cap H and tighten securely Changing Hydraulic Oil Filter 1 Perform the Mandatory Safety Shutdown Procedure on page 14 2 Wait until the engine has cooled 3 Open the engine compartmen...

Page 149: ...proper disposal DO NOT pour onto the ground or down a drain 7 Unscrew and remove the hydraulic oil filter L Figure 109 8 Clean the surface of the filter housing where the element seal contacts the hou...

Page 150: ...in and cause serious injury Obtain immediate medical attention if pressurized oil pierces the skin Failure to obtain prompt medical assistance could result in gangrene or other serious damage to tissu...

Page 151: ...ory Safety Shutdown Procedure on page 14 3 Remove check fill plug S Figure 112 from each chaincase housing If the oil can be reached with the tip of your finger the oil level is adequate 4 If the leve...

Page 152: ...ont axle assembly toward the front of the loader To loosen the chain move the front axle assembly toward the rear of the loader Rear Chain Tension To tighten the rear chain move the rear axle assembly...

Page 153: ...ossible trained personnel should service and mount tires To avoid possible death or serious injury follow the safety precautions below Important The tread bars of all tires should point the same direc...

Page 154: ...ine s electrical equipment at regular intervals Defects such as loose connections or scorched cables much be repaired before using the machine Only use proper original equipment fuses with the specifi...

Page 155: ...ompartment just behind the cab on the right side of the machine Table 19 Relay Locations Figure 115 Relay Circuit Relay Circuit A High speed cab blower fan relay B Horn relay C Medium speed cab blower...

Page 156: ...rculation EGR M 20A Operator s seat switch optional air suspension N 3A Electronic display LCD O 5A Hand control buttons Table 21 Diode Locations Figure 115 Diode Circuit Diode Circuit P Ignition Q EG...

Page 157: ...use or being charged Keep flames or sparks away from the battery area ALWAYS charge the battery in a well ventilated area Never lay a metal object on top of a battery because a short circuit can resul...

Page 158: ...rication on page 128 5 Check all fluid levels and top off as necessary 6 Add a fuel stabilizer to the fuel system according to the fuel supplier s recommendations 7 If the machine is so equipped turn...

Page 159: ...ng the engine to service according to long term engine storage section in the engine operation manual 5 Check V belt tension See V Belt Maintenance on page 140 6 Check all fluid levels and top off as...

Page 160: ...and allow the engine to cool for approximately 2 minutes 4 Shut off the engine 5 Move the lift tilt and if equipped the Power A Tach quick attach control s to verify that the controls do not cause mo...

Page 161: ...cific to the material of the part Take care to separate different materials for recycling Dealer Services Service of the following components require special tools skill and knowledge are not part of...

Page 162: ...158 50940193 DP0415 NOTES...

Page 163: ...page 90 Battery disconnect switch in open position or malfunctioning Place battery disconnect switch into closed position Repair or replace if necessary Starter malfunction Contact dealer Operator no...

Page 164: ...e ON position Engine fault code s displayed Identify problem and correct Engine too cold ambient temperature too low Pre heating module malfunction check connection and voltage and charge replace as n...

Page 165: ...ool operating temperatures Blue smoke Blue smoke indicates engine oil combustion which could be caused by Worn valve guides or seals Wear in cylinders piston rings ring grooves etc Cylinder glaze Stic...

Page 166: ...ously overloaded Improve operation procedure Lift tilt or auxiliary system continuously overloaded Improve operation procedure Drive motor s or hydrostatic pump s internal damage leakage Contact deale...

Page 167: ...sary Table 26 Hydraulic System Troubleshooting Problem Possible Cause Corrective Action Lift tilt and drive controls fail to respond Restraint bar raised Lower restraint bar Solenoid valve malfunction...

Page 168: ...fuel filter remove restriction See Changing Fuel Filter on page 138 Dirty restricted air filter s Replace filter s Air in hydraulic system Cycle lift and tilt cylinders to maximum stroke and maintain...

Page 169: ...l valve not actuated or leaking Contact dealer Hydraulic oil leaking past cylinder piston seals Lift arm support engaged Release lift arm support Lift solenoid valve malfunction Check solenoid electri...

Page 170: ...solenoid valve malfunction Check electrical connections to solenoid repair as necessary Contact dealer Tilt spool in control valve not actuated or leaking Contact dealer Control valve in float positio...

Page 171: ...one direction Rear hydrostatic pump relief valve malfunction Contact dealer Rear hydrostatic pump malfunction Left side drive doesn t operate in either direction right side operates normally Front hy...

Page 172: ...l on page 143 See Fluid Capacities Lubricants on page 183 for proper oil grade Oil cooler fins restricted Clean oil cooler fins Hydraulic oil filter restricted Clean hydraulic oil cooler See Cleaning...

Page 173: ...Check circuit and replace fuse See Fuses Relays and Diodes on page 151 Battery terminals cables loose corroded Clean battery terminals and cables and tighten Main wiring harness connectors at rear of...

Page 174: ...connections Alternator malfunction Repair replace alternator Hour meter malfunction Replace information center electronic display Work road lights inoperative Single light not working light bulb burn...

Page 175: ...operation range 3 P0227 Acceleration Sensor 3 Acceleration sensor 3 fault high voltage P0228 Acceleration Sensor 3 Acceleration sensor 3 fault high voltage 8 P1127 Acceleration Sensor 3 Sensor failur...

Page 176: ...w voltage 157 0 P0088 Abnormal Rail Pressure Actual rail pressure rise error 3 P0193 Rail Pressure Sensor Rail pressure sensor high voltage 4 P0192 Rail Pressure Sensor Rail pressure sensor low voltag...

Page 177: ...OM checksum error main software 630 2 P1601 ECU Internal Fault EEPROM error 12 P0601 EEPROM EEPROM memory deletion error 633 3 P0629 SCV MPROP SCV MPROP high side VB short circuit 5 P0627 SCV MPROP SC...

Page 178: ...2 Injector 2 short circuit 5 P0202 Injector 2 Cylinder Number 2 Injector 2 open circuit inherent location of the injector 6 P0265 Injector 2 Cylinder Number 2 Injector 2 coil short circuit 11 P1266 I...

Page 179: ...ource 7 P068B Main Relay Main relay contact stuck 2791 0 P0404 EGR Valve EGR over voltage malfunction 1 P1404 EGR Valve EGR low voltage malfunction 7 P1409 EGR Valve EGR feedback malfunction 9 U0401 E...

Page 180: ...sensor fault low voltage 3251 0 P2452 DPF Differential Pressure Sensor DPF differential pressure sensor differential pressure abnormally high 3 P2455 DPF Differential Pressure Sensor DPF differential...

Page 181: ...ault B 4 P1412 EGR Stepping Motor B Circuit fault A 522253 3 P1423 EGR Stepping Motor C Circuit fault B 4 P1422 EGR Stepping Motor C Circuit fault A 522254 3 P1433 EGR Stepping Motor D Circuit fault B...

Page 182: ...ternal Malfunction CY146 SPE SPI communication error 522588 12 P1608 ECU Internal Malfunction Excessive supply 1 voltage error 522589 12 P1617 ECU Internal Malfunction Dropped Insufficient supply 1 vo...

Page 183: ...12 U1401 EGR Valve EGR target value out of range 522618 9 U1302 CAN 2 EBC1 CAN message Reception time out error 522619 9 U1303 CAN 2 Y_DPFIF CAN message reception time out 522623 7 P1647 Acceleration...

Page 184: ...70 0 P1667 Rail Pressure Sensor Rail pressure fault PLV opening timing error 523471 6 P1467 ECU Internal Malfunction Actuator drive circuit 3 GND short circuit 523473 12 P1469 ECU Internal Malfunction...

Page 185: ...ensor Rail pressure fault the actual rail pressure is too high during PRV limp mode 543491 0 P1669 Rail Pressure Control Sensor Rail pressure fault injector B F temp error during PLV4 limp home Table...

Page 186: ...182 50940193 DP0415 NOTES...

Page 187: ...Petro Canada HVI60 Mobil DTE 15M or equivalent which contain anti rust anti foam and anti oxidation additives and conforms to ISO VG46 HVLPD 46 HYD0530 Biodegradable oil AVILUB Syntofluid 46 PANOLIN H...

Page 188: ...SAE J814C J1941 J1034 or J2036 international See Coolant Compound Mixtures on page 189 9 5 L 2 5 gal 14 4 L 3 8 gal Radiator Cap Pressure N A 1 10 bar 16 psi Chaincase each SAE grade 10W 30 motor oil...

Page 189: ...lbs 2796 kg 6165 lbs Operating Weight with counterweight 2424 kg 5345 lbs 2783 kg 6135 lbs 2887 kg 6365 lbs Shipping Weight without counterweight a a Without operator and bucket with 10 fuel 2073 kg...

Page 190: ...reakout Force Lift w o Counterweight 1346 kg 2967 lbs 1538kg 3391 lbs 1636 kg 3607 lbs Table 33 Payloads Capacities Dirt Construction Buckets w out Counterweight Weight R135 Rating R150 Rating R165 Ra...

Page 191: ...g 1392 lbs N A 1676 mm 0 54 m3 66 in 19 0 ft 3 203 kg 476 lbs 538 kg 1186 lbs 606 kg 1336 lbs 656 kg 1446 lbs 1778 mm 0 57 m3 70 in 20 3 ft 3 228 kg 502 lbs N A N A 651 kg 1436 lbs a Can be used on R1...

Page 192: ...ring In line filter cartridge with water trap and replaceable element Firing Order 1 3 4 2 1 from flywheel end Normal Starting Aid Glow plugs Cold Starting Aid Optional Engine block Oil pan heater Lub...

Page 193: ...ar 2600 psi 2830 RPM 62 L min 16 4 gpm 167 4 bar 2428 psi 2830 RPM 71 L min 18 75 gpm 169 1 bar 2452 psi 2530 RPM Auxiliary System Standard Flow Maximum Flow 64 4 L min 17 0 gpm 71 4 L min 18 9 gpm Au...

Page 194: ...ical System R135 R150 R165 Glow Plug Engine Pre heat Auto with glow lamp Electrical System Voltage 12 6 V Alternator 100 Amp Battery Type Maintenance free Volts 12 V Group Size 34 31 Cold Cranking Amp...

Page 195: ...s2 Uncertainty m s2 Hand Foot 1 13 0 6 T Bar 1 53 0 8 Pilot 1 27 0 6 Model R150 Whole Body Vibration Values Seat Option Vibration m s2 Uncertainty m s2 Standard Non Suspension 0 80 0 4 Mechanical Susp...

Page 196: ...42 Bucket Angle 2090 mm 82 6 in 2379 mm 93 7 in G Dump Reach Bucket Full Height 42 Bucket Angle 577 mm 22 7 in 579 mm 22 8 in J Rollback at Ground 29 28 M Rollback Angle at Full Height 82 99 O Seat t...

Page 197: ...Hydrostatic Drive Hand Foot Pilot Controlled Hydrostatic Drive Dual Joysticka Servo Controlled Hydrostatic Drive T Bar All Tach Attachment Mounting System Single Lever manual Hand Throttle Engine Aut...

Page 198: ...Lift System Kits Upper torso Restraint Required with Two Speed Drive Two Speed Drivea a Model R165 only Sliding Side Windows Lift Kit Single Point Lift System Rear View Mirror Hydraglide Ride Control...

Page 199: ...100 1280 1600 Coal 3 53 6 848 1008 Concrete 115 1840 Cinders 50 800 Coal anthracite 94 1504 Coke 30 480 Earth dry loam 70 90 1121 1442 Earth wet loam 80 100 1281 1602 Granite 93 111 1488 1776 Gravel...

Page 200: ...196 50940193 DP0415 NOTES...

Page 201: ...t 83 Cab Heat Cool 74 Chaincase Drive Chain Tension 148 Maintenance 147 Oil Maintenance 147 Changing Attachments 96 Connection Attachments 96 Control Keypad 48 Controls 47 59 Hand and Foot Controls 67...

Page 202: ...intenance 121 Chaincase 147 Chaincases 147 Cooling System 141 Draining Flushing 142 Engine 132 Fuel System 135 Hydraulic System 142 V Belt 140 Maintenance Log 125 Maintenance Schedules 123 Manual Cont...

Page 203: ...hine 25 Maintenance 21 Mandatory Safety Shutdown Procedure 14 Pallet Forks 109 Proper Machine Use 4 Rear Window Emergency Exit 43 Safety Alert Symbol 1 13 Safety Decals 25 ANSI Style Safety Decals 26...

Page 204: ...ine Diagnostic Trouble Codes DTC 171 Error Codes 171 Hydraulic System 163 Seal and Hose 163 Two Speed Drive 69 92 U Upper Torso Restraint 41 V V Belt Maintenance 140 Vibration Information 9 191 W Whee...

Page 205: ...0 56 9 9 9 10 17 19 75 86 13 14 12 14 25 25 9 10 18 20 3 8 16 3 8 24 7 16 14 7 16 20 20 23 32 36 15 17 24 27 30 35 50 55 23 25 35 40 45 50 70 80 35 35 55 60 1 2 13 1 2 20 9 16 12 9 16 18 50 55 70 80 3...

Page 206: ...ou have any questions on proper operation adjustment or maintenance of this machine contact your dealer or the Gehl Company Service Department before starting or continuing operation Manitou Americas...

Reviews: