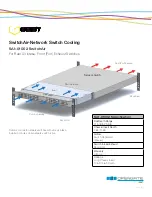
Network Switch Cord Management
STEP 1
Before installing SwitchAir; Velcro tie the network switch power cords to power supply handle toward
the center of the switch. This will dress the switch power cords toward the center where the SwitchAir brush strip
is located – allowing a good SwitchAir to switch seal. The SwitchAir brush strip has ample width to allow you to
just direct the switch power cords toward the center. Power cords from one switch are allowed to pass through
the brush strips of a unit below. Example shown of two networks switches would require two SwitchAir units.
Installing SwitchAir
STEP 2
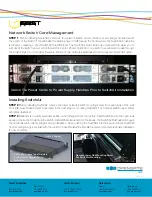
Before installing SwitchAir; remove the lower network switch mounting screw from each side of the rack
front rails. Save these screws to be used in the next step for mounting SwitchAir. The network switch upper screw
will remain fastened.
STEP 3
SwitchAir is in a fully extended position when shipped from the factory. Insert SwitchAir into the open rack
space at the same U height as the switch. As SwitchAir is pushed into the space, the SwitchAir Rail Tabs will engage
the network switch rails for support during installation. Keep pushing the SwitchAir into the space until the SwitchAir
front mounting flanges are flush with the rack front rails. Reinstall the screws that were removed previously. Installation
is now complete.
Velcro Tie Power Cords to Power Supply Handles Prior to SwitchAir Installation
Rail Tab Support
Remove Lower Rail Mounting Screw
For SwitchAir Mounting
Rail Tab To Engage Top of Network
Switch Rail for Support During
Installation
Geist Americas
Geist Europe
Geist Asia
Geist DCiM
China
Hong Kong
800.432.3219
1.877.449.4150
+44 (0) 1823 275100
+86.755.86639505
+852 90361927
geistglobal.com
geistglobal.com
geistglobal.com
geistglobal.com
geistglobal.com
10001301


