background image

Instructions for Use: GEV019-100 


Page 63 


------- End ------- 

Summary of Contents for GeVentor GEV019-100

Page 1: ...Gekko Medical Pty Ltd GeVentor Ventilator GEV019 100 Instructions for Use ...

Page 2: ...Instructions for Use GEV019 100 Page 2 NOTE ...

Page 3: ...lation VCV 32 6 7 Pressure Controlled Ventilation PCV 34 6 8 Respiratory Rate and I E Ratio Setting 35 6 9 FiO2 Mixture Setting 36 6 10 Gas Flowrate Control Slope 36 6 11 Suctioning 37 6 12 Continuous Positive Airway Pressure CPAP 38 6 13 PEEP Setting 38 6 14 Alarms and Faults 39 6 15 Stopping Ventilation 42 6 16 Stand by Off State Mode 42 6 17 Shutdown 42 6 18 Unscheduled Stops 43 6 19 Battery Li...

Page 4: ...ntensive Care Unit with emergency on Intended Use section on page 5 Include tidal volume range in Section 6 6 and replace 800 ml with 1 500 ml on Intended Patient Population Section 4 5 updated 24 VDC to 30 VDC Section 3 2 Electromagnetic Compatibility updated as per compliant EMC tests Section 10 1 included update to compliance standard for EMC requirements Section 4 4 sentence to refer to Sectio...

Page 5: ...e products in use These actions or failures are regarded as product misuse which are not covered under Gekko s warranty Intended Use The GeVentor is intended to provide continuous or intermittent ventilatory support to individuals who require mechanical ventilation The GeVentor is intended to be used by qualified trained personnel under the direction of a physician Specifically the GeVentor is app...

Page 6: ...e GEV019 100 Page 6 2 Labels Front The front labels of the GeVentor areas per the label given below Patient circuit On the side of the GeVentor where the patient breathing circuit is connected the label below is available ...

Page 7: ...Instructions for Use GEV019 100 Page 7 Warning On the rear of the GeVentor the label below is available ...

Page 8: ...harm or injury CAUTION Failure to heed CAUTION alerts can result in moderate or minor injury damage to the device or associated equipment NOTE Provided to assist and guide personnel with helpful additional information 3 2 Warnings and Contraindications Device Use The use of the GeVentor requires comprehensive understanding of the GeVentor as per this IFU document The GeVentor must be used for its ...

Page 9: ...ly components to come into contact with elements such as fuels heat oils that may result in combustible or explosive gas mixtures Device Connection CAUTION This device should only be connected to a pipeline installation designed using a diversity factor that allows for the indicated high flow at a specified number of terminal outlets to avoid exceeding the flow This will minimise the risk that the...

Page 10: ... Patient Precautions and Safety Always check unit operation with a bag test lung before connecting to the patient to ensure correct settings have been made and the unit is delivering as prescribed CAUTION When connected to the patient and operating healthcare professionals must ensure that no water or fluids are allowed to ingress into the device Remove all potential hazards in close proximity to ...

Page 11: ...ion phase the gas is released from the lung to flow back through the mechanical PEEP which ensures PEEP positive end expiratory pressure pressure does not drop below the set pressure prescribed and set on the PEEP valve Ventilation Modes Volume Controlled Ventilation VCV Pressure Controlled Ventilation PCV To facilitate patient ventilation and oxygenation operators of the GeVentor can simply add t...

Page 12: ...ressure from R2 and R3 and mixes it to any desired ratio from 21 oxygen 100 air up to 100 oxygen V4 V5 Non return valves ensure no mixing of gases can occur in the system and no contamination can occur in the hospital gas delivery system Without these valves backflow occurs in the regulators and it is not possible to set them up to equal pressures V6 Pressure relief valve PRV for main emergency pr...

Page 13: ...rface Air Connection Port Oxygen Gas Connection Port LCD Touch Screen HMI FiO2 Air Oxygen Mixing Control Knob GeVentor Expiration Valve GEV Expiration Hose Connection Port Inspiration Hose Connection Port Slope Gas Flowrate Control Knob Warnings for Good Use Pole Mount Connections optional Electrical Power Connection Cable Port Power ON OFF Switch Pneumotachograph Tubes Attachment Ports ...

Page 14: ...rammable Logic Controller 4 GEV Regulator 12 GeVentor Expiration Valve GEV 5 Battery Charger Circuit Board 13 Expiratory Hose Connection Port 22 mm 6 Vti Flow Control Valve 14 Pneumotachograph for Vte 7 Non return Valves 15 Differential Pressure Sensor Vti 8 Pneumotachograph Tube Ports 16 Position for PEEP Valve Pressure Relief Multiple pressure settings will prevent any overpressure event from oc...

Page 15: ... Valve GEV is a push and turn fitting on the right hand side of the enclosure The Bacterial Filter and the patient expiration hose are attached to this connection on the patient s expiratory limb The PEEP valve is mounted on the top of the GEV For use in Australia the GEV is a single use device and in case of emergency the GEV can be cleaned for re use only in exceptional circumstances when the GE...

Page 16: ...uit The Y Piece is incorporated in the standard patient circuit however the humidifier is not included refer to Section 6 20 for connecting other devices in the standard circuit Refer to Section 11 for specific details on breathing circuit components NOTE All GeVentor parts of the patient circuit comprising the breathing system through to the Bacterial Filter are single use components with the lab...

Page 17: ... main power supply WARNING GeVentor power supply cabling is to be routed in such a way to avoid tripping hazards Battery Back up The GeVentor is supplied with continuous battery supply effectively charged by the power supply consisting of two batteries The batteries have a typical back up life of 25 minutes and a minimum charge time of 30 minutes Refer to Section 6 19 Battery Back up Indicator for...

Page 18: ...explosion Do not allow oxygen supply components to come into contact with elements such as fuels heat oils that may result in combustible or explosive gas mixtures Gas inlet connection ports are shown below SIS Air Connection Port SIS Oxygen Connection Port ...

Page 19: ...pressure and flow To operate FiO2 Air Oxygen Mixture control knob Gas Flow Control The Gas Flow control valve is located on the front panel of the enclosure This controls the rate at which the gas is injected into the system The gas is pressurised and released across an orifice to generate a highly reproducible flow rate This flow rate dictates the Vti when measured over time Also it dictates the ...

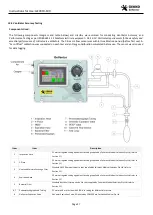
Page 20: ...use the HMI to operate the GeVentor To operate the Gas Flowrate control knob 5 2 Human Machine Interface HMI The Human Machine Interface HMI enables the following functions The interface between GeVentor and the operator Selection of control mode PCV VCV Suction CPAP and setting of control and target parameter values as well as alarm settings Display of real time performance Alarms setting listing...

Page 21: ...le Range Indicator for Tidal Volume ml Patient Gender Selection Set FiO2 CPAP Page Respiratory Rate RR Page Button PCV Page Start Stop Button Start in VCV Mode default Alarm Page Button Set PEEP cmH2O Measured PEEP Value cmH2O Start Stop Button VCV Mode Return to HOME PAGE Button Target Tidal Volume Button Target Tidal Volume Setting ml Set FiO2 Measured Peak Inspiratory Pressure PIP cmH2O Measure...

Page 22: ...O Measured Expiratory Tidal Volume ml Measured PEEP cmH2O Set PEEP cmH2O Set Respiratory Rate breaths min Acceptable Range Indicator for Pressure cmH2O Set Respiratory Rate breaths min Measured Respiratory Rate breaths min Return to HOME PAGE Button Manual I E Mode Enable Disable Toggle Button Green Enabled Red Disabled Inspiration Time Setting Button seconds Hold Time Setting Button seconds Expir...

Page 23: ...P page from the HOME PAGE when the GeVentor is not ventilating in any mode the following page is displayed Accessing the CPAP page when the GeVentor is running in PCV or VCV mode the following page will be displayed This page has a STOP button to prompt the user to either STOP ventilation before conducting CPAP ventilation or go back to the Home page by pressing the Home button Return to HOME PAGE...

Page 24: ...aximum Pressure Alarm Tolerance Setting for Inlet Gas Low Pressure Alarm Tolerance Setting for Tidal Volume Low and High Alarms Tolerance Setting for PEEP Low and High Alarms Tolerance Setting for Plateau Pressure Low and High Alarms Alarm History Button to access alarm history Up and Down Scroll Buttons for Alarms List Acknowledge All Alarms Button Silence Audible Alarm Button Return to HOME PAGE...

Page 25: ...form the Alarms page displays the page below This page enables the user to change or adjust the date and time Clear All Alarms Button Silence Audible Alarms Button Up and Down Scroll Buttons for Alarms List Date and Time Setting Button Calibration Button to access Calibration page Return to HOME PAGE Button List of Historical Alarms Time and Date the Alarm was Acknowledged by the User Alarm Messag...

Page 26: ...essing the SUCTION page from the HOME page displays the following page Suction Start Stop Button FiO2 Setting Return to HOME page Button Gas Flowrate Bar Graph l min Minimum Gas Flowrate Required l min Inspiratory Pressure Bar Graph cmH2O Measured PEEP cmH2O ...

Page 27: ...nit as per clinical guidelines 3 Install battery isolation fuse in fuse mount on bottom of enclosure 4 Securely attach accessories 5 Connect air gas supply connection into the air connection port 6 Install GeVentor Expiration Valve on expiration side of the patient circuit 7 Connect oxygen gas supply connection into oxygen connection port 8 Connect inspiration hose into 22 mm inspiration hose port...

Page 28: ...tion end of the Y Piece 4 Attach the Bacterial Filter into the expiration hose 5 Attach the Pneumotachograph to the expiratory end of the GEV and Bacterial Filter 6 Attach the GeVentor Expiration Valve GEV by inserting and turning it to lock 7 Attached the PEEP Valve above the GEV CAUTION Ensure that all components are cleaned as per clinical guidelines and that GeVentor and patient circuit parts ...

Page 29: ...e or antistatic breathing hoses with the GeVentor DANGER Risk of explosion Do not allow oxygen supply components to come into contact with elements such as fuels heat oils that may result in combustible or explosive gas mixtures 6 3 Default Settings The defaults ventilation settings are given in the table below Default Ventilation Parameters Volume Controlled Ventilation Tidal Volume 396 ml PEEP 1...

Page 30: ...t FiO2 using FiO2 Mixture knob Set PEEP on PEEP Valve Select START Adjust Gas Flowrate to achieve desired gas flow CAUTION The user must be familiar with the operation and use of the GeVentor when selecting to use the Quick Start instructions 6 5 Start Up Standby Ready Mode The GeVentor is switched on but not in operation and all ventilation settings are default settings DANGER Patients are not to...

Page 31: ... Section 6 3 above HOME page then ALARM page 2 Set patient gender Press Male or Female button Enter value on keypad HOME page 3 Set patient height Press Height button Enter value on keypad HOME page 4 Set PEEP Press PEEP button Enter value on keypad HOME page 5 Set respiratory rate RR Press RR button Press RR Enter value on keypad HOME page then RR page 6 Set FiO2 Press FiO2 button Enter value on ...

Page 32: ...rn to the HMI page without entering a value press key Escape 6 6 Volume Controlled Ventilation VCV Volume controlled ventilation is a mode of ventilation in which the Tidal Volume is the set point Tidal Volume is achieved during the inspiration phase in a time determined by the Flow Rate control slope control The Tidal Volume is delivered within the inspiration time depending on the slope setting ...

Page 33: ... cmH2O View the measured Peak Inspiratory Pressure cmH2O View the measured FiO2 mixture View or set the desired Respiratory Rate breaths min Access Respiratory Rate page to o Select control for I E ratio to Auto default or Manual control o View or set the Inspiration time seconds o View or set the Hold time seconds o View or set the Expiration tie seconds View the measured PEEP cmH2O View the meas...

Page 34: ...ion PCV Pressure controlled ventilation is a mode of ventilation in which the pressure is the set point The pressure is achieved during the Inspiration phase in a time determined by the flow control The pressure is then maintained for the duration of the inspiration time and then released against the PEEP valve Setting high ramp speeds will get the system up to pressure quickly but will cause high...

Page 35: ... the unit is delivering as prescribed During normal operation with longer inspiration times set and running high slope values the unit will make a buzzing clicking sound as the valves chase the pressure set point This is normal 6 8 Respiratory Rate and I E Ratio Setting The I E ratio can be set manually on this page In VCV mode select Manual I E Mode Disabled button and once the button turns green...

Page 36: ... volume is not achieved 6 9 FiO2 Mixture Setting To adjust the FiO2 mixture adjust the knob by turning it clockwise from the 21 marker air only to the 100 marker full oxygen supply To reduce oxygen concentration turn the know anti clockwise Air Oxygen Gas Mix Knob 6 10 Gas Flowrate Control Slope To adjust the gas flowrate adjust the knob by turning it clockwise to increase the flow rate or anti cl...

Page 37: ...ate must be set high enough to ensure the unit maintains PEEP pressure in the circuit typical 30 l min to ensure PEEP is not lost whilst suction is being performed Pushing the Suction Start button will start a 30 second suction period during which a continuous flow of gas is directed into the patient circuit and pressurises against the PEEP valve The GeVentor Expiration valve remains open for this...

Page 38: ... 5 Press PEEP button to enter the required PEEP pressure on keypad and press Enter 6 Adjust PEEP valve to required PEEP setting 7 Navigate to the alarms page and check 8 Connect test lung 9 Push the Start button and check operational pressure and flows 10 Attach to the patient when all flows and pressures checked 6 13 PEEP Setting To adjust PEEP Enter the required PEEP cmH2O on using the PEEP butt...

Page 39: ...e Not Achieved Plateau Pressure is Below Designated Pressure Please Increase Flow Rate Yes Yes Yes PEEP Not Achieved PEEP is Below Designated PEEP Please Adjust PEEP Valve Yes Yes Yes Expiratory Tidal Volume Not Achieved by 10 Expiratory Tidal Volume Not Achieved Yes Yes Yes Inspiratory Tidal Volume Exceeded by 10 Inspiratory Tidal Volume Exceeded Please Reduce Flow Rate OR Decrease Inspiration Ti...

Page 40: ...ower Yes Yes Yes Battery Is Critically Low Connect the Main Power Immediately System Will Shutdown in 5 mins Yes Yes Yes Internal Connection Failure Internal Connection OR Sensor Failure Please Contact Service Technician Yes Yes Yes Tidal volume entered value out of range The value is not within the minimum and maximum range 200 1500 Yes No No PEEP entered value out of range The value is not withi...

Page 41: ...ed in the table above Silence silence or mute the audible alarm fault siren Ack acknowledge the alarm fault Close close the banner from appearing on the HMI screen The alarms faults messages can be viewed on the Alarm page and a list of historical alarms is accessible through the Alarm History button Alarm tolerance settings can be set by the user on the Alarms page of the HMI However it is recomm...

Page 42: ...th default settings or if the unit has been running and is waiting to be re started it will still be holding the settings from the last ventilation To return to default settings and re set the controls it is necessary to power down the unit with the on off switch on the left hand side of the unit DANGER Patients are not to be connected to the GeVentor when in Stand by or Off State mode Ventilation...

Page 43: ...ally check that the GeVentor shuts down Isolate oxygen and air supply if shutting down for long periods DANGER Ensure that there is no requirement for ventilation on the patient When the ventilator is shut down no ventilation occurs 6 18Unscheduled Stops After an unscheduled stop the cause of the stop shall be determined No restart shall be allowed until the cause is known and clearance from all s...

Page 44: ...is low and critically low The battery life indicator is displayed on the top right of the HMI page as shown below CAUTION If it is suspected that the batteries are not performing to the required or expected performance replace the batteries or contact the manufacturer In the case that the electrical supply power cable is pulled off the GeVentor the Battery Life Indicator turns red as given below a...

Page 45: ...UTION Humidifiers that do not conform to the requisite standards and specifications and that are not approved must not be used with the GeVentor Should the treating healthcare professional require that a humidifier be used it can be connected to the GeVentor on the patient circuit by following the instructions below refer to the diagram below 1 Connect the inspiration hose from the GeVentor into t...

Page 46: ...NGER Do not connect other devices to the GeVentor that may compromise its operation and performance If in doubt contact the manufacturer for more information The GeVentor is not designed to be connected to other devices that are not approved by the manufacturer except for patient circuit accessories that are stated in this document such as a Bio filter PEEP valve and HMEF ...

Page 47: ...rt or long term storage in extreme environmental conditions for example sub zero temperatures and cyclone flood volcanic or earthquake prone regions The following is some general advice to be read in conjunction with that of the OEM suppliers NOTE It is the responsibility of the purchaser to assure protection during storage to maintain equipment reliability and warranty Refer to the individual OEM...

Page 48: ...a controlled environment Note that the ideal shelter for long term storage is a clean temperature controlled ventilated building with no excessive vibrations After Operation When the GeVentor has been in use and is to be inactive for an extended period the following guideline is recommended 1 Shut down unit per GeVentor shut down procedure Refer to Section 6 15 2 Disconnect GeVentor from power oxy...

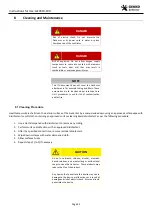
Page 49: ...or surface of the GeVentor by a manual wipe down using an approved surface wipe with disinfectant or soft cloth containing an approved surface cleaning liquid disinfectant as per the following procedure 1 Use a cloth dampened with disinfectant to remove any soiling 2 Perform surface disinfection with an approved disinfectant 3 After the specified contact time remove residual disinfectant 4 Wipe do...

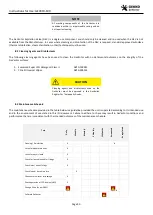
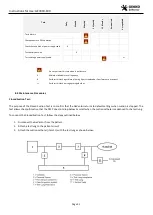
Page 50: ... Clinell Universal Wipes ARTG 299351 CAUTION Cleaning agents and disinfectants used on the GeVentor must be approved in the Australian Register for Therapeutic Goods 8 3 Maintenance Schedule The maintenance schedule provided in the table below is a guideline provided the unit is operated according to its intended use and in the environment of use stated in this IFU document Failure to adhere to th...

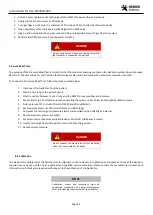
Page 51: ...f performance is suspect Perform this task per regulatory guidelines 8 4 Maintenance Procedures Closed Suction Test The purpose of the Closed Suction Test is to confirm that the GeVentor returns to default settings when suction is stopped The test allows the confirmation that the PEEP does not drop below 5 cmH2O when the suction catheter is advanced to the test lung To conduct the Closed Suction T...

Page 52: ...uit 3 Attach a sensor between the test lung and the HMEF to measure flow and pressure 4 Set ventilator to 275 ml tidal volume by operating the system under Volume Controlled Ventilation mode 5 Enter volume of 275 ml with 10 cmH2O PEEP and 10 breaths min 6 Set maximum pressure of 35 cmH2O Pmax on HMI setting 7 Compress the test lung until pressure alarms and ventilator stops inflating and alarms 8 ...

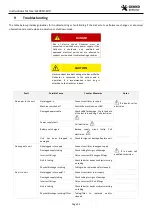
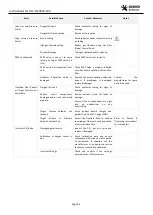
Page 53: ...switched off Switch the machine on at HMI Damaged power cable Check cable for damage Check the date of the last test and tag Call electrician Power supply fault Call electrician Battery not charged Backup supply circuit faulty Call electrician Unit has been dropped or damaged Check for signs of damage Replace unit No oxygen to unit Not plugged into supply Connect ventilator to oxygen supply If in ...

Page 54: ... for spare parts if required Intended Tidal Volume or Target Pressure not Achievable Oxygen Air Leak Check ventilator tubing for signs of damage Patient circuit components damaged and or not connected properly Inspect patient circuit for leaks or damage Ensure all hose connections are tight and no obstructions on any hose tubing Target Volume Setpoint not reached Verify patient details height and ...

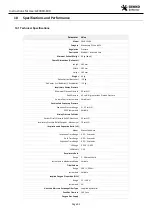
Page 55: ...ents Variable ml Positive End Expiratory Pressure Expiration Pressure Range 5 25 cmH2O PEEP Increments Variable Airway Pressure Failsafes Patient Circuit Pressure Relief Electronic 50 cmH2O Inspiratory Pressure Relief Setpoint Mechanical 70 cmH2O Inspiration and Expiration Ratio I E Modes Manual and Auto Inspiration Time Range 0 25 5 seconds Hold Time Range 0 25 5 seconds Expiration Time Range 0 2...

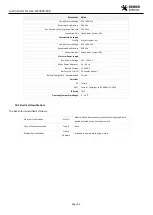
Page 56: ...Voltage 100 250 VAC Mains Power Frequency 50 60 Hz Battery Voltage 12 24 VDC Battery Life Typical 25 minutes typical Battery Charge Time Recommended 5 hours Emissions RF Tested EMC Tested Compliant to IEC 60601 1 2 2014 IP Rating IP22 Operating Temperature Range 0 50 0C 10 2 Electrical Classifications The GeVentor is classified as follows Electrical Classification Class II Medical Device does not ...

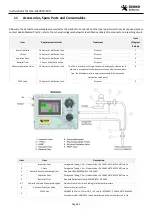
Page 57: ...2 mm corrugated tubing equivalent to tubing supplied by Fairmont Medical Solutions Pty Ltd refer to Section 11 2 Y Piece 22 mm corrugated tubing equivalent to tubing supplied by Fairmont Medical Solutions Pty Ltd refer to Section 11 3 Heat and Moisture Exchange Filter Standard HME Filter equivalent to that supplied by Fairmont Medical Solutions Pty Ltd refer to Section 11 4 Expiration Hose 22 mm c...

Page 58: ... mbar Vt 400 ml Manufactured and supplied by BC Medical a unit of BC Group International Inc 12 Humidifier not shown in diagram refer to Section 6 20 MR850AEA Respiratory Humidifier Manufactured and supplied by Fisher Paykel Healthcare Ltd 13 Humidifier Breathing Circuit applicable to humidifier circuit as shown in diagram in Section 6 20 Three in One Respiratory Care System REF RT380 CE 0123 Manu...

Page 59: ... for re use only in exceptional circumstances when the GEV is not available from the Manufacturer use approved standard disinfection and sterilisation techniques 8 PEEP Valve 14 Days or End of Patient Use Disposal 9 Item Item Description 1 Inspiration Hose Corrugated Tubing 1 5 m Product Code DVC9681 ARTG 335449 Class IIa 2 Y Piece Corrugated Tubing 1 5 m Product Code DVC9681 ARTG 335449 Class IIa...

Page 60: ...vice which provide full battery health and functionality Spontaneous breathing WARNING In the unlikely event of complete power loss the current configuration of the GeVentor does not allow for patients to breathe spontaneously This warning is to notify end users physicians nursing staff etc to ensure they administer an appropriate level of care when performing mechanical ventilation on patients Ob...

Page 61: ...Ltd Standard Conditions of Sale of Supply If in doubt contact Gekko Medical Pty Ltd Contact Details Head Office and Manufacturing Facility Business Phone 61 3 5339 5859 Address 323 Learmonth Road City Mitchell Park State Victoria Country Australia Postal Code 3350 Postal Address Postal Address PO Box 244 Wendouree 3355 Website www gekkomedical com ...

Page 62: ...Moisture Exchange Filter HMI Human Machine Interface also referred to as the User Interface Hold Time The time the gas is held in the lungs above the PEEP MC Mandatory Control OEM Original Equipment Manufacturer PAT Portable Appliance Test PCV Pressure Controlled Ventilation PEEP Positive End Expiratory Pressure the pressure retained in the lungs to ensure they do not fully collapse at the end of ...

Page 63: ...Instructions for Use GEV019 100 Page 63 End ...

Reviews: