background image

11

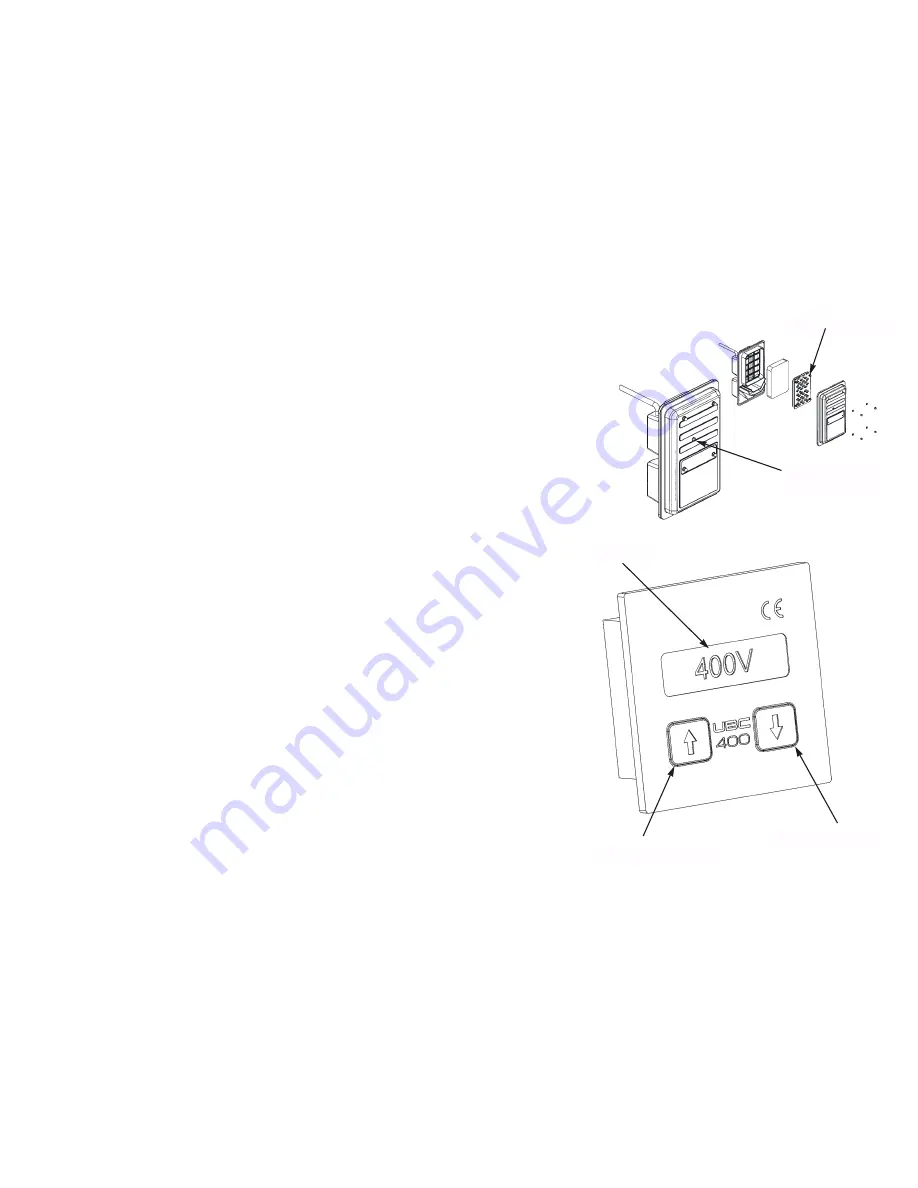
Key for moving upwards

Display

Key for moving downwards

12.3  Universal built-in controller UBC 400 (option)

It provides the display of 20 current parameters of the electric plant, which were not displayed
earlier.
Due to the application of the microprocessor measuring system, UBC is made in the form of a
Geko compact module, and the controller UBC 400 can be mounted in most Geko electric
plants.
It is applied for both one- and three-phase electric plants.

• Voltage

N - L1, N - L2, N - L3

• Voltage

L1 - L2, L2 - L3, L3 - L1

• Current L1,

L2, L3

• Total current
• Frequency
• Power per Phase in kVA

L1, L2,

L3

• Total power in kVA
• Running time
• Maintenance periodicity 100 + 300 Std.
• Real time and date

All data are transformed by a high-efficiency measuring amplifier to digital signals. The latter sig-
nals are processed by a microprocessor. The parameter is chosen by arrow keys.
Change of the parameters of maintenance periodicity, the calibrations of voltage and current,
and the reset of the operating hours counter can be made only by our authorized representative.
See also electrical connection schemes 100122 and 100123.

Indicator of air heater
work

Resistive heating element

12.2  Air heater LVH 25 (option)

It can be applied to all engines Honda-Super Silent GX 270 and GX 390. It prevents the icing of the carburetor at low temperatures,
which allows the reliable exploitation of the electric plant under extreme conditions.
Inlet air is heated by an automatic electric resistive heater controlled by a gauge. The mode is initiated by a light-emitting diode on
the casing of the air filter.
The heater is turned on at +10°C, because the icing of the carburetor often begins already at temperature from 0°C to + 5°C. 
See also electrical connection scheme 100127.

Summary of Contents for 4401 E -AA/HEBA

Page 1: ...fax 49 7267 806100 www metallwarenfabrik com 4401 E AA HHBA 4401 E AA HEBA 5401 ED AA HHBA 5401 ED AA HEBA 6401 ED AA HHBA 6401 ED AA HEBA 7401 ED AA HHBA 7401 ED AA HEBA 7401 E AA HHBA 7401 E AA HEBA...

Page 2: ...2...

Page 3: ...Fuel cock Sockets Silent economic fast start switch Starting handle Ignition key switch Drain plug Oil filler neck Oil level indicator Filler neck of the fuel tank Ground screw Air filter Silencer Fu...

Page 4: ...y On the contrary electric power is often necessary urgently by inquiry similarly to the circuits of power supplying enterprises By using the Geko Silent Economic mode the rotation frequency of the en...

Page 5: ...ric test requirements to waste gases in the world accep ted in California California Air Resources Board for 2006 Automatic stop at low oil level OHV reduces the consumption of oil by 50 reduces the c...

Page 6: ...required short circuit current of the generator is insufficient for the circuit breaker of an available consumer or the wire resistance is more than 1 5 M it is necessary to provide protection measur...

Page 7: ...dicator 2 Insert the oil level indicator into the filler neck but do not screw 3 If the oil level is low it is recommended to add oil up to the edge of the filler neck It is necessary to use oil for f...

Page 8: ...the fuel cock to the ON position 2 If necessary close the air valve At hot start the valve opens automatically Warning Do not use the valve if the engine is hot or the tempera ture of air is high Fue...

Page 9: ...Warning When the cord retracts back do not release the handle It should be moved accurately in order to pre vent the damage of the starting device Electric start all types For the start by the electri...

Page 10: ...FFS 100 for remote start and stop of the electric plant option The device is made in the form of a compact module Geko SMD Due to the small sizes of the transmitter a user can constantly carry it wit...

Page 11: ...r sig nals are processed by a microprocessor The parameter is chosen by arrow keys Change of the parameters of maintenance periodicity the calibrations of voltage and current and the reset of the oper...

Page 12: ...he first maintenance i e after this time the first maintenance must be car ried out 2 500h Operating time remaining to the second maintenance i e after this time the second maintenance must be carried...

Page 13: ...ules and other instructions of the manufacturer should be executed every time when working with this device If you have no instructions on work with the equipment appeal to a representative of the man...

Page 14: ...s lead to danger to life the possibility of heavy physical injuries or material damage Attention If a BLC equipped genset will be started with disconnected battery or reverse connected battery a 2A fu...

Page 15: ...ion of the electric plant with BLC 100 See electric schemes 100107 100108 and 100132 The circuit is connected to a head on the face panel of the distribution box Output voltage is taken through a CEE...

Page 16: ...t it is necessary to check its serviceability by the test button of the protective circuit breaker If the circuit breaker is not triggered it is forbidden to use the electric plant See electrical conn...

Page 17: ...tional The additional fuel tank enable extra long running times of the genset A mechanical engine driven pump deliver the fuel from the lower tank to the careburator The standard 20l tank remain usabl...

Page 18: ...turn short circuit in stator replace the stator by a new one Overcurrent circuit breaker Actuate or replace the circuit is actuated or defect breaker Insufficient rotation speed run up to rated speed...

Page 19: ...the authorized workshops in the Appendix Mount only original components when replacing them 14 Scheduled maintenance Before the beginning of maintenance works the engine should be stopped 14 1 Electr...

Page 20: ...Remove the ignition wire from the spark plug Unscrew the spark plug by a spark plug wrench If necessary clean electrodes by a brass brush If the spark plug is damaged replace it Check the interelectro...

Page 21: ...lywheel again turn the central nut Unscrew four screws with six sided heads drawing moment 7 3 N m and remove the fan case Weaken the clamp and remove the fan propeller Unscrew screws and remove the b...

Reviews: