background image

m d j -

5 0 0

  m a n u a l  

  g e m i n i s o u n d . c o m

3

Please ensure that you find these accessories included with 
the MDJ-500:

(1) Power cord 
(1) RCA cable
(1) Operating instructions

1   Do not use this MDJ-500 at temperatures below 41°F/5°C    
    or higher than 95°F/35°C.

2  This device should not be exposed to dripping or 
    splashing, and no objects filled with liquids (such as drinks)
    should be placed on or near the device.

3  Place the unit in a clean and dry location.

4  Do not place the unit in an unstable location.

5  When disconnecting the power cord from the AC outlet, 
    always grasp by the plug. Never pull the power cord.

6  To prevent electric shock, do not remove the cover or the 
    bottom screws.

7  There are NO USER SERVICEABLE PARTS INSIDE. Please  
    refer to a qualified technician.

8 Do not use chemical solvents to clean the unit.

9 Keep this manual in a safe place for future reference.

Selecting fine audio equipment such as the unit you have just purSeSe-
lecting fine audio equipment such as the unit you’ve just purchased is 
only the start of your musical enjoyment. Now it’s time to consider how 
you can maximize the fun and excitement your equipment offers. This 

Selecting fine audio equipment such as the unit you’ve just purchased 
is only the start of your musical enjoyment. Now it’s time to consider 
how you can maximize the fun and excitement your equipment offers. 
This manufacturer and the Electronic Industries Association’s 
Consumer Electronics Group want you to get the most out of your 
equipment by playing it at a safe level. One that lets the sound come 
through loud and clear without annoying blaring or distortion—and, 
most importantly, without affecting your sensitive hearing. Sound can 
be deceiving. Over time your hearing “comfort level” adapts to higher 
volumes of sound. So what sounds “normal” can actually be loud and 
harmful to your hearing. Guard against this by setting your equipment 
at a safe level BEFORE your hearing adapts. 

To establish a safe level, start your volume control at a low setting. 
Slowly increase the sound until you can hear it comfortably and clearly, 
and without distortion.  Once you have established a comfortable 
sound level, set the dial and leave it there. Taking a minute to do this 
now will help to prevent hearing damage or loss in the future. After all, 
we want you listening for a lifetime.

Used wisely, your new sound equipment will provide a lifetime of 
fun and enjoyment. Since hearing damage from loud noise is often 
undetectable until it is too late, this Manufacturer and the Electronic 
Industries Association’s Consumer Electronics Group recommend you 
avoid prolonged exposure to excessive noise.  This list of sound levels 
is included for your protection.

30 dB - Quiet library, soft whispers
40 dB - Living room, refrigerator, bedroom away from traffic
50 dB - Light traffic, normal conversation, quiet office
60 dB - Air conditioner at 20 feet, sewing machine
70 dB - Vacuum cleaner, hair dryer, noisy restaurant
80 dB - Average city traffic, garbage disposals, alarm clock   
             at two feet

The following noises can be dangerous at extended exposure:

90 dB - Subway, motorcycle, truck traffic, lawn mower
100 dB -  Garbage truck, chain saw, pneumatic drill
120 dB - Rock band concert in front of speakers, thunderclap
140 dB - Gunshot blast, jet plane 
180 dB - Rocket launch pad


Information courtesy of the Deafness Research Foundation.

Thank you for purchasing our Gemini MDJ-500. We are confident that the Gemini Family of products will not only make 
your life easier through the use of the latest technological advancements in cross-platform connectivity 
and sound reproduction but will raise the bar for DJ and pro audio products. With the proper care & maintenance, 
your unit will likely provide years of reliable, uninterrupted service. All Gemini products are backed by a 1-year 
limited warranty*.

w e  w a n t  y o u  l i s t e n i n g   

f o r   a   l i f e t i m e

i n t r o d u c t i o n

• In the USA- if you experience problems with this unit call Gemini 
customer service at 1 (732) 346-0061. Do not attempt to return 
this equipment to your dealer

PREPARING FOR 

FIRST USE 

PRECAUTIONS

Summary of Contents for MDJ-500

Page 1: ...Please read the manual carefully before operation WWW GEMINISOUND COM MDJ 500 PROFESSIONAL ME DIA C ON TROL L E R USER MANUAL ...

Page 2: ...roduct is equipped with a three wire grounding type plug a plug having a third grounding pin it will only fit into a grounding type power outlet This is a safely feature If you are unable to insert the plug into the outlet contact your electrician to replace your obsolete outlet Do not defeat the safety purpose of the grounding type plug POWER CORD PROTECTION Power supply cords should be routed so...

Page 3: ...apts To establish a safe level start your volume control at a low setting Slowly increase the sound until you can hear it comfortably and clearly and without distortion Once you have established a comfortable sound level set the dial and leave it there Taking a minute to do this now will help to prevent hearing damage or loss in the future After all we want you listening for a lifetime Used wisely...

Page 4: ... III AAC 16 bit 44 1 kHz stereo AAC Core AAC Plus AAC Plus v2 AIFF 16 bit 44 1 kHz stereo Supported file systems on USB Storage Devices include FAT FAT32 HFS NTFS When placed in MIDI mode the MDJ 500 can send MIDI data from the buttons and dials to a computer to control the parameters and playback controls of DJ software The audio playback from the computer can also be output from the MDJ 500 Befo...

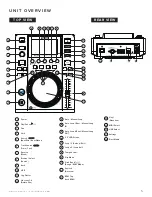
Page 5: ... Back USB Hot cues 1 4 Delete Cue Auto Manual Loop Auto Loop 1 Beat Manual Loop IN Auto Loop 4 Beat Manual Loop OUT 4 3 LCD Screen Loop 2 Reloop Exit Loop x 2 Loop Roll Tempo Slider Slip Mode Range BPM Mode Keylock Autocue BPM Tap Lock BPM Vinyl Quantize MIDI Select Settings Eject Media 16 17 18 19 20 21 22 23 25 26 27 28 1 2 3 4 5 6 7 8 9 10 11 12 13 14 15 24 Track Search USB Select Jog Platter P...

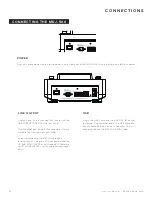
Page 6: ...g the RCA connectors into the CD AUX INPUT JACKS on your receiver If there are no CD or AUX INPUTS use any line level not phono inputs U S B Plug in the USB cable into the USB OUT B on the rear panel Plug the other end of the USB cable into any available USB port on your computer This will enable you to use the MDJ 500 in MIDI mode connections POWER Plug the 2 prong power cable into the power inpu...

Page 7: ...play The white line indicates the current position of the track while blue markers show hotcues and a green waveform highlight indicates a stored loop PROGRESS BAR Indicates the progress of the current playing song When elapsed time is displayed the left edge of the graph lights green to show how much of the song has elapsed When remaining time is displayed the right side of the graph lights green...

Page 8: ...s on the USB storage device To eject the USB drive press EJECT or MIDI and remove the USB storage device NOTE Before powering off the MDJ 500 it s a good idea to remove any connected USB storage device Turning the browse knob 8 activates the browse screen The browser shows the available files and folders on the USB storage device Rotating the browse encoder 8 allows searching through the browser T...

Page 9: ...rily raise or lower the pitch from the existing pitch setting Releasing the buttons will return the pitch to the original setting The tempo increases when the tempo slider 19 is moved to the side down decreases when moved to the side up The rate at with the playing speed is changed is indicated on the LCD display Pressing shift and pitch bend 21 toggles the range between 4 8 16 24 50 and 100 KEY L...

Page 10: ...en the loop is active Auto beat loops are set based on current BPM of track AUTO LOOP ROLL Press shift and the x2 button 18 to activate loop roll mode Press and hold any of the AUTO LOOP buttons to set a loop to your desired length with slip mode activated Release to exit the loop and turn off slip mode VINYL MODE Pressing the VINYL 24 button enables VINYL mode Enabling VINYL mode allows scratchin...

Page 11: ...lows you to zoom into the waveform of the selected track To cycle through the available views hold the shift button 4 and press the REV button 7 Multiple presses will toggle through different zoom levels TIME FORMAT TIME FORMAT toggles the display between ELAPSED or REMAINING time This feature can either be accessed by holding shift and pressing the TRACK SEARCH button 6 or through the SETTINGS me...

Page 12: ...ss SETTTINGS 27 Scroll down to the entry called MIDI CHANNEL Press the browse knob to select that entry then turn the browse knob to select the desired channel 0 15 are available Once you ve selected the correct MIDI channel press the BACK button to exit Settings NOTE In Settings the MIDI channels are presented in hexadecimal If your software defines the MIDI channel in decimal just add 1 so if Se...

Page 13: ...Channel Vinyl Mode On Off Turns Vinyl scratch mode on or off Platter Nudge 1 2 3 4 5 Determines platter nudge sensitivity Load Settings from MSD Loads stored settings off mass storage device Save Settings to MSD Save setings to mass storage device Reset Settings Reset settings to default values Software Version Current software version Exit Exit the menu Settings are stored and loaded from the USB...

Page 14: ... Incorrect processing MIDI ERRORS If the computer does not recognize the device try powering the unit off and rebooting the computer If the DJ software does not list the device ensure that you are using the latest version by downloading any updates to your DJ software If the MDJ 500 mapping does not appear in your DJ software s list go to geminisound com for downloads and support GENERAL TROUBLESH...

Page 15: ...mdj 5 00 manual ge m inis ou nd c om 15 ...

Page 16: ...is manual may be reproduced stored in a retrieval system or transmitted in any form or by any means electronic electrical mechanical optical chemical including photocopying and recording for any purpose without the express written permission of Innovative Concepts and Design LLC It is recommended that all maintenance and service on this product is performed by nnovative Concepts and Design LLC or ...

Reviews: