m d j -
5 0 0
m a n u a l
•
g e m i n i s o u n d . c o m
9
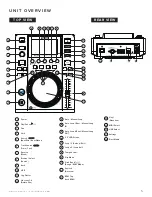
Pressing PLAY/PAUSE (2) will begin playback of the selected
track. Pressing PLAY/PAUSE (2) again will pause playback and
hold the track at the current position.
S E T T I N G A M A S T E R C U E P O I N T
While the unit is in playback, press PLAY/PAUSE / ll (2) to
pause the track. While the track is paused, press CUE (3) to set
the cue point at the current position.
ADJUSTING THE MASTER CUE POINT
After the cue point has been programmed, press PLAY/
PAUSE (2) to pause the track at the cue point. Press SEARCH (5)
or rotate the jogwheel to adjust the cue position. Press CUE (3)
to set the cue point at the play marker.
RETURNING TO THE MASTER CUE POINT
While the unit is playing and after the cue point has been
programmed, pressing CUE (3) will cause the unit to enter the
PAUSE mode at the programmed cue point. Holding down the
CUE button changes the function to preview, and allows you to
stutter start or play from the programmed CUE POINT. Releasing
the CUE button will return the track to the preset CUE point.
You can press the PLAY/PAUSE button while holding the CUE
button to allow playback to continue from the current position.
The AUTO CUE (22) function sets the Master Cue at the point
immediately before sound starts, skipping the beginning silent
section of tracks. Press shift and keylock (22) to enable auto cue.
The audio level threshold determines where the auto cue is set,
and can be adjusted in Settings>Autocue Level.
Pressing SEARCH FORWARD (5) will fast-search through the
track in the forward direction, and holding SEARCH BACK (5)
will fast-search through the track in the reverse direction.
Pressing TRACK SEARCH FORWARD (6) will advance to the
beginning position of the next track. Pressing TRACK SEARCH
BACK (6) will return the current track to the beginning position.
Pressing the PITCH BEND - / + (21) will temporarily raise or lower
the pitch from the existing pitch setting. Releasing the buttons
will return the pitch to the original setting.
The tempo increases when the tempo slider [19] is moved to the
[+] side (down), decreases when moved to the [-] side (up). The
rate at with the playing speed is changed is indicated on the
LCD display.
Pressing shift and pitch bend - (21) toggles the range between
+/- 4%, 8%, 16%, 24% ,50% and 100%.
KEY LOCK (22) allows the user to adjust the tempo (speed) of
the song without causing a noticeable change in pitch.
Pressing shift and pitch bend + (21) button allows the user to
toggle through the different BPM modes: ID3 / AUTO / MANUAL
/ TAP.
BPM TAP -
When BPM mode is set to TAP, the BPM TAP
(23) button can be used to set the BPM of the loaded track. BPM
is calculated through a rolling average, with each tap increasing
the accuracy. To re-start the calculation, don’t touch the BPM
TAP button for 2 seconds.
MANUAL BPM -
When BPM mode is set to MANUAL, the browse
knob (8) can be used to set the beats per minute of playback by
rotating to the desired tempo. Hold shift and turn the browse
knob for fine control. Press the browse knob to set the new
BPM.
ID3 -
when BPM mode is set to ID3, the BPM information from
the ID3 tag will be displayed.
AUTO BPM -
When BPM mode is set to AUTO BPM, the beats
per minute are calculated automatically and corresponding info
is displayed on screen.
NOTE:
If a BPM value is present in file info ID3 tag, the
value is loaded into the unit and displayed.
The BPM LOCK feature allows the user to lock the BPM of all
songs to a specific value. To use, enable the feature by pressing
shift and BPM Tap buttons. By default, the BPM value will change
to the BPM of the current song. To change this value, turn the
browse knob to the desired value and press the browse knob
to set. All songs played from your MDJ-500 will now be at the
selected tempo.
To turn off, press shift and BPM TAP again.
p l ay b a c k c o n t r o l s
PLAY/PAUSE
ADJUSTING TEMPO
PITCH RANGE
KEY LOCK
BPM
BPM LOCK
AUTO CUE
SEARCH
TRACK SEARCH
PITCH BEND
MASTER CUE CONTROLS


