background image

CPE7000 Outdoor Dual Mode - Quick Installation Guide 


Preparing and Connecting the Cable 

Use only Category 5E 4x2x24# FTP outdoor cables from an approved manufacturer. The cable provides pin-to-pin 

connection on both ends.


1.


Prepare the cable: 

Use a crimp tool for RJ-45 connectors to prepare the wires. Insert them into the appropriate pins


and 

use the tool to crimp the connector. Make sure to do the following:


A.


Remove as small a length as possible of the external jacket. Verify that the external jacket is well inside the sealing cover 

when connected to the unit, to ensure good sealing.   

B.


Pull back the shield drain wire before inserting the cable into the RJ-45 connector, to ensure a good connection with the 

connector's shield after crimping.   

2.


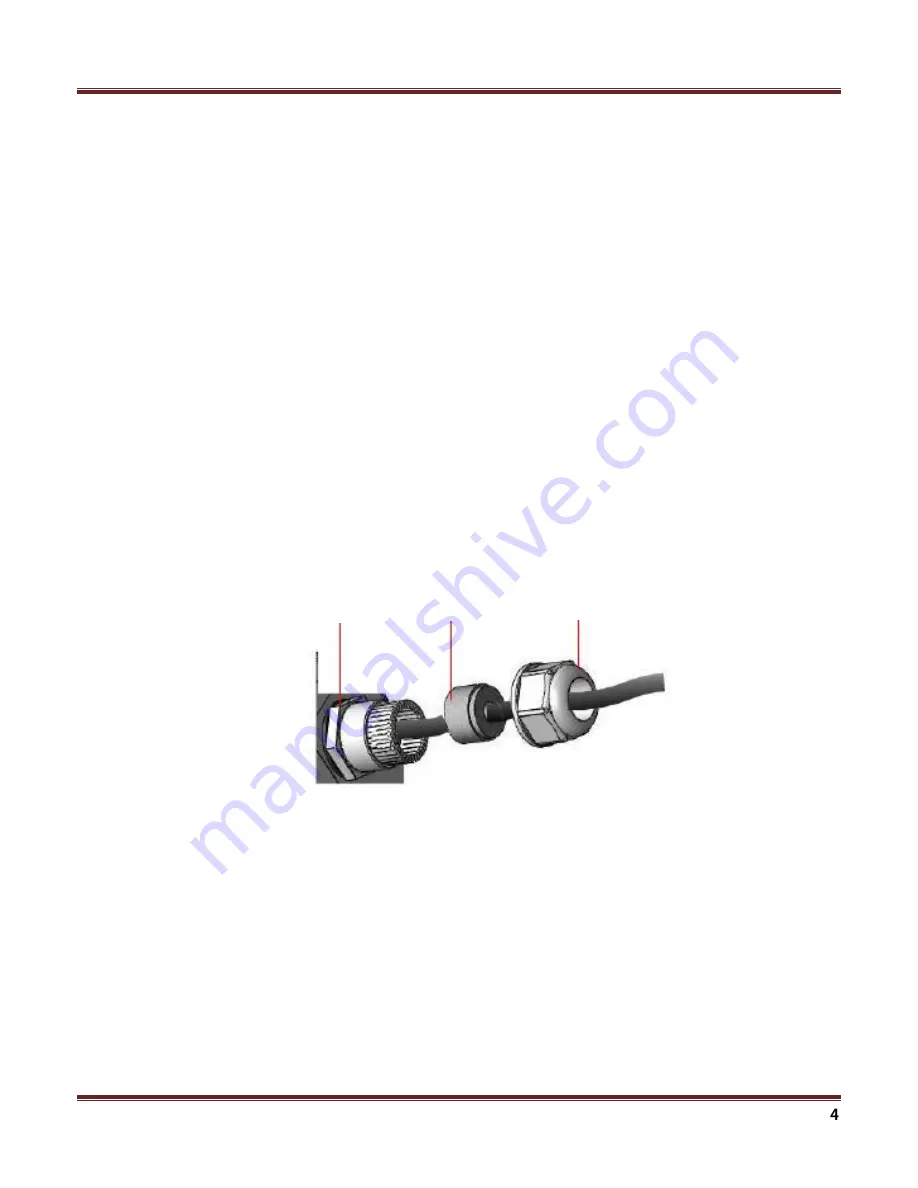
Connect the cable (see Figure 3):


A.


Remove the sealing gland plug from the gland nut.   

B.


Open the sealing gland nut and remove it. Do not disassemble the gland base from the bracket.   

C.


Insert the cable into the sealing gland base and connect it to the RJ-45 connector at the bottom of the ODU, labeled. Make 

sure that the connector is completely inserted and tightened.   

D.


Insert the rubber bushing on the cable into the gland base.   


Figure 3: Cable Insertion


Inserting the Cable into the Sealing Cap


Sealing Gland Base


Sealing  Gland  Nut


Rubber  Bushing


Summary of Contents for CPE7000

Page 1: ...stalling the ODU verify that you have all the items listed in the package checklist If any of the items are missing or damaged please contact your service provider Installing the ODU The ODU should be pole mounted outdoors and aligned so its antenna faces the nearest base station When selecting a suitable location for the unit consider these guidelines Place the ODU as high as possible to achieve ...

Page 2: ...Tilt accessory Using the Clamp 1 Tread the M10 100mm bolt through a spring washer flat washer and the bracket holes 2 With the connector facing downward attach the ODU to a 1 4 pole 3 Attach the bracket to the other side of the pole 4 Thread the M10 100 mm bolts through both holes on either side Tighten the nuts Figure 1 Mounting the ODU on the Pole ...

Page 3: ...ct the telephone with RJ 11 port Available for other device such as PC Hub Switch connected to LAN port Figure 2 CPE Connections Do not connect the data equipment to the PoE port as it supplies DC power to the ODU and this may harm other equipment connected to it CAUTION 2 One RJ 11 phone cable not included for connecting Phone 1 CAT 5 or Cat5E Outdoor Shielded Patch Ethernet cable not Included fo...

Page 4: ...nnected to the unit to ensure good sealing B Pull back the shield drain wire before inserting the cable into the RJ 45 connector to ensure a good connection with the connector s shield after crimping 2 Connect the cable see Figure 3 A Remove the sealing gland plug from the gland nut B Open the sealing gland nut and remove it Do not disassemble the gland base from the bracket C Insert the cable int...

Page 5: ... Step 1 Click the web browser Internet Explorer and enter default IP address of the ODU CPE http 192 168 254 251 Step 2 Enter ODU administrator login username password to access the web management interface The default username password admin admin Step 3 Simply configure the device settings after login Figure 4 Figure 4 User Interface ...

Page 6: ...r Status Indication LED list Main Power Blue ON Power On OFF Power Off Ethernet Status Yellow Steady ON Ethernet connected Blinking Data transmission OFF No Ethernet action SIM status Green Steady ON SIM Detected Blinking when On hook PUK PIN Code OFF No SIM Detected 4G Status LED Link Status After power on LED color will indicate different link status as below 4G 1 Red Steady ON CINR 8dB 4G 2 Red...

Page 7: ...e must accept any interference received including interference that may cause undesired operation IMPORTANT NOTE Radiation Exposure Statement This equipment complies with FCC radiation exposure limits set forth for an uncontrolled environment This equipment should be installed and operated with minimum distance 20cm between the radiator your body This transmitter must not be co located or operatin...

Page 8: ... ΑΙ Ι ΙΩ Ι Α ΑΙ Η Ι ΑΙ Ι Ι Ι ΙΑ Α Ι Η Η ΙΑ 1999 5 Français French Par la présente nom du fabricant déclare que l appareil type d appareil est conforme aux exigences essentielles et aux autres dispositions pertinentes de la directive 1999 5 CE Italiano Italian Con la presente nome del costruttore dichiara che questo tipo di apparecchio è conforme ai requisiti essenziali ed alle altre disposizioni p...

Reviews: