Setting the input sensitivity
Setting the input sensitivity
Setting the input sensitivity
Setting the input sensitivity
Setting the input sensitivity
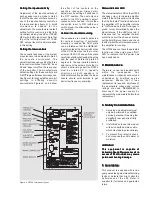
Adjustment of the input sensitivity of
each speaker can be made to match
that of the decoder or other source, by
use of the input sensitivity control on
the rear panel (see figure 4). A small
screwdriver is needed for the
adjustment. The manufacturer default
setting for this control is -6 dBu (fully
clockwise) which gives SPL of 100 dB
@1m with -6 dBu input level. Note that
to get the full output level of 110 dB
SPL, an input level of +4 dBu is needed
in this setting.
Setting the tone controls
Setting the tone controls
Setting the tone controls
Setting the tone controls
Setting the tone controls
The acoustic response of the system
may also have to be adjusted to match
the acoustic environment. The
adjustment is done by setting the three
tone control switches 'treble tilt', 'bass
tilt' and 'bass roll-off' on the rear panel
of the amplifier. The manufacturers
default settings for these controls are
'All Off' to give a flat anechoic response.
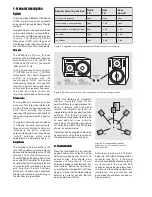
See Figure 1 for suggested tone control
settings in differing acoustic
environments. Figures 5 and 6 show
the effect of the controls on the
anechoic response. Always start
adjustment by setting all switches to
the 'OFF' position. Then set only one
switch to the 'ON' position to select
response curve needed. If more than
one switch is set to 'ON' (within one
switch group) the attenuation value is
not accurate.
Vertical / horizontal mounting
Vertical / horizontal mounting
Vertical / horizontal mounting
Vertical / horizontal mounting
Vertical / horizontal mounting
The speakers are normally delivered
for vertical mounting. If horizontal
mounting is needed the DCW plate
can be rotated so that the GENELEC
logo is located at the bottom left corner
of the DCW. Remove the four corner
screws of the DCW and pull the plate
carefully out without stressing the wires
and the gasket. Rotate the plate 90
degrees to the appropriate direction
and remount the screws. Note that to
obtain a mirror image pair the DCW's
must be rotated 90° in opposite
directions on both speakers. In
horizontal mounting position the bass
drivers should point inwards to get
better low frequency summing.
Figure 4. HT208 rear panel layout.
Status indicator LED
Status indicator LED
Status indicator LED
Status indicator LED
Status indicator LED
The status indicator LED on the HT208
changes colour to indicate amplifier
status. If the LED is yellow, it indicates
that the "autostart" function has turned
the amplifier off. The amplifier returns
to "ON" mode and the LED changes to
green colour automatically when the
signal returns. If the LED turns red, it
indicates that the amplifier thermal
protection circuit has been activated.
Let the amplifier cool down and check
that there is sufficient clearance around
the amplifier for cooling.
The HT206 does not have the autostart
function, so it has only a green "ON"-
LED to indicate that the power has
been switched on.
3. Maintenance
3. Maintenance
3. Maintenance
3. Maintenance
3. Maintenance
There are no user serviceable parts
within the loudspeaker. Any
maintenance or repair should only be
undertaken by qualified service
personnel. Ensure that if fuse
replacement is required, only fuses of
the appropriate voltage and current
ratings are used. REMEMBER to
disconnect the power supply by
removal of the mains cable before fuse
replacement.
4. Safety Considerations
4. Safety Considerations
4. Safety Considerations
4. Safety Considerations
4. Safety Considerations
1.
Servicing and adjustment must
only be performed by qualified
service personnel. Opening the
amplifier's rear panel is strictly
prohibited.
2.
It is forbidden to use this product
with an unearthed mains cable,
which may lead to personal injury.
3.
To prevent fire or electric shock,
do not expose the unit to water or
moisture.
WARNING!
WARNING!
WARNING!
WARNING!
WARNING!
T h i s e q u i p m e n t i s c a p a b l e o f
T h i s e q u i p m e n t i s c a p a b l e o f
T h i s e q u i p m e n t i s c a p a b l e o f
T h i s e q u i p m e n t i s c a p a b l e o f
T h i s e q u i p m e n t i s c a p a b l e o f
delivering Sound Pressure Levels in
delivering Sound Pressure Levels in
delivering Sound Pressure Levels in
delivering Sound Pressure Levels in
delivering Sound Pressure Levels in
excess of 85 dB, which may cause
excess of 85 dB, which may cause
excess of 85 dB, which may cause
excess of 85 dB, which may cause
excess of 85 dB, which may cause
permanent hearing damage.
permanent hearing damage.
permanent hearing damage.
permanent hearing damage.
permanent hearing damage.
5. Guarantee
5. Guarantee
5. Guarantee
5. Guarantee
5. Guarantee
This product is supplied with a two
year guarantee against manufacturing
faults or defects that might alter the
performance of the unit. Refer to
supplier for full sales and guarantee
terms.


