Commissioning and Setup
Installation Manual for Generac PWRCell Inverter
33
4.
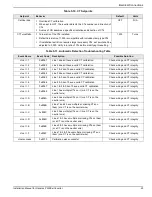
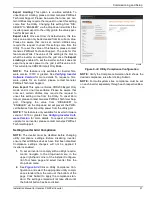
. From the IP Settings menu select
Manual.
Figure 6-27. Ethernet Configuration (2 of 2)
5.
Adjust any of the following:
•
IP
•
Subnet Mask
•
DNS
•
Gateway
NOTE:
Contact your network system administrator to
connect the PWRcell inverter to a restricted network.
6.
Disconnect and move blue Cat 5 connector back to
its original RJ-45 connection port on the topside of
the Beacon.
NOTE:
Beacon must retain an Internet connection in
order to use the PWRview mobile app.
Ethernet Troubleshooting
NOTE:
Use a laptop or other device to verify the Internet
connection is working properly before troubleshooting.
For a successful connection the following must be valid:
•
The Internet LED on the control panel must be lit.
NOTE:
A lit Internet LED is a necessary, but not suffi
-
cient indication of a successful connection to the PWR
-
view server. The blue LED may be lit even if the inverter
is not connected to the server.
•
A valid IP address must be displayed on the Ether
-
net settings page.
To validate the connection to the server, the Ethernet set
-
tings page must be accessed. To access the Ethernet
settings page:
1.
Relocate the blue Cat 5 cable connector inserted
into the RJ-45 port on the top of the Beacon to the
RJ-45 port on the backside of the inverter control
Panel.
2.
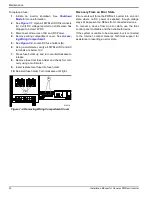
Navigate the inverter control panel to access a
screen similar to
. When properly
installed, the inverter control panel will have an
additional device page for Ethernet Settings.
Figure 6-28. Ethernet Troubleshooting
NOTE:
Ensure blue Cat 5 cable is reconnected to the
Beacon after troubleshooting is complete.
On the Ethernet settings page, the PWRview State
should read “Listen”, then a successful connection has
not been made to the PWRview server.
If the inverter does not automatically connect to the
network and begin communicating with the PWRview
server, perform the following steps:
1.
Verify an Ethernet connection has been enabled by
pressing the center button on the Ethernet page
and selecting Enable Ethernet.
2.
Verify the network is configured for DHCP and that
DHCP is enabled.
3.
If the network is not configured for DHCP, obtain
the MAC address and contact the system
administrator for IP address assignment.
4.
Input IP address under Manual settings. See
5.
Restart router and modem.
6.
Contact system administrator for further
troubleshooting steps.
NOTE:
It is the installer’s responsibility to make sure the
Internet connection is reliable and secure. Generac
recommends always using a hardwired connection.
Generac does not recommend or support using any
wireless or power line carrier network devices. Use these
devices at your own discretion.
Commissioning Multiple Inverter
Systems
PLM Crosstalk
NOTE:
Do not energize two or more inverters before
commissioning. Energizing two or more inverters prior to
commissioning will result in crosstalk.
PWRcell inverters are manufactured with some common
default parameters. One of these default parameters is
the default Power Line Modem (PLM) channel. PWRcell
inverters use the PLM channel to communicate with and
010049
IP: 192.168.158.37
MAC:00:04:a3:0b:77:fc
DHCP: bound, 83285s
ARP: idle
DNS: done
ctr btn: net settings
009981


