background image

ELECTRICAL REQUIREMENTS

6

BEFORE CONNECTING THE MACHINE TO THE POWER SOURCE, VERIFY THAT THE VOLTAGE OF YOUR POWER 

SUPPLY CORRESPONDS WITH THE VOLTAGE SPECIFIED ON THE MOTOR I.D. NAMEPLATE. A POWER SOURCE 

WITH GREATER VOLTAGE THAN NEEDED CAN RESULT IN SERIOUS INJURY TO THE USER AS WELL AS DAMAGE 

TO THE MACHINE. IF IN DOUBT, CONTACT A QUALIFIED ELECTRICIAN BEFORE CONNECTING TO THE POWER 

SOURCE.
THIS TOOL IS FOR INDOOR USE ONLY. DO NOT EXPOSE TO RAIN OR USE IN WET OR DAMP LOCATIONS.

GROUNDING INSTRUCTIONS

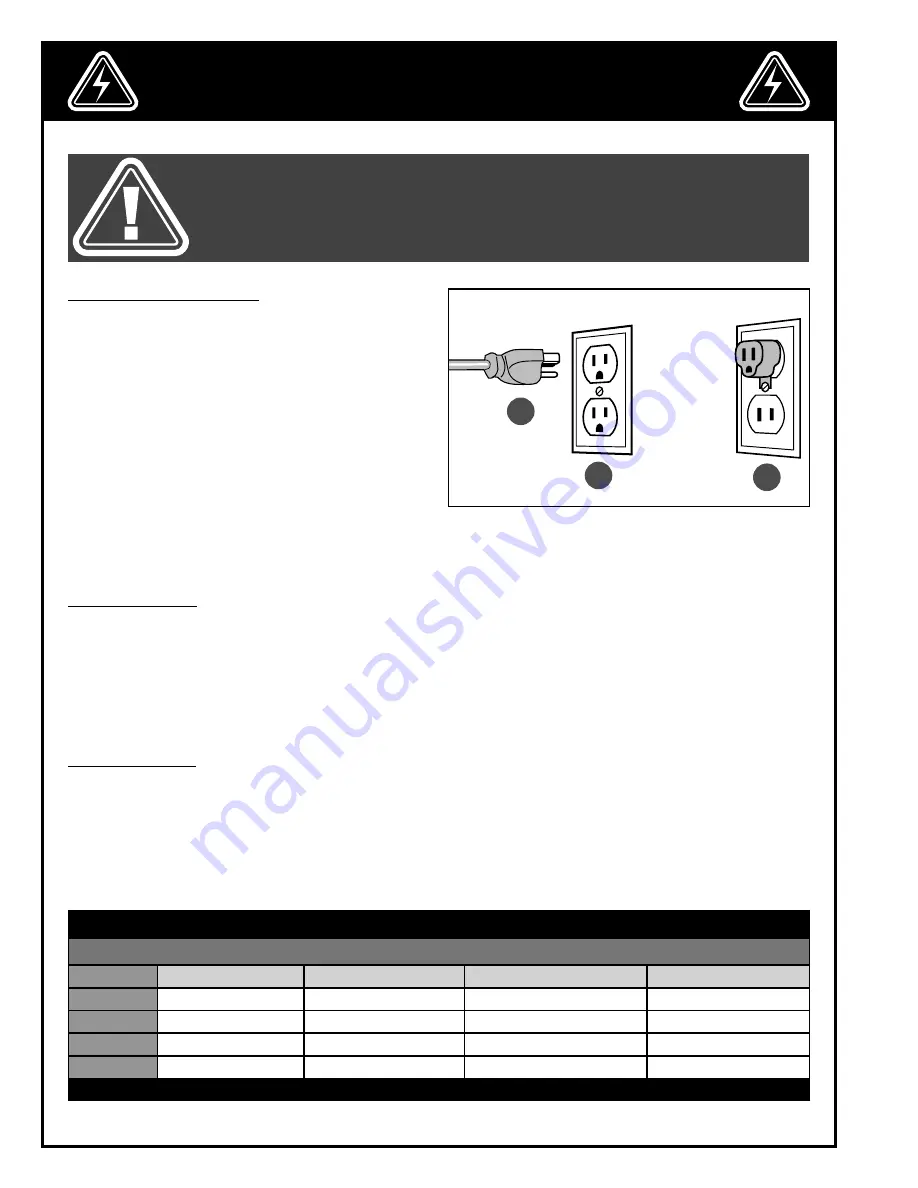
In the event of an electrical malfunction or short circuit, 

grounding reduces the risk of electric shock. The motor 

of this machine is wired for 120 V single phase opera-

tion and is equipped with a 3-conductor cord and 

a 3-prong grounding plug 

A

 to fit a grounded type 

receptacle 

B

. Do not remove the 3rd prong (ground-

ing pin) to make it fit into an old 2-hole wall socket or 

extension cord. If an adaptor plug is used 

C

, it must be 

attached to the metal screw of the receptacle. 

Note: The use of an adaptor plug is illegal in some 

areas. Check your local codes. If you have any 

doubts or if the supplied plug does not correspond 

to your electrical outlet, consult a qualified electri-

cian before proceeding.

CIRCUIT CAPACITY

Make sure that the wires in your circuit are capable of handling the amperage draw from your machine, as well 

as any other machines that could be operating on the same circuit. If you are unsure, consult a qualified electri-

cian. If the circuit breaker trips or the fuse blows regularly, your machine may be operating on a circuit that is 

close to its amperage draw capacity. However, if an unusual amperage draw does not exist and a power failure 

still occurs, contact a qualified technician or our service department.

EXTENSION CORDS

If you find it necessary to use an extension cord with your machine, use only 3-wire extension cords that have 

3-prong grounding plug and a matching 3-pole receptacle that accepts the tool’s plug. Repair or replace a dam-

aged extension cord or plug immediately.
Make sure the cord rating is suitable for the amperage listed on the motor I.D. plate. An undersized cord will cause 

a drop in line voltage resulting in loss of power and overheating. The accompanying chart shows the correct size 

extension cord to be used based on cord length and motor I.D. plate amp rating. If in doubt, use the next heavier 

gauge. The smaller the number, the heavier the gauge.

TABLE - MINIMUM GAUGE FOR CORD

EXTENSION CORD LENGTH

AMPERES

50 feet

100 feet

200 feet

300 feet

< 5

18

16

16

14

6 to 10

18

16

14

12

10 to 12

16

16

14

12

12 to 16

14

12

*NR

*NR

*NR = Not Recommended

A

B

C

Summary of Contents for 10-055

Page 1: ...balanced impeller for smooth operation and minimal noise Reusable clear plastic collector bag Washable extra fine 5 micron filter bag Quick release bags clamps with metal straps Hole in base allows fl...

Page 2: ...from knowledgeable and qualified sources that it is safe to do so Once you ve read through these instructions keep this manual handy for future reference DISCLAIMER The information and specifications...

Page 3: ...rd 2 year Limited Warranty or under our Limited Lifetime Warranty all defective parts components or machinery must be returned freight or postage prepaid to General International or to a nearby distri...

Page 4: ...ller separator assembly 11 Installing the hose 11 Installing the filter bag 12 Installing the collector bag 13 Basic adjustments and controls 13 Connecting to a power source 13 On Off power switch 13...

Page 5: ...model or cartridges on CF model on a regular basis and replace as needed 11 Do not handle the electrical plug with wet hands 12 Do not use this unit outdoors or near wet surfaces 13 Always turn on the...

Page 6: ...eding CIRCUIT CAPACITY Make sure that the wires in your circuit are capable of handling the amperage draw from your machine as well as any other machines that could be operating on the same circuit If...

Page 7: ...AIN PARTS AND COMPONENTS A SWIVEL CASTER 4 B FLOOR SWEEP OPENING C BASE D DUST HOSE E IMPELLER SEPARATOR ASSEMBLY F SAFETY SWITCH G MOTOR H 5 MICRON FILTER BAG I QUICK RELEASE BAG CLAMP J COLLECTOR BA...

Page 8: ...B VERTICAL SUPPORT PANEL 2 C CROSS PANEL 1 D BAG HANGER 1 E BASE 1 F DUST HOSE 1 G FILTER BAG 1 H HOSE FITTING 1 I COLLECTOR BAG 1 J HOSE CLAMP 2 K BAG CLAMP 2 L CARRIAGE BOLT M8 X 12 4 M CARRIAGE BO...

Page 9: ...ver possible See the accompanying examples of non recommended and recommended installations Wherever possible avoid running hoses and ducting along the floor Keep hoses and ducting safely mounted alon...

Page 10: ...wn D E BEFORE ASSEMBLING MAKE SURE THAT THE SWITCH IS IN THE OFF POSITION AND THAT THE POWER CORD IS UNPLUGGED DO NOT PLUG IN OR TURN ON THE MACHINE UNTIL YOU HAVE COMPLETED THE ASSEMBLY AND INSTALLAT...

Page 11: ...ANUAL INSTALLING THE IMPELLER SEPARATOR ASSEMBLY 1 Install the separator on the frame 2 Align the mounting holes D with the correspond ing holes on the two sides of frame 3 Insert a carriage bolt E in...

Page 12: ...driver Repeat steps 1 to 2 with the other hose clamp then connect to the dust producing ma chine 12 INSTALLING THE HOSE CONTINUED INSTALLING THE FILTER BAG 1 Fit the bag hanger support into the holes...

Page 13: ...SK OF SHOCK OR FIRE DO NOT OPERATE THE UNIT WITH A DAMAGED POWER CORD OR PLUG RE PLACE DAMAGED CORD OR PLUG IMMEDIATELY TO AVOID UNEXPECTED OR UNINTENTIONAL START UP MAKE SURE THE POWER SWITCH IS IN T...

Page 14: ...NVIRONMENT IS TAKEN INTO CONSIDERATION MAINTENANCE MAKE SURE THE MACHINE HAS BEEN TURNED OFF AND UNPLUGGED FROM THE POWER SOURCE BEFORE PERFORM ING ANY MAINTENANCE OR ADJUSTMENTS PERIODIC MAINTENANCE...

Page 15: ...kbench and slowly passing the vacuum nozzle over the entire surface area 2 Reinstall the bag and reattach the clamp Note Filter bags can also be machine washed gentle cycle only in cold or warm water...

Page 16: ...16 DIAGRAM 10 055 1 7 2 2 3 4 29 5 6 8 13 9 10 11 12 14 21 16 17 18 19 20 22 30 31 33 34 26 25 24 15 23 27 32 28 36 35 8...

Page 17: ...10055 19 RIGHT SIDE PANEL 1 10055 20 IMPELLER 1 10055 21 HEX HEAD BOLT M8 X 12 4 10055 22 LOCK WASHER 4 10055 23 LARGE WASHER 1 10055 24 LOWER IMPELLER COVER 1 10055 25 CAP SCREW M6 X 1 1 10055 26 UP...

Page 18: ...Follow us 8360 Champ d Eau Montreal Quebec Canada H1P 1Y3 Tel 514 326 1161 Fax 514 326 5565 Parts Service 514 326 5555 Order Desk orderdesk general ca www general ca...

Reviews: