English
28. Compressed air from the unit may contain carbon
monoxide. Air produced is not suitable for breathing
purposes.
29. Always use a respirator when spraying paint or
chemicals.
30. The air pressure switch is set at the factory for optimum
performance of your equipment. Never attempt to bypass
or remove this switch as serious damage to equipment or
personal injury could result from excessive air pressure.
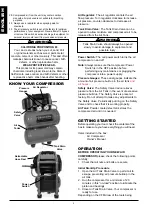
KNOW YOUR COMPRESSOR
Air Regulator:
The air regulator controls the air
flow pressure. Turn regulator clockwise to increase
air pressure, counter-clockwise to decrease air
pressure.
Tank Drain Valve:
The Tank Drain Valve can be
opened to allow moisture and compressed air to be
released from the Air Tank.
Power Switch:
The red power switch turns the air
compressor on and off.
Note:
Always make sure that compressor Power
Switch is in the OFF position before
performing any maintenance or plugging the
compressor into a power supply.
Pressure Gauges:
These dual gauges indicate the
amount of air pressure built up in the air tank
and
air hoses.
Safety Valve:
The Safety Valve device relieves
pressure from the Air Tank in the event of excessive
pressure build up. The Safety Valve is preset at
factory. Do not attempt to make any adjustments to
the Safety Valve. Periodically pull ring on the Safety
Valve end to check that it is working properly.
Air Tank:
Powder coated steel tank stores the
compressed air until it is needed.
GETTING STARTEd
Before operating your tool, check the contents of the
box to make sure you have everything you will need.
Items included in the box:
Air Compressor
Owner’s Manual
OPERATION
BEFORE OPERATING YOUR NEW AIR
COMPRESSOR
please check the following points
carefully:
1 Check that all nuts and bolts are secure.
Initial Start-Up Procedure
1. Open the Air Tank Drain Valve to permit air to
escape, preventing air pressure buildup in the
air tank.
2. Run the compressor for a minimum of 20
minutes in this “no-load” position to lubricate the
piston and bearings.
3. Close Air Tank Drain Valve. Your compressor is
ready for use.
Depending on the CFM draw of the tools being
3
!
!
WARNING
Tank Drain Valve should always be opened
slowly to avoid damage to equipment and
possible injury.
Power
Switch
Retractable
Hose Reel
Air Regulator
Pressure
Gauges
Tank Drain
Valve
Air
Tanks
Safety
Valve
!
!
WARNING
CAlIFORNIA PROPOSITION 65
You can create dust when you cut, sand, drill
or grind materials such as wood, paint, metal,
concrete, cement, or other masonry. This dust often
contains chemicals known to cause cancer, birth
defects, or other reproductive harm.
WEAR PROTECTIVE GEAR.
This product or its power cord may contain
chemicals, including lead, known to the State of
California to cause cancer and birth defects or other
reproductive harm. Wash hands after handling.

