background image

MS3002 Manual v.200909

Page 19

GLOSSARY OF TERMS 

AMPERAGE (AMPS) –

 A measure of 

the flow of electric current. Higher ratings 

generally means the tool is suited for 

heavier use.

ARBOR LOCK –

  Allows the user 

to keep the blade from rotating while 

tightening or loosening the arbor bolt 

during blade replacement or removal.

BASE –

  Supports the table, holds 

accessories and allows for workbench or 

leg set mounting.

BEVEL LOCK HANDLE –

 Locks the 

miter saw at a desired bevel angle.

BEVEL SCALE –

 To measure the bevel 

angle of the saw blade 0° to 47° left.

CARBIDE TIPPED –

 Extremely hard 

steel pieces with sharp cutting edges 

fastened to cutting tools such as saw 

blades.

COVER PLATE SCREW –

 Loosen this 

screw and rotate the plate for access to 

the blade arbor bolt.

EXTENSION CORD –

 An electric cord 

used between power tools and outlets to 

extend the range of the tools. The more 

amperage your tool uses, the longer the 

distance, the larger the size of the wire 

needed in your extension cord.

EYE PROTECTION –

 Goggles or 

spectacles intended to protect your 

eyes. Eye protection should meet the 

requirements of ANSI Z.87.1 (USA) or 

CSA Z94.3-M88 (Canada).

FACE SHIELD –

 An impact resistant 

shield that helps to protect your face from 

chips, sparks, small debris. Should only 

be used in conjunction with additional eye 

protection. 

FENCE –

 Helps to keep the workpiece 

from moving when sawing. Scaled to 

assist with accurate cutting.

GUARD –

 Protective devise that forms 

a barrier between a hazardous object 

such as a blade, wheel or cutter and the 

operator.

HOLD-DOWN LATCH –

 Locks the 

miter saw in the lowered position for 

compact storage and transportation.

INSTRUCTION OR OPERATOR’S
MANUAL –

 Booklet accompanying 

your power tool that describes the 

hazards and safe operation procedures, 

outlines basic tool operation, care and 

maintenance.

MITER HANDLE –

 Used to rotate the 

table, and to rotate the saw to a right or 

left cutting position.

MITER SCALE –

 Measures the miter 

angle of the saw blade. Positive stop 

index points have been provided at 0°, 

15°, 22.5°, 31.6° and 45° right and left.

MOUNTING HOLES –

 To mount the 

miter saw to a stable surface. 

ON/OFF TRIGGER SWITCH –

 To 

start the tool, squeeze the trigger. 

Release the trigger to turn off the miter saw.

POSITIVE STOP LOCKING LEVER 

 Locks the miter saw at a preset positive 

stop for the desired miter angle.

SWITCH HANDLE –

 The switch handle 

contains the trigger switch and the laser 

on/off switch. The blade is lowered into 

the workpiece by pushing down on the 

handle. The saw will return to its upright 

position when the handle is released.

Summary of Contents for MS3002

Page 1: ...ATURES Precision cuts with laser alignment system Comfortable horizontal D Handle Bevel cuts up to 45 left Miter cuts up to 45 left and right 7 1 4 in saw blade with carbide tipped teeth Powerful 9 A motor With Adjustable cut depth for dadoes Shaft lock for trouble free blade changes Easy access motor brushes Includes Dust bag Hold down clamp SPECIFICATIONS 120 V 60 Hz 9 A motor No load speed 5000...

Page 2: ...CONTENTS____________________________________________ 17 UNPACKING YOUR MITER SAW__________________________________ 17 KNOW YOUR SLIDING COMPOUND MITER SAW____________________ 18 GLOSSARY OF TERMS _________________________________________ 19 CUTTING HEAD________________________________________________ 21 INSTALLING THE MITER HANDLE ________________________________ 21 INSTALLING THE DUST BAG________...

Page 3: ...OLDING_______________________________________ 39 CUTTING CROWN MOLDING_____________________________________ 40 BEVEL MITER SETTINGS________________________________________ 41 CROWN MOLDING CHART_______________________________________ 42 REPLACING CARBON BRUSHES _________________________________ 43 LOWER BLADE GUARD__________________________________________ 43 MAINTENANCE___________________________...

Page 4: ...eriod of 2 years 24 months from the date of purchase General International agrees to repair or replace any part or component which upon examination proves to be defective in either workmanship or material to the original purchaser during this 2 year warranty period subject to the conditions and exceptions as listed below Repairs made without the written consent of General International will void t...

Page 5: ...riginal purchaser only Prior warranty registration is not required but documented proof of purchase i e a copy of original sales invoice or receipt showing the date and location of the purchase as well as the purchase price paid must be provided at the time of claim Warranty does not include failures breakage or defects deemed after inspection by General International to have been directly or indi...

Page 6: ...ght Left Bevel Positive Stops 0 45 Left Cutting capacity Crosscut 2 in x 8 in Miter 45 Right Left 2 in x 6 in Bevel 45 Left 1 1 2 in x 8 in 45 Miter and 45 Bevel Left 1 1 2 in x 6 in Crown Molding Nested 3 1 4 in Base Molding Against Fence 3 in WARNING To avoid electrical hazards fire hazards or damage to the tool use proper circuit protection This tool is wired at the factory for 110 120 Volt ope...

Page 7: ...otection READ AND UNDERSTAND INSTRUCTION MANUAL To reduce the risk of injury user and all bystanders must read and understand instruction manual before using this product KEEP HANDS AWAY FROM BLADE Failure to keep your hands away from the blade will result in serious personal injury SUPPORT AND CLAMP WORK DANGER Indicates an imminently hazardous situation which if not avoided will result in death ...

Page 8: ...p locations Read The Operator s Manual To reduce the risk of injury user must read and understand operator s manual before using this product Eye Protection Always wear safety goggles or safety glasses with side shields and a full face shield when operating this product Safety Alert Precautions that involve your safety No Hands Symbol Failure to keep your hands away from the blade will result in s...

Page 9: ...OOL It will do the job better and safer at the rate for which it was designed 9 USE THE RIGHT TOOL Do not force the tool or an attachment to do a job for which it was not designed 10 USE PROPER EXTENSION CORDS Make sure your extension cord is in good condition When using an extension cord be sure to use the one heavy enough to carry the current that the product will draw An undersized cord will re...

Page 10: ... or other part that is damaged should be properly repaired or replaced 20 NEVER LEAVE THE TOOL RUNNING UNATTENDED TURN THE POWER OFF Do not walk away from a running tool until the blade comes to a complete stop and the tool is unplugged from the power source 21 DO NOT OVERREACH Keep proper footing and balance at all times NEVER reach across the path of the cutting blade while tool is in operation ...

Page 11: ... clean and the arbor bolt is tightened securely 10 USE only blade collars specified for your saw 11 NEVER use blades larger in diameter than 7 1 4 inches 12 NEVER apply lubricants to the blade when it is running 13 ALWAYS check the blade for cracks or damage before operation Replace a cracked or damaged blade immediately 14 NEVER use blades recommended for operation at less than 4800 RPM 15 ALWAYS...

Page 12: ...onotonous operations Don t be lulled into carelessness due to a false sense of security Blades are extremely unforgiving Clean the lower guard frequently to help visibility and movement Unplug before adjustment or cleaning 31 ABRASIVE CUT OFF WHEELS SHOULD NOT BE USED on miter saws Miter saw guards are not appropriate for abrasive cut off wheels 32 TO AVOID LOSS OF CONTROL OR PLACING HANDS IN THE ...

Page 13: ... shock this saw has a polarized plug one blade is wider than the other This plug will fit in a polarized outlet only one way If the plug does not fit fully in the outlet reverse the plug If it still does not fit contact a qualified electrician to install the proper outlet Do not change the plug in any way WARNING Double insulation does not take the place of normal safety precautions when operating...

Page 14: ...ulting in loss of power and cause overheating The table below shows the correct size to use depending on cord length and nameplate ampere rating If in doubt use the next heavier gauge The smaller the gauge number the heavier the cord Be sure your extension cord is properly wired and in good condition Always replace a damaged extension cord or have it repaired by a qualified person before using it ...

Page 15: ...carbide tipped blades to prevent accidental damage Slight shocks such as striking the tip while handling can seriously damage the blade Foreign objects in the workpiece such as wire or nails can also cause tips to crack or break off Before using always visually examine the blade and tips for bent blade cracks breakage missing or loose tips or other damage Do not use if damage is suspected Failure ...

Page 16: ... to the table top ALWAYS WEAR EYE PROTECTION CARTON CONTENTS TOOLS NEEDED FOR ASSEMBLY Supplied Not supplied Blade Wrench Adjustable Wrench Phillips Screwdriver 8 mm 10 mm Hex Wrench Slotted Screwdriver Combination Square COMBINATION SQUARE MUST BE TRUE Should not gap or overlap when square is flipped over see dotted figure raw light line on board along this edge Straight edge or a 3 4 in board th...

Page 17: ...y handle 2 Place the saw on a secure stationary work surface 3 Separate all parts from the packing material Check each one with the illustration to make certain all items are accounted for before discarding any packing material WARNING If any part is missing or damaged do not attempt to assemble the miter saw or plug in the power cord until the missing or damaged part is correctly replaced To avoi...

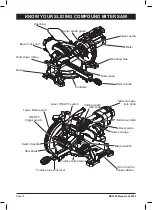
Page 18: ... knob Positive miter detent Slide carriage Slide carriage lock knob Positive stop lock lever Laser ON OFF switch Lower blade guard Base Bevel scale Saw blade Bevel lock knob Dust bag Hold down clamp Turntable Upper blade guard Miter handle Mounting hole Motor Table insert Laser guide Switch handle ON OFF trigger switch Blade wrench ...

Page 19: ...at helps to protect your face from chips sparks small debris Should only be used in conjunction with additional eye protection FENCE Helps to keep the workpiece from moving when sawing Scaled to assist with accurate cutting GUARD Protective devise that forms a barrier between a hazardous object such as a blade wheel or cutter and the operator HOLD DOWN LATCH Locks the miter saw in the lowered posi...

Page 20: ...ICKBACK sudden and unintended movement of the tool or workpiece It is typically caused by binding or pinching of the workpiece MITER CUT A miter is a type of joint where the two parts to be joined are cut at an angle and typically the finished joint forms a 90 degree angle Also commonly spelled mitre REVOLUTIONS PER MINUTE RPM The number of turns completed by a spinning object in one minute SAW BL...

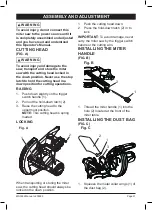
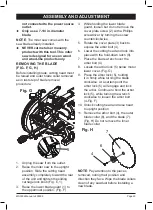
Page 21: ...rigger switch handle 1 2 Pull out the hold down latch 2 3 Raise the cutting head to the uppermost position NOTE This cutting head is spring loaded LOCKING When transporting or storing the miter saw the cutting head should always be locked in the down position Fig A 1 2 1 Push the cutting head down 2 Press the hold down latch 2 in to lock IMPORTANT To avoid damage never carry the miter saw by the t...

Page 22: ...he rear side of the saw base 2 Place the hold down clamp 2 in one of the mounting holes 3 3 Tighten the screw 1 UNLOCKING THE SLIDE CARRIAGE FIG E After removing the saw from the carton loosen the slide carriage lock knob 1 located on the right side of the slide carriage When transporting or storing the miter saw the slide carriage Fig D 1 3 should always be locked in position Fig E 1 REMOVING AND...

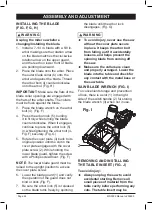
Page 23: ...osen but do not remove the cover plate screw 2 with a Phillips screwdriver by turning the screw counterclockwise 5 Rotate the cover plate 3 back to expose the arbor bolt 4 6 Lower the cutting head and lock into place with the hold down latch 8 7 Place the blade wrench over the arbor bolt 4 8 Locate the arbor lock 5 below motor lower cover Fig G 9 Press the arbor lock 5 holding it in firmly while t...

Page 24: ... plate screw 2 While holding the lower blade guard tighten the screw with a Phillips screwdriver Fig F NOTE The lower blade guard must be raised to the upright position to access the cover plate screw 6 Lower the blade guard 1 and verify the operation of the guard does not bind or stick Fig F 7 Be sure the arbor lock 5 is released so the blade turns freely by spinning the blade until the arbor loc...

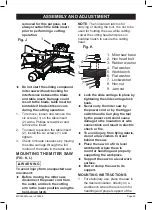
Page 25: ...tch 2 1 Fig J NOTE The hold down latch is for carrying or storing the tool It is not to be used for holding the saw while cutting Lower the cutting head and press in holddown latch to secure the cutting head Lock the slide carriage in place by tightening the slide carriage lock knob Never carry the miter saw by the power cord or by the trigger switch handle Carrying the tool by the power cord coul...

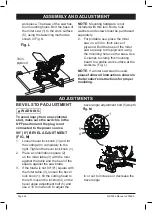
Page 26: ...hown in that product s instructions for proper mounting BEVEL STOP ADJUSTMENT WARNING To avoid injury from an accidental start make sure the switch is in the OFF position and the plug is not connected to the power source 90 0 BEVEL ADJUSTMENT FIG M 1 Loosen bevel lock knob 1 and tilt the cutting arm completely to the right Tighten the bevel lock knob 1 2 Place a combination square 2 on the miter t...

Page 27: ...he cutting arm to the right 6 7 Fig N loosen the locknut 8 on the bevel angle adjustment bolt 9 and use a 10 mm wrench to adjust the bevel angle adjustment bolt 9 depth in or out to increase or decrease the bevel angle Fig O 4 Tilt the cutting arm to the left to 45 bevel and recheck for alignment 5 Repeat steps 1 through 4 until the blade is at 45 to the miter table 6 Tighten bevel lock handle 1 a...

Page 28: ...mark and retighten screw ADJUSTING FENCE SQUARENESS FIG Q 1 Lower the cutting arm and lock in position Fig P 4 3 2 1 2 Using a square 1 lay the heel of the square against the blade and the ruler against the fence 2 as shown 3 Loosen the two fence locking bolts 3 with a 8 mm hex wrench 4 Adjust the fence 90 to the blade and tighten the two fence locking bolts CAUTION If the saw has not been used re...

Page 29: ...down until the blade extends just 1 4 in below the table insert 2 Adjust the stop knob 1 to touch the stop plate 2 3 Recheck the blade depth by moving the cutting head front to back through the full motion of a cut along the Fig R 1 2 control arm If the blade touches the inside of the control arm readjust the setting TURNING LASER ON FIG S The cutting head is equipped with a laser line to help ens...

Page 30: ... the laser If unqualified persons attempt to repair this laser product serious injury may result Any repair required on this laser product should be performed by a qualified service dealer Fig T Laser Warning Label Laser Aperture OPERATING SAFELY SAFETY INSTRUCTIONS FOR BASIC SAW OPERATION BEFORE USING THE MITER SAW WARNING To avoid mistakes that could cause serious permanent injury do not plug th...

Page 31: ...adjustment If any part of this miter saw is missing bent damaged or broken in any way or any electrical parts don t work turn OPERATING SAFELY the saw off and unplug it Replace bent damaged missing or defective parts before using the saw again Maintain tools with care Keep the miter saw clean for best and safest performance Follow instructions for lubricating Do not put lubricants on the blade whi...

Page 32: ...te other dangers Remove all nails that may be in the workpiece to prevent sparking that could cause a fire Remove dust bag when cutting nonferrous metals DRESS FOR SAFETY Any power tool can throw foreign objects into the eyes This can result in permanent eye damage Everyday eyeglasses have only impact resistant lenses and are not safety glasses Glasses or goggles not in compliance with ANSI Z87 1 ...

Page 33: ...ngers to be within 6 3 4 in of the saw blade the workpiece is too small Keep hands and fingers out of the no hands zone area marked on the saw table When cutting odd shaped workpieces plan your work so it will not bind in the blade and cause possible injury Molding for example must lie flat or be held by a fixture or jig that will not let it move when cut Properly support round material such as do...

Page 34: ...rt saw Lower blade into workpiece with a firm downward motion On wider boards slide the cutting arm back toward fence to make the cut FINISHING A CUT Hold the cutting arm in the down position Release trigger switch and wait for all moving parts to stop before moving your hands and raising the cutting arm If the blade does not stop within 10 seconds unplug the saw and follow the instructions in TRO...

Page 35: ... boards up to 8 in the sliding carriage lock knob 1 must be loosened to allow the cutting head to slide freely BEFORE LEAVING THE SAW Never leave tool running unattended Turn power OFF Wait for all moving parts to stop Make workshop childproof Lock the shop Disconnect master switches Store tool away from children and other unqualified users WARNING To avoid injury from materials being thrown alway...

Page 36: ...vel scale 2 3 The blade can be positioned at any angle from a 90 straight cut 0 on the scale to a 47 left bevel Tighten the bevel lock handle 1 to lock the cutting head in position Positive stops are provided at 0 and 45 4 Turn the Laser Trac on and position the workpiece on the table for prealignment of your cut 1 2 3 Fig BB COMPOUND CUT FIG CC DD A compound cut is the combination of a miter and ...

Page 37: ... into position 3 Use a hold down clamp to secure the workpiece 4 Turn the Laser Trac on and position the workpiece on the table for prealignment of your cut 5 Grasp and pull forward the switch handle 2 until the center of the saw blade is over the front of the workpiece 3 6 Engage the trigger to turn the saw on 7 When the saw reaches full speed push the switch handle 2 down cutting slowly through ...

Page 38: ...ard saw blade for this operation 1 Mark lines identifying the width and depth of the desired cut on the workpiece and position on the table so the inside tip of the blade is positioned on the line Use a hold down clamp to secure the workpiece 2 Lower the cutting head so the tip of the blade touches the top surface workpiece at the marked line 3 While holding the upper arm in position turn the stop...

Page 39: ... for interference between the wood fence and the lower Fig II Blade slot Auxiliary fence Fig II Blade slot Auxiliary fence OPERATION blade guard Adjust if necessary NOTE This auxiliary fence is used only with the saw blade in the 0 bevel position 90 to the table The auxiliary wood fence must be removed when bevel cutting CUTTING BASE MOLDING FIG JJ Base moldings and many other moldings can be cut ...

Page 40: ...ost crown molding has a top rear angle the section that fits flat against the ceiling of 52 and a bottom rear angle the section that fits flat against the wall of 38 In order to accurately cut crown molding for a 90 inside or outside corner lay the molding with its broad back surface flat on the saw table When setting the bevel and miter angles for compound miters remember that the settings are in...

Page 41: ...31 6 Right 1 Position top of molding against fence 2 Miter table set at RIGHT 31 6 Inside corner Right side IR 33 9 31 6 Left 1 Position bottom of molding against fence 2 Miter table set at LEFT 31 6 Outside corner Left side OL 33 9 31 6 Left 1 Position bottom of molding against fence 2 Miter table set at LEFT 31 6 Outside corner Right side OR 33 9 31 6 Right 1 Position top of molding against fenc...

Page 42: ...24 68 23 84 22 01 117 20 67 24 31 23 43 21 68 118 20 30 23 94 23 02 21 36 119 19 93 23 57 22 61 21 03 120 19 57 23 20 22 21 20 70 121 19 20 22 83 21 80 20 38 122 18 84 22 46 21 40 20 05 123 18 48 22 09 21 00 19 72 52 38 Crown Molding 45 45 Crown Molding Angle Between Walls Miter Setting Bevel Setting Miter Setting Bevel Setting 124 18 13 21 71 20 61 19 39 125 17 77 21 34 20 21 19 06 126 17 42 20 9...

Page 43: ...is springloaded Then pull out the brush 3 and replace Replace for the other side To reassemble reverse the procedure The ears on the metal end of the assembly go in the same hole the carbon part fits into Tighten the cap snugly but do not overtighten NOTE To reinstall the same brushes first make sure the brushes go back in the way they came out This will avoid a break in period that reduces motor ...

Page 44: ...onditions therefore no further lubrication is required Lubricate the following as necessary CHOP PIVOT Apply light machine oil to points indicated in illustration CENTRAL PIVOT OF PLASTIC GUARD Use light household oil sewing machine oil on metal to metal or metal to plastic guard contact areas as required for smooth quiet operation Avoid excessive oil to which sawdust will cling LINK actuates lowe...

Page 45: ...F cycling 3 Arbor bolt loose 4 Brushes cracked damaged etc 5 Other 1 Inspect clean replace brushes See MAINTENANCE section 2 Use a recommended blade Let cool down See REMOVING OR INSTALLING THE BLADE section 3 Retighten See REMOVING OR INSTALLING THE BLADE section 4 Replace brushes 5 Contact Service Center Motor does not start 1 Limit switch failure 2 Brush worn 3 Fuse blown or circuit breaker tri...

Page 46: ...ct Service Center Cutting arm will not fully raise or blade guard won t fully close 1 Pivot spring not replaced properly after service 2 Sawdust build up 1 Clean and lubricate moving parts 2 Contact Service Center Blade binds jams burns wood 1 Improper operation 2 Dull or warped blade 3 Improper blade size 4 Wood is moving during cut 1 See BASIC SAW OPERATION section 2 Replace or sharpen blade 3 R...

Page 47: ... washer 1 27 M8 Lock nut 1 28 Chamfer ruler 1 Ref Description Qty 29 M6 Hexagonal nut 2 30 Bearing shim 1 31 M10 x 65 outer hexagon bolt 1 32 φ5 x 35 elastic cylindrical pin 2 33 Hood bracket 1 34 Depth Positioning Plate 1 35 Φ Wave Elastic Washer 3 36 M6 x 12 non standard step screw 4 37 φ8 Jump ring for shaft 1 38 Hood self locking pin 1 39 Φ7 5 x 1 9 O ring 1 40 M6 x 25 outer hexagonal bolt 2 4...

Page 48: ... M4 x 14 Phillips pan head screws 1 79 M5 x 16 Phillips pan head screws 2 80 ST4 8 x 20 Phillips pan head tapping screws 1 Ref Description Qty 81 Bearing gland 82 Output shaft 1 83 4 semicircle key 1 84 6002Z bearing 85 Bearing housing 1 86 φ15 Jump ring for shaft 1 87 Big gear 1 88 φ12 Jump ring for shaft 1 89 HK0910 Needle bearing 1 90 Case label 1 91 ST3 9 x 12 Phillips pan head tapping screws ...

Page 49: ...1 124 M5 x 30 Phillips pan head screw 4 125 Φ5 spring washer 7 126 Φ5 flat washer 3 127 Battery case label 1 128 Battery case cover 1 129 Laser switch 1 130 Wrench 1 131 ST3 9 x 16 Phillips pan head tapping screw 4 132 Handle cover 1 133 Shift knob 1 134 Switch 1 135 Switch self locking button 1 136 Hand grip 1 137 Cable sheath 1 Ref Description Qty Clamp Parts BOM List 1 M5 x 12 Phillips pan head...

Page 50: ...MS3002 Manual v 200909 Page 50 EXPLODED DIAGRAM ...

Page 51: ...MS3002 Manual v 200909 Page 51 ...

Page 52: ...MS3002 Manual v 200909 Page 52 ...

Reviews: