background image

14

15

3.

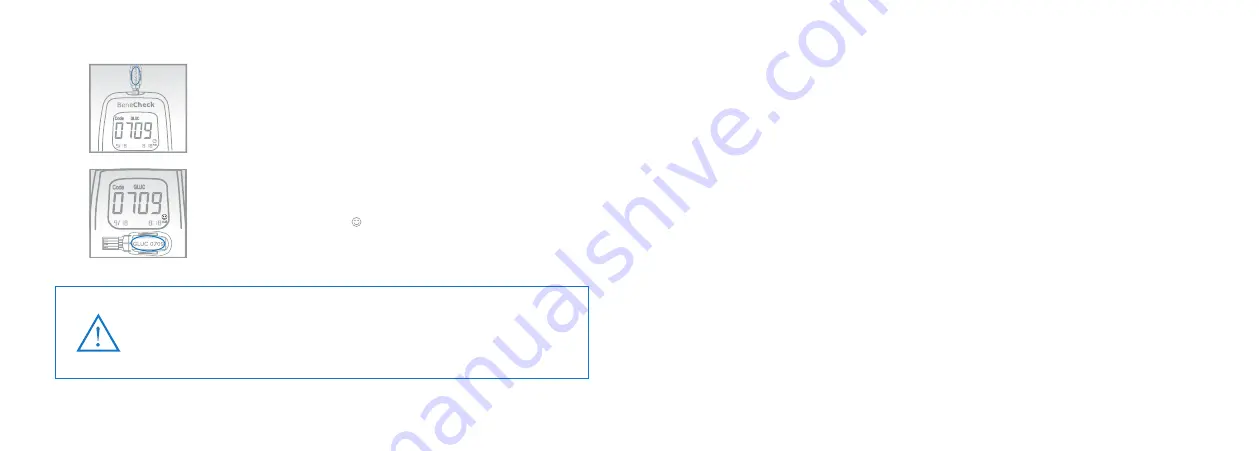
Wait for the code number to appear on the screen.

4.

Make sure the code number on the screen is the same as 
the code number on the


code strip. 

Remove the code strip. “ ” should appear on the screen, 
indicating that the meter has been coded successfully. 


Cautions :

If “E-C” appears on the screen after removing the code strip, there 
may be a problem with the code strip. Perform the coding again, and 
if  “E-C”  continues  to  appear,  please  contact  the  original  dealer  or 
supplier for


service.

2.4 Control Test

A  control  solution  is  used  to  check  the  performance  of  the  BeneCheck  GLU

PLUS


Glucose  Monitoring  System,  including  BeneCheck  GLU

PLUS

  Glucose  Meter, 

BeneCheck GLU

PLUS

 Glucose Test Strip, and the user’s operating skill. The system 

performs  adequately  if  the  control  test  result  falls  within  the  indicated  control 
range listed on the test strip vial.

The system should be checked
●  When you get the meter for the fi rst time or begin using a new vial of test strip.
●  When you suspect that the meter or the test strips are not working properly.●  
●    Any  time  the  blood  glucose  test  results  are  not  consistent  with  how  you
     feel, or any time you think your results are not accurate.
●   Any time you drop or bump the meter.
●   Upon the advice of the healthcare professional.

Summary of Contents for BENECHECK GLU

Page 1: ......

Page 2: ...of the Kit 3 1 3 Labelling and Informations 4 1 4 System Components Meter 5 6 Test Strips 7 Code Strip 8 Chapter 2 Setting up the Meter 2 1 Installing Replacing the Batteries 9 10 2 2 Set the Year Mon...

Page 3: ...GLUPLUS Glucose Monitoring System is designed to measure the blood glucose levels in whole blood The test strips are for testing outside the body in vitro diagnostic use It should be used only for tes...

Page 4: ...contact your local distiubutor for ordering BeneCheck GLUPLUS Glucose Control Solution PD F004 The BeneCheck GLUPLUS Glucose Monitoring System is calibrated using venous plasma with calibrators which...

Page 5: ...nt Button for on off and memory mode operation 1 3 Labelling and Informations Caution consult accompanying documents Do not re use Keep dry Operation temperature limitation In vitro diagnostic Lot num...

Page 6: ...the whole blood or control solution is drawn in When a blood sample or control solution touches this end the sample will be sucked into the reaction zone automatically The sample is not necessary full...

Page 7: ...Shin Juang City Taipei 242 Taiwan Battery CR2032 X 1 BeneCheck Doc No 10 RN01 L 48A Hold the meter with one hand slightly lift the back cover lid to open the back cover 2 0197 PLUS Glucose Meter Mode...

Page 8: ...ogy Co Ltd 5F No 240 Shinshu Road Shin Juang City Taipei 242 Taiwan Battery CR2032 X 1 BeneCheck Doc No 10 RN01 L 48A Please back the cover onto the meter 4 T O S H I B A LI T H IU M B A T T E R Y C R...

Page 9: ...ucose Meter should be coded before testing with BeneCheck Glucose Test Strips for the first time or every time a new box of BeneCheck Glucose Test Strips is used Each vial of test strips has an assign...

Page 10: ...sed to check the performance of the BeneCheck GLUPLUS Glucose Monitoring System including BeneCheck GLUPLUS Glucose Meter BeneCheck GLUPLUS Glucose Test Strip and the user s operating skill The system...

Page 11: ...eful to make sure the code number is the same as the code number marked on test strip vial 3 A blood drop symbol blinking on the screen means the system is ready for sample loading 4 Please shake well...

Page 12: ...k GLUPLUS Glucose Monitoring System to do any test until you can get the control test result falls within the range listed on the test strip vial If the test results fall outside the control range ple...

Page 13: ...blood sampling area after test or simply wash hands with soap and water thoroughly before and after test for disinfection Directions 1 Take a test strip and immediately cover the vial to keep the othe...

Page 14: ...test strip is inserted backwards the meter will not activate Warning Lancet cannot be reused Please always use certified lancets to ensure safety 3 2 Perform the Blood Glucose Test Directions 1 Inser...

Page 15: ...lly turned off 3 Record the test result and date in your personal diabetes diary Note Please check your system performance regularly or when you suspect your test result is inaccurate Dropping bumping...

Page 16: ...n the meter 2 Press the Front Button once to turn the meter on A full display will appear on screen after a short beep sound 3 Press the Front Button once again before the code number appears The 7 da...

Page 17: ...n by wiping the exterior of the meter with a tissue or lint free cloth Chapter 6 Icon and Alert Tones 6 1 lcon on the Screen The vivid and clear information icons on the screen are helpful and conveni...

Page 18: ...he power of the battery is too low to run a test Replace the battery at once Message Cause Solution E C Usage of the code strip was inserted improperly damaged or incorrect Check that the code number...

Page 19: ...ry Battery Life Approximately 1 000 tests Dimensions 61 77 19 mm Weight About 47g batteries not included Message Cause Solution Hi 1 Blood glucose level is higher than 600 mg dL 2 Test strip has probl...

Page 20: ...effect on test results Additional Information for Healthcare Professionals When venous whole blood is used for the test it can be collected into heparin containing test tubes winthin 30 minutes after...

Page 21: ...triglycerides up to 3000 mg dL 34 88 mmoL L do not affect the results Grossly lipemic patient samples have not been tested and are not recommended for testing with the BeneCheck Glucose Test Strips C...

Reviews: