49
Model FL4000H
NOTE:
By grounding the TEST input during the first 1 second of the power up cycle, the
FL4000H will enable the DIP Switch Override, enabling the 8-position Dip Switch
settings to take effect. The DIP Switch Override bit will be set to zero after
approximately 1 second, at which time this input can be released from ground.
X
X
X
X
X
X
X
X
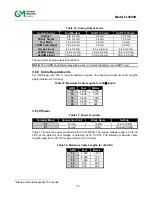
Command Register (0x0007, Dipswitch Override)
Dipswitch#
8
7
6
5
4
3
2
1
Bit#
7
6
5
4
3
2
1
0
Bit
01 Low Sensitivity
10 Med Sensitivity
11 High Sensitivity
00 (Not Used)
00 0-Sec Alarm Time Delay
01 8-Sec Alarm Time Delay
10 10-Sec Alarm Time Delay
11 14-Sec Alarm Time Delay
0 ALARM Latching
1 ALARM Non-Latching
0 WARN Latching
1 WARN Non-Latching
0 ALARM Normally Energized
1 ALARM Normally De-Energized
0 WARN Normally Energized
1 WARN Normally De-Energized
Figure 24: Command Register
4.10.8 Options (0x0008)
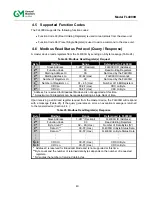
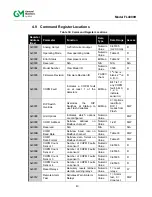
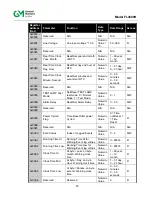
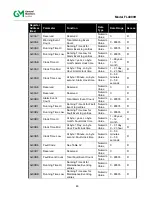
A read returns the status of the settings for the Detector Sensitivity, Relay Delay, Relay
Latching/Non-Latching and Relay Energized/De-Energized features either from the Options
dipswitch or the FLASH depending on the setting of the dipswitch override bit listed above. A
write command changes the settings for the FLASH only when the dipswitch override bit is
enabled. The bits, 0-7 in the register, map directly to the dipswitches 1-8 as shown in Table 21.
NOTE:
If one writes to register 0x005B, the delay value will be changed, but bits 2 and 3 in
register 8 will not be affected. If register 0x0008 is then written to, it will reset register
0x005B if the bits are different from their previous values. If you intend to set the delay
through register 0x005B, bits 2 and 3 of register 0x0008 should always be written as
11.
EXCEPTION:
If an attempt to change the FLASH Options is made while the dipswitch
override bit is disabled, then the unit shall return an Exception Code 03 (Illegal Data
Value).
4.10.9 COM1 Address (0x0009)
A read command returns the current address for Com1. A write command changes the address
to the requested value. Valid addresses are 1-247 decimal.
Factory
default is
1
.
Summary of Contents for FL4000H
Page 2: ...ii Model FL4000H This page intentionally left blank ...
Page 8: ...viii Model FL4000H Figure 2 Mounting Instruction Figure 3 Wall Mounting Assembly ...
Page 28: ...28 Model FL4000H Figure 16 Detector Mounting and Installation ...
Page 61: ...61 Model FL4000H 6 2 Final Assembly Figure 26 FL4000H Cross Section View ...

