background image

6•24   User Guide

SAVE SINGLE SETUP

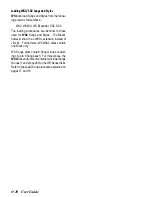
Use «Save Single Setup» to save a Setup file to
a Block on floppy disk or Hard Disk.

The Setup corresponds to the configuration of
the instrument’s global parameters (Edit General
status) that determine how the machine operates,
regardless of the contents of RAM (Song, Styles,
Performances).  Saving a Setup file to a Block
overwrites the existing file without affecting other
data.  Only one Setup file can be saved in each
Block.

Create Setup files for particular occasions.  For
example, one for home sessions, one for live
shows, one for piano-bar work, etc.

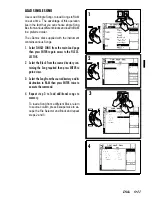
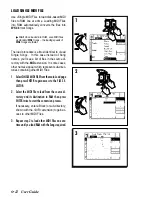
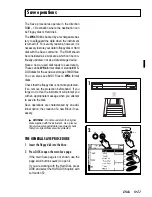
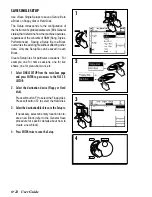
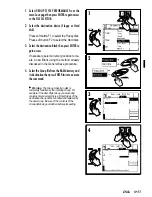
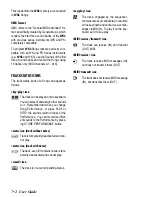
1. Select SINGLE SETUP from the main Save page

and press ENTER to gain access to the FILE SE-
LECTOR.

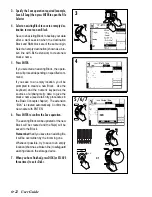
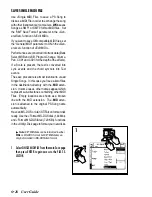
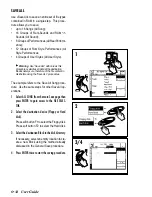
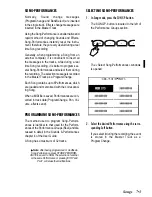
2. Select the destination device (Floppy or Hard

disk).

Press soft button F1 to select the Floppy disk.
Press soft button F2 to select the Hard disk.

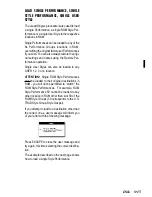
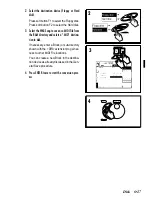
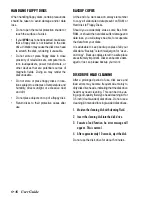
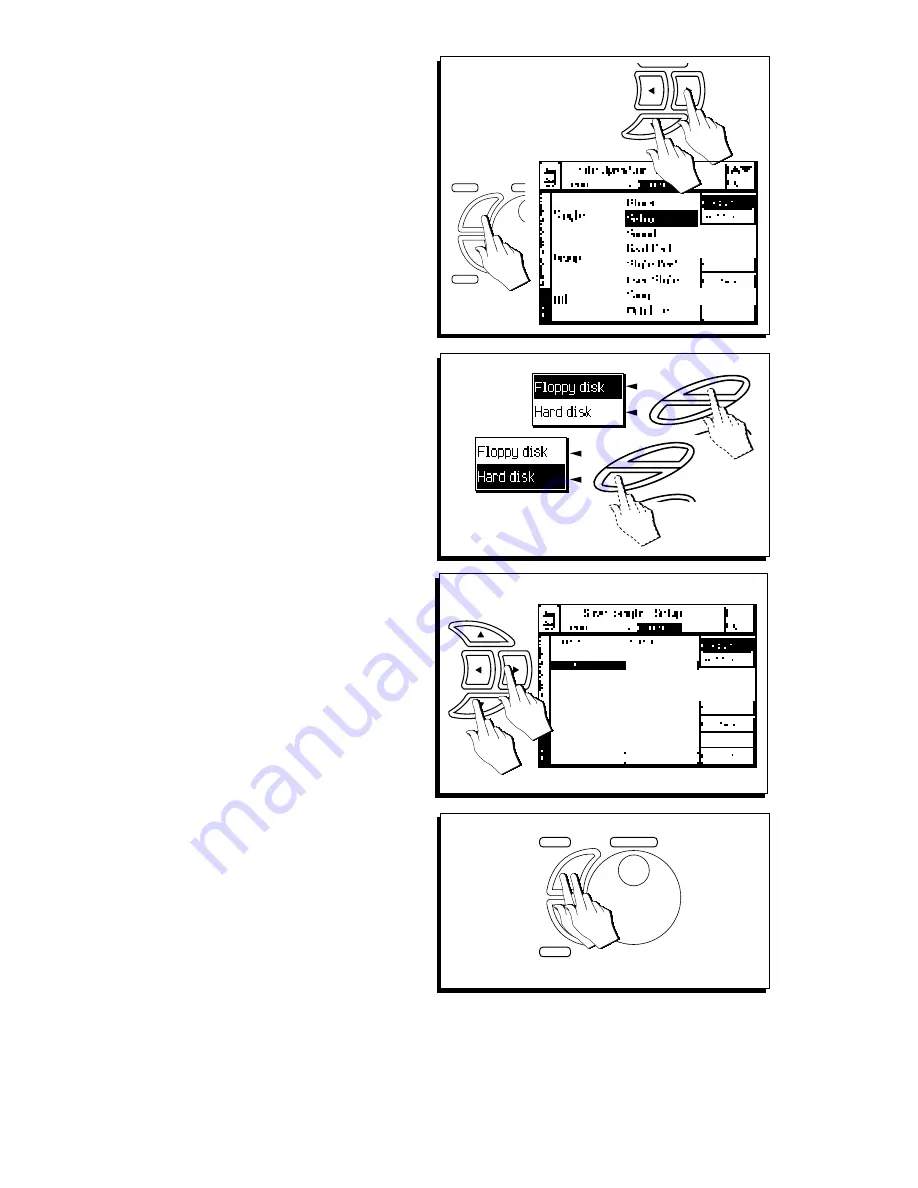
3. Select the destination Block to save the Setup to.

If necessary, select an empty location to cre-
ate a new Block (refer to the General Save
procedure for specific details about how to
create a new block).

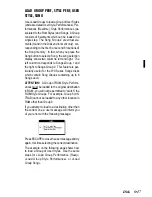
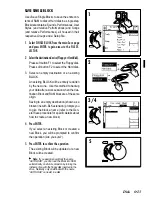
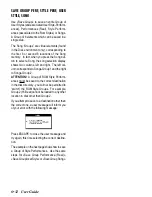
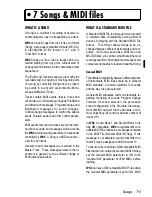
4. Press ENTER twice to save the Setup.

F2

F1

F2

F1

1

ENTER

TEMP

ESCAPE

3

4

ENTER

TEMPO / DATA

ESCAPE

2

Summary of Contents for WK4

Page 1: ...Cod 271054 English OWNER S MANUAL ...

Page 2: ...connecting cords of any kind 6 This product should be located so that its location does not interfere with its proper ventilation 7 This product should be located away from heat sources such as radiators heat registers or other products that produce heat 8 This product should be connected to a power supply only of the type described in the operating instructions or as marked on the product 9 This ...

Page 3: ... 16 Transposing tracks by octaves 1 17 Preload 1 18 Record a Song Quick Rec Recording 1 20 2 Front Rear Panel Front Panel 2 3 Rear Panel Connections 2 9 3 Basic concepts Connections 3 7 The Display 3 10 Data Entry 3 18 User Configurations 3 23 4 Sounds and Performances Selecting single Sounds 4 2 Selecting Performances 4 4 Select Sounds Performances or Styles using Display Hold 4 5 How to Program ...

Page 4: ...g Songs on an external sequencer 8 8 9 Digital Signal Processor Selecting the effect types 9 2 Bypassing the effects 9 4 Regulating the Send levels 9 5 REFERENCE GUIDE 10 Selection Help Selecting Performances 10 1 Selecting Styles 10 2 Selecting Sounds 10 3 Selecting Songs 10 6 Selecting Song Performances 10 7 Display Hold 10 8 Effects Off 10 8 Help 10 9 11 Recording a Song The Quick Rec method 11...

Page 5: ...ramming 17 2 Pads Ped Pads Lock 17 3 The Switch Pedal Functions 17 4 The Continuous Pedal Functions 17 5 18 Edit Tracks Splits Transpose 18 1 Master Transpose enable disable 18 1 Detune 18 2 Random Pitch 18 2 Mode Priority 18 3 Velocity curve 18 3 Velocity Range 18 4 Harmony 18 4 Delay 18 6 Key Range 18 6 Create Track 18 7 Copy Track 18 7 Erase Track 18 8 19 Edit PerfSound Sound Patch Edit Perf So...

Page 6: ... 3 Move 23 5 Copy 23 6 Quantize 23 8 Insert Measures 23 10 Delete measures 23 11 Velocity 23 12 Transpose 23 13 Microscope 23 14 Mask 23 17 24 Preload Playback all the Songs or MIDI Files on disk 24 1 Create a Preload list 24 2 The Preload functions 24 3 25 Edit Disk Hard Disk Erase 25 2 Copy 25 4 Move 25 6 Utility 25 8 Additional functions 25 12 APPENDIX Tables Sounds Drumkits Styles Performances...

Page 7: ...User Guide Introduction 1 Guick Guide 2 Layouts 3 Basic concepts 4 Sounds Performances 5 Styles 6 Disk Hard Disk 7 Songs MIDI Files 8 MIDI 9 Effects ...

Page 8: ...linternalelectronicoptionsareinstalledbyanauthorizedGeneralmusicservicetechnician Check with an authorized Generalmusic dealer for information on the closest service center Copyright Generalmusic 1997 All rights reserved Products and brand names that are referred to in this publication Apple IBM Macintosh Microsoft MS DOS Windows may either be trademarks and or registered trademarks of their respe...

Page 9: ...ted inside How to use the manual Do not use it as a paperweight read it If you understand how WK4 operates you can save a lot of time You are encouraged to experiment with alternative operating methods the WK4 is sufficiently flexible to permit several approaches to obtain the same results This User Guide offers information on three different levels of complexity as numbered pictures or images as ...

Page 10: ...ptional WK4 can be fitted with an optional 2 mega bytes of RAM for samples Waves backed by a Ni Cd battery to retain data after turning off the instrument Sample RAM allows to load new samples Waves on which RAM Sounds can be based Volatile Sample RAM optional It is possible to install up to 32 megabytes of additional Sample RAM via standard 30 pin computer SIMMs obtainable from most com puter out...

Page 11: ...y for matting a disk while playing Up dateable operating system OS Since the operating system resides in a flash ROM it is possible to load updates from flop py disk Operating system updates can add new functions to the instrument Score view The display can show the score the lyrics and chord symbols of a song It is also possible to connect WK4 to a video system monitor domestic TV closed circuit ...

Page 12: ...g system than the one contained in the instrument s Flash ROM To load the operating system contained on the floppy disk 1 turn off the instrument 2 insert the floppy disk in the drive 3 turn on the instrument 4 When the message Loading OS disk clears all memory ENTER to load ESCAPE to abort appears press ENTER to start the OS update 5 wait while the operating system is being loaded 6 when the mes ...

Page 13: ...harged WARNING Sounds based on sample RAM RAM Sounds are conserved after power down only if the Backed Sample RAM is installed If the volatile Sample RAM is installed the Sounds and samples will be lost at power down much like typical computer memory If desired these Sounds can be reloaded from disk after powering up the instrument again Note It is possible to load RAM Sounds totally new Sound Wav...

Page 14: ...ll slowly discharge When the battery discharges completely it causes the total loss of all user programmed data If the battery has lost its charge completely turning the instrument on will show the following message The message cancels automatically after 2 3 seconds After the message cancels be sure to save all of your edited work to disk until after the battery has sufficiently charged Leave the...

Page 15: ...h to turn on WK4 After a few seconds the instrument sets to the default situation Ifnecessary regulatethedisplaycontrastwith the DISPLAY CONTRAST panel knob on the left of the display Different viewing angles may require an adjustment of the display con trast The display reaches its maximum brightness a few minutes after turning on At this point WK4 is ready to play Automatic loading at power up I...

Page 16: ... go through some of the basic operations that you can carry out after powering up Performance name Style name status bar Sound name Tempo Locator Style chord zone M VOL MIC LINE MAX MIN ADJUSTING THE GENERAL VOLUME Adjust the general volume with the M VOLUME slider If you are using headphones a comfortable level is around half way of the slider s travel distance If you are using external amplifica...

Page 17: ...anges the sounds of the accompani ment tracks as well as those assigned to the keyboard sections Also recalled are settings relating to the keyboard mode and chord rec ognition mode for the current Style 2 PressaStylebuttonintheSTYLEGROUPS 8Beat 16 Beat Rock etc 3 Select a Style Use the soft buttons near the Style name in the DISPLAY SWING in this example 4 Press the START STOP button to start the...

Page 18: ... One finer Fingered 2 or Free 1 2 by entering theARRANGE MODE options See the ARRANGE MODE function in the Styles chapter 5 6 Play a different chord Note how the accompaniment pattern is transposed 7 Start to play a melody with the right hand The combination of sounds that play and the current keyboard mode will depend on the Style selected 8 Stop the Style with Start Stop or Ending Styles are dis...

Page 19: ...stops 3 Select the ALL DEMO command to chain all seven demos Playback starts automatically from the first song shown in the top left hand corner Demos not yet played are shown in negative highlight while those played return positive While a demo plays all the buttons on the control panel except DEMO the Function buttons and ESCAPE and the keyboard are disabled 4 To stop a demo song without closing...

Page 20: ...ic WK4 Series does 1 Press the SONG BUTTON You will see up to sixteen Song choices in the display autoload the four song demo disk provided with the instrument if necessary 2 Select the desired SONG with the corresponding Soft button 3 Press PLAY to start the SONG playback 4 Press the SCORE button and the score will ap pear 5 Press the F8 soft button to activate the SCORE CONTROLS A B C D E F G H ...

Page 21: ...ARROWS to highlight the desired viewing choices All Lyrics 1 2 3 4 Chord Press the ENTER button to view the results 7 Press ESCAPE or SCORE to return to the main Song Playback page 6 ENTER TEMPO DATA ESCAPE ENTER TEMPO DATA ESCAPE SCORE OR 7 ...

Page 22: ...turns you to the last selected Performance of the Perform ance Groups You may use the Style RealTime button as a return to start button whenever you wish to have one or more sounds active across all 76 keys 2 Press a SOUND GROUPS button and select a Sound Select a Sound by pressing the Soft button near the Sound name in the display Piano3 in this example 3 Play on the keyboard and listen to the So...

Page 23: ...ill play The keyboard is divided at note B3 and the Sound assigned to the Lower1sectionismute TheSoundassigned to Upper 1 plays from C4 to G7 6 Select the Sound assigned to Lower 1 Slow Strings in this example by pressing the corre sponding Soft button TWICE and press a key be low B3 Pressing F3 F4 once selects the Sound pressing the same button again activates the sound for play You ll hear a dif...

Page 24: ...sound layered with the Lower 1 sound If you play with both hands you ll hear two sounds on the right hand and two on the left 9 PresstheSOLObuttonandplayonthekeyboard The Sound currently shown highlighted in this example Nylon Guitar assigned to Lower 2 is isolated from the other sounds which are all muted The Sound plays across the full keyboard Press the SOLO button again to return to normal ope...

Page 25: ... button in the PERFORMANCE GROUPS section The display shows 8 Performances to choose from each with a different name 2 Select the Performance called StGuitar Use the Soft button nearest to the name of the Performance to select it StGuitar in this example Note If you do not select a Performance within the first 2 3 seconds the display returns to the previous situation with no changes 3 Play on the ...

Page 26: ...AY WITH EFFECTS OR BYPASS THEM You can temporarily modify the way in which a Performance is processed by the on board ef fect processor by changing the On Off setting of the Effects Bypass button When the LED is off the current Performance is processed by the effects when on the effects are bypassed Bypass 1 To bypass the effects press the EFFECTS BYPASS button The LED of the button turns on indic...

Page 27: ...our jacks for control pedals denoted Volume 1 2 Damper The Volume jack is a non programmable port for a standard Volume Pedal optional The remain ing three pedal jacks are programmable and pre set to provide Performance functions The default configuration of the pedals is as fol lows Ped1 Soft Ped2 Sostenuto Ped3 Damper sustain Volume Volume The pedal jacks 1 2 and Damper are function assignable a...

Page 28: ...t for Per formance functions The default configuration of the Trackball is as follows Left Right movement Pitch Bend Up Down movement Modulation The Trackball is spring loaded to return to the central position The Trackball can be enabled or disabled to re act with the keyboard tracks of a Performance Pitch Bend Modulation ...

Page 29: ...ress F3 Gen Rev Bal 3 Adjust the reverb intensity with the DIAL 4 Press ESCAPE to return to the main page The setting does not remain in RAM after turning off the instrument EQUALIZATION It is possible to equalize the tone of the instru ment for the surroundings in which you play 1 Press MIXER in the EDIT NUMBERS section 2 Press F5 Equalizer 3 Select the parameters with the cursor buttons 4 Modify...

Page 30: ...trument is in a positive transposed status Press the Transpose button as many times as necessary until you reach the desired pitch 2 Press TRANSPOSE b to lower the pitch The current Transpose value is reduced by one half step Continue pressing the TRANSPOSE b but ton until the LED on the button turns on An eventual positive transpose status will be cancelled To clear the keyboard transpose setting...

Page 31: ...ressed in semitones 12 1 octave 24 2 octaves etc The in sertion screen cancels automatically after 2 3 seconds 3 Press OCTAVE button to lower the octave setting The current Octave setting is shown Continue pressing the OCTAVE button as many times as necessary until you reach the desired setting An eventual positive Octave status will be cancelled To clear the Track Octave setting 4 Press both OCTA...

Page 32: ...data disk into the drive Check the disk label for the type of data con tained in the disk 2 Press PRELOAD Ifyouarepreloadingfromafloppydisk press ing Preload shows you the Song directory of the disk If you want to select the hard disk press F2 to select HARD DISK Selecting the HARD DISK option prompts you to select a Block file identified by the BLK extension If necessary select the type of file t...

Page 33: ...When the first Song or MidiFile ends a sec ond sequence begins there will be a short pause while the second song is accessed Playback continues non stop until all the Songs or MidiFiles on disk have been played When the last Song or MidiFile reaches the end playback stops automatically 5 Stop the playback at any time by pressing STOP or START STOP Playback stops instantly and the Preload list is c...

Page 34: ...nction in Edit General to clear all songs in memory 2 Select an empty location with the corresponding Soft button or Function button 3 Select QuickRec with Function button F2 The RECORD button turns on LED on A new Song and Song Performance is cre ated based on the Performance selected at the time of entering Quick Rec mode 4 Select a preferred Style to use as the provider of the backings for the ...

Page 35: ...eactivate other real time tracks etc 6 When you have finished stop the recording ei ther with STOP or START STOP START STOP stops the accompaniment tracks but not the sequencer allowing you to continue recording the real time tracks You must press STOP to stop the sequencer recording and take the song pointer locator to the starting position 1 1 1 The RECORD button LED will now turn off 7 Press PL...

Page 36: ... 1 22 Quick Guide ...

Page 37: ...5 F4 F3 F2 F1 INTRO KEY START ENDING START STOP ENTER TEMPO DATA ESCAPE TRANSPOSE OCTAVE b _ PAD 4 PAD 3 PAD 2 PAD 1 EFFECTS MIDI MIXER EDIT NUMBER CNT PADS T SPLIT SOUND ST SONG OPTION GENERAL DEMO PRELOAD DISK H D 1 2 3 4 5 6 7 8 9 0 _ SEQUENCER SCORE SONG STOP PLAY RECORD ST SONG STYLE REAL TIME SOUND GROUPS STRINGS BRASS ENSEMB SFX PERC ETHNIC BASS SYN FIX SYN PAD SYN LD GUITAR ORGAN CHROM PIP...

Page 38: ...MODE EFFECTS BYPASS SINGLE TCH PLAY SOLO STORE PERF PROG 2 PROG 4 PROG 3 PROG 1 DANCE 2 DANCE 1 LATIN 2 LATIN 1 TRAD 2 TRAD 1 FUNK ROCK 16 BEAT 8 BEAT US TRAD JAZZ STYLE GROUPS FILL FILL FILL VAR 4 VAR 3 VAR 2 VAR 1 FADE I O TAP TEMPO M VOL MIC LINE DRUMS BASS ACC 1 3 ACC 4 6 LOWER 1 LOWER 2 UPPER 2 UPPER 1 Front Panel left section 3 1 4 5 2 ...

Page 39: ...ts automatically SECTION 1 SLIDERS MASTER VOLUME Adjuststhegeneralvolume headphones and outputs Not transmitted or received via MIDI MIC LINE Controls the volume of the signal fed into the MIC LINE IN1 or IN2 Inputs DRUM BASS ACC 1 3 ACC 4 6 In Full and Upper Lower keyboard modes the top led indicator turns on to show that the sliders adjust the track volumes of the relative sections shown above e...

Page 40: ... Guide TRACK SCROLL PERFORMANCE GROUPS ST LOCK 1 2 3 4 5 6 7 8 SONG P A B C D E F G H F8 F7 F6 F5 F4 F3 F2 F1 INTRO KEY START ENDING START STOP ENTER TEMPO DATA ESCAPE Front Panel central section 11 10 9 6 7 8 ...

Page 41: ...NDING Stops a Style with an Ending KEY START Synchronizes the start of a Style with a note or chord pressed on the lower keyboard area SECTION 11 DIAL TEMPO DATA active for Tempo changes in Style or Song mode or operates as a data entry control in Edit and Record situations ENTER confirmsspecifieddataineditsituationsandcloses the dialogue window ESCAPE cancels the entered data and closes the dia l...

Page 42: ...ER EDIT NUMBER CNT PADS T SPLIT SOUND ST SONG OPTION GENERAL DEMO PRELOAD DISK H D 1 2 3 4 5 6 7 8 9 0 _ SEQUENCER SCORE SONG STOP PLAY RECORD ST SONG STYLE REAL TIME SOUND GROUPS STRINGS BRASS ENSEMB SFX PERC ETHNIC BASS SYN FIX SYN PAD SYN LD GUITAR ORGAN CHROM PIPE PIANO REED Front Panel right section 12 13 14 15 16 ...

Page 43: ...all other banks contain sound variations of Bank 1 Sounds SECTION 16 PAD 1 PAD 2 PAD 3 PAD 4 4 buttons which provide sounds or samples that can be played in real time in any mode The configuration of the Pads is programmable and can be stored to the Performances OCTAVE Track octave transposer which affects the currently selected track over the maximum range of 5 octaves Pressing both buttons at th...

Page 44: ...PUTE THRU B IN B OUT B IN A OUT A THRU A MIDI RIGHT LEFT MIC LINE IN 2 1 RIGHT LEFT OUTPUT RGB S VHS VIDEO 2 1 DAMPER 2 1 PEDAL VOLUME PEDALB COMPUTER THRU B IN B OUT B IN A OUT A THRU A MIDI 1 2 3 4 RIGHT LEFT MIC LINE IN 2 1 RIGHT LEFT OUTPUT RGB S VHS VIDEO 2 1 5 6 7 8 ...

Page 45: ...tput in SVHS Composite Video stand ard Both outputs are operational only with the optional Au dio Video Interface Models not fitted with the A V Interface leave the factory withanadhesiveappliedbelowtheseoutputssaying NO VIDEO INTERFACE INSTALLED 8 MAIN SOCKET Insert the supplied power cord into this socket 1 PEDALS DAMPER 1 2 VOLUME Threeprogrammablejacksforcon tinuous control pedals or switch ac...

Page 46: ...2 10 User Guide ...

Page 47: ...ONG WK4 offers two different play modes Style RealTime mode to play with the Per formances and use WK4 as a conventional keyboard or to play with the automatic ac companiments WK4 powers up in this mode every time it is turned on Press the Style RealTime button to activate Style RealTime mode if the instrument is not currently set to this mode Song mode to play Songs or to work via MIDI with an ex...

Page 48: ...the Style is recalled SINGLE TOUCH PLAY off Selecting a Style changes the accompaniment Sounds Tempo data and the relative pattern The live keyboard Sounds remain unchanged SONG MODE A Song is sequenced data consisting of one or more tracks instrumental parts A Song can be loaded from disk as an WK4 Song or as a Stand ard MIDI file it can be recorded one track at a time multitrack recording or in ...

Page 49: ...ored in the eight PERFORMANCE GROUPS buttons Performances contain the programmed status of the keyboard Sounds and the auto accompani ment sounds Given that the Performances store the current Style Variation and Tempo at the moment of pressing the STORE PERFORM ANCE command the PERFORMANCES can also be utilized to recall a Style and a Variation Style Performance 128 Performances associated to the ...

Page 50: ...ifferent ways in key play if it can be played on the key board in mute if the track is temporarily deacti vated in record if the track is in a record pending status in seq play if the track contains recorded notes Each status is shown by an icon which appears in the track status column Icons can be combined together to allow you to control the status of the various tracks under control The MIDI st...

Page 51: ...based on the internal samples archive ROM Waves RAM Sound Sounds loaded from floppy disk WK4 or WX SX or created by the more advanced Edit Sound method RAM Sound RAM Sounds based on RAM samples WK4 has an incorporated Sample Translator which allows you to load disk based Samples and edit them with dedicated parameters WARNING RAM Sounds are conserved in memory when the instrument is turned off pro...

Page 52: ... other without escaping from the one you are cur rently working on You can also select a Sound Style Song or Performance without having to escape the current edit mode first The multitasking operating system allows several environments to be opened at the same time Therefore Sounds for example can be edited with Edit Perf Sound while a Style is currently being modified without having to escape Edi...

Page 53: ... auxiliary outputs 1 2 in Edit Mixer Each Per formance can be independently programmed for the audio outputs General equalization regulate the General equalization in Edit Mixer Consult the instruc tions in the Reference Section PEDALS Volume Damper Ped 1 and Ped 2 are connec tors for continuous or switch action control ped als The Volume connector can only accept a continuous pedal to control mai...

Page 54: ... 8 pin male HSKo 1 HSKi 2 TXD 3 GND 4 RXD 5 TXD 6 GPi 7 RDX 8 1 HSKo 2 HSKi 3 TXD 4 GND 5 RXD 6 TXD 7 GPi 8 RDX APPLE MACINTOSH mini DIN 8 pin male 6 7 8 3 4 5 1 2 D sub 25 pin female mini DIN 8 pin male mini DIN 25 pin female HSKo 1 HSKi 2 TXD 3 GND 4 RXD 5 4 RTS 5 CTS 2 TXD 7 GND 3 RXD 1 13 14 25 mini DIN 8 pin male 6 7 8 3 4 5 1 2 D sub 25 pin male mini DIN 8 pin male mini DIN 25 pin female HSK...

Page 55: ...slider If the GeneralmusicAudio Video card is installed the Mic Line input signal can be processed by the internal effects processor and directed to the main mix outputs The editing operations are in Edit General PHONES Two headphones jacks are available under the keyboard on the extreme left of the instrument Each jack can accept a standard pair of stereo headphones Private listening is achieved ...

Page 56: ...c keypad Parameters are shown in various different types of pages or windows Sound View pages Play View or Rec View pages Edit pages Index pages Selection windows Dialog windows Warnings SOUND VIEW PAGES This type of page shows the Sounds assigned to the tracks Sound View is the default viewing mode The Style RealTime and Song editing modes and the Style and Song recording modes each show a slight...

Page 57: ... are coupled F1 F2 F3 F4 F5 F6 F7 F8 and the menu shows the options to select the track status the Split Point The keyboard area below the split point corresponds to the chord recognition zone for the automatic accompaniment d Status bar showing general information e Style RealTime mode Style and Performance name Performance or Style Performance depend ing on whether SINGLE TOUCH PLAY is on or off...

Page 58: ...ied when the sequencer is off to change the starting point of a song c Song start and end locators for play record or loops d Time Signature starting Tempo of a Song record Quantize value e Free memory indicator for the Song recording max 400 kb f Menu Contains options which are selected with the Soft buttons F1 F8 The menu contains the Sound View option the metronome setting parameter the track o...

Page 59: ... first line indicates the Variation the second the cycle or section Basic Fill Intro Ending the third the chord Major Minor Seventh Can be selected with Soft button F2 Rec riff c Time Signature parameters Tempo length of riff in measures reference key Scale Converter record Quantize activator d Menu Contains options which can be selected with the Soft buttons F1 F8 The menu contains the Sound View...

Page 60: ...of the respective edit environment In some cases On Off options also appear e Status bar showing general information f Edit environment icon The symbol appears if the page parameters can be stored in the Per formance g Name of the edit environment and edit page h Name of the Performance and the track in edit pages with parameters relating to the single track or name of the Sound in edit i Icon cor...

Page 61: ...ucture the buttons allow to pass to other functions within the same environment In some versions of the operating system some of these environments will have one function only therefore the buttons will not be active In Edit Style Song Edit General complex environments with several editors where only one menu is available the buttons pass from one editor to another without returning to the main me...

Page 62: ...tons a Title of the window b Bank selector only in the Sound selection Corresponds to the buttons Note The bank can be selected either in this selection window or by means of a BankSelect message received via MIDI Once the bank has been selected the received ProgramChange selects Sound of the current bank Via MIDI the Bank remains selected until a different BankSelect number is sent c List of item...

Page 63: ...ications ENTER and ESCAPE close the dialog windows Select the parameter which has to be modified with the cursor Modify the value with the DIAL or numeric keypad Press ENTER to confirm or press ESCAPE to cancel the modifications Press the soft button corresponding to the option required WARNINGS These are similar to the dialog windows but they do not display options to select They communicate spec...

Page 64: ...elect the elements with the cursor buttons The black frame represents the cursor the white frame the selected location The display can show only a part of the list when the first or last element of the list is reached with the cursor the list scrolls up wards or downwards Press ENTER to confirm the selection NAVIGATING THROUGH THE MAIN MENUS Some operating environments show a main menu The main me...

Page 65: ...gative highlight zone using the cursor buttons For example after turning on the display shows the Style Performance mode You can select the tracks with the cursor buttons In edit pages select the parameters with the cursor buttons and modify the parameter value with the DIAL ...

Page 66: ...y speci fying the corresponding ProgramChange BankSelect MSB number on the nu meric keypad If WK4 is used as a stand alone unit it is not necessary to specify the BankSelect LSB number the last digit 1 Select the track to which a sound has to be assigned 2 Press the KEY PAD button to activate the numeric keypad An active zone appears for a numeric insertion KEY PAD EFFECTS MIDI MIXER EDIT NUMBER C...

Page 67: ...E has been pressed TEXT ENTRY For text entry purposes the keyboard activates as a source of alphabetical data where each note of the central zone of the keyboard corresponds to a letter Use the cursor buttons or the DIAL to navigate within the active zone The following example shows how to modify a Performance name 1 Press the STORE PERFORMANCE button 2 Press F7 or F8 to activate the Change name f...

Page 68: ...n and correct wrong characters In Overwrite mode the inserted characters substitute the selected characters in negative highlight 6 Press ENTER to confirm and to close the active zone or press ESCAPE to cancel and close the window ENTER ESCAPE ENTER confirms selections and values assigned to parameters in dialogue windows In some edit pages ENTER confirms the value assigned to the relative paramet...

Page 69: ...mance Groups User Styles Songs Setup Data NOT conserved at power down Status of the control panel RAM Sounds if the battery backed Sample RAM is not installed RAM Samples if the battery backed Sample RAM is not installed THE BLOCK The Block is a data set consisting of almost the entire contents of the instrument s memory You can therefore configure the instrument s RAM according to your needs and ...

Page 70: ... the programmed MIDI channels Edit Effects General Effect 1 Balance page Edit Mixer Equalizer page A Setup is always present in memory and after power down SAVING THE SETUP The Setup present in RAM can be saved in two ways Save the Setup to a Block as a single file Save Single Setup in order to create files for particular occasions for example you can create a Setup for home sessions a Setup for l...

Page 71: ...configured to play on the key board in different ways called keyboard modes Full keyboard mode the Upper tracks 7 and 8 play across the entire keyboard range The Lower 1 and 2 sections are disabled for activation for Full keyboard mode only Upper Lower mode the Upper tracks 7 and 8 play to the right of the Split point while the Lower tracks 1 and 2 play to the left from the split point down Multi ...

Page 72: ...ctions The procedure for this method is outlined below 1 Press F1 or F2 to select Full Keyboard mode The Upper1 and Upper2 sections are as signed to the entire keyboard range while the Lower sections are temporarily disabled for activation 2 Set Upper1 to play and Upper2 to mute Select Upper2 by pressing the Soft buttons E or F Press the same button repeatedly to toggle between the mute and key pl...

Page 73: ... up to 16 banks The bank number corresponds to the BankSelect MSB CC00 MIDI message 5 Select a Sound with the soft buttons In the Sound selection window the soft but tons are paired Either of the two buttons can be used for selection purposes 6 The selected Sound is assigned to the currently selected track in this case Upper 1 Play and repeat the selection operations to listen to other sounds Note...

Page 74: ...s showing the con figuration and sounds of the selected Per formance The settings recalled by the Performance in clude the keyboard mode the track status the Sounds assigned to the tracks the ef fects the track assignments for the action of the pedals and the chord recognition mode The status bar shows the name of the se lected Performance Note When a selection window shows a choice of 8 items to ...

Page 75: ... PERFORMANCE GROUPS or the STYLE GROUPS section to open the relative selection window In this case a Sound 3 Select an item The selection window remains locked 4 Select other items as required 5 Press another Group button to open a different selection window and select another item 6 Press ESCAPE to close the selection window with out cancelling D HOLD Press D HOLD to cancel the function LED off A...

Page 76: ...are lost when you select a different Performance or reselect the same one Note The changes described in this section can also be applied to Style Performances and Song Performances HOW THE SOUNDS ARE ARRANGED In default conditions the Performances recall factory set Sound combinations You can change one or more Sounds of any Performance and store the resulting modifications to memory so that the P...

Page 77: ...und The Sound is assigned to the selected track and the selection window closes The dis play returns to its previous status showing the updated situation The new situation remains in memory as a temporary status until changed again or un til you recall the default conditions by select ing the same Performance again 5 To save the change press STORE PERFORMANCE followed by ENTER to confirm The new s...

Page 78: ...to which the Sound is to be as signed 2 Press the KEY PAD button to enable the numeric keypad An insertion window activates showing the number of Sound currently assigned to the track 3 Specify the ProgramChange of the required Sound If the Sound belongs to a different Bank key in a dash which acts as a separator then specify the corresponding Bank number Bank Select MSB If necessary add a second ...

Page 79: ...on and the track is temporarily deactivated for play and ceases to receive or transmit MIDI messages 3 Press the same Soft button once more to toggle back to the key play status The track status changes back to key play showing the relative icon as before The track activates for play and it is able to receive and transmit MIDI messages as before 4 Press STORE PERFORMANCE and confirm with ENTER to ...

Page 80: ... Try playing and changing the track status of the Upper sections 2 Select Upper Lower mode using Soft button F3 or F4 Upper Lower keyboard mode splits the key board at note B3 and assigns the Lower 1 and Lower 2 tracks to the left split from B3 down and the Upper 1 and Upper 2 tracks to the right from C4 up Try changing the track status to modify the combination of the sounds in both sections of t...

Page 81: ...anging the track status to experiment with the overall sound combinations that can be obtained 4 Press STORE PERFORMANCE and confirm with ENTER to save the change When you press STORE PERFORMANCE the last set keyboard mode is memorized to the Performance If you select another Per formance before saving the setting your new data will be lost 4 STORE PERF 3 F8 F7 F6 F5 F4 F3 F2 F1 ENTER TEMPO DATA E...

Page 82: ...alog window 2 Rotate the DIAL or play a note on the keyboard corresponding to the highest note of the Lower split zone to modify the setting The new Split Point is shown in the dialog window If you entered the wrong note sim ply play another 3 Press ENTER to confirm the new Split Point or ESCAPE to cancel the operation If you press ENTER the main page will show the new Split Point setting If you p...

Page 83: ...rk ings shown above the sliders If eight tracks are displayed refer to the markings shown below the sliders In Full Keyboard or Upper Lower keyboard modes refer to the markings above the sliders The sliders control the indicated tracks In Multi mode or when the Style accompani ment tracks are shown refer to the markings A H Each slider corresponds to one of the dis played tracks sliderAto trackA s...

Page 84: ...e required transposi tion In the edit pages the DIAL modifies the se lected parameter Rotate the DIAL to raise or lower the transposition in steps of one semitone Negative values correspond to a lowering of the transposition 4 Exit the Tracks Splits editor by pressing ES CAPE or T SPLIT ESCAPE returns to the main Edit Perform ance page PERFORMANCE escapes from the edit and returns to the previous ...

Page 85: ... lower the pitch by one or more semitones The b LED turns on cancelling an eventual positive transposition if present 2 PresstheTRANSPOSE buttononeormoretimes to raise the pitch by one or more semitones The previous transposition is cancelled The b LED goes off and the LED turns on 3 Cancel the current Transpose setting by pressing both b and buttons at the same time The LED goes off and the instr...

Page 86: ...ces containing Sounds modified in Edit Perf Sound are identified by the symbol next to the name of the modified Sound Performances containing a modified Drumkit or SoundPatch are identified by the keyboard sym bol Note The examples above show how to save a Performance The procedures to save a Style Performance or Song Performance are identical Note The changes made do not alter the original WK4 da...

Page 87: ...cted and ready to play The factory programmed status of the Grand Piano Performance can be modified in order that WK4 powers up according to a preferred setting The factory set situation recalled by the GrandPiano Performance is the following Piano1 sound assigned to the Upper 1 keyboard section and set to play across the entire keyboard range the ARRANGE ON OFF and LOWER MEMORY buttons activated ...

Page 88: ...type of Per formance to save the changes to You can save the Performance as a Perform ance or a Style Performance The two types of Performance are perfectly compatible To save the data as a Performance select the Performance option with cursor button To save the Performance as a Style Per formance select the Style option with cursor button Note The type of Performance proposed by WK4 when the dial...

Page 89: ...rformance If you are saving as a Style Performance the Perf area switches to Style if you select the Style option in point 2 above Empty locations are identified by a location number while those already occupied show the name of a Performance or Style Styles with a modified Style Performance are shown with an asterisk after the name 4 Press ENTER to confirm the save procedure or ESCAPE to cancel A...

Page 90: ...open the Store Performance dialog window 2 Press F7 or F8 to open the Performance name dialog window The entire name of the current Performance is shown selected Specifying one character will cancel the entire name 3 Change the name of the Performance Modify the name using the data entry devices Using the keyboard as a source of alphanu meric data is explained in the chapter enti tled Data entry 1...

Page 91: ... 21 4 Press ENTER to confirm or ESCAPE to cancel After pressing either ENTER or ESCAPE the display returns to the Store Performance dialog window 5 Press ENTER to save the Performance 4ENTER ESCAPE 5 ENTER TEMPO DATA ESCAPE ...

Page 92: ...el the changes made to the Performances or Style Performances in RAM You are prompted with a request to recon firm your choice 3 Press ENTER to confirm or ESCAPE to cancel With ENTER the changes are cancelled and the original Performance settings volume sounds transposition tempo are restored With ESCAPE the new settings are retained Hint To cancel the entire contents of RAM in a single operation ...

Page 93: ...ns The Select Style selection window ap pears The button pressed corresponds to a group of 8 Performance Styles which are dis played in the selection window Note The PROG1 PROG2 PROG3 and PROG4 buttons recall programmable Styles which can be empty If you select an empty location WK4 prompts you to create a new Style Press ESCAPE or F5 to cancel and return to the previous display Do not press any o...

Page 94: ...lecting a Style instantly changes the auto matic accompaniment the accompaniment and keyboard sounds and the effects If TEMPOLOCKisoff thetempoalsochanges If MIXER LOCK is off the track volumes also change If the arrangements are playing the new Style enters at the next measure bar 3 A B C D E F G H ...

Page 95: ...uttons of the STYLE GROUPS section 3 Select a Style from the Style Select window with the corresponding Function button Selecting a Style instantly changes the auto matic accompaniment pattern together with the sounds and effects of the automatic ac companiment tracks The sounds and effects of the live keyboard tracks remain un changed If TEMPO LOCK and MIXER LOCK are off the tempo and track volum...

Page 96: ...tyle and Variation by selecting a Performance STYLE LOCK must be off 2 Press a bank button in the PERFORMANCE GROUPS section 3 Select a Performance If on SINGLE TOUCH PLAY deactivates au tomatically The sounds and effects of all the tracks change reverts to those contained in the Programmable Performances The Style and Variation that were active at the time of saving the Performance are re called ...

Page 97: ... the Performance Style Performance or Performance Press the right TRACK SCROLL button to bring the 8 automatic accompaniment tracks into view Each track corresponds to a precise part of the accompaniment and is identified by an abbrevia tion Track Abbr Part MIDI channel 9 DR Drum 10 10 BS Bass 9 11 AC1 Acc1 11 12 AC2 Acc2 12 13 AC3 Acc3 13 14 AC4 Acc4 14 15 AC5 Acc5 15 16 AC6 Acc6 16 Default confi...

Page 98: ...e on Note If ARRANGE MEMORY or LOWER MEMORY are off the accompaniment plays while your notes are pressed on the keyboard and stops instantly when the notes are released If instead one of these two functions are active the accompa niment of the drum track will continue playing after releasing the keys 2 When the accompaniment is not playing press KEY START if not already activated 3 You can press o...

Page 99: ...OUT while the accompaniment is running all the track volumes gradually de crease and the accompaniment automatically stops at the end of the Fade Out cycle During the Fade cycle the relative LED flashes INTRO Selects an introductory pattern lasting one or more measures After pre selecting the INTRO to start the Style you will need to press START STOP or play left hand notes if Key Start is se lect...

Page 100: ...he tempo changes too If the function is on the tempo will not change MIXER LOCK A Performance also memorizes the track vol umes If MIXER LOCK is off when a Style or a Performance is selected the track volumes change too If it is on all the volumes of the tracks assigned to the keyboard will change while the accompaniment track volumes will not BASS TO LOWEST If BASS TO LOWEST is on the bass part o...

Page 101: ...n be either fixed or can change when the keyboard modeischanged Respectively theoptionsFixed Chord Mode or Auto Chord Mode must be se lected in Arrange Mode The Fixed Chord Mode option allows you to select a general chord recognition mode which does not take into consideration the keyboard mode and consequently any Performance changes The Auto Chord Mode option active by de fault changes according...

Page 102: ...egardless of the keyboard mode Auto Chord Mode the display divides into two parts The left part shows the options for Upper Lower and Multi while the right shows those for Full Keyboard The black frame a represents the cursor which can be moved with the cursor buttons while the white frame b shows that the element has been chosen but not yet selected by the cur sor 3 Select the preferred recogniti...

Page 103: ...of a major chord To obtain a minor chord play the root and the minor third e g C and Eb To obtain a seventh chord play the root and the seventh e g C with a Bb either above or below Fingered 1 Needs at least three notes for the chord to be recognized If less than three notes are played the chord is not recognized and the notes played in the left hand are con sidered stray notes Fingered 2 At least...

Page 104: ...e than a fifth interval seven semitones the chord recognized will be di vided into two parts the bass note itself and the rest of the notes which make up the chord The bass note is considered a Pedal note For example see the illustration if a chord of C major is played with a D in the bass the chord symbol will be C Maj D While the instrumental parts in the accom paniment play in the recognized ke...

Page 105: ... Arrange Mode page Press ARRANGE MODE to access Dy namic Arrange The Autobacking function permits the accompa niment to change pattern the instant you change chord WhenAutobacking is off when you change chord the accompaniment pattern does not update in stantly but waits for the next note of the accom paniment before revising the pattern IfAutobacking is on changing chord updates the accompaniment...

Page 106: ...K If STYLE LOCK is on the Style and tempo rest unchanged when you select a Perform ance If STYLE LOCK is off when you select a Performance the Style Variation and tempo memorized in the Performance are recalled 3 Select a Style 4 Press INTRO ENDING or FILL to activate the introduction 1 STORE PERF TEMPO LOCK MIXER LOCK 2 3 U U DANCE 2 DANCE 1 LATIN 2 LATIN 1 TRAD 2 TRAD 1 FUNK ROCK 16 BEAT 8 BEAT ...

Page 107: ... combination of keyboard sounds the keyboard mode and the assigned effects memorized in the Performance are re called The sounds and arrangements of the Style accompaniment tracks rests un changed 8 Select other Performances 9 StoptheaccompanimentwithENDINGorSTART STOP INTRO KEY START ENDING START STOP F8 F7 F6 F5 F4 F3 F2 F1 INTRO KEY START ENDING START STOP or 6 5 7 8 9 1 2 3 4 5 6 7 8 ...

Page 108: ...intro or an ending The following explanation is a typical example 1 Select a Style 2 PressINTRO ENDINGorFILLtoactivatetheintro 3 Press START STOP to start the accompaniment 4 Play normally with the selected Style 1 A B C D E F G H U U DANCE 2 DANCE 1 LATIN 2 LATIN 1 TRAD 2 TRAD 1 FUNK ROCK 16 BEAT 8 BEAT US TRAD JAZZ STYLE GROUP 2 INTRO KEY START ENDING START STOP FILL or or 3 INTRO KEY START ENDI...

Page 109: ...tive cycle usually plays for one measure bar only unless the FILL button is held pressed for a period The Intro and Ending patterns start their relative cycles and the end of current measure and can last for more that one measure Therefore when changing Styles the Intro and Ending give you more time to select a different Style 5 8 A B C D E F G H USER 2 USER 4 USER 3 USER 1 DANCE 2 DANCE 1 LATIN 2...

Page 110: ...of the new Style are played before passing to the selected Variation 11 Press START STOP or ENDING to stop the accom paniment F8 F7 F6 F5 F4 F3 F2 F1 9 DANCE DANCE 1 LATIN LATIN 1 TRAD 2 TRAD 1 FUNK ROCK 16 BEAT 8 BEAT US TRAD JAZZ STYLE GROUP FILL FILL FILL TAP TEMPO INTRO KEY START ENDING START STOP or or INTRO S ...

Page 111: ... of the Performance and not the original SAVING THE TEMPO TO A PERFORM ANCE A tempo setting that differs to the default tempo data of the ROM Style can be saved to the Style Performance or Performance 1 Select a Style 2 Modify the tempo with the DIAL 3 Press START STOP to listen to the Style If the tempo needs further adjustment rotate the DIAL until you obtain the desired tempo 4 Press STORE PERF...

Page 112: ...ronment 2 Press F8 Rest St Perfs to cancel the changes made to the Style Performances in RAM You are prompted with a request to recon firm your choice 3 Press ENTER to confirm or ESCAPE to cancel With ENTER the changes are cancelled and the original Performance settings volume sounds transposition tempo are restored With ESCAPE the new settings are retained Hint To cancel the entire contents of RA...

Page 113: ...Style and Sound data disks originating from non Generalmusic in struments Song exchanges with other instru ments requires that the Song be saved as a MIDI file on MS DOS formatted disks 1 44 Mb or 720 Kb formats Working with disks provides you with a means of building a library of Performances Styles Sounds and Songs that you can load into the WK4 RAM memory at any time As you become more fa milia...

Page 114: ...vironment are identified by a name In some cases a file name includes an extension which is eliminated when the file is loaded into RAM The table which follows summarizes the file types encountered and where applicable the exten sion Type of File Description ID Block All file types Name BLK except MIDI files Setup General settings Name for MIDI channels video pedals pads Sound RAM Sound and Name R...

Page 115: ... select a destination already occupied by a file the existing file is replaced by the incoming one source device destination device page selection device selection directory refresh file type quantity available memory Load Single Song File selector Main Load page Source Directory Destination Directory FILE QUANTITY Files can be handled as Single elements as a Group of files or as an entire set of ...

Page 116: ...ngle Setup Single Sound Single Group All Real Perfs Single Group All Style Perfs Single Group All User Styles Single Group All Song Single Group All MIDIFile Single HOW TO NAVIGATE IN THE DISK ENVI RONMENT Move around in the Disk pages with the naviga tional tools which are the directional arrows the page selector buttons Execute the Disk commands with the ENTER button or abort with the ESCAPE but...

Page 117: ...d go to the page relating to the desired Disk function Load Save Erase Copy Move Utility Use the buttons to scroll through the main disk pages The example shows the main Load page 3 Select ifnecessary thedevicebeinghandledwith the soft buttons F1 F2 F3 Load and Save operations show the Floppy Disk and Hard Disk options If you are work ing with the Hard disk the H D LED will turn on during the cour...

Page 118: ...eing handled in this case the Song memory This display example shows the floppy disk directory a with a single Block file and the instrument s RAM directory b showing the empty Song memory The disk name is shown at the top of the left column c If the disk has no name either NO NAME or UNTITLED or other will be shown Note At this point to exit from Edit Disk press DISK Escape exits the File selecto...

Page 119: ...owing a message relating to the current operation For exam ple if you are loading a single Song the message will say Loading Single Song When the dialog window closes the opera tion has been executed 11 Repeat steps 7 8 9 and 10 until your destina tionisorganizedaccordingtoyourrequirements To select another file from a different block return to the source column press Escape to escape the current ...

Page 120: ... working with the Hard Disk press DISK and select the HARD DISK option with soft button F2 3 Specify the load operation required example Load SingleSong then press ENTER to open the File Selector From here proceed as described for the Load operations on the pages which follow NOTE All Load Single operations also fea ture a SEARCH RESOURCE function which allows you to search for a single element Bl...

Page 121: ...in Load page then press ENTER to gain access to the FILE SE LECTOR 2 Select the BLOCK to load then press ENTER twice to load into RAM The RAMFILE shown at the destination is replaced by the new file with the same iden tity 1 RAMFILE BLK The Demo Disk supplied with the instrument contains a Block file with the name AUTOLOAD BLK which is loaded automati cally to RAM when you turn on the instru ment ...

Page 122: ...he instrument s general functions Tun ing Scale Audio Mic Line settings the MIDI Lock status the locked MIDI channel configuration the status of the Pedals Pads Lock option and the Pedals and Pads configuration Loading a Setup file into RAM does not affect other data Only one Setup file resides in each Block 1 Select SINGLE SETUP from the main Load page then press ENTER to gain access to the FILE ...

Page 123: ...oad page then press ENTER to gain access to the FILE SE LECTOR 2 Select the Block from the source directory con taining the Song required then press ENTER to gain access 3 Select the Song from the source directory and its destination in RAM then press ENTER twice to execute the command 4 Repeat step 3 to load additional songs to memory To load a Song from a different Block return to source column ...

Page 124: ...les in the source di rectory with the MID extension In some cases other names appear which represent sub direc tories containing other MIDI Files 1 SelectSINGLEMIDIFILEfromthemainLoadpage then press ENTER to gain access to the FILE SE LECTOR 2 Select the MIDI file to load from the source di rectory and its destination in RAM then press ENTER twice to start the conversion process If necessary enter...

Page 125: ... slots You can choose to load your Ram Sounds any where you want but it is recommended that you load to the Sound Group that originally housed the sound when it was saved to facilitate future selection Load Single Sound also features a Sound Search function Owing to the large WK4 Sound library you might find it easier to pass directly to a Sound bank by specifying the name of a Sound that occupies...

Page 126: ...enumber19 7alsoindicatesthattheRAM Sound originally occupied Bank 19 slot 7 at the time it was saved to disk The display example A shows Group 17 se lected Display example B shows the origi nal destination now empty of the RAM Sound at the time of saving it to disk 19 7 It is recommended that you load your RAM Sounds to their original positions but you are free to load them wherever you please Bea...

Page 127: ...an also be loaded to any USER 1 2 3 or 4 location ATTENTION Single ROM Style Performances must be loaded to their original destinations in RAM you will not be permitted to switch the ROM Style Performances For example ROM Style Performance 59 cannot be loaded to any other location in RAM other than slot 59 of the ROM Style Groups 59 corresponds to the U S TRAD Style Group Style Gospel If you attem...

Page 128: ...ng destination in RAM In this case Style Performance 59 corre sponding to STYLEBANK58 must be loaded to destination 59 of the ROM Style directory Use the directional arrow to scroll to the destination required 4 Press ENTER twice to load to the destination If you try to load to a different destination a user message will inform you of your proce dural error Press ESCAPE to close the window and re ...

Page 129: ... right to Songs Group 2 This feature is par ticularly useful for the WX Series Songs disks which contain Song Groups containing up to 8 Songs each ATTENTION A Group of ROM Style Perform ances must be loaded to the original destination in RAM you will not be permitted to switch the ROM Style Groups For example Group 8 US TRAD cannot be loaded to any other location in RAM other than Group 8 If you a...

Page 130: ...s destination in RAM then press ENTER twice to execute the command Warning The Group currently in memory is overwritten by the incoming Group If the User Style Group you are loading contains only one User Style all User Styles of the destination Group currently in RAM will be cancelled and replaced by the new Group Be sure that your Group data are safely saved to Disk or Hard Disk before proceedin...

Page 131: ...Use the same steps for other Load All op erations 1 Select ALL SONG from the main Load page then press ENTER to gain access to the FILE SELEC TOR 2 Select the Block containing the Songs required fromthesourcedirectorythenpressENTERtwice to start the loading procedure Warning Use Load ALL with care If for example the disk based All User Style data contains only one User Style all your User Styles c...

Page 132: ...l to those used for WK4 Songs and Styles The Blocks however show the WXS extension instead of BLK Furthermore WX2 SX2 disks contain one Block only WX Songs disks contain Song Groups consist ing of up to 8 Songs each For this purpose the WK4DiskenvironmentcontainstwovirtualSongs Groups 1 and 2 specific for the WX Series disks Refer to the Load Group procedure explained on pages 17 and 18 ...

Page 133: ...at disks Check that the floppy disk is not write protected if so remove the protection beforehand If you forget to do this the instrument will prompt you with an appropriate message when you attempt to save to the disk Save operations are characterized by an addi tional option the creation of a new Block if nec essary WARNING Do not save data to the original disks supplied with the instrument As a...

Page 134: ...ted to create a new Block Use the keyboard and the numeric keypad as the sources of alphanumeric data to give the block a name see Data Entry procedures in the Basic Concepts chapter The extension BLK is created automatically Confirm the new name with ENTER 6 Press ENTER to confirm the Save operation The existing Block will be updated or the new Block will be created and the file s will be saved t...

Page 135: ... your data after a work session when the des tination Block and RAM block are of the same origin Saving to an empty destination shown as a broken line with BLK extension prompts you to give the block a name refer to the Gen eral Save procedure for specific details about how to create a new block 4 Press ENTER If you select an existing Block or created a new Block you will be prompted to confirm th...

Page 136: ...Setup files for particular occasions For example one for home sessions one for live shows one for piano bar work etc 1 Select SINGLE SETUP from the main Save page and press ENTER to gain access to the FILE SE LECTOR 2 Select the destination device Floppy or Hard disk Press soft button F1 to select the Floppy disk Press soft button F2 to select the Hard disk 3 Select the destination Block to save t...

Page 137: ...te a new Block refer to the General Save procedure for specific details about how to create a new block 4 Select the Song from the RAM directory and its destination in disk then press ENTER twice to execute the command If you save to an existing Song it will be overwritten by the incoming song If possible save to an empty location shown as a broken line Hint A Block can hold up to 16 Songs divided...

Page 138: ...ord symbols into Text events The save procedure is almost identical to Load Single Song In this case you ll see a list of files in the destination directory with the MID exten sion In some cases other names appear which represent sub directories containing other MIDI Files Empty locations are shown as a broken line with the MID extension The MID exten sion is attached to the original PS Song name ...

Page 139: ... MIDI file from the RAM directory and select a MID destina tion in disk If necessary enter a Block or sub directory shown with the DIR extension to gain ac cess to other MIDI File locations You can create a new Block in the destina tion device as already discussed in the Gen eral Save procedure 4 Press ENTER twice to start the conversion proc ess F2 F1 F2 F1 2 3 4 ENTER TEMPO DATA ESCAPE ...

Page 140: ...OR 2 Select the destination device Press soft button F1 to select the Floppy disk Press soft button F2 to select the Hard disk 3 Select the destination Block and press ENTER to gain access If necessary select an empty location to cre ate a new Block using the method already discussed in the General Save procedure 4 Select the Sound from the RAM directory and its destination in disk To select the d...

Page 141: ...that the RAM Sound will take the ProgramChange number of the chosen destination therefore if you save 19 7 SwOrgan to say destination 25 16 the Sound will be shown with the new ProgramChange number on a future load op eration not with the old 5 ENTER TEMPO DATA ESCAPE ...

Page 142: ... Single ROM Style Performances must be loaded to their correct destinations in the disk directory you will not be permitted to switch the ROM Style Performances For ex ample ROM Style Performance 59 cannot be saved to any other location on disk other than slot 59 of the ROM Style Groups 59 corresponds to the 16 Beat Style Group Style 16 Beat Folk If you attempt to load to a destination other than ...

Page 143: ...eneral Save procedure 4 Select the Style Performance that you wish to save and its corresponding destination in disk In this case Style Performance 59 corre sponding to STYLEBANK58 must be saved to destination 59 of the disk Style directory Use the directional arrow to scroll to the destination required 5 Press ENTER twice to save to the destination If you try to save to a different destination a ...

Page 144: ...ght The left col umn corresponds to Songs Group 1 and the right to Songs Group 2 ATTENTION A Group of ROM Style Perform ances must be saved to the correct destination in the disk directory you will not be permitted to switch the ROM Style Groups For example Group 2 16 Beat cannot be loaded to any other location in disk other than Group 2 If you attempt to save to a destination other than the corre...

Page 145: ...ew Block using the method already discussed in the General Save procedure 4 SelecttheGroupfilefromtheRAMdirectory and its destination then press ENTER twice to execute the command Warning The Group currently in disk is completely rewritten by the incoming Group For example if the User Style Group you are saving contains only one User Style all User Styles of the destination Group will be cancelled...

Page 146: ...e file content in disk before using the Save ALL procedures The example refers to the Save All Song proce dure Use the same steps for other Save All op erations 1 Select ALL SONG from the main Save page then press ENTER to gain access to the FILE SELEC TOR 2 Select the destination device Floppy or Hard disk Press soft button F1 to select the Floppy disk Press soft button F2 to select the Hard disk...

Page 147: ...nserting it EJECTING A FLOPPY DISK Before ejecting a disk make sure that the disk drive operating led is off and that the WK4 dis play is not currently showing a Loading or Sav ing message To extract the disk press the eject button and remove the disk THE WRITE PROTECT TAB Floppy disks contain a write protect tab which allows you to protect valuable data from being accidentally overwritten To prev...

Page 148: ...remember to copy all elaborated data present on RAM or Hard disk to Floppy Disks Should you accidentally erase some files from RAM or should the hard disk suffer damage and data loss you will always be able to recuperate the data from your disks It is advisable to keep backup copies of all your disk data Backup is technical jargon for a sec ond copy Backup copies stored in a safe place are extreme...

Page 149: ...gs MIDI files WHAT IS A STANDARD MIDI FILE A Standard MIDI File is a storage format created to maintain data compatibility among different devices complying with the Standard MIDI File format This format allows Songs to be ex changed between different instruments and com puters If a Song is saved as a MIDI file on an MS DOS disk you can be certain that all the most recent generation of instruments...

Page 150: ... instruments WK and PS completely compatible To program WK4 Songs that are perfectly com patible with all WK and PS Series instruments e g WK4 and WK3 use the Sounds of the first three Sound banks and record the Songs using 16 tracks only MIDI channels A1 A16 TRACK STATUS ICONS The track status icons of a Song can appear as follows key play icon The track can be played on the keyboard You can sele...

Page 151: ...ith the correspond ing Song When a MIDI file is saved Performances are con verted in track data ProgramChange Pan Vol ume effects send PROGRAMMING SONG PERFORMANCES The method used to program Song Perform ances is identical to that used for the Perform ances of the Performance Groups Real and dis cussed in detail in the Sounds Performances chapter 4 of the User Guide A Song has a maximum of 32 tra...

Page 152: ...the list of the memorized Songs Once a Song has been selected with the Soft button the Song is active and can be played TO SELECT A SONG 1 Press the SONG button The Select Song window appears 2 Select the Song with the Soft buttons The Song is selected and you pass automati cally to Song mode The Song name appears on the status bar SONG 2 A B C D E F G H Performance name Song Name ...

Page 153: ...rrent position of the Song If the Song is not playing pressing PLAY starts the Song from the current position Song playback control buttons PLAYBACK CONTROL BUTTONS The buttons which control the playback of Songs in memory are in the SEQUENCER section 2 Press rewind the Song and to advance The and buttons rewind or advance one measure bar at a time If you hold these buttons pressed the Song rewind...

Page 154: ...playback or re cording When the Song has been stopped at a posi tion that differs to the initial Song start posi tion the LED on the STOP button flashes 5 Press STOP again to return to the starting posi tion of the Song or rewind with the button When the Song is not playing and at its initial starting position the LED on the STOP but ton remains on 5 STOP ENTER TEMPO DATA ESCAPE ENTER TEMPO DATA E...

Page 155: ... to the tracks of the current Song Per formance You can pass from one mode to an other by pressing the corresponding Soft button F5 or F6 Tempo Metronomic Tempo The value represents the playing speed beats per second at the current song position During the playback the Tempo can be modified with the DIAL The i or e symbols shownafterthetempovalue are an indication of the status of the synchronizin...

Page 156: ...d stop The Song starts at the point indicated by the locator and stops at the specified End Loop The Song starts at the point indicated by the locator stops at the End then repeats from the Starting point The loop repeats continu ously until stopped with the Stop button Start Determines the start measure and can be modi fied only if the Play mode is set to Loop If Loop is selected this parameter i...

Page 157: ...except new samples Samples are contained in the Sample RAM optional Play view Soft buttons JUKEBOX F1 Recalls the Jukebox function explained after wards OPTION F2 Metronome options Countdown activates a one measure lead into the recording of a sequence during which events cannot be captured Options On Off Metr volume Sets the metronome volume Options Off 10 127 SOUND VIEW F5 Recalls the Sound View...

Page 158: ...rt the Song in the list The right part of the display shows the name of the Song added to the list and the frame advances one step automatically 3 Repeat the procedure for other Songs and press INSERT or ENTER each time to compile the list Ifyouwanttosubstituteoneofthenamesinthe Jukeboxlist movethecursortotherightpartof the display select the name to change move the cursor back to the left part se...

Page 159: ...y View page of the Song To stop the playback of Jukebox press STOP Jukebox Soft buttons To display score chords and lyrics SCORE button While the Sequencer is playing a Song the dis play or an external monitor or television can show the melody chords and or lyrics the optional Generalmusic A V card is need for external dis play It is possible to see the score of the main melody or any other part o...

Page 160: ...the Soft buttons 2 Press the SCORE button The Score View display appears If the melody has already been created the notes will be shown otherwise only an empty clef appears 3 Press PLAY to listen the Song During the performance an indicator box monitors the notes as they are played If you are viewing lyrics only you will see a change of color of the words in synchronization with the playback 4 Pre...

Page 161: ...core controls dialog window 3 Select the Lyrics 1 2 3 or 4 option with the cursor buttons The options correspond to All notes chords and lyrics Lyrics 1 2 3 4 lyrics of various dimen sions Chords chord symbols 4 Press ENTER to close the dialog window and return to the Score View page 1 2 3 4 ENTER TEMPO ESCAPE SCORE F8 F7 F6 F5 F4 ...

Page 162: ...o connect an RCA con nector is supplied with the optionalAV board 2 Tune the TV to the AV channel To select the AV channel consult the own er s manual of the television set Computer monitors or televisions normally operate in AV mode 3 In Song mode press SCORE to display the Score 4 Press F8 Score controls to open the Score controls dialog window and move the cursor to the Echo LCD parameter 1 2 R...

Page 163: ... the 16 option will display the image as a back ground for the lyrics on the external monitor 7 Move the cursor to Video mode and select the RGB or CV Composite Video mode To view on RGB monitors set this parameter to RGB U S A models normally operate in CV and transmit in Composite 8 Move the cursor to Y shift and regulate the vertical alignment of the image 9 Press ENTER to close the dialog wind...

Page 164: ...n to enter Edit Song Select an existing Song not an empty one 2 Press F6 Edit Score 3 Press F4 Get Score to create the part from a track A dialog window appears which prompts you to select the track from which the Score will be created 4 Rotate the DIAL to specify the different track number and press ENTER to confirm If the track contains chords the melody ana lyser extracts the highest notes thos...

Page 165: ...ds assigned to the keyboard sections with automatic accompaniments Once a song has been recorded the result obtained is a normal Song which can be saved as a MIDI file and ed ited with the Edit Song functions The Song recorded with the QuickRec method is identical to a Song created with the Record option Note The following procedure explains one of the several possible examples without referring t...

Page 166: ... and access to the Quick Record mode is achieved The page is shown in negative highlight The instrument is now in record pending status The page is very similar to the main Style Performance page with the Locator in the top right hand corner monitoring the meas ures of the Song rather than the Style For the recording you can select any Style anduseanyaccompanimentcommand intro fill etc exactly as ...

Page 167: ...ternal sound generation Configuration page of Edit MIDI The QuickRec method allows you to record only the tracks connected to the WK4 sounds Hint To use one or more tracks to play only the sounds of an expander connected to MIDI OUT after recording you can disconnect the same tracks from the internal sound generator in Configura tion USER 2 USER 4 USER 3 USER 1 DANCE 2 DANCE 1 LATIN 2 LATIN 1 TRAD...

Page 168: ... track play a chord and press START STOP at the same time or use KEY START Hint To start the Song without arrangements start the record by pressing PLAY and press START STOP when you want to introduce the arrangements 4 Start to play You can stop the Style select another one and restart as if you were playing live 5 Press START STOP or ENDING to stop the ar rangements The Song is still in record m...

Page 169: ... method modify the Song in Edit Song save the Song to disk as an WK4 Song convert the song in MIDI file format if you wish to transfer it to another compatible MIDI instrument or compu ter sound card Note Avoid saving the Song as a MIDI file format only The WK4 format conserves a great deal more information for example the name of the composer and editor and has faster file handling and loading ti...

Page 170: ...ding with the restore proce dure 1 Press GENERAL in the EDIT section to gain access to the Edit General environment 2 PressF7 RestoreSongs tocancelalltheSongs and relative Song Performances in RAM You are prompted with a request to recon firm your choice 3 Press ENTER to confirm or ESCAPE to cancel With ENTER the Songs are cancelled from memory With ESCAPE the song data are retained Hint To cancel...

Page 171: ...hen the COMPUTER port is in use the MIDI ports can be used to connect to other musical instruments WHAT IS MIDI MIDI Musical Instruments Digital Interface is a system of communication between electronic musical instruments and computers With MIDI it is possible to control another musical instrument withWK4 control WK4 with a master keyboard or other controlling device guitar controller wind con tr...

Page 172: ...IDI cables with the sin gle serial cable TheconnectionviatheCOMPUTERportallowsthe control of 16 MIDI channels group A while MIDI connections can control 32 groupsAand B Note The COMPUTER port and PEDALBOARD connector cannot be used at the same time Connecting one excludes the other automatically Fig 1 Connection diagram of a master keyboard and two expanders or other instruments slave 1 and slave ...

Page 173: ...ice to the same channels as the WK4 Alternatively program the WK4 accordingly to react with the mas ter THE COMMON CHANNEL The Common Channel is used to simulate the WK4 keyboard with a master keyboard The master keyboard must trans mit on the same channel as the WK4 Com mon Channel dedicate a special track in a sequencer or other instrument for the selection and con trol of Styles Performance Son...

Page 174: ...ansmit on the same channel as the WK4 Common Channel Consult the owner s manual of the masterkeyboardforinformationregardingthe assignment of the transmission channel SELECTING SOUNDS AND PERFORM ANCES If you are not able to select single WK4 sounds from a master keyboard connected via the Com mon Channel you can use the Bank Select CC00 and Program Change PC messages to select the Performances Th...

Page 175: ... 32 89 96 89 96 LATIN 2 44 1 8 1 8 USER 1 44 9 16 9 16 USER 2 44 17 24 17 24 USER 3 44 25 32 25 32 USER 4 Note If SINGLE TOUCH PLAY is active selecting a Style will also change the keyboard sounds and effects CONTROLLING THE STYLES The Style controls can be simulated by sending a Control Change 80 message to WK4 with the values shown in the following table The messages travel on the Common Chan ne...

Page 176: ...ong Performance 64 1 16 1 16 CONTROLLING A SONG To control a Song via remote control the WK4 MIDI Clock must be set to External 1 Press MIDI in the EDIT section to enter Edit MIDI 2 Press F4 General set to recall the Gen eral settings page 3 Set the MIDI Clock parameter to External 4 Press ESCAPE or MIDI to exit Edit MIDI The setting rests in memory after power down The START STOP or PLAY and STOP...

Page 177: ...to control an external expander instead of an internal sound The tracks that limit themselves to transmitting on MIDI OUT are set to the MIDI transmit status In Song mode it is possible to define a keyboard zone to assign to the track Key range param eter in Edit MIDI 1 Program the expander to receive data on the same MIDI channel as that assigned to the track For example if the WK4 track trans mi...

Page 178: ...e keyboard the external sequencer must be set for MIDI THRU operation and the track corresponding to the WK4 track to listen to must be selected In LOCAL OFF status WK4 transmits on MIDI channel 1 of group A PREPARATION 1 Connect the WK4 MIDI OUT to the external sequencer s MIDI IN Connect the external sequencer s MIDI OUT to the WK4 MIDI IN closed MIDI Loop Consult the sequenc er s owner s manual...

Page 179: ...nector DB9 to the WK4 COMPUTER port and the larger connector DP25 to the RS 232 port of the computer Note The COMPUTER port and PEDALBOARD connector cannot be used at the same time Connecting one excludes the other automatically WK4 COMPUTER EXPANDER CONNEC TION Connect the WK4 to the computer in the follow ing manner closed loop WK4 MIDI OUTconnected to the computer s MIDI IN WK4 MIDI IN connecte...

Page 180: ... 8 10 User Guide ...

Page 181: ...processed by two effects When a Style is selected with the SINGLETOUCH PLAY off only the effects assigned to the accompaniments will change Group B When a Performance is se lected with STYLE LOCK on only the effects assigned to the keyboard will change GroupA In Song mode each track can be independently processed by either A or B channel effects Access to the DSPs is via the EFFECTS button in the ...

Page 182: ...o select the processor Eff1 or Eff2 and the effect type shown in negative highlight If WK4 is set to Style RealTime Mode the GroupAparameters will be assignable for the keyboard tracks and the Group B to the ac companiment tracks If WK4 is set to Song Mode the GroupAand Group B parameters will be freely assignable Group A and B assignments are carried in the Send Level page explained in the Edit E...

Page 183: ...ial to enter a value Select other tracks with the cursor button 5 Press STORE PERFORMANCE and ENTER to save the changes to the current Performance If you select a different Performance or reselect the same Performance without sav ing the changes the newly assigned effects will be lost and the original settings will be restored Press EFFECTS or ESCAPE to exit the Edit Effect page STORE PERF ENTER T...

Page 184: ...e inserted or bypassed LED on effects bypassed LED off effects inserted 1 Press the EFFECTS BYPASS button to bypass the effects The LED goes on to indicate that the current Performance is not routed to the DSPs 2 Press the same button to reactivate the effect The LED goes off to indicate that the current Performance is routed to the DSPs 2 1 EFFECTS BYPASS EFFECTS BYPASS EFFECTS BYPASS EFFECTS BYP...

Page 185: ...isplay shows the Send Level values of each track depending on the current mode IfStyle RealTimemodeisselected theGroup parameter will be fixed If Song mode is selected the Group param eter will be variable 2 Select the track that needs to be modified Use the Track select soft buttons A H To bring other tracks into view use the directional arrow 3 Select the Send level parameter that you wish to re...

Page 186: ...ke other modi fications 5 Press STORE PERFORMANCE and ENTER to save the changes to the current Performance Press EFFECTS or ESCAPE to exit the Edit Effects page Effect Editing Effect editing procedures are discussed in the Edit Effects chapter of the Reference Guide 4 ENTER TEMPO DATA ESCAPE 5 STORE PERF ENTER TEMPO DATA ESCAPE ...

Page 187: ...cording a Song 12 User Style recording 13 Edit overview 14 Edit Effects 15 Edit MIDI 16 Edit Mixer 17 Edit Contr Pads 18 Edit T Split 19 Edit Perf Sound 20 Edit Sound Option 21 Edit General 22 Edit Song 23 Edit Style 24 Preload 25 Edit Disk ...

Page 188: ... Reference Guide ...

Page 189: ...s to open a Select Performance win dow 2 Select a Performance with the correspond ing Soft button Note When you select a Performance WK4 sends CC00 value 48 PC messages in rapid succession on the Common Channel The BankSelect ProgramChange Volume and Pan messages of the tracks are sent on the normal MIDI channels Selection via MIDI WK4 must receive the relative selection mes sages on the Common Ch...

Page 190: ...gram Change Volume Pan the Programmable Per formances memorize a the selection of a Style b the selection of a Variation of the Style c the Tempo 1 Deactivate the STYLE LOCK button 2 Press one of the PERFORMANCE buttons to open a Select Performance window 3 Select a Performance with the correspond ing Soft button The memorized Style and Variation will be recalled Selection via MIDI WK4 must receiv...

Page 191: ...d with the corresponding Soft button Note When you select a Sound WK4 sends CC00 CC32 32 PC messages in rapid succession on the MIDI channel assigned to the track Selecting with the Numeric keypad It is possible to specify a Sound selection mes sage on the numeric keypad EDIT NUMBERS section This section can send a MIDI message consisting of Control Change 00 CC00 BankSelect MSB Control Change 32 ...

Page 192: ...or ENTER or press ESCAPE to cancel the entry The LED on the KEY PAD button goes off 5 Press STORE PERF followed by ENTER to memorize the modification to the current Per formance Note Sound selection messages are transmitted and received via MIDI in the order CC00 CC32 PC with the ProgramChange last For practical purposes the reverse order has been adopted for the panel selection procedure given th...

Page 193: ...ned To select a WK4 Sound you must send a Con trol Change 00 CC00 BankSelect MSB and Pro gram Change PC message Therelativenumbersarealsodisplayedinthemain page Multi mode and the selection window that appears when you select a SOUND GROUPS button The Sound table in theAppendix lists all the WK4 Sounds and corresponding MIDI selection mes sages ...

Page 194: ... sends CC00 value 55 PC messages in rapid succession on the Common Channel The BankSelect ProgramChange Volume and Pan messages of the tracks are sent on the normal MIDI channels SELECTION VIA MIDI WK4 must receive the relative selection mes sages on the Common Channel Send Control Change 00 value 55 and Program Change messages in rapid succession to WK4 Message selects CC00 55 PC 1 16 Song 1 16 S...

Page 195: ...tracks are sent on the normal MIDI channels Note If PLAY or STOP are pressed the Song Performance recorded in the Song is recalled the initial one or the most recent one All temporary modifications will therefore be cancelled Note If a Song Performance is selected in record mode the selection number specified is recorded in the Master Track SELECTION VIA MIDI To select a Song via MIDI the selectio...

Page 196: ...ating D HOLD Use Display Hold when selecting Sounds Styles Programmable Performances and Songs You can choose to select and play your Perform ances Styles and Songs without the programmed effects by activating the EFFECTS OFF button The LED of the button turns on to indicate the activation of the function When the LED is on the effects are bypassed and the current Perform ance Style or Song plays ...

Page 197: ...ects for exam ple press HELP to get information on the Ef fects section Some Help pages consist of a General informa tion page and one or more Detail pages which provide detailed information regarding the cur rent topic HOW TO USE HELP 1 Press the HELP button when you want gen eral information regarding the current mode A GENERAL page will open showing infor mation regarding the current operating ...

Page 198: ...mes sage The PANIC function sends the All notes off and Reset all Controllers messages to all external MIDI devices connected to the WK4 MIDI OUT port How to activate PANIC If your machine locks up while working with MIDI press the two buttons to the right of the display WK4 sends the all notes off and reset all controllers messages to all connected MIDI devices ...

Page 199: ... note us ing the individual percussive instruments of a Drumkit assigned to one of the tracks RESTORING THE SONGS MEMORY If you have loaded disk based Songs or recorded Songs and used up all the memory dedicated to the storage of Songs a quick and easy way of clearing Song memory and making room for other Songs is to use the Restore Songs operation Naturally you must remember to save the Songs tha...

Page 200: ...controls MIXER LOCK TEMPO LOCK AR RANGE ON OFF ARRANGE MEMORY LOWER MEMORY ARRANGE MODE OP TIONS 4 Program the Performance as required and save the changes with STORE PERFORM ANCE 5 If necessary activate KEY START INTRO FILL or ENDING 6 Press START STOP to start the recording The PLAY button activates automatically 7 Play the keyboard sounds with the automatic accompaniment using the Fills and Int...

Page 201: ... confirm Press F2 Option to open the Option dialog window where you can program the metronome and countdown options Press ENTER to confirm the settings Press F3 Controls rec to activate or deactivate the record ing of the Tempo Pedal Volume Effect Changeevents Press ENTER to confirm the settings 5 Select and program the initial Song param eters Time Signa ture to modify the time signature metronom...

Page 202: ...t locator can be modified only when the Play Rec mode is set to Loop The End locator can be modified only if the Play Rec mode is set to Forced Stop or Loop 9 Select the track s to record and set it them for recording Only tracks marked by the record icon will capture data and be heard To place all the tracks in record press F4 Select all tracks All the tracks will be activated for recording and t...

Page 203: ...the corre sponding Soft buttons The recording will be confirmed and the tracks set to seq play 6 Repeat the recording procedures for other tracks 7 Press RECORD to escape Record mode The LED of the RECORD button goes off and the display returns to normal UNDO If during the recording phase you want to can cel the last performed recording task use UNDO to cancel the last performed task The UNDO butt...

Page 204: ... captured Settings On Off Metronome vol Volume setting of the met ronome tick Settings Off 10 127 CONTROLS REC F3 Recording options for Tempo Master Volume effects changes These events are captured in the Master Track Tempo To record the Tempo variations Settings On Off P Volume To record the general Volume of the instrument using the Volume pedal These events are recorded as CC07 seeAp pendix Set...

Page 205: ...arameter can be modified only be fore starting a recording If the Song contains recorded events the parameter cannot be modi fied ERASE F7 Cancellation of the track or Song Track Cancels the selected track Song Cancels all the tracks entire Song and leaves an empty Song ready to cap ture recorded events The Song Performance remains intact METRONOME F8 Activates deactivates the metronome LOC Locato...

Page 206: ...uantization 1 4 1 8 1 12 triplet 1 16 1 24 triplet 1 32 1 48 triplet 1 64 1 64 1 96 1 64 triplet free no quantization 1 8 B F swing 1 16 B F swing free no quantization B F indicate an adjustment of the Swing feel MEMORY PROGRESS BAR A bar graph which monitors the amount of memory being used up by the song as it is being recorded In Play mode the parameter changes to SONG MEMORY expressed as a nume...

Page 207: ... A RIFF ARiffisamusicalmotifcapableofrepetition loop ing It can also be expressed as a phrase or lick but it is important to understand that the Riff must be capable of repetition In fact when you play with Styles you will note that the pat terns are short repeating sequences The table shown below lists all the Riffs that make up a Style The basic Riff is the principal pattern of the Style which r...

Page 208: ...uttons and press ENTER to con firm The LED on the RECORD button lights up and the Record View page is shown in negative highlight 5 Once the dialog window closes press F1 Mode to select the recording mode The Record Mode dialog window opens where you can select the required mode Select the record mode and press ENTER to confirm Recording Style Mode Sound View display menu Tempo tracks environment ...

Page 209: ...r riff and the Scale Converter en gages the task of reconstructing the Basic Minor and Basic 7th Refer to the Scale con verter table at the end of this chapter 8 Select the Quantize pa rameter to modify the pre quantization set ting auto correction of the timing during the recording 9 Select the tracks that you want to record and set them in Record mode OnlyTracks show ing the record icon will cap...

Page 210: ...example after adding new events to an ex isting drum pattern you might want to return to the original pattern and just cancel the new events A quick and easy way is to use UNDO Just press UNDO and confirm with ENTER to return to the previous status or ESCAPE to re tain the last task RESTORING THE USER STYLES MEMORY If you have loaded disk based Style or recorded User Styles and used up all the mem...

Page 211: ...rd with the cursor buttons and press ENTER to confirm SOUND VIEW F5 Recalls the Sound View page where you can see and change the sounds assigned to the Per formance REC VIEW F6 Recalls the Record View page where it is pos sible to control the record play parameters ERASE F7 Cancellation of a track riff variation or Style Track Cancels the selected track Riff Cancels the selected riff Variation Can...

Page 212: ...is selected the arranger car ries out the simplified conversion referred to The tables at the end of this chapter show how the scale converter operates both in the off status as well as for the Minor and 7th chords Several different solutions for each chord are provided for Thetablesrefertochordandbasspatternsplayed in the key of C and shows which notes are con verted The changes are expressed in ...

Page 213: ... G A B accomp 2 1 1 bass 1 1 Scale Converter in OFF status C Major riff C minor riff C D F G A C D E F G A B accomp 1 1 1 bass 1 1 1 Scale Converter active C Major riff C 7th riff C D F G A C D E F G A B 7th 1 accomp 2 7th 1 bass 7th 2 accomp 2 1 7th 2 bass 1 7th 3 accomp 2 1 7th 3 bass 1 7th 4 accomp 2 7th 4 bass ...

Page 214: ... 5 accomp 1 1 1 min 5 bass 1 1 1 min 6 accomp 1 1 1 min 6 bass 1 1 1 min 7 accomp 1 1 1 1 min 7 bass 1 1 1 1 Complex chords The logic applied to the conversion of the more complex chords follows similar lines to that used for the standard Major minor and 7th chords in dicated above The user is invited to experiment with the Scale Converter in order to discover the most suitable conversion for the ...

Page 215: ...with out confirming a new entry THE STRUCTURE OF THE EDIT ENVIRON MENTS The Edit environments consist of pages which contain related parameters example a page can contain a set of Effects parameters or MIDI pa rameters etc The pages of the simple structure edit environ ments Edit MIDI Edit Effects Edit Mixer Edit Controllers Pads Edit Tracks Splits Edit Perf Sound are arranged on a single level Th...

Page 216: ...ne accessed editor to another by means of the page scroll buttons The functions of an editor are recalled with the soft buttons F1 F8 as in the simple structure environments To escape an editor press the button correspond ing to the edit environment or press ESCAPE twice once to return to the main menu once to escape the edit Edit environments diagram with complex structure In the Disk environment...

Page 217: ... both are active for selection they indicate the presence of a menu before or after PASSING FROM ONE EDIT SECTION TO ANOTHER While you are inside an edit environment it is possible to pass to a different environment by pressing the corresponding button in the EDIT section It is not necessary to escape an edit environment to pass into another MOVING THE CURSOR The cursor is represented by the negat...

Page 218: ...ith the di rectional arrows 6 Modify the parameter with the DIAL or the numerical keypad 7 If necessary pass on to another editor You can use the buttons or return to the main menu with ESCAPE and select another editor with DIAL ENTER 8 Press ESCAPE twice or the corresponding edit button to return to the main display of the current operating mode 9 If you have modified a Performance save the modif...

Page 219: ...cts Effects type selection Page stored in Performance EFFECTS 1 EFFECTS TYPE F1 This function assigns the effects to the DSP Each Performance can have its own effect and the general level volume can be regulated The ef fect levels for each track are adjusted using the Send level function Group A B Eff1 The Reverb selector Rotating the Dial when this parameter is selected scrolls through the 24 ava...

Page 220: ...ach track Assignable values 0 dry 127 wet GENERAL EFF1 BALANCE F3 Value added or subtracted from the general reverb level regardless of the selected Perform ance Allows you to adapt the reverberation of the WK4 to the natural reverb of the surround ings The reverb duration varies according to the di mensions and absorption characteristics of the surroundings in which you play You can pro gram the ...

Page 221: ...rst reflection and the remain der of the reverb Diffusion Duration of the reverb Early type reverbs L P Filter Low Pass Filter Determines the cutoff frequency of the filter Delay delays Velocity of the delay repetition Feedback delays Interaction of the delay with itself Determines the number of repetitions of the delay Feedback phasers and flangers Interaction of the phaser or flanger with itself...

Page 222: ...e Semitone Transposition in semitone steps Detune Detuning over a range of 100 Cents Low Gain Enhancement of the low frequencies Medium Gain Enhancement of the mid frequencies High Gain Enhancement of the high frequencies ...

Page 223: ...io Room 2 10StudioRoom 3 11Club Room 1 12Club Room 2 13Club Room 3 14Vocal 15Metal Vocal 16Plate 1 17Plate 2 18Church 19Mountains 20Falling 21Early 1 Room Size 0 64 Diffusion 0 127 L P Filter 0 bypass 10 16kHz 22Early 2 Room Size 0 64 Delay 0 127 L P Filter 0 bypass 10 16kHz 23Early 3 Room Size 0 64 Delay 0 127 L P Filter 0 bypass 10 16kHz 24Stereo Room Size 0 64 Rev Time 0 0 1s 99 10s L P Filter ...

Page 224: ...kHz 30 6kHz Depth 0 100 Feedback 0 99 16Flanger 2 17ChorusDelay 1 Delay 0 0ms 125 500ms Freq Mod 0 0Hz 30 6kHz Depth 0 100 18ChorusDelay 2 19FlangerDelay 1 Delay 0 0ms 125 500ms Freq Mod 0 0Hz 30 6kHz Depth 0 100 20FlangerDelay 2 21Dubbing Delay 0 0ms 125 500ms Feedback 0 99 L P Filter 0 bypass 10 16kHz 22Distortion Depth 0 100 Feedback 0 100 L P Filter 0 bypass 10 16kHz 23DistortionDelay Delay 0 ...

Page 225: ...DI Channels and ports for each track Track in edit Performance Page memorized to the Performance MIDI IN port A or B MIDI OUT channel 1 16 MIDI OUT port A or B MIDI OUT channel 1 16 MIDI CHANNELS F1 This parameter assigns the MIDI channel 1 16 and MIDI port A or B to each track The Performances are independently program mable for a MIDI configuration The MIDI Lock option soft button F8 locks the c...

Page 226: ...wing the track can be played from the keyboard When OFF the track cannot be played from the keyboard but can receive data via MIDI or it can be exploited by a Song or Style The icon also corresponds to a master keyboard connected via the Common Channel which simu lates the WK4 keyboard and on board control lers pedals trackball Internal sound generator icon When on icon showing the events generate...

Page 227: ...tion provides settings that influence the instrument as a whole saved to the Setup MIDI Clock A MIDI synchronizer to synchronizeWK4 with ex ternal rhythm units and sequencers Setting Internal renders WK4 independent from the Clock of external MIDI devices Setting External placesWK4 on stand by wait ing to receive the PLAY START or STOP com mand from the external device connected to the instrument ...

Page 228: ...4 MIDI OUT Options On Off MIDI Merge Enables data received at MIDI IN to be merged with data transmitted at MIDI OUT If Merge Off the data received at MIDI IN are directed to the internal sound engine and to MIDI THRU If Merge On the data received at MIDI IN are directed to the internal sound engine to MIDI THRU and MIDI OUT Unlike data sent from MIDI THRU the data transmitted via MIDI OUT are pro...

Page 229: ...umkits are converted to Program Changes compatible with General MIDI The table shows the drumkit Program Changes according to the status of the parameter Options On Off BankSelect Enables the reception and transmission of the BankSelect MSB CC00 and BankSelect LSB CC32 message Options On Off MIDI channel 10 General MIDI On conversion table automatic PC GM PC BS WK4 Drumkit GM Drumkit WK4 1 8 113 2...

Page 230: ...r B The channel assigned to the Common Channel is no longer available for the tracks of the exter nal sequencer The Common Channel is re served to special tracks dedicated to the control of effects and other parameters ProgramChange and ControlChange data re ceived on the Common Channel select Style Song Performance Effectsandotherparameters listed in the Appendix Options Off 1 16 Chord to Arr 1 C...

Page 231: ... sound en gine responds only to data received at MIDI IN The keyboard cannot play the internal WK4 sounds directly Activate Local Off to program Songs on an ex ternal sequencer WK4 transmits data to the ex ternal sequencer and the sequencer returns the data to the WK4 internal sound engine MIDI OUT MIDI IN MIDI LOCK F8 When this function is selected shown in nega tive highlight the current MIDI ch...

Page 232: ... 15 8 Reference Guide ...

Page 233: ...he EDIT MIXER environment Note Save the changes with STORE PERFORMANCE The Performances memorize the pages whose icon shows the symbol VOLUME F1 You can regulate the track volume with the DIAL or the sliders A H In edit each slider corresponds to a track the LED near the A H letters is on Value range 0 127 Performance MIXER 3 PAN F2 Track position in the stereo panorama Moving the Pan all to the l...

Page 234: ...parameter is important only when the tracks are connected to the internal sound generation Normally the WK4 sends sounds to both LEFT and RIGHT outputs but it is possible to send some tracks to the auxiliary 1 and 2 outputs for an external mixing operation and a wider sound opening The outputs selection also affects the internal amplification Options Left Right Out1 Out2 Out1 Out2 Edit Mixer Rando...

Page 235: ...he intersection zone of the two bands Low Frequency The highest limit of the Bass frequencies Value range 100Hz 400Hz Low gain Control of the Low frequencies Value range 12dB 12dB High Frequency The lowest limit of the High frequencies Value range 3Hz 15Hz High gain Control of the High frequencies Value range 3Hz 15Hz Edit Mixer Equalizer High Low general equalization ...

Page 236: ... 16 4 Reference Guide ...

Page 237: ...reset Pitchbend and or the Modulation functions of the Trackball This con trolling device is spring loaded to return it to the central position PitchBend 1 Pitch Bend is applied by horizontal left right movements of the Trackball The parameter of fers a maximum pitch excursion of 12 semitones and Off The same control can be assigned to a continu ous control pedal See Pedals Programming F2 Edit Con...

Page 238: ...als depend on the type of pedal SWITCH Off Damper Sostenuto Soft Start Stop Key Start Intro Fill Fill Fill Ending Var 1 Var 2 Var 3 Var 4 Var Var Perf Perf Harmony Bass to Low Arrange On Off Fade In Out Tempo Tem po Punch Rotary Slow Fast Minor 7th Dim Min 7th Maj 7th Freeze Chord CONTINUOUS Off PitchBend Pitch Pitch Filter Cutoff Frequency CC74 Reso nance CC71 Modulation CC01 Breath controller CC...

Page 239: ... Note Determines the note played Range C 1 to G9 Dynamic Note velocity Range 0 127 Rotary slow fast Switches the Rotary velocity from slow to fast or vice versa Hardcopy Captures a bitmap image of the current display BMP into RAM The images can be saved to an MS DOS disk and elaborated by a graphic program running on a personal computer Confirm F1 confirms the captured display Save F2 saves the ca...

Page 240: ...n increasing order all the Performances you intend to recall must be programmed for the action of the Perf function Perf Returns to the previous Perform ance N B To select several Perform ances in decreasing order all the Performances you intend to recall must be programmed for the action of the Perf function Harmony Activates deactivates the Harmony button Bass to Low Activates deactivate the Bas...

Page 241: ...the value set in the Pit Mod parameter Pitch Decreases the Pitch down the value set in the Pit Mod parameter Filter Opens closes the Filter Cutoff pa rameter in Edit Perf Sound Resonance Affects the Resonance parameter Modulation Applies Modulation CC01 to tracks activated for the effect in Pit Mod Breath Cnt Generates Breath controller CC02 data useful for external MIDI devices capable of recogni...

Page 242: ... 17 6 Reference Guide ...

Page 243: ...the pages whose icon shows the symbol TRANSPOSE F1 A track transposer which transposes in steps of one semitone The maximum transposition ob tainable is 5 octaves Assignable values 60 0 60 MASTER TRANSPOSE ENABLE DISABLE F2 Master Transpose general transpose enable disable for the track Tracks set to Enable are tuned to the scale selected in Edit General Tracks set to Disable play with the Equal t...

Page 244: ... equivalent to 1 64th semitone Assignable values 63 0 63 Edit Tracks Split Random pitch RANDOM PITCH F4 Creates slight pitch variations freely and is use ful to simulate the pitch instability typical of acous tic instruments It is advisable to assign a value of 1 or 2 to wind instruments Assignable values 0 no effect 7 maximum randomness ...

Page 245: ... Note Avoid assigning Priority On to too many tracks as this will cancel the function due to conflicts between the assigned tracks VELOCITY CURVE F6 Provides a selection of Velocity response curves As well as modifying the velocity data velocity curves allow the creation of crossfade effects between two tracks For example it is possible to assign two tracks with opposing dynamic curves for example...

Page 246: ...ns HARMONY F1 Allows you to choose from a selection of harmony types The Harmony function is enabled and disa bled by pressing the HARMONY button on the control panel Harmony is a function that affects the instrument set to Styles Performance mode when the keyboard is split Upper Lower and Multi modes Songs are not affected Harmony type Provides a selection of harmony types defined by the tables a...

Page 247: ... Jazz adds two notes above the note played by the right hand at intervals of a fourth and a minor seventh No left hand chord required Rock adds three notes of the perfect chord below the note played with the right hand No left hand chord required Track Selects the track to which the harmony type is assigned Options tracks 3 8 HARMONY TYPE STRUCTURES Harmony example The left hand plays a chord in C...

Page 248: ...f a quarter note crotchet and the sign appears when the value exceeds that of the indicated musical note Delay is synchronized with the Clock and affects the internal generation as well as MIDI OUT Assignable values 0 off 192 1 384 2 576 3 768 4 KEY RANGE F3 This parameter is valid only when the instrument is set to Song Mode Assigns a keyboard extension highest and low est notes to a track Assign...

Page 249: ... cel COPY TRACK F6 Copiesonetracktoanother Thedestinationtrack assumes all the programmed settings of the source track Press the corresponding Soft button to open the Copy track dialog window Procedure 1 Select the track to copy 2 Press F6 Copy track 3 Specify the number of the track to copy with the DIAL or numeric keypad 4 Press ENTER to confirm the copy or ES CAPE to cancel the operation The se...

Page 250: ... the track You are prompted to confirm the operation 3 Press ENTER to confirm or ESCAPE to can cel Note This command is valid for Song mode In Style RealTime mode it is not possible to cancel tracks Note It is not possible to cancel track that contains note information If a track shows the seq play or mute icon with notes it cannot be cancelled Hint Cancel Song tracks that are not used The resulti...

Page 251: ...eters not on track pa rameters as in Edit Perf Sound For more in formation about the advanced Edit Sound pro gram contact your local Generalmusic dealer Sound and Sound Patch The term Sound refers to all the WK4 Sounds that are not Drumkits nor contain a dynamic switch Sound Patch is a generic term used to describe a Drumkit or a Sound containing a dy namic switch This section discusses SOUNDS in ...

Page 252: ... environment Note Save the changes with STORE PERFORMANCE The Performances memorize the page whose icon shows the symbol OSCILLATORS AND LAYERS The WK4 Sounds can comprise 1 2 or 3 layers The layers are sound generating units consisting of 1 or 2 oscillators and each oscillator elabo rates a Wave sample Consequently each poly phonic voice can be generated by 6 simultane ous oscillators Given that ...

Page 253: ...il ter Low pass Cuts into the higher frequen cies As a result if you use Sounds with a low harmonic content the notes at the higher end will be cut This parameter regulates the brilliance of the Sound Lowering the cutoff frequency produces a mellow sound while an increase produces a bright sound High pass Cuts into the lower frequencies making the sound brighter The higher the value the lighter th...

Page 254: ...alues 63 minimum rate 0 un changed 63 maximum rate THE PERF SOUND OPTIONS Copy to F6 Copies the modifications applied to the Sound of a track to a different Track of the same Perform ance The parameter values are copied NOT the Sound therefore if a Piano sound is at the source and a Bass is at the destination the Bass sound will inherit the parameter modifications Track Select the track with the D...

Page 255: ...the parameters Performance Track in edit SOUND 6 Edit Sound Patch Dynamic Layer options to select and mute the layers Press the same soft button repeatedly to toggle between L and M A B In a Sound Patch two different sounds are separated by a dynamic threshold in order that playing harder recalls the sound at the higher dy namic level Try playing for example the sound ORCHESTRA 48 3 play softly fi...

Page 256: ...ive while if above will require transposing down negative Assignable values 64 63 Tuning Fine tune control in steps of 1 64 of a semitone Assignable values 64 63 Filter Regulates the cutoff frequency of the filter Assignable values 64 maximum decrease 0 unchanged 63 maximum increase Exclude A linking number between two notes that exclude each other Playing a note will interrupt another note with t...

Page 257: ... THE SOUND PATCH OPTIONS Catch note F1 Selects the note to place in edit by playing it on the keyboard 1 Press F1 Catch note The following message appears 2 Play the note to place in edit The dialog window closes and the Edit note parameter is modified Copy to Layer F2 Copies an entire Layer to the other 1 Select the Layer to copy with the soft buttons A and B 2 Press F2 Copy to Layer You are prom...

Page 258: ...t are temporarily recalled in order to compare them with the current edited ones Restore F6 This option restores the original Sound Patch or cancels the last modifications applied after sav ing to the Performance 1 Press F6 to open the following dialog window 2 Select the function required with the directional arrows and press ENTER to confirm or ESCAPE to cancel to abort S P Performance Restores ...

Page 259: ...e Store window 6 Press ENTER to save the new file to the selected location The new Drumkit SoundPatch is now avail able as a RAM Sound As any new RAM Sound the new Drumkit SoundPatch will remain in memory after power down To conserve it and safeguard it against future cancellation save it to disk using the Save Single Sound SaveAll Sound or Save All procedures Save the modifications to a Performan...

Page 260: ... 19 10 Reference Guide ...

Page 261: ...f func tions implemented by future software updates In the software version on which your owner s manual is based no software updates are imple mented through the OPTION function When you press this button the following mes sage appears Press ESCAPE to close the window ...

Page 262: ... 20 2 Reference Guide ...

Page 263: ... directional arrows to select the editor and press ENTER c use the page scroll buttons to pass directly from one editor to another d specify the editor number on the keypad with the KEY PAD LED on and press EN TER Edit General Main menu GENERAL 9 DESCRIPTION OF THE MAIN MENU PAGE The menu page shows 6 editors at the centre General Controls Tuning Scale Pedalboard Computer Date Time Display Control...

Page 264: ...EYBOARD SCALE Provides a selection of Temperaments Scales Options Equal Inverse Meantone Werkmeister III Arabian 1 Arabian 2 User1 User8 USER PROGRAMMABLE SCALES You can program your own scale using the key board map shown at the bottom of the display This graphical representation shows the current pitch of the notes of an octave The octave cur rently in edit is shown in the title bar directly abo...

Page 265: ... save it to the Setup by pressing F7 Save You will be prompted to select a User location THE TUNING SCALE OPTIONS Copy to octave F3 Copies the current setting to another octave The Copy to octave dialog window is opened where you can specify the elements to copy and the octave to copy the user programmed data to Coarse Fine Copies both the coarse tuned notes as well as the fine Coarse Copies only ...

Page 266: ...ents is deactivated and the BASS track is assigned to the Pedalboard allowing you to play the bass with the pedalboard Pedalchord Chord recognition on the keyboard is disabled and passed over to the pedalboard To play minor and sevenths play two bass notes at the same time Alternatively you can program the Pedals 1 2 or 3 to select minor and sev enths Multifunction Each note of the pedalboard re c...

Page 267: ...ion velocity of 31250 baud A standard PC serial cable must be connected to the RS 232 port of the computer PC2 As above but with a communication ve locity of 38400 baud Edit General Date Time Date Time Sets the internal calendar and clock SET DATE F1 Sets the date in edit Take the cursor to the day month and year and specify the value of each parameter with the DIAL Confirm with ENTER or F1 SET TI...

Page 268: ...ccording to the absence or presence of the optional Audio Video card AV CARD NOT INSTALLED You can plug a microphone or musical instrument or other audio source into the Mic Line jacks IN1 IN2 to play through the instrument s inter nal pre amplifier The input signals are directed to the instrument s internal speakers and to the LEFT and RIGHT audio outputs but are not proc essed by the on board Di...

Page 269: ...heleftoftheMic Linejacks An optimum signal level can be obtained when the input signal at maximum volume almost touches the extreme right of the VU bar graph the clipping zone RegulatethemaximumvolumewiththeMIC LINE panel slider The M VOLslider regulates the sum of the internal sound generator output level WK4 sounds and signal of the MIC LINE IN inputs Edit General Mic Line In AV interface instal...

Page 270: ... the filter resonance Assignable values 0 127 Audio Out Directs the signal to the audio output or outputs Assignable values L R Left Right L R MIC LINE ON OFF F1 Switch to activate deactivate the Mic Line IN1 and IN2 jacks When the inputs are active the over all polyphony is reduced by two voices if you do not intend using the Mic Line inputs deactivate them in order to direct the two voices to th...

Page 271: ... instrument is in Song mode or when you attempt to select a Song Performance while the instrument is set to Style RealTime mode SYSTEM INFO F3 This option displays information regarding the presence or absence of the various accessories that can be installed in WK4 RESTORE The Edit General environment offers several dedicated RESTORE commands which are use ful to restore part or all the instrument...

Page 272: ...slots are restored to the factory set conditions empty Pressing F5 prompts a request to confirm the operation with ENTER or cancel with ESCAPE RESTORE PERFORMANCE F6 This operation cancels all user programmed Per formances in RAM residing in the 8 buttons of the PERFORMANCE GROUPS The status of the Performance parameters are restored to the factory set values Pressing F6 prompts a request to confi...

Page 273: ...n menu appears 2 Select the editor that you wish to edit using the DIAL or the cursor buttons It is also pos sible to enter an editor by specifying the rela tive number on the numeric keypad 3 Press ENTER to gain access to the editor 4 Select the desired option with the soft but tons 5 Select the parameters with the directional arrows Modify the parameter with the DIAL or the numeric keypad 6 Conf...

Page 274: ...utton and confirming with ENTER activates the follow ing user message Press ESCAPE to close the window and repeat the UNDO operation this time with UNDO ena bled EDIT SCORE F6 Opens the Score Edit function Score Edit is described separately in detail in the Score Edit Score section towards the end of this chapter SONG NAME F8 Modifies the name of the Song The method used to insert characters is de...

Page 275: ...lected the following pa rameters may or may not appear Track F3 Single track Select the track with the Soft buttons A H Master track F4 The MasterTrack records events pertaining to the general controls of the Song Tempo Time Signature selected Performance selected effects Chords track F5 Track for the chord sym bols inserted in the score Music track F6 Track for the notes of the score standard not...

Page 276: ...rom to The highest and lowest limits of the note range to cancel To cancel a single percussive instru ment from the Drum track assign the same value to the from and to parameters For example to cancel the snare D2 set the parameter as Note range from D2 to D2 Assignable values C 1 G9 From locator To locator Determines the start and end point of the part to cancel In some cases it is possible to sp...

Page 277: ...rmines the start and end point of the part to move It is possible to specify the measure beat and resolution tick Assignable values within the limits of the Song It is not possible to specify a point before the start or after the end of the Song Start locator Determines the new position of the part that is to be moved Assignable values any point even after the end point of the Song ...

Page 278: ...d the following param eters may or may not appear Track F3 Single track Select the track with the Soft buttons A H Master track F4 The MasterTrack records events pertaining to the general controls of the Song Tempo Time Signature selected Performance selected effects Chords track F5 Track for the chord sym bols inserted in the score Music track F6 Track for the notes of the score standard notation...

Page 279: ...previous one ends Assignable values 1 998 PARAMETERS Copy mode Determines the copy mode Merge unites the copied events to those already present at the des tination Replace substitutes the events present at the destination with those copied Options Merge Replace From track to track Specifies the source and destination track of the copy The From track part is selected with the Soft buttons A H The T...

Page 280: ...m the quantization SOFT BUTTONS F1 AND F2 These select the Note On Quantize and Note Off Quantize parameters Note On Quantize Quantization of the Note On event Note Off Quantize Quantization of the Note Off event After a Note On quantization a Note Off quantization affects the duration of the notes adapting them to the quantization grid Quantize ...

Page 281: ...ze value Same as Note On Note range from to Determines the highest and lowest note range to quantize To quantize a single percussive instru ment of the Drum track assign the same note to the highest and lowest limit For example to quantize the snare D2 set the parameter to Note range from D2 to D2 Assignable values C 1 G9 From locator To locator Determines the start and end point of the part that ...

Page 282: ...ER to con firm the insertion PARAMETERS Measures to insert Specifies the number of measures to insert As signable values 1 999 Time Signature Determines the Time Signature of the measures to insert Insert from locator Specifies the measure at which the new meas ures will be inserted Assignable values from the first measure of the Song to the first measure after the end measure of the Song coda ins...

Page 283: ...gnable values any number that does not ex ceed the total number of measures in the Song For example if the Song is 50 measures long the maximum value that can be assigned is 50 Delete from locator This parameter indicates the first measure of those to be deleted Assignable values within the actual limits of the Song The parameter is linked to the previous one which can be modified if the measures ...

Page 284: ... Velocities are all set to the value specified in the Change Velocity pa rameter Change Velocity Specifies the amount by which the velocity val ues can be changed This depends on the option selected in Velocity Mode Note range from to Assigns the upper and lower limits of the notes to be affected To modify the velocity of a single percussive instrument of the Drum track assign the same note to the...

Page 285: ...a single percussive instrument of the Drum track assign the same note to the highest and lowest limit For exam ple to change the snare D2 set the parameter to Note range from D2 to D2 Assignable values C 1 G9 From locator To locator Determines the start and end point of the part to be affected It is possible to specify Measure Beat and tick Assignable values within the actual limits of the Song It...

Page 286: ...y using the cur sor buttons 4 Use the DIAL to modify the selected param eter EVENTS AND PARAMETERS WHICH CAN BE CHANGED The Status column shows the type of event One or more parameters can be modified for each event Refer to the events table on the following page for an explanation of each event Microscope measure beat Event List event type Status Value 3 Value 2 Value 1 Gate track in edit resolut...

Page 287: ... To select the WK4 banks use numbers 1 16 1 128 Bank Select LSB message Not necessary to select the WK4 sounds 1 128 Control Change Type of Control Change or MIDI Controller Example CC00 Bank Select MSB CC32 Bank Select LSB CC01 Modulation CC07 Volume 1 128 Control Change value Pitchbend Value of LSB Least Significant Byte 0 Off 1 127 On Value of MSB Most Significant Byte Effective value of bendin...

Page 288: ...4 M Tch 0 P Tch C4 0 After inserting the desired event modify its pa rameters accordingly INS TYPE F4 Recalls a dialog window where you can select the type of event to insert manually with the Ins x function Select the event type and press ENTER DELETE F6 Cancels the selected event CATCH LOCATOR F7 Selects the event currently playing or the event immediately after the current Song position GO TO L...

Page 289: ...rack parameters Program Change Volume Pan Effects If the same pa rameters are also found at the beginning of each track sound volume and pan settings are se lected and controlled by the events contained in the tracks and not by the initial Performance Assignable values one of the 8 max Song Per formances bar Event List event type Status Initial parameters value beat resolution Note When loading a ...

Page 290: ...serted event precisely modify its locator the parameters to the left of the Status STATUS VALUE TEMPO Metronomic Tempo If the Tempo Rec option is active during the recording tempo variations are recorded 20 250 PERFORMANCE Change of Performance 1 8 VOLUME Volume variation via MIDI through the Common channel or by means of the Volume Pedal Does not record volume changes effected with the M VOL cont...

Page 291: ...a dialog window from which you can se lect the type of event to insert manually with the Ins x function Press the cursor arrow to bring other events into view Select the type of event and press ENTER DELETE F6 Cancels the selected event CATCH LOCATOR F7 Selects the event currently playing or the event immediately after the current Song position GO TO LOC F8 Takes the cursor directly to the first e...

Page 292: ...he score can be viewed on the instrument s dis play or projected onto an external monitor by pressing SCORE To view on an external moni tor the WK4 must be fitted with Generalmusic s optional Audio Video card The Score is created in Edit Song THE SCORE BUTTON Press SCORE to view the notes lyrics and chord symbols on the display and or on an external monitor SCORE Press F8 Score controls to select ...

Page 293: ...ns RGB CV Y shift Controls the vertical alignment Score split ON the notes are displayed on a staff OFF the notes are displayed on the treble clef only Notes that normally occupy the bass clef are shown with the symbol bass 8va In the Score page press F8 to open the Score Control dialog window F8 F7 F6 F5 F4 Score control dialog window viewing options for external monitor When finished press ENTER...

Page 294: ...er symbol The displayed note or notes are in reality one octave lower The note too high symbol The note at the position corresponding to the dis played symbol is too high to appear in the staff The note too low symbol The note at the position corresponding to the dis played symbol is too low to appear in the staff This symbol rarely appears with a standard music staff Score split option in the Sco...

Page 295: ...dit Song Press ESCAPE once again to return to the Play View or Record View page INSERTING NOTES To create a Score notes are withdrawn from a Song track 1 Press F4 Get Score 2 User the DIAL to select the track to transcribe 3 Press ENTER to confirm Wait a few sec onds for the score to be generated INSERTING CHORD SYMBOLS Chord symbols correspond to the MIDI Text event These are loaded and saved wit...

Page 296: ...escape and return to the note press the soft button E Previous event To escape and pass to the next note press the soft but ton D Next event 5 Play the chord below the Split Point The chord symbol appears in the following form CMaj Dmin E7th 6 If you want to indicate a bass extension or a pedal note press the function button F Ex tension and play the alternative chord The bass extension will appea...

Page 297: ... the soft button E Previous event To escape and pass to the next note press the soft but ton D Next event At this point Next event and previous event pass from 16th to 16th instead of from note to note 5 In this operating mode the keyboard trans forms into a source of alphabetic data see the Data Entry chapter Write the required syllable using the keys of the keyboard 6 Press soft button F End phr...

Page 298: ...this button takes the cursor to the next sixteenth For example a quaver 8th is divided into two 1 16ths a crotchet quarter into four 1 16ths etc The edit takes place in an active zone To escape and return to the normal edit of the note press soft button E Previous event To escape and pass to the next note press soft but ton D Next event 1 16 H See above Takes the cursor to the previous six teenth ...

Page 299: ...breviation then to return to the edit of the en tire chord symbol You can modify the selected part with the DIAL or by playing a different chord Play the chords below the Split Point END PHRASE F This command inserts an End phrase symbol I at the end of a verse In the viewing modes Lyrics 1 Lyrics 4 the verses end with the End phrase symbol is reached and the next verse starts on a new line We rec...

Page 300: ... 22 28 Reference Guide ...

Page 301: ...ss ST SONG to enter Edit Style The main menu appears 2 Select the editor that you wish to edit using the DIAL or the cursor buttons It is also pos sible to enter an editor by specifying the rela tive number on the numeric keypad 3 Press ENTER to enter the editor 4 Select the desired option with the soft but tons 5 Select the parameters with the cursor but tons and modify their value with the DIAL ...

Page 302: ...at the UNDO operation this time with UNDO ena bled STYLE NAME F8 Changes the name of a Style This function only applies to USER Styles the names of the ROM Styles are permanent and cannot be modified The method used to insert characters is described in the Data Entry chapter You can move the cursor with the soft buttons or the DIAL Insert the characters with the keys of the keyboard EMPTY TRACK IN...

Page 303: ... Single track the current riff Riff all tracks F6 An entire riff all the tracks of the riff Var all riffs F7 An entire Variation all the riffs of the Variation Style all vars F8 An entire Style the 4 Variations of the Style PARAMETERS Variation Selects one of the 4 Variations Only Variations that contain at least one recorded riff can be se lected Riff Selects one of the riffs of the selected Vari...

Page 304: ... cancel a single percussive instrument of the Drum track assign the same note to the highest and lowest limit For example to cancel the snare D2 set the parameter to Note range from D2 to D2 Assignable values C 1 G9 From locator To locator Determines the start and end point of the part to cancel It is possible to specify the measure beat and resolution Assignable values within the actual limits of...

Page 305: ...ts one of the riffs of the current Variation Only existing riffs can be selected If the Style is empty the phrase No Riff appears From locator To locator Sets the start and end points of the part to be moved The measure beat and resolution can be specified Assignable values within the actual limits of the riff It is not possible to specify a point beyond the end of the riff Start locator Sets the ...

Page 306: ...or may not appear Track F5 Single track the current riff Riff all tracks F6 An entire riff all the tracks of the riff Var all riffs F7 An entire Variation all the riffs of the Variation Style all vars F8 An entire Style the 4 Variations of the Style PARAMETERS Current Style to Style Selects the source Style to copy from and the destination Style to copy to Assignable values any USER Style From var...

Page 307: ... the new position of the copied part Assignable values within the actual limits of the destination riff Copy times Sets the number of consecutive copies Each copy starts exactly where the previous one ends Assignable values depends of the length of the riff The copy must not exceed the riff length Copy mode Determines the copy mode Merge unites the copied events to those already present at the des...

Page 308: ...ost Quantization of the Note On event Note Off Quantize Post Quantization of the Note Off event After a Note On quantization a Note Off quantization affects the duration of the notes adapting them to a quantization grid PARAMETERS Variation Selects one of the 4 Variations Only existing Variations can be selected those with at least one riff recorded Riff Selects one of the riffs from the chosen Va...

Page 309: ...es the Note Off quantize value Same as Note On Note range from to Sets the highest and lowest note range to quantize To quantize a single percussive instru ment of the Drum track assign the same note to the highest and lowest limit For example to quantize the snare D2 set the parameter to Note range from D2 to D2 Assignable values C 1 G9 From locator To locator Determines the start and end point o...

Page 310: ...m the selected Varia tion Only existing riffs can be selected If the Style is empty the phrase No Riff appears Measures to insert Specifies the number of measures to insert Assignable values depends on the length of the riff max 16 measures Insert from locator Specifies the measure at which the new meas ures will be inserted Assignable values from the first measure bar of the Riff to the first mea...

Page 311: ...ne recorded Riff Riff Selects one of the riffs from the chosen Varia tion Only existing riffs can be selected If the Style is empty the phrase No Riff appears Measures to delete Specifies the number of measures to delete Assignable values a number that does not exceed the length of the Riff For example if the Riff is 4 measureslong themaximumassignablevalueif4 Delete from locator This parameter in...

Page 312: ...ffect the way the Change Velocity func tion operates Normal The value indicated in Velocity change is added to or subtracted from the Velocity values of the notes Fixed The note Velocities are all set to the value specified in Velocity change Change Velocity Specifies the amount by which the velocity val ues can be changed This depends on the op tion selected in Velocity Mode Note range from to Se...

Page 313: ...position insemi tones Assignable values 64 64 Note range from to Sets the upper and lower limits of the notes to be affected To transpose a single percussive in strument of the Drum track assign the same note to the highest and lowest limit For example to change the snare D2 set the parameter to Note range from D2 to D2 Assignable values C 1 G9 From locator To locator Defines the start and end poi...

Page 314: ...or buttons 4 Use the DIAL to change the selected param eters PROGRAMMABLE EVENTS AND PARAM ETERS The Status column shows the type of event One or more parameters can be changed for each event Seethefollowingpageforatableofevents and their parameters SELECT RIFF F1 Selects the riff to edit Select the variation and the riff in the dialog window Microscope resolution Event List event type Status Valu...

Page 315: ...e To select the WK4 banks use numbers 1 16 1 128 Bank Select LSB message Not necessary to select the WK4 sounds 1 128 Control Change Type of Control Change or MIDI Controller Example CC00 Bank Select MSB CC32 Bank Select LSB CC01 Modulation CC07 Volume 1 128 Control Change value Pitchbend Value of LSB Least Significant Byte 0 Off 1 127 On Value of MSB Most Significant Byte Effective value of bendi...

Page 316: ...64 M Tch 0 P Tch C4 0 After inserting the desired event modify its pa rameters accordingly INS TYPE F4 Opens a dialog window where you can select the type of event to insert manually with the Ins x function Select the type of event and press ENTER DELETE F6 Deletes the selected event CATCH LOCATOR F7 Selects the event currently playing or the event immediately after the current riff position GO TO...

Page 317: ...g the Arranger Tracks function mask one or two accompaniment sections in one or two Variation to reduce the instrumental content of the respective accompaniments The Bass tracks rest unchanged and cannot be altered Program the Intro Ending and Fill of the 4 Varia tions to create a complete Style PARAMETERS Mask Activates the Mask function When the Mask parameter is enabled ON the Basic Variation 2...

Page 318: ...track DR of the four different variations Select the variation with the cursor buttons Play the notes corresponding to the percussion instruments to exclude them from the selected variation The excluded notes are denoted by a small black line on white notes and a white line on the black notes Play the same note to cancel the line and to play the sound in the selected variation Press ENTER to confi...

Page 319: ...sk contains Song files you can playback all the files in a Block with a single command without having to load them to memory beforehand Preload plays back up to 16 Songs or MIDI files one after the other 1 Press PRELOAD After a short scanning period the Preload window shows Songs or MIDI files present on disk on the left and the Preload list on the right If your instrument is fitted with a Hard di...

Page 320: ...s will however cancel the Preload operation Create a Preload list 1 If the Preload window is not showing press PRELOAD with a disk inserted in the drive or without if you are using the Hard disk The Preload window shows the Songs or MIDI files disk directory on the left and the destination directory on the right represented by the Preload list Press RESET LIST F4 to cancel the previ ous list if pr...

Page 321: ...ntly SONG F5 When this option is selected the left part of the display shows WK4 or WX SX format Songs only 5 Select other files and press ENTER each time to include them in the list IMPORTANT If you are working from Floppy disk do not extract the disk dur ing the file insertion procedure doing so will provoke the cancellation of the list 6 If you want to change an inserted file take the cursor ov...

Page 322: ...s You can se lect one or more tracks set them to key play and play along with the Song It is not possible how ever to select the Song Performances To stop the playback press the STOP button The instant you start the playback all Songs cur rently residing in memory are cancelled except the one currently playing Preload exploits locations 1 and 2 for playback and stand by of the background loaded fi...

Page 323: ... Erase Copy and Move commands are executed with the same procedures as those used for the Load and Save commands In this chapter you ll find general information re lating to Erase Copy and Move operations the user is encouraged to apply the same logic to these operations as that applied to the Load and Save operations already discussed Refer to the Disk Hard disk chapter 6 for de tailed informatio...

Page 324: ...he device you are cancel ling files from The example which follows shows how to Erase a single Song from RAM 1 Press DISK to open the main Erase page If the main Erase page is not shown use the page scroll buttons to open it 2 Select the ERASE command required from the main page 3 Select the source device to erase from In this case select the RAM option with soft button F3 If you are erasing from ...

Page 325: ... 3 5 If necessary select the Block containing the file to erase then press ENTER to access the Block 6 Select the file to erase 7 Press ENTER twice to erase the file from the di rectory 5 6 7 ENTER TEM ESCAPE ENTER TEM ESCAPE ...

Page 326: ...ress DISK to open the main Copy page If the main Copy page is not shown use the page scroll buttons to open it 2 Select the COPY command required from the main page 3 Select the source and destination devices with soft buttons F1 F2 or F3 and directional arrows In this case use the button to pass to the source directory and if necessary select Floppy Disk F1 Then use the button to pass to the dest...

Page 327: ...lect the destination If necessary select a Block in the Hard disk and press ENTER to access then select a destination 8 Press ENTER twice to copy the file to the destina tion Note It is not possible to copy a file to itself Attempting to do so prompts the following message Press ENTER or ESCAPE to close the win dow and repeat the operation by copying to a different destination 5 6 7 8 ENTER TEM ES...

Page 328: ...RAM then save it to the other floppy The example which follows shows how to use the Move operation within RAM Move Single Sound and provides sufficient information which you can apply to all Move situations 1 Press DISK to open the main Move page If the main Move page is not shown use the page scroll buttons to open it 2 Select the MOVE command required from the main page 3 Select the source and d...

Page 329: ...and the directional arrows to scroll through the individual Sound Group locations 8 Press ENTER twice to Move the Sound file to the selected destination The file at the original location in this case 19 7 is cancelled and moved to the new lo cation in this case 17 8 Note It is not possible to move a file to itself Attempting to do so prompts the following message Press ENTER or ESCAPE to close the...

Page 330: ... Hard Disk operations Format Hard Disk Hard Disk Check Recovery Hard Disk Sleep Time Hard Disk protection NAVIGATING IN THE UTILITY PAGE Move around in the Disk pages with the naviga tional tools which are the directional arrows the page selector buttons Execute the Disk commands with the ENTER button or abort with the ESCAPE button ENTER TEMPO DATA ESCAPE The cursor is represented by a negative h...

Page 331: ...s running MS DOS Windows OS 2 Macin tosh Atari Amiga and all computers capable of reading MS DOS format disks The procedure is identical to that described for the Format work disk 1 62 Mb operation FORMAT MS DOS ATARI DISK 720 KB This operation formats a 3 5 DD floppy disk in MS DOS Atari ST format capacity 720 kilo bytes suitable in particular for MIDI file ex changes The procedure is identical t...

Page 332: ...to can cel Note A hard disk can be installed with an IDE interface with a capacity not greater than 500 Mb The installation requires the Generalmusic HD kit HARD DISK CHECK RECOVERY This procedure can restore a damaged Hard Disk to its original status Damage to the Hard Disk can be caused by a power failure during a Save operation physical defects of the disk If the Hard disk is damaged attempting...

Page 333: ... from one disk to another you must first copy the original data to RAM then save or copy to the backup copy disk WARNING Never turn off the instrument while the Hard disk or disk drive are writing data Save Copy Move Erase operations HARD DISK SLEEP TIME To avoid hearing the noise caused by the rota tion of the hard disk you can set this parameter to turn the hard disk off after an operation Optio...

Page 334: ...ument has been installed with one or both optional Sample RAM kits The Sample RAM option which appears in all the main Disk pages except Utility selects the type of Sample RAM required to access Select the type of Sample RAM with the cursor buttons and press ENTER to confirm Once a RAM Sound is loaded into memory a flag is applied to it to indicate which Sample RAM contains the sound s associated ...

Page 335: ...level pages are those that appear after confirming a File Se lector selection The Search Resource function is particularly use ful if your instrument is fitted with a Hard Disk containing a large number of files For example if you do not remember in which Block of the Hard disk you stored a user pro grammed Sound or you want to go directly to a Block name without scrolling through the entire Hard ...

Page 336: ... displays for the following opera tions Load Single Sound Save Single Sound Erase Single Sound Copy Single Sound Move Single Sound The function recalls the nearest Sound having the string of characters specified in the active zone 1 Press Soft button F7 The following dialog window appears 2 Insert the string of characters that relate to the Sound you are looking for 2 or 3 letters are sufficient 3...

Page 337: ... limit imposed by the WK4 RAM do not change the names of the permanent files contained in the Blocks e g the ROM Style Group names WK4 requires stand ard names to recognize the structure of the data Furthermore owing to some limitations of MS DOS Windows 3 1 Atari it is essential to bear in mind the following advice do not insert spaces within a file name e g MY FILE BLK MS DOS is not able to hand...

Page 338: ... 25 16 Reference Guide ...

Page 339: ...Appendix Sound tables Drum tables Style tables Performance tables Effects tables MIDI Implementation MIDI Controllers Glossary Index alphabetical ...

Page 340: ...2 14 Xylophone2 Xylophone22 XyloTribal2 15 TubularBel2 SoftBell2 Oohlalaa2 16 Santur2 BarChimes2 Climbing2 ORGAN group 17 Organ12 16 1 Draw2 Organ1WX2 OrgTheatre2 16 1 Vib32 18 Organ22 16 8 5 Drw2 JazzOrgan32 Organ3W2 19 Organ32 SwOrgan2 SynOrg12 OrganC32 20 ChurchOrg12 Church22 Organ3WX2 Organ1W2 PipeOrg32 21 ReedOrgan2 PipeOrgan2 Organ42 PipeChiff2 22 Musette2 Accord12 Accord22 Accord32 23 Harmo...

Page 341: ... Tables A 3 ROM Sounds 9 10 11 12 13 14 15 16 1 2 3 4 5 6 7 8 9 10 11 12 13 14 15 16 17 18 19 20 21 22 23 24 25 26 27 28 29 30 31 32 ...

Page 342: ...tra2 46 Pizzicato2 OctPizz2 EchoPizz2 47 Harp2 HarpDelay2 Spacehar2 48 Timpani2 TimpaniEFX2 Dyn Orch I I2 ENSEMBLE group 49 Strings2 StereoStrg2 StrgGlock2 DualStrgs2 Strings 2 50 SlwStrings2 StrgOrch2 St SlwStrg2 51 SynStrg12 SynStrg32 SynStrg52 52 SynStrg22 SynStrg42 Strings32 53 Choir2 VoiceUuh2 SlowUuh2 54 VoiceOohs2 VoiceAah2 SlowAah2 55 SynVox2 SkatVoices2 Vocoder2 56 OrchHits2 Rave2 Dyn St ...

Page 343: ... Tables A 5 9 10 11 12 13 14 15 16 33 34 35 36 37 38 39 40 41 42 43 44 45 46 47 48 49 50 51 52 53 54 55 56 57 58 59 60 61 62 63 64 ROM Sounds ...

Page 344: ... Tube2 78 Shakuhachi2 Shakupad2 ShakuVoice2 79 Whistle2 Whistle1WX2 Whistle3WX2 80 Ocarina2 OcarinaPan2 OcarinaSyn2 SYNTH LEAD group 81 SquareWave2 Pulse12 Pulse22 82 SawWave2 ObxFilter2 Lyle2 83 SynCalliop2 Azimut2 SynLead12 84 ChiffLead2 Chopper2 Digital2 85 Charang2 Jump2 SoundTrk2 86 SoloVox2 FiltRes12 FiltRes22 87 5thSawWave2 Decay12 Decay22 88 BassLead2 Obx22 Obx32 SYNTH PAD group 89 Fantasi...

Page 345: ... Tables A 7 9 10 11 12 13 14 15 16 65 66 67 68 69 70 71 72 73 74 75 76 77 78 79 80 81 82 83 84 85 86 87 88 89 90 91 92 93 94 95 96 ROM Sounds ...

Page 346: ... BrassEns2 111 Fiddle2 Hukin2 FiddleBell2 112 Shanai2 BacktoWS2 VoiceSpect2 PERCUSSIVE group 113 TinkleBell2 DK_STAND 12 DK_STAND 22 DK_STAND 32 DK_STD 2WX2 114 Agogo2 DK_ROOM2 DK_WS2 DK_ROOM1WX2 DK_ROOM2WX2 115 SteelDrums2 DK_POWER2 DK_STD 1WX2 DK_POWER1WX2 DKPOWER2WX2 116 Woodblock2 DK_ELECT 2 DK_DANCE2 DK_ELECT1WX2 DKELECT2WX2 117 Taiko2 DK_HOUSE2 DK_TECHNO2 DK_HOUSE1WX2 DKHOUSE2WX2 118 Melo To...

Page 347: ...RIDECYM2 SPLASH2 CHINA2 SMASH2 108 TAMBOURINE2 TAMBSLP2 COWBELL2 VIBRASLAP2 HOUSECOWB2 109 BONGOHISL2 CONGALSLAP2 BONGOLOW2 CONGAHSLAP2 CONGALSLAP2 CONGAHIGH2 CONGALOW2 HOUSETCON2 110 TIMBALES2 TIMBLOW2 AGOGO2 CABASA2 CABASAL2 MARACAS2 WHISTLE2 MUTBELL2 111 GUIROLONG2 GUIROSHORT2 CLAVES2 WOODBLOCK2 QUICAHIGH2 QUICALOW2 TRIANLONG2 TRIANSHORT2 112 SHAKER2 JNGLEBELL2 WINDCHIMES2 CASTANETS2 MTSURDO2 O...

Page 348: ...92 91 94 93 95 C5 C6 C7 99 WHISTLE 110 15 GUIROSHORT 111 10 GUIROLONG 111 9 CLAVES 111 11 WOODBLOCK 111 12 WOODBLOCK 111 12 QUICAHIGH 111 13 QUICALOW 111 14 TRIANSHORT 111 16 TRIANLONG 111 15 SHAKER 112 9 JINGLEBELL 112 10 WINDCHIMES 112 11 CASTANETS 112 12 MTSURDO 112 13 OPSURDO 112 14 Drumkits same as DK_STAND1 113 2 1 ...

Page 349: ... 109 16 TOMJAZZ 104 11 HHPEDAL 105 12 HOUSEHH 105 15 TOMLOW 104 14 TOMROOM 104 12 TOMELEC 104 9 HOUSETCON 109 16 TOMJAZZ 104 11 HHOPEN2 106 9 HHOPEN1 105 11 HOUSERIDE 107 11 HHOPEN1 105 11 TOMLOW 104 14 TOMROOM 104 12 TOMELEC 104 9 HOUSETCON 109 16 TOMJAZZ 104 11 TOMHIGH 104 10 TOMROOM 104 12 TOMELEC 104 9 HOUSETCON 109 16 TOMJAZZ 104 11 CRASH 107 10 HOUSERIDE 107 11 TOMHIGH 104 10 TOMROOM 104 12 ...

Page 350: ... 9 TIMBALES 110 9 AGOGO 110 11 TRIANLONG 111 15 WHISTLE 110 15 BDHOUSE1 97 9 NOISEPERC 116 9 HOUSSD1 101 12 VOICES1 114 9 Applause 127 1 VOICES 3 114 11 VOICES2 114 10 VOXHHCL 114 12 VOICES2 114 10 VOXHHCL 114 12 VOXTIP 114 14 VOXTAP 114 13 CLAKSON 113 16 DOLLYVOX 114 15 TAMBSLP 108 10 ROLLSNARE 103 9 SDORCH 100 13 HHCLO1S 105 10 CLAVES 111 11 CONGALOW 109 15 QUICAHIGH 111 13 AGOGO 110 11 STICK 99...

Page 351: ... 15 TOMELEC 104 9 TIMPANI 104 15 TAMBSLP 108 10 TOMBRUSH 115 13 TIMPANI 104 15 TOMELEC 104 9 TIMPANI 104 15 COWBELL 108 11 HHOPEN1 105 11 TOMBRUSH 115 13 TIMPANI 104 15 RIMSHOT2 99 10 TOMELEC 104 9 TOMBRUSH 115 13 TIMPANI 104 15 BDJAZZ 97 12 TOMELEC 104 9 TIMPANI 104 15 BRUSRIG 103 11 TOMBRUSH 115 13 TIMPANI 104 15 DYNSDJAZZ 100 10 TOMELEC 104 9 TIMPANI 104 15 BRUSHTAP 103 13 TIMPANI 104 15 TOMJAZ...

Page 352: ...ES1 114 9 NOISEPERC 116 9 VOICES1 114 9 DOOR 113 13 VOICES1 114 9 NOISEPERC 116 9 VOICES1 114 9 SDSTD2 101 9 VOICES1 114 9 ROLLSNARE 103 9 VOICES1 114 9 FINGERSNAP 113 9 SDSTD3 101 10 VOICES1 114 9 CELESTA 9 1 9 VOICES1 114 9 BARCHIMES 16 2 1 VOICES1 114 9 VOICES1 114 9 DARBKHIGH 112 15 VOICES1 114 9 DARBKLOW 112 16 VOICES1 114 9 DROP 113 13 VOICES1 114 9 WATER 113 12 VOICES1 114 9 VOICES1 114 9 V...

Page 353: ...11 SDROOM2 100 15 TOMROOM 104 12 TOMROOM 104 12 HOUSETCON 109 16 TOMJAZZ 104 11 TOMLOW 104 14 TOMROOM 104 12 TOMROOM 104 12 HHOPEN2 106 9 TOMROOM 104 12 SDSTD3 101 10 HOUSETCON 109 16 TOMJAZZ 104 11 TOMLOW 104 14 TOMROOM 104 12 TOMROOM 104 12 ReverseCym 120 1 TOMROOM 104 12 RIMSHOT1 99 9 TOMHIGH 104 10 SDELECT 100 9 HHCLO1S 105 10 TOMROOM 104 12 HOUSEHH 105 15 HOUSECLAP 102 9 HHPEDAL 105 12 COWBEL...

Page 354: ...LOW 112 16 DARBKLOW 112 16 DROP 113 10 DROP 113 10 DROP 113 10 DROP 113 10 DROP 113 10 DROP 113 10 WATER 113 12 WATER 113 12 WATER 113 12 WATER 113 12 WATER 113 12 WATER 113 12 VOICES1 114 9 VOICES1 114 9 VOICES1 114 9 VOICES1 114 9 VOICES1 114 9 VOICES1 114 9 VOXTAP 114 13 VOXTAP 114 13 VOXTAP 114 13 VOXTAP 114 13 VOXTAP 114 13 VOXTAP 114 13 VOXTIP 114 14 VOXTIP 114 14 VOXTIP 114 14 VOXTIP 114 14...

Page 355: ...YVOX 114 16 BDSTD1 97 11 BDSTD1 97 11 BDELECT1 97 11 BDELECT1 97 11 BDHOUSE 97 9 BDJAZZ 97 12 BDSTD2 97 15 TIMPANI 48 1 HOUSERIM 99 11 SDROOM2 110 15 SDROOM2 110 15 HOUSSD1 101 12 SDJAZZ2 100 11 BRUSHTAP 103 13 SDJAZZ3 100 12 BRUSHSLAP FINGERSNAP 113 8 SDSTD3 101 10 SDROOM2 110 15 SDSTD2 101 9 SDJAZZ3 100 12 BRUSHREV 103 10 SDJAZZ3 100 12 TOMROOM 104 12 HOUSETCON 109 16 TIMPANI 48 1 HOUSEHH 105 15...

Page 356: ...RBKHIGH 112 15 RIDECYM 107 13 DARBKLOW 112 16 DARBKLOW 112 16 DARBKLOW 112 16 DARBKLOW 112 16 DARBKLOW 112 16 RIDECYM 107 13 DROP 113 10 DROP 113 10 DROP 113 10 DROP 113 10 DROP 113 10 RIDECYM 107 13 WATER 113 12 WATER 113 12 WATER 113 12 WATER 113 12 WATER 113 12 RIDECYM 107 13 VOICES1 114 9 VOICES1 114 9 VOICES1 114 9 VOICES1 114 9 VOICES1 114 9 RIDECYM 107 13 VOXTAP 114 13 VOXTAP 114 13 VOXTAP ...

Page 357: ... SDROOM1 100 14 SDSTD2 101 9 RIDECYM 107 13 RIDECYM 107 13 SDSTD3 101 10 SDROOM2 110 15 SDELECT 100 9 SDSTD3 101 10 SDJAZZ3 100 12 RIDECYM 107 13 TOMROOM 104 12 TOMROOM 104 12 TOMHIGH 104 10 TOMHIGH 104 10 RIDECYM 107 13 HOUSEHH 105 15 RIDECYM 107 13 TOMROOM 104 12 TOMROOM 104 12 TOMHIGH 104 10 TOMHIGH 104 10 RIDECYM 107 13 HOUSEHH 105 15 RIDECYM 107 13 TOMROOM 104 12 TOMROOM 104 12 TOMROOM 104 12...

Page 358: ...y Pop JAZZ 32 49 Swing 50 Mid Swing 51 Slow Swing 52 Big Band 1 53 Big Band 2 54 Dixieland 55 Broadway 56 Foxtrot U S TRAD 32 57 Blues 58 Slow Blues 59 Gospel 60 Western 61 Bluegrass1 62 Bluegrass2 63 Country 64 March USA TRAD 1 32 65 Slow Waltz 66 Wien Waltz 67 Waltz 68 Romagna 69 Mazurka 70 Folk 2_4 71 Polka 6_8 72 ItalyMarch TRAD 2 32 73 Paso Doble 74 Germ Polka 75 Tarantella 76 Bajon 77 HullyG...

Page 359: ...rs 4 53 Drawbars 5 54 Drawbars 6 55 Drawbars 7 56 Drawbars 8 Group 8 48 57 58 59 60 61 62 63 64 CC16 PC DSP Effects 0 Eff1 Reverbs GrpA 1 Eff1 Reverbs GrpB 48 1 Hall 1 2 Hall 2 3 Hall 3 4 Warm Hall 5 Long Hall 6 St Concert 7 Chamber 8 Studio Room 1 9 Studio Room 2 10 Studio Room 3 11 Club Room 1 12 Club Room2 13 Club Room3 14 Vocal 15 Metal Vocal 16 Plate 1 17 Plate 2 18 Church 19 Mountains 20 Fal...

Page 360: ... dec Cntrl 81 OFF 0 63 ON 64 127 0 1 2 Fill Fill Fill 61 Rotary 1 Off slow GrpA 62 Rotary 2 Off slow GrpB Program 0 127 0 127 0 127 Change True number System Exclusive x x System Song Position o o Song Select o o Common Tune o o System Clock o o Start Stop Real Time Commands o o Continue Aux Active sensing o o Messages All Sound Off o o Reset All Contr o o Local ON OFF o o All Note Off o o Notes T...

Page 361: ...n Change 1 Modulation 1 Modulation common channel only in reception 6 38 Data Entry 6 38 Data Entry 7 Volume 7 Volume Bank P change 10 Pan 10 Pan 1st 2nd Value 11 Expression Contr 11 Expression Controller C 0 C 32 0 95 Internal styles 18 50 Tuning control 16 48 Effects selection C 0 C 44 0 31 User Styles 64 Damper Pedal 17 49 Effects volume C 0 C 48 0 63 Programmable Performances 66 Sustain Sosten...

Page 362: ... tables data byte 2 value 2 value of the activated MIDI Controller CONTROL CHANGE ON TRACKS CC00 32 Bank change CC01 Modulation CC06 38 Data Entry CC07 Main Volume CC10 Pan panorama CC11 Expression CC16 48 Effects selection CC17 49 Effects volume CC18 50 General Purpose Tuning control CC32 BankSelect LSB CC64 Damper pedal CC66 Sostenuto sustain pedal CC67 Soft pedal CC71 Resonance CC72 Release Tim...

Page 363: ... merical Keypad and the Keyboard name writ ing Destination Refers to all that to which a MIDI message generated by a Track can be di rected The WK4 can direct MIDI messages to the internal Sound Generation to MIDI Out and to the Sequencer In the Disk environment the Destination refers to the device to which data can be saved Dial The Data Entry wheel located under the Display active for Tempo chan...

Page 364: ...sive Menu List of items A menu appears in most edit displays and consists of several items which can be selected with the cursor buttons the dial or the numeric keypad Merge See MIDI Merge Microscope A page in Edit Song or Edit Style where every recorded MIDI event can be individually modified in terms of position as well as value MIDI Musical Instrument Digital Interface A system of communication...

Page 365: ...served includ ing the Operating System MIOS In the WK4 the ROM is a flash ROM up dateable with OS disks containing later versions of the operating system ROM memory is not cancelled when the instrument is switched off Sample Refers to a portion of the sound recorded in numeric form The combination of several samples along the music scale is called a multi sample In the WK4 multi samples are called...

Page 366: ...n of one or more of a Sound s param eters You can tweak a sound in real time for example using the programmable pedals to which the Edit Sound parameters have been assigned Filter Attack Release etc User Interface All that which appears within the Display The means with which the user communicates with the musical instrument that is the availability of information relating to the status of the dat...

Page 367: ...hanging the Split Point 4 12 Changing the tempo of a Style 5 19 Changing the track status 4 9 Changing track volumes 4 13 Channel A effects 9 1 Channel B effects 9 1 Check version 25 11 Chord Language 21 6 Chord recognition modes 5 9 Chord to Arr 1 Chord to Arr 2 15 6 Chords Edit Score 22 24 Chords Score Controls 22 21 Chords on lyrics Video controls 22 22 Chords track 22 3 Clear the keyboard tran...

Page 368: ...nformation 6 35 Display 3 10 Display Contrast 1 1 Display controls 21 6 Display Hold 4 5 10 8 Display lyrics on an external monitor 7 14 Display mode 21 6 Display the score 7 12 Drum mask 23 18 Drumkit 3 5 19 5 Drumkit Sound Patch parameters 19 6 Drumkits tables A 10 Duet 18 4 Dynamic Arrange 5 13 Dynamic layer 19 5 Dynamic switch 19 7 E E IDE interface Hard disk 6 1 E1 Send A V interface 21 7 E2 ...

Page 369: ...Patch 19 6 Filter Cutoff Ed Perf Sound 19 3 Finetune 21 3 Fingered 1 5 9 5 11 Fingered 2 5 9 5 11 Fixed 23 12 Fixed Chord Mode 5 9 Fixed Velocity Mode Edit Song 22 12 Floppy disk 6 21 Floppy disk Preload 24 3 Floppy disks 6 1 Footswitch polarity 21 2 Forced Stop 7 8 11 4 11 7 Format hard disk 25 10 Format MS DOS Atari disk 25 9 Format work disk 25 9 Free 1 5 9 5 12 Free 2 5 9 5 12 Free memory 12 6...

Page 370: ...n to the Demo Songs 1 5 Load All 6 19 Load Group 6 17 Load Operations 6 8 Load Single Block 6 9 Load Single MIDI File 6 12 Load Single Performance 6 15 Load Single Setup 6 10 Load Single Song 6 11 Load Single Sound 6 13 Load Single Style Performance 6 15 Load Single Prog User Style 6 15 Loading WX2 SX2 Songs and Styles 6 20 Local Off 8 7 8 8 15 7 Locator 7 8 11 7 Loop 7 8 11 4 11 7 Low Frequency E...

Page 371: ... 21 3 Octave Up 21 3 One Finger 5 9 One finger 5 11 Open 1 18 4 Open 2 18 4 Option 11 6 20 1 Oscillators and Layers Ed Perf Sound 19 2 Output 3 7 Overdub 11 6 Overdub Mode User Styles 12 5 P Pads 1 12 17 3 Pages 3 10 Pan 19 6 Pan A V interface 21 7 Pan Mixer 16 1 Panic 10 10 Parametric boost Filter Ed Perf Sound 19 3 Parametric cut Filter Ed Perf Sound 19 3 PC IBM 3 8 PC1 Computer 21 5 PC2 Compute...

Page 372: ... 19 4 Restoring the original default Style Performances 5 20 Restoring the original Performance settings 4 22 Restoring the Songs memory 7 22 11 1 Restoring the User Styles memory 12 4 Reverb Time 14 3 Reverbs 9 1 Riff 12 1 23 3 Rock 18 5 ROM Sound 3 5 ROM Sound tables A 2 Room Size Reverb 14 3 Root Edit Score 22 24 22 27 Rotary Reverb 14 3 S Sample RAM Edit Disk 25 12 Save All 6 34 Save Group 6 3...

Page 373: ...Patch 19 1 Sound Patch 19 5 Sound Patch Options 19 7 Sound Search 25 14 Sound View 11 6 Sound View User Styles 12 5 Sound View pages 3 10 SoundPatch 3 5 Sounds 3 5 Sounds and tracks 4 1 Source 6 3 Specifications ii Speed rotary effects 14 3 Standard MIDI file 7 1 Start 7 8 11 7 Start and End locators 11 4 Start measure 7 8 Start parameters 22 18 Start Tempo 7 9 Start Stop 5 6 Status of a track 3 4...

Page 374: ...18 3 Velocity mode Edit Song 22 12 Velocity mode Edit Style 23 12 Velocity range 18 4 Video 3 9 Video controls Score Controls 22 21 Video mode 7 15 View mode Score Controls 22 21 Volume A V interface 21 7 Volume Mixer 16 1 W Warnings 3 17 What is a Riff 12 1 What is a Song 7 1 What is a Standard MIDI file 7 1 Windows 3 10 WK4 used as a controlling device 8 7 WK4 computer expander connection 8 9 Wr...

Page 375: ...willnotoccurinaparticularinstallation Ifthisinstrumentdoes cause harmful interference to radio or television reception which can be determined by turning the instrument off and on the user is encouraged to try to correct the interference by one or more of the following measures Reorient or relocate the receiving antenna Increase the separation between the equipment and the receiver Connect the equ...

Page 376: ... ITALY Specifications are subject to change without prior notice Sales Division I 47048 S Giovanni in Marignano RN Italy Via delle Rose 12 Tel 39 541 959511 fax 39 541 957404 tlx 550555 GMUSIC I Internet http www generalmusic com ...

Reviews: