4 - 20
Maintenance and Repair
4.13
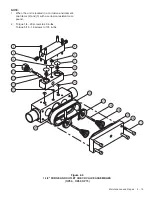
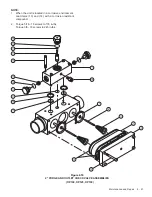
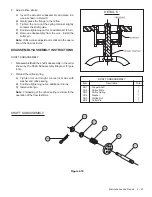
2" Purge and Outlet Check
Valve Maintenance
(Models OP100 through OP150)
WARNING!
Ensure that the Dryer is de-energized, valve isolated,
and fully depressurized before attempting to remove
or disassemble any Dryer component or subassembly.
Failure to do so may result in serious personal injury
and/or equipment damage.
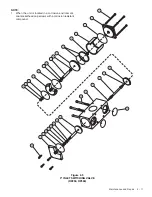
Note: The purge orifice [4] is specifically sized and drilled
for your dryer. If the purge orifice [4] is lost or damaged,
contact your local General Pneumatics Sales Representa-
tive for the correct replacement.
Note: Do not remove poppet guides [8] from the outlet
check valve cover [2] unless wear or damage necessitates
replacement.
1.
Clean and inspect all valve hardware upon disassem-
bly. Replace all software and any hardware which ap-
pears damaged or abnormally worn. Closely inspect
valve poppets [7], check balls [15], purge adjusting
valve [6] and associated mating-sealing surfaces for
any faults which could prevent positive sealing.
2.
Apply an ultra-thin film of O-ring lubricant to items [10],
[11], [12], [17], and [18]. Do not apply lubricant to
check balls [15] or valve poppets [7].
2" Purge and Outlet Check Valves
Item
Description
Total
1
Flow Block
1
2
Check Valve Cover
1
3
Valve Housing
1
4
Purge Orifice
2
5
Hex Plug
2
6
Purge Adjusting Valve
1
7
Valve Poppet
2
8
Poppet Guide
2
9
Valve Spring
2
10
Square O-Ring
2
11
O-Ring
1
12
O-Ring
3
13
Sockethead Cap Screw
4
14
Sockethead Cap Screw
4
15
Check Ball
2
16
Valve Guide
1
17
O-Ring
1
18
Gauge Snubber
1
19
Square O-Ring
2


