background image

3. Press the 

OK 

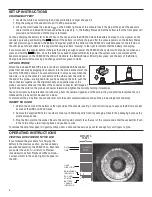
button to select the SD card icon. The SD card icon will move to the center of the screen and remain there

until you unplug the USB cable from the console. On most PCs, making the connection to the DCS2000 causes an AutoPlay
screen to appear in Windows Explorer. This indicates that the PC recognizes the SD card in the DCS2000 as a removable,
external disk.

4. In the lower, “General options” section of the AutoPlay screen, choose “Open folder to view files”. Doing so will give you

access to the SD card’s content via its hierarchical file structure. At the top of the hierarchy is a folder named “DCIM”.

The SD card’s file structure is worth detailing to underscore the importance of 

not

changing any factory-assigned folder names. 

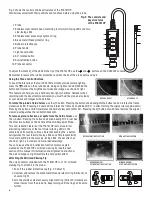
As the figure below shows, the SD card has been formatted to contain one folder named “DCIM” and one subfolder named
“100COACH”. The 100COACH folder contains all stored photo and video files, identified by their .JPG and .AVI extensions. 

You should not rename the DCIM and 100COACH folders while
the SD card is inside your PC or connected to it to through a
card reader. If you rename either folder, the DCS2000 will fail to
recognize the SD card the next time you plug it into the
console.

If you choose to remove the SD card from the console and plug it into a PC, either directly or through a card reader, remember to
eject the card from the PC once you are done viewing (and/or copying) the files stored on the card. Depending on your PC’s startup
settings, your computer may fail to restart following its next shutdown if the SD card remains inserted. The PC’s operating system
may try to reboot from the SD card and be unable to do so.

Finally, remember to disable the Auto Power Off function of the DCS2000 if you expect to view SD card content on a PC via the USB
cable for longer than the APO triggering time. If you allow the APO function to activate during your viewing session, you must power
on the unit again and then remove and re-insert the USB cable before you can resume viewing.

NAVIGATING THE MENUS

The Main Menu of the DCS2000—accessible by pressing the 

OK

button—has eight submenus for accessing and controlling the

following operational and housekeeping functions:

• The 

DATE/TIME

submenu lets you set the current date and time (together known as system time). It also lets you choose

whether to superimpose the system time on live video as a time stamp. You can change the default YY/MM/DD
(Year/Month/Day) format used for time stamps to MM/DD/YY or DD/MM/YY.

• The 

AUTO POWER OFF 

submenu lets you change the status of the Auto Power Off function and set its triggering time. The

options are: Off (disabled), 5 minutes, 10 minutes, 15 minutes or 30 minutes.

• The 

REPEAT RECORDING 

submenu lets you break up long video recordings into sequential clips of 5, 10, 20 or 30 minutes

duration.

• The 

AV OUTPUT 

submenu lets you choose the analog video output format (NTSC or PAL) used by your TV or TV monitor.

• The 

USB

submenu lets you enable viewing of media files stored on the DC2000’s SD card on your PC without having to eject

the card.

• The 

ALBUM

submenu provides a quick way to display thumbnails of all saved media files in a 3 x 3 grid format. 

• The 

SD CARD STATUS

submenu lets you format the card and bulk-erase its content. The submenu’s screen breaks down how

much of the card’s capacity is devoted to photos (in kbytes) and video clips (in minutes and seconds). It also indicates how
much of the card’s capacity has been used (as a percentage).

• The 

LANGUAGE

submenu lets you choose one of 27 languages for on-screen notifications and menu items.

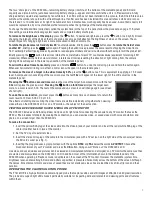
The eight submenus are navigated in identical fashion. After you put the Main Menu on-screen by pressing the 

OK

button with the

DCS2000 in Preview mode, you have two minutes to use the the

and

buttons to navigate to the submenu of interest,

navigate to the parameter you wish to change, make the change, and save the selection or setting.

Using the

and

buttons to select a submenu from the Main Menu highlights it and changes the color of its name from white to

green.

Pressing the 

OK

button with a submenu highlighted opens a new screen with the name of that submenu at the top, in white. Again

using the

and

buttons, navigate to the parameter or setting you wish to select. Then press the 

OK

button to save the

parameter or setting. Doing so automatically switches the display to the next-highest level of that menu or submenu. Pressing the

button has the same effect: it switches the display to the next-highest level. In this regard, the

button functions just like

the “up one level” button in a traditional computer folder-subfolder hierarchy.

Finally, remember that once you open any menu or submenu, 

you have 2 minutes to select an option before the menu

automatically closes

, returning the DCS2000 to its default Preview operating mode.


ESC


ESC

11

100COACH

PICT00XX.JPG

PICT00XX.AVI

DCIM

Summary of Contents for DCS2000

Page 1: ... BORESCOPE SYSTEM WITH 7 INCH LCD USER S MANUAL DCS2000 Please read this manual carefully and thoroughly before using this product 99 Washington Street Melrose MA 02176 Phone 781 665 1400 Toll Free 1 800 517 8431 Visit us at www TestEquipmentDepot com ...

Page 2: ...he console s LCD The DCS2000 automatically enters this mode when powered on Separate front panel buttons on the console allow you to increase and decrease the brightness of the two or four camera lighting LEDs used at the same time to any of 10 levels Another front panel button allows you to enlarge a target by 50 a zoom level of 1 5X 200 3 0X or 400 5 0X Yet another button allows you to horizonta...

Page 3: ...nnotation and still images using familiar menu driven user interface Saved video and photo files incorporate real time brightness and zoom adjustments made prior to recording or on the fly to optimize target clarity and detail Easy to navigate album style 3 x 3 grid display of all stored media files Different areas of interest on saved photos can be selected for extreme close up viewing Field of v...

Page 4: ...nectors and physical structures of the DCS2000 Table 1 on the next page details how the function of each front panel button changes with the console s operating mode Familiarize yourself with the labels positions and functions of all buttons and connectors before moving on to the Setup Instructions and Operating Instructions Fig 1 The display controls connectors and physical structures of the DCS2...

Page 5: ...ture Switches to Album view with Switches to Preview mode stores jpg file on SD card selected file highlighted and notes alphanumeric name of last saved file in metadata panel Pressed once starts recording N A N A an avi video clip on SD card Pressed again stops recording OK Opens Main Menu Begins playback of selected Selects highlighted item or saves video clip setting During playback pauses resu...

Page 6: ...mate in only one way when the two dots one on the console s connector and the other under the collar at the end of the probe are aligned After you have lined up the dots push the two connectors together so the alignment keys on opposite sides of the probe s connector slide over the flats of the console s connector left image at right Slide the collar on the probe s connector forward and tighten th...

Page 7: ...pear at the lower right of the LCD as well as in the metadata panel Pressing the button a second time doubles the size of the target A compound icon with the text 2 0x will replace the previous icon Pressing the button a third time enlarges the target even more to a zoom level of 5 0X The text of the compound on screen icon will change again see screen shot at right To undo the zoom function you m...

Page 8: ...otates the field of view yet another 90 Pressing the button a fourth time restores the original view and extinguishes the red button backlight To remove glare reflections or spots from the field of view use the button Pressing the button adds a red backlight to it just like the other two buttons on the handle of the VGA Resolution Probe This anti reflection feature of the P16181HP is most useful f...

Page 9: ... the SD card A red running clock indicating the duration of the clip recorded so far is displayed in the metadata panel see photo at right The red border and the running clock remain on screen until the recording is stopped To stop recording press the button again This returns the DCS2000 to Preview mode and replaces the red running clock by the file name of the video clip for 1 minute and 30 seco...

Page 10: ... The Left and Top coordinates of the box reference a grid with 0 0 coordinates at the lower left corner of the video frame of the LCD Now press the OK button again and note that doing so shrinks the box and changes its size and position data in the metadata panel Press the OK button a third time and note that the box shrinks even more as its position coordinates change yet again The four direction...

Page 11: ...oose whether to superimpose the system time on live video as a time stamp You can change the default YY MM DD Year Month Day format used for time stamps to MM DD YY or DD MM YY The AUTO POWER OFF submenu lets you change the status of the Auto Power Off function and set its triggering time The options are Off disabled 5 minutes 10 minutes 15 minutes or 30 minutes The REPEAT RECORDING submenu lets y...

Page 12: ...INUTES to automatically power off the DCS2000 after any period of front panel inactivity of that duration When your selection is highlighted press the OK button to save the setting and return to the Main Menu The term highlighted in green can be increased or decreased by one unit by each press of the and buttons respectively After changing a setting or leaving it unchanged press the button to adva...

Page 13: ...A Video File Format avi Photo File Format jpg Video Zoom Options 1 5X 2 0X 5 0X Frame Rotation Options 90 180 270 Interfaces Analog video headphone USB 2 0 jacks Analog Video Out Formats NTSC and PAL Video Frame Rate 30 frames per second fps Compression Format Compatible with MPEG4 Recording Medium Standard size SD card of up to 32GB capacity 4GB card included Capacity of Included 4GB SD Card Thre...

Page 14: ...000 only in a cool under 140ºF or 60ºC dry well ventilated place Avoid exposing the unit to sunlight for long periods of time To avoid damaging the console s probe connector use only compatible probes The camera head LEDs and thread protector ring are waterproof but not acid proof or fireproof Do not touch acidic corrosive or hot materials or they will ruin the head Cover the camera tipped end of ...

Page 15: ...freight prepaid and insured Acceptance of the exclusive repair and replacement remedies described herein is a condition of the contract for purchase of this product In no event shall General be liable for any incidental special consequential or punitive damages or for any cost attorneys fees expenses or losses alleged to be a consequence of any damage due to failure of or defect in any product inc...

Page 16: ...hout notice 2015 GENERAL TOOLS INSTRUMENTS NOTICE WE ARE NOT RESPONSIBLE FOR TYPOGRAPHICAL ERRORS MAN DCS2000 5 6 15 99 Washington Street Melrose MA 02176 Phone 781 665 1400 Toll Free 1 800 517 8431 Visit us at www TestEquipmentDepot com ...

Reviews: